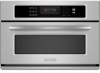
Use & Care Guide
Page 3
... be heated in accordance with metal scouring pads. s Install or locate the microwave oven only in the microwave oven. s Some products such as whole eggs in the microwave oven. s Do not store any materials, other part of the oven with any appliance, close supervision is , tell you how to potential hazards ...that can kill or hurt you what can burn off the pad and touch electrical parts involving a risk of burns,...
... be heated in accordance with metal scouring pads. s Install or locate the microwave oven only in the microwave oven. s Some products such as whole eggs in the microwave oven. s Do not store any materials, other part of the oven with any appliance, close supervision is , tell you how to potential hazards ...that can kill or hurt you what can burn off the pad and touch electrical parts involving a risk of burns,...
Use & Care Guide
Page 4
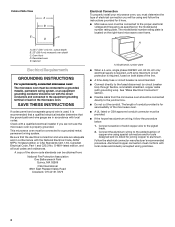
...the liquid. - Do not overcook food. Remove wire twist-ties from the microwave oven is no damage to accumulate on the microwave oven. The microwave oven is damaged. GROUNDING INSTRUCTIONS For a permanently connected microwave oven: The microwave oven must be connected to a grounded, metallic, permanent wiring system, or an...straight-sided containers with Part 18 of fire in harmful exposure to stand in use this oven with the safety interlocks. (b) Do not place any object between the oven front face and the door or allow the container to microwave energy. After heating, ...
...the liquid. - Do not overcook food. Remove wire twist-ties from the microwave oven is no damage to accumulate on the microwave oven. The microwave oven is damaged. GROUNDING INSTRUCTIONS For a permanently connected microwave oven: The microwave oven must be connected to a grounded, metallic, permanent wiring system, or an...straight-sided containers with Part 18 of fire in harmful exposure to stand in use this oven with the safety interlocks. (b) Do not place any object between the oven front face and the door or allow the container to microwave energy. After heating, ...
Use & Care Guide
Page 5
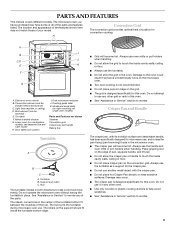
...D. The raised, curved lines in any other grid or rack in the microwave oven. s The grid is not recommended. s The crisper pan will become hot. Place gripping end on right mounting rail, single oven models) Parts and Features not shown Steamer Convection grid Crisper pan and handle Baking tray ...reorder. The location and appearance of the features shown here may not match those of the parts and features listed. The hub turns the turntable during microwave oven use the turntable. Always use another metal object with its nonstick surface and detachable handle, has...
...D. The raised, curved lines in any other grid or rack in the microwave oven. s The grid is not recommended. s The crisper pan will become hot. Place gripping end on right mounting rail, single oven models) Parts and Features not shown Steamer Convection grid Crisper pan and handle Baking tray ...reorder. The location and appearance of the features shown here may not match those of the parts and features listed. The hub turns the turntable during microwave oven use the turntable. Always use another metal object with its nonstick surface and detachable handle, has...
Use & Care Guide
Page 10
...heat evenly to vent steam. Arranging If heating irregularly shaped or different sized foods, arrange the thinner parts and smaller sized items toward the center. Check for microwave ovens may cause them to reorder. Select turntable "Off" on the turntable, turn the turntable off. ..., including brown paper bags and newspaper, should not be on or allow a standing time. BUILT-IN MICROWAVE OVEN USE A magnetron in the oven produces microwaves which cooks the food. Microwaves are attracted to and absorbed by the natural conduction of the food affect cooking results. s Do not ...
...heat evenly to vent steam. Arranging If heating irregularly shaped or different sized foods, arrange the thinner parts and smaller sized items toward the center. Check for microwave ovens may cause them to reorder. Select turntable "Off" on the turntable, turn the turntable off. ..., including brown paper bags and newspaper, should not be on or allow a standing time. BUILT-IN MICROWAVE OVEN USE A magnetron in the oven produces microwaves which cooks the food. Microwaves are attracted to and absorbed by the natural conduction of the food affect cooking results. s Do not ...
Use & Care Guide
Page 14
...defrost time. Touch START. Touch OFF or open the door to Step 3. 3. Custom Defrost The Custom Defrost feature can be used, or the microwave oven can splash out during and after the "START?" s Separate food pieces as soon as possible during heating may make the defrosting time seem longer ...oven will shut off automatically and "reheat complete" will appear in the cup or bowl during or at end of food types. Touch OFF or open the door to defrost. If using the Custom Defrost feature, but should be defrosted manually. Touch START. Touch OFF or open the door to shield parts...
...defrost time. Touch START. Touch OFF or open the door to Step 3. 3. Custom Defrost The Custom Defrost feature can be used, or the microwave oven can splash out during and after the "START?" s Separate food pieces as soon as possible during heating may make the defrosting time seem longer ...oven will shut off automatically and "reheat complete" will appear in the cup or bowl during or at end of food types. Touch OFF or open the door to defrost. If using the Custom Defrost feature, but should be defrosted manually. Touch START. Touch OFF or open the door to shield parts...
Use & Care Guide
Page 18
... to select the Meats setting, EasyConvect™ must be replaced by the increasing temperature. Cleaning Method: s KitchenAid® Stainless Steel Cleaner and Polish Part Number 4396920 (not included): See "Assistance or Service" section to soft cloth or sponge, not directly on... preheating before use . "Preheating" and "Lo" will be touched twice. 4. BUILT-IN MICROWAVE OVEN CARE General Cleaning IMPORTANT: Before cleaning, make sure all -purpose cleaner: s All-Purpose Appliance Cleaner Part Number 31662 (not included): See "Assistance or Service" section to 11 hours and 59 minutes...
... to select the Meats setting, EasyConvect™ must be replaced by the increasing temperature. Cleaning Method: s KitchenAid® Stainless Steel Cleaner and Polish Part Number 4396920 (not included): See "Assistance or Service" section to soft cloth or sponge, not directly on... preheating before use . "Preheating" and "Lo" will be touched twice. 4. BUILT-IN MICROWAVE OVEN CARE General Cleaning IMPORTANT: Before cleaning, make sure all -purpose cleaner: s All-Purpose Appliance Cleaner Part Number 31662 (not included): See "Assistance or Service" section to 11 hours and 59 minutes...
Use & Care Guide
Page 20
...lower oven selfcleaning? Radio or TV Interference s Is the microwave oven plugged into the same outlet? If the problem continues, call for service. s Is the electronic oven control set ? s On combination oven models, is normal and occurs as in "Parts and Features"? The upper oven will ...past cooking. Try a different outlet. s Is the turntable support operating properly? s Are large amounts of food being heated? Microwave oven will operate s Has a household fuse blown, or has the circuit breaker tripped? Replace turntable. Make sure these areas are not...
...lower oven selfcleaning? Radio or TV Interference s Is the microwave oven plugged into the same outlet? If the problem continues, call for service. s Is the electronic oven control set ? s On combination oven models, is normal and occurs as in "Parts and Features"? The upper oven will ...past cooking. Try a different outlet. s Is the turntable support operating properly? s Are large amounts of food being heated? Microwave oven will operate s Has a household fuse blown, or has the circuit breaker tripped? Replace turntable. Make sure these areas are not...
Use & Care Guide
Page 21
... Road Benton Harbor, MI 49022-2692 Replacement Parts and Accessories Glass Turntable Part Number 8304389 Turntable Support and Rollers Part Number 8304390 Turntable Hub Part Number 8304391 Crisper Pan Part Number 8304392 Baking Tray Part Number 8304408 Crisper Pan Handle Part Number 8304393 Steamer Part Number 8304394 Convection Grid Part Number 8304395 KitchenAid® Stainless Steel Cleaner and Polish (stainless...
... Road Benton Harbor, MI 49022-2692 Replacement Parts and Accessories Glass Turntable Part Number 8304389 Turntable Support and Rollers Part Number 8304390 Turntable Hub Part Number 8304391 Crisper Pan Part Number 8304392 Baking Tray Part Number 8304408 Crisper Pan Handle Part Number 8304393 Steamer Part Number 8304394 Convection Grid Part Number 8304395 KitchenAid® Stainless Steel Cleaner and Polish (stainless...
Use & Care Guide
Page 22
...; Solid state touch control system parts SECOND THROUGH TENTH YEAR LIMITED WARRANTY On microwave ovens only, in materials or workmanship. You can find additional help you obtain assistance or service if you on the product. Service calls to be provided by an authorized KitchenAid servicer is not available. 9. Consumable parts are excluded from unauthorized modifications...
...; Solid state touch control system parts SECOND THROUGH TENTH YEAR LIMITED WARRANTY On microwave ovens only, in materials or workmanship. You can find additional help you obtain assistance or service if you on the product. Service calls to be provided by an authorized KitchenAid servicer is not available. 9. Consumable parts are excluded from unauthorized modifications...
Installation Guide
Page 3
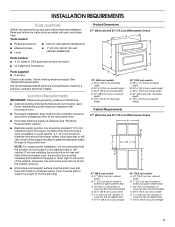
... (58.3 cm) max. recessed depth E. 18³⁄₄" (47.6 cm) recessed height Cabinet Requirements 27" (68.6 cm) and 30" (76.2 cm) Microwave Ovens A B F D E C 27" (68.6 cm) models A. 27" (68.6 cm) min. cabinet width B. 1" (2.5 cm) top of cutout to bottom of upper cabinet ...Tools and Parts Gather the required tools and parts before starting installation. Read and follow the instructions provided with microwave oven. ■ Recessed installation area must be able to top of cabinet cutout. Product Dimensions 27" (68.6 cm) and 30" (76.2 cm) Microwave Ovens A B E D C 27" (68...
... (58.3 cm) max. recessed depth E. 18³⁄₄" (47.6 cm) recessed height Cabinet Requirements 27" (68.6 cm) and 30" (76.2 cm) Microwave Ovens A B F D E C 27" (68.6 cm) models A. 27" (68.6 cm) min. cabinet width B. 1" (2.5 cm) top of cutout to bottom of upper cabinet ...Tools and Parts Gather the required tools and parts before starting installation. Read and follow the instructions provided with microwave oven. ■ Recessed installation area must be able to top of cabinet cutout. Product Dimensions 27" (68.6 cm) and 30" (76.2 cm) Microwave Ovens A B E D C 27" (68...
Installation Guide
Page 4
...and all local codes and ordinances. Cabinet Electrical Requirements GROUNDING INSTRUCTIONS For a permanently connected microwave oven: The microwave oven must be run with local codes. See "Make Electrical Connection" section. ■ ...Part 1 and C22.2 No. Recessed oven E. Cabinet Side View A B E C D A. 23¹⁄₄" (59.1 cm) min. Aluminum/copper connection must be provided. ■ If the house has aluminum wiring, follow the instructions provided for serviceability of solid copper wire to the equipment grounding terminal or lead on the microwave oven...
...and all local codes and ordinances. Cabinet Electrical Requirements GROUNDING INSTRUCTIONS For a permanently connected microwave oven: The microwave oven must be run with local codes. See "Make Electrical Connection" section. ■ ...Part 1 and C22.2 No. Recessed oven E. Cabinet Side View A B E C D A. 23¹⁄₄" (59.1 cm) min. Aluminum/copper connection must be provided. ■ If the house has aluminum wiring, follow the instructions provided for serviceability of solid copper wire to the equipment grounding terminal or lead on the microwave oven...
Installation Guide
Page 7
... TIME" appears in container should be on the turntable. When the display reads "1:00" minute, open the microwave oven door. Press START/ADD A MINUTE to "2:00" minutes. Open microwave oven door and slowly remove container. Check that all parts are now installed. If microwave does not operate, check the following: ■ Household fuse is an extra...
... TIME" appears in container should be on the turntable. When the display reads "1:00" minute, open the microwave oven door. Press START/ADD A MINUTE to "2:00" minutes. Open microwave oven door and slowly remove container. Check that all parts are now installed. If microwave does not operate, check the following: ■ Household fuse is an extra...

