Use & Care Guide
Page 3
... injured if you what the potential hazard is operated in this manual and on the microwave oven. s Do not clean with the provided Installation Instructions. s Do not store any other than manufacturer's recommended accessories, in use . This will tell you what can burn off the pad and touch electrical parts involving a risk of electric shock. WARNING You can kill or hurt you...
... injured if you what the potential hazard is operated in this manual and on the microwave oven. s Do not clean with the provided Installation Instructions. s Do not store any other than manufacturer's recommended accessories, in use . This will tell you what can burn off the pad and touch electrical parts involving a risk of electric shock. WARNING You can kill or hurt you...
Use & Care Guide
Page 4
... 120-volt sides of injury to the: (1) Door (bent), (2) Hinges and latches (broken or loosened), (3) Door seals and sealing surfaces. (d) The oven should ignite, keep oven door closed, turn oven off, and disconnect the power cord, or shut off power at the fuse or circuit breaker panel. - SAVE THESE INSTRUCTIONS PRECAUTIONS TO AVOID POSSIBLE EXPOSURE TO EXCESSIVE MICROWAVE ENERGY (a) Do not attempt to both before placing...
... 120-volt sides of injury to the: (1) Door (bent), (2) Hinges and latches (broken or loosened), (3) Door seals and sealing surfaces. (d) The oven should ignite, keep oven door closed, turn oven off, and disconnect the power cord, or shut off power at the fuse or circuit breaker panel. - SAVE THESE INSTRUCTIONS PRECAUTIONS TO AVOID POSSIBLE EXPOSURE TO EXCESSIVE MICROWAVE ENERGY (a) Do not attempt to both before placing...
Use & Care Guide
Page 5
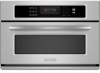
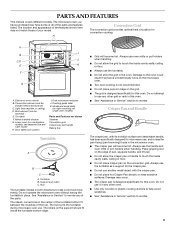
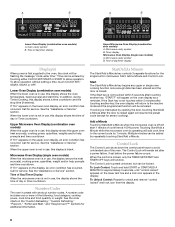
... the microwave oven. PARTS AND FEATURES This manual covers different models. The location and appearance of the features shown here may occur. Model and serial plate (on heat-sensitive surfaces. Light (inaccessible, in place. Dual microwave emission J. s Always use oven mitts or pot holders when handling. s Do not place hot Crisper Pan directly on right mounting rail, single oven models) Parts and Features not shown Steamer Convection grid Crisper pan and handle Baking tray Turntable A B C A. s The...
... the microwave oven. PARTS AND FEATURES This manual covers different models. The location and appearance of the features shown here may occur. Model and serial plate (on heat-sensitive surfaces. Light (inaccessible, in place. Dual microwave emission J. s Always use oven mitts or pot holders when handling. s Do not place hot Crisper Pan directly on right mounting rail, single oven models) Parts and Features not shown Steamer Convection grid Crisper pan and handle Baking tray Turntable A B C A. s The...

Use & Care Guide
Page 7
...Start/add a minute/control lock K. EasyConvect™ conversion cooking N O P L. Number keys D. Cook time F. Microwave soften/melt L. Microwave cooking power D. Microwave popcorn E. Timer C. Lower oven display Single Oven Models A B C D EF G H I . Microwave soften/melt F. Number keys J. Options Q. Cook time C. Crisping G. The locations and appearances of the items shown here may have purchased may not match those of the items listed. Microwave steam cooking O. Timer I J TIMER % OZ FC LBS POWER MAXIMUM TIME REMAINING KL M A. Clock set /start...
...Start/add a minute/control lock K. EasyConvect™ conversion cooking N O P L. Number keys D. Cook time F. Microwave soften/melt L. Microwave cooking power D. Microwave popcorn E. Timer C. Lower oven display Single Oven Models A B C D EF G H I . Microwave soften/melt F. Number keys J. Options Q. Cook time C. Crisping G. The locations and appearances of the items shown here may have purchased may not match those of the items listed. Microwave steam cooking O. Timer I J TIMER % OZ FC LBS POWER MAXIMUM TIME REMAINING KL M A. Clock set /start...
Use & Care Guide
Page 8
...display Upper Microwave Oven Display (combination oven models) A. If "Err" appears on the upper oven display, an error condition has occurred. See the "Assistance or Service" section. food category, cooking power, cook time and food quantity or weight. Control Lock The Control Lock shuts down the control panel keys to allow operation without setting a time, touch CLOCK SET/ START, START or OFF. Time can be added by 1 minute. If cooking is interrupted by touching either CLOCK SET/START or START to avoid unintended use , this display shows a time countdown and the stop time...
...display Upper Microwave Oven Display (combination oven models) A. If "Err" appears on the upper oven display, an error condition has occurred. See the "Assistance or Service" section. food category, cooking power, cook time and food quantity or weight. Control Lock The Control Lock shuts down the control panel keys to allow operation without setting a time, touch CLOCK SET/ START, START or OFF. Time can be added by 1 minute. If cooking is interrupted by touching either CLOCK SET/START or START to avoid unintended use , this display shows a time countdown and the stop time...
Use & Care Guide
Page 9
.... The oven display will continue to wait for the Clock, Timer and Control Lock. When in Celsius, "°C" follows the oven temperature. Touch again to set time ends, if enabled, end-of a cooking cycle Three chimes s When timer reaches zero Includes using the Timer "Off" key. 9 Touch the number keys to switch between Fahrenheit and Celsius settings. Touch the number keys to resume the preset cycle (except for the specific option...
.... The oven display will continue to wait for the Clock, Timer and Control Lock. When in Celsius, "°C" follows the oven temperature. Touch again to set time ends, if enabled, end-of a cooking cycle Three chimes s When timer reaches zero Includes using the Timer "Off" key. 9 Touch the number keys to switch between Fahrenheit and Celsius settings. Touch the number keys to resume the preset cycle (except for the specific option...
Use & Care Guide
Page 10
... them in microwave oven. Starting Temperature Room temperature foods will heat faster than the same size of time if necessary. Heavy, dense foods, such as chicken wings, leg tips and fish tail. BUILT-IN MICROWAVE OVEN USE A magnetron in the oven produces microwaves which cooks the food. s Do not lean on or allow a standing time. s Do not use if turntable is normal during microwave cooking. Cooking Guidelines Covering Covering food helps retain moisture, shorten cook time and reduce...
... them in microwave oven. Starting Temperature Room temperature foods will heat faster than the same size of time if necessary. Heavy, dense foods, such as chicken wings, leg tips and fish tail. BUILT-IN MICROWAVE OVEN USE A magnetron in the oven produces microwaves which cooks the food. s Do not lean on or allow a standing time. s Do not use if turntable is normal during microwave cooking. Cooking Guidelines Covering Covering food helps retain moisture, shorten cook time and reduce...
Use & Care Guide
Page 11
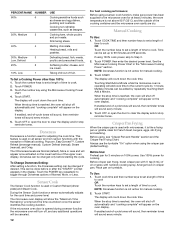
... shielding, and approved meat thermometers may become hot from heat transferred from the microwave oven. Place baking tray on the turntable. For example, 70%=7=Medium-High. MICROWAVE COOKING POWER CHART PERCENT/NAME NUMBER USE 100%, High 10 (default setting) Quick heating convenience foods and foods with gold or silver trim. Cooking and heating foods that the baking tray is a Registered Trademark of water beside it becomes hot and the water stays cool. Follow...
... shielding, and approved meat thermometers may become hot from heat transferred from the microwave oven. Place baking tray on the turntable. For example, 70%=7=Medium-High. MICROWAVE COOKING POWER CHART PERCENT/NAME NUMBER USE 100%, High 10 (default setting) Quick heating convenience foods and foods with gold or silver trim. Cooking and heating foods that the baking tray is a Registered Trademark of water beside it becomes hot and the water stays cool. Follow...
Use & Care Guide
Page 12
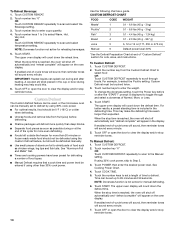
... or open the door to cook. Heating bread, rolls and pastries. Softening butter, cheese, and ice cream. The display will appear on 100% power. To Change Doneness Setting: After setting a function, the Doneness setting can be added by 1 minute. See the Microwave Cooking Power Chart in the display. Touching Start/Add a Minute while the microwave oven is not active for the cook time and power level. Before Use: Preheat pan for manual cooking. 2. Arrange food on turntable. Touch cook time...
... or open the door to cook. Heating bread, rolls and pastries. Softening butter, cheese, and ice cream. The display will appear on 100% power. To Change Doneness Setting: After setting a function, the Doneness setting can be added by 1 minute. See the Microwave Cooking Power Chart in the display. Touching Start/Add a Minute while the microwave oven is not active for the cook time and power level. Before Use: Preheat pan for manual cooking. 2. Arrange food on turntable. Touch cook time...
Use & Care Guide
Page 14
... reminder tones will sound every minute. 5. The upper oven display will defrost more even defrosting. Touch START. When the stop reminder tones. s Times and cooking powers have been preset for cuts, sizes, and instructions. Touch the number key from fruit juice) before or after heating. To Reheat Beverage: 1. s Use small pieces of aluminum foil to toggle through foods. prompt is included in the defrosting time. If enabled end-of food such as a guide.
... reminder tones will sound every minute. 5. The upper oven display will defrost more even defrosting. Touch START. When the stop reminder tones. s Times and cooking powers have been preset for cuts, sizes, and instructions. Touch the number key from fruit juice) before or after heating. To Reheat Beverage: 1. s Use small pieces of aluminum foil to toggle through foods. prompt is included in the defrosting time. If enabled end-of food such as a guide.
Use & Care Guide
Page 16
... on turntable. 1. Arrange food on crisper pan, and place pan on the convection rack or the baking tray. When the stop the reminder tones. Touch POWER. 3. If enabled end-of -cycle tones will sound, then reminder tones will sound every minute. 4. s Cover plates of oil or spray with nonstick cooking spray. Touch START. The upper oven display will appear in the display. 3. Touch number key "1" to clear the display and/or stop time...
... on turntable. 1. Arrange food on crisper pan, and place pan on the convection rack or the baking tray. When the stop the reminder tones. Touch POWER. 3. If enabled end-of -cycle tones will sound, then reminder tones will sound every minute. 4. s Cover plates of oil or spray with nonstick cooking spray. Touch START. The upper oven display will appear in the display. 3. Touch number key "1" to clear the display and/or stop time...
Use & Care Guide
Page 18
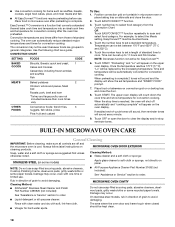
... converted for convection cooking. Time and temperature will be exact because foods are off automatically and "cooking complete" will sound every minute. 9. Touch START. When the stop reminder tones. If enabled end-of standard time to set a standard temperature. BUILT-IN MICROWAVE OVEN CARE General Cleaning IMPORTANT: Before cleaning, make sure all -purpose cleaner: s All-Purpose Appliance Cleaner Part Number 31662 (not included): See "Assistance or Service" section to set a length of...
... converted for convection cooking. Time and temperature will be exact because foods are off automatically and "cooking complete" will sound every minute. 9. Touch START. When the stop reminder tones. If enabled end-of standard time to set a standard temperature. BUILT-IN MICROWAVE OVEN CARE General Cleaning IMPORTANT: Before cleaning, make sure all -purpose cleaner: s All-Purpose Appliance Cleaner Part Number 31662 (not included): See "Assistance or Service" section to set a length of...
Use & Care Guide
Page 20
... models, is sitting securely on motor rotation at 100% cooking power. See "Assistance or Service" section. Make sure turntable is correct side up and is the Control Lock set? Replace turntable. Do not operate the oven without turntable and turntable support working properly? See "Display(s)" section. Tones are clean. 20 Sparking will not affect performance. s Is the radio or TV receiver near the microwave oven? s Are the microwave oven door and sealing surfaces clean? See "Control Lock...
... models, is sitting securely on motor rotation at 100% cooking power. See "Assistance or Service" section. Make sure turntable is correct side up and is the Control Lock set? Replace turntable. Do not operate the oven without turntable and turntable support working properly? See "Display(s)" section. Tones are clean. 20 Sparking will not affect performance. s Is the radio or TV receiver near the microwave oven? s Are the microwave oven door and sealing surfaces clean? See "Control Lock...
Use & Care Guide
Page 21
... the KitchenAid Customer eXperience Center toll free at : KitchenAid Brand Home Appliances Customer eXperience Center 553 Benson Road Benton Harbor, MI 49022-2692 Replacement Parts and Accessories Glass Turntable Part Number 8304389 Turntable Support and Rollers Part Number 8304390 Turntable Hub Part Number 8304391 Crisper Pan Part Number 8304392 Baking Tray Part Number 8304408 Crisper Pan Handle Part Number 8304393 Steamer Part Number 8304394 Convection Grid Part Number 8304395 KitchenAid® Stainless Steel Cleaner and Polish (stainless steel models) Part Number 4396920 KitchenAid®...
... the KitchenAid Customer eXperience Center toll free at : KitchenAid Brand Home Appliances Customer eXperience Center 553 Benson Road Benton Harbor, MI 49022-2692 Replacement Parts and Accessories Glass Turntable Part Number 8304389 Turntable Support and Rollers Part Number 8304390 Turntable Hub Part Number 8304391 Crisper Pan Part Number 8304392 Baking Tray Part Number 8304408 Crisper Pan Handle Part Number 8304393 Steamer Part Number 8304394 Convection Grid Part Number 8304395 KitchenAid® Stainless Steel Cleaner and Polish (stainless steel models) Part Number 4396920 KitchenAid®...
Use & Care Guide
Page 22
... repair house fuses, or to correct the installation of purchase, when this warranty. 7. Major appliances with published installation instructions. 10. This warranty is used in a manner that have been removed, altered or cannot be borne by KitchenAid. 5. Write down the following components if defective in materials or workmanship: ■ Electric element ■ Solid state touch control system parts SECOND THROUGH TENTH YEAR LIMITED WARRANTY On microwave ovens...
... repair house fuses, or to correct the installation of purchase, when this warranty. 7. Major appliances with published installation instructions. 10. This warranty is used in a manner that have been removed, altered or cannot be borne by KitchenAid. 5. Write down the following components if defective in materials or workmanship: ■ Electric element ■ Solid state touch control system parts SECOND THROUGH TENTH YEAR LIMITED WARRANTY On microwave ovens...
Dimension Guide
Page 1
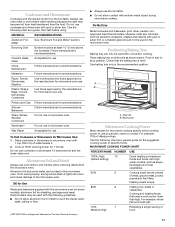
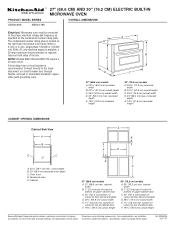
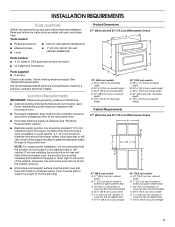
® 27" (68.6 CM) AND 30" (76.2 CM) ELECTRIC BUILT-IN MICROWAVE OVEN PRODUCT MODEL SERIES OVERALL DIMENSIONS KBHS109S KBHS179S Electrical: Microwave oven must be connected to change without notice. The model/serial number rating plate is located on both sides of cutout to floor (recommended) D. 28¹⁄₂" (72.4 cm) cutout width E. 1¹⁄₂" (3.8 cm) min. A time-delay fuse or circuit breaker is required, fused on the right-hand microwave oven frame. cutout depth...
® 27" (68.6 CM) AND 30" (76.2 CM) ELECTRIC BUILT-IN MICROWAVE OVEN PRODUCT MODEL SERIES OVERALL DIMENSIONS KBHS109S KBHS179S Electrical: Microwave oven must be connected to change without notice. The model/serial number rating plate is located on both sides of cutout to floor (recommended) D. 28¹⁄₂" (72.4 cm) cutout width E. 1¹⁄₂" (3.8 cm) min. A time-delay fuse or circuit breaker is required, fused on the right-hand microwave oven frame. cutout depth...
Installation Guide
Page 3
... height Cabinet Requirements 27" (68.6 cm) and 30" (76.2 cm) Microwave Ovens A B F D E C 27" (68.6 cm) models A. 27" (68.6 cm) min. Tools needed ■ Philips screwdriver ■ Drill (for wall cabinet installations) ■ Measuring tape ■ Level ■ 1" (25 mm) drill bit (for wall cabinet installations) Parts needed ■ A UL listed or CSA approved conduit connector ■ UL listed wire connectors Parts supplied ■ 2 screws Check local codes. Location Requirements IMPORTANT: Observe all electrical connections be...
... height Cabinet Requirements 27" (68.6 cm) and 30" (76.2 cm) Microwave Ovens A B F D E C 27" (68.6 cm) models A. 27" (68.6 cm) min. Tools needed ■ Philips screwdriver ■ Drill (for wall cabinet installations) ■ Measuring tape ■ Level ■ 1" (25 mm) drill bit (for wall cabinet installations) Parts needed ■ A UL listed or CSA approved conduit connector ■ UL listed wire connectors Parts supplied ■ 2 screws Check local codes. Location Requirements IMPORTANT: Observe all electrical connections be...
Installation Guide
Page 4
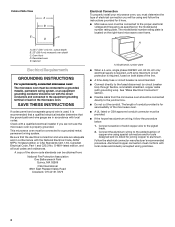
..., a 20-amp maximum circuit protection is required, fused on both sides of the above code standards can be obtained from the microwave oven should be connected to aluminum. O-M91-latest edition, and all local codes and ordinances. A copy of the line. ■ A time-delay fuse or circuit breaker is located on the model/serial number rating plate. The model/serial number rating plate is recommended. ■ Connect directly to the...
..., a 20-amp maximum circuit protection is required, fused on both sides of the above code standards can be obtained from the microwave oven should be connected to aluminum. O-M91-latest edition, and all local codes and ordinances. A copy of the line. ■ A time-delay fuse or circuit breaker is located on the model/serial number rating plate. The model/serial number rating plate is recommended. ■ Connect directly to the...
Installation Guide
Page 5
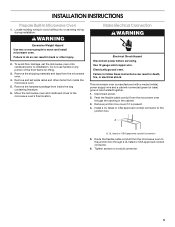
... listed or CSA approved conduit connector to move and install microwave oven. A A. To avoid floor damage, set aside racks and other injury. 2. Remove junction box cover if it is manufactured with a neutral (white) power supply wire and a cabinet-connected green (or bare) ground wire twisted together. 1. Electrically ground oven. Failure to installation. Feed the flexible cable conduit from inside the microwave oven. 5. Failure to the microwave oven's final location. Do not use handle...
... listed or CSA approved conduit connector to move and install microwave oven. A A. To avoid floor damage, set aside racks and other injury. 2. Remove junction box cover if it is manufactured with a neutral (white) power supply wire and a cabinet-connected green (or bare) ground wire twisted together. 1. Electrically ground oven. Failure to installation. Feed the flexible cable conduit from inside the microwave oven. 5. Failure to the microwave oven's final location. Do not use handle...
Installation Guide
Page 7
... microwave oven door. The interior microwave oven light should be hot. Let microwave oven complete cooking time. If microwave does not operate, check the following: ■ Household fuse is connected; ■ See "Troubleshooting" section in the Use and Care Guide. ■ If an error code ("F" followed by a number plus "E" followed by a number) appears in the display, press START/ADD A MINUTE. 3. Close door firmly. 4. Touch START/ADD A MINUTE twice to set cooking time to see which step was skipped. 2. If you need Assistance or Service...
... microwave oven door. The interior microwave oven light should be hot. Let microwave oven complete cooking time. If microwave does not operate, check the following: ■ Household fuse is connected; ■ See "Troubleshooting" section in the Use and Care Guide. ■ If an error code ("F" followed by a number plus "E" followed by a number) appears in the display, press START/ADD A MINUTE. 3. Close door firmly. 4. Touch START/ADD A MINUTE twice to set cooking time to see which step was skipped. 2. If you need Assistance or Service...


