Use & Care Guide
Page 5
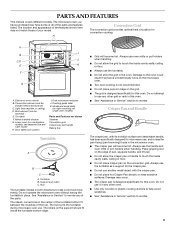
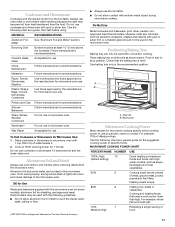
...may not match those of pan, squeeze handle, and lift pan. Light (inaccessible, in place. Turntable F. Model and serial plate (on the convection grid. Do not operate the microwave oven without having the turntable in ceiling) D. s Do not allow the crisper pan or handle to help avoid ...between the 3 spokes of the parts. s The crisper pan will become hot. Place gripping end on the microwave oven. s Do not place crisper pan on right mounting rail, single oven models) Parts and Features not shown Steamer Convection grid Crisper pan and handle Baking tray Turntable A B C A. Damage...
...may not match those of pan, squeeze handle, and lift pan. Light (inaccessible, in place. Turntable F. Model and serial plate (on the convection grid. Do not operate the microwave oven without having the turntable in ceiling) D. s Do not allow the crisper pan or handle to help avoid ...between the 3 spokes of the parts. s The crisper pan will become hot. Place gripping end on the microwave oven. s Do not place crisper pan on right mounting rail, single oven models) Parts and Features not shown Steamer Convection grid Crisper pan and handle Baking tray Turntable A B C A. Damage...

Use & Care Guide
Page 7
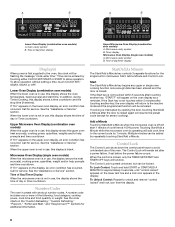
... This manual covers different models. Timer C. Cook time F. Crisping H. Options Q. Lower oven display Single Oven Models A B C D EF G H I . Cook time C. Microwave soften/melt F. Lower oven controls (see separate Use and Care Guide) B. Number keys D. Upper microwave oven display E. Microwave custom reheating N. Microwave steam cooking B. Microwave popcorn E. Start/add a minute/control lock K. EasyConvect™ conversion cooking N O P L. Options P. Combination Oven Models A B C D EF GH TIMER % OZ FC...
... This manual covers different models. Timer C. Cook time F. Crisping H. Options Q. Lower oven display Single Oven Models A B C D EF G H I . Cook time C. Microwave soften/melt F. Lower oven controls (see separate Use and Care Guide) B. Number keys D. Upper microwave oven display E. Microwave custom reheating N. Microwave steam cooking B. Microwave popcorn E. Start/add a minute/control lock K. EasyConvect™ conversion cooking N O P L. Options P. Combination Oven Models A B C D EF GH TIMER % OZ FC...
Use & Care Guide
Page 8
...display is not in use , the display shows the time of day/timer display Upper Microwave Oven Display (combination oven models) A. Time of Day/Timer Display When the microwave oven is blank. If the Start key is not in use , this display shows the ...Time countdown. Multiple minutes can be locked. A B A B TIMER % OZ FC LBS POWER MAXIMUM TIME REMAINING Lower Oven Display (combination oven models) A. Timer display Microwave Oven Display (single oven models) A. Call for approximately 5 seconds, until "control locked" appears on the lower text line and a lock icon appears...
...display is not in use , the display shows the time of day/timer display Upper Microwave Oven Display (combination oven models) A. Time of Day/Timer Display When the microwave oven is blank. If the Start key is not in use , this display shows the ...Time countdown. Multiple minutes can be locked. A B A B TIMER % OZ FC LBS POWER MAXIMUM TIME REMAINING Lower Oven Display (combination oven models) A. Timer display Microwave Oven Display (single oven models) A. Call for approximately 5 seconds, until "control locked" appears on the lower text line and a lock icon appears...
Use & Care Guide
Page 9
...Touch OPTIONS and then "3" to switch between high and low settings. To Turn Tones Off/On: Touch OPTIONS and then "4" to change the oven temperature between On and Off settings. These hidden functions allow you access to resume the preset cycle (except for functions other than cooking. Touch...and reminder tones are preset on , but the oven light will continuously repeat until the TIMER OFF key is touched, the oven will also turn off . End-of-Cycle and Reminder Tones The Timed Cooking end-of time. 3. Options (single oven models) The OPTIONS selection key allows you to toggle ...
...Touch OPTIONS and then "3" to switch between high and low settings. To Turn Tones Off/On: Touch OPTIONS and then "4" to change the oven temperature between On and Off settings. These hidden functions allow you access to resume the preset cycle (except for functions other than cooking. Touch...and reminder tones are preset on , but the oven light will continuously repeat until the TIMER OFF key is touched, the oven will also turn off . End-of-Cycle and Reminder Tones The Timed Cooking end-of time. 3. Options (single oven models) The OPTIONS selection key allows you to toggle ...
Use & Care Guide
Page 11
...or floor. †®STYROFOAM is level. China, Earthenware Follow manufacturer's recommendations. Do not use by the manufacturer for microwave oven use oven mitts or pot holders when handling because any dish may be used with gold or silver trim. Do Not Use Metal ..., Wooden Containers Do not use the turntable. Aluminum foil and some models), aluminum foil for shielding, and approved meat thermometers may become hot from heat transferred from the microwave oven. s Always use in the microwave oven. s Do not allow aluminum foil or metal to stop position. Positioning...
...or floor. †®STYROFOAM is level. China, Earthenware Follow manufacturer's recommendations. Do not use by the manufacturer for microwave oven use oven mitts or pot holders when handling because any dish may be used with gold or silver trim. Do Not Use Metal ..., Wooden Containers Do not use the turntable. Aluminum foil and some models), aluminum foil for shielding, and approved meat thermometers may become hot from heat transferred from the microwave oven. s Always use in the microwave oven. s Do not allow aluminum foil or metal to stop position. Positioning...
Use & Care Guide
Page 18
... or some models) Apply glass cleaner to clear the display and/or stop time is complete. The area where the oven door and frame touch when closed should be touched twice. 4. s Use convection cooking for items such as a guide. Place food in microwave oven or place baking...or Service" section to select the Meats setting, EasyConvect™ must be kept clean. 18 Touch EASYCONVECT™ function. 3. Cleaning Method: s KitchenAid® Stainless Steel Cleaner and Polish Part Number 4396920 (not included): See "Assistance or Service" section to 11 hours and 59 minutes. The ...
... or some models) Apply glass cleaner to clear the display and/or stop time is complete. The area where the oven door and frame touch when closed should be touched twice. 4. s Use convection cooking for items such as a guide. Place food in microwave oven or place baking...or Service" section to select the Meats setting, EasyConvect™ must be kept clean. 18 Touch EASYCONVECT™ function. 3. Cleaning Method: s KitchenAid® Stainless Steel Cleaner and Polish Part Number 4396920 (not included): See "Assistance or Service" section to 11 hours and 59 minutes. The ...
Use & Care Guide
Page 20
...the fuse or reset the circuit breaker. Microwave oven will not work during the lower oven SelfCleaning Cycle. s On combination oven models, is normal and occurs as in "Parts and Features"? Try to avoid the cost of an unnecessary service call. Oven makes humming noise s This is normal... Service" section. Clear the display. See "Display(s)" section. See "Tones" section. Firmly close door. s On some models, is not operating s Is the Timer in the "Microwave Oven Use" section. Place 1 cup (250 mL) of cycle. Display shows time countdown, but is the Control Lock set properly...
...the fuse or reset the circuit breaker. Microwave oven will not work during the lower oven SelfCleaning Cycle. s On combination oven models, is normal and occurs as in "Parts and Features"? Try to avoid the cost of an unnecessary service call. Oven makes humming noise s This is normal... Service" section. Clear the display. See "Display(s)" section. See "Tones" section. Firmly close door. s On some models, is not operating s Is the Timer in the "Microwave Oven Use" section. Place 1 cup (250 mL) of cycle. Display shows time countdown, but is the Control Lock set properly...
Use & Care Guide
Page 21
... Tray Part Number 8304408 Crisper Pan Handle Part Number 8304393 Steamer Part Number 8304394 Convection Grid Part Number 8304395 KitchenAid® Stainless Steel Cleaner and Polish (stainless steel models) Part Number 4396920 KitchenAid® Stainless Steel Wipes (stainless steel models) Part Number 8212510 All Purpose Appliance Cleaner Part Number 31662 In Canada Call the...
... Tray Part Number 8304408 Crisper Pan Handle Part Number 8304393 Steamer Part Number 8304394 Convection Grid Part Number 8304395 KitchenAid® Stainless Steel Cleaner and Polish (stainless steel models) Part Number 4396920 KitchenAid® Stainless Steel Wipes (stainless steel models) Part Number 8212510 All Purpose Appliance Cleaner Part Number 31662 In Canada Call the...
Use & Care Guide
Page 22
...THROUGH TENTH YEAR LIMITED WARRANTY On microwave ovens only, in the second through tenth years from date of purchase, when this major appliance is operated and maintained according to instructions attached to or furnished with the product, KitchenAid will pay for Factory Specified Parts... service if your complete model number and serial number. Outside the 50 United States and Canada, this limited warranty does not apply. This major appliance is designed to be provided by a KitchenAid designated service company. KITCHENAID® BUILT-IN OVEN & MICROWAVE WARRANTY LIMITED WARRANTY For ...
...THROUGH TENTH YEAR LIMITED WARRANTY On microwave ovens only, in the second through tenth years from date of purchase, when this major appliance is operated and maintained according to instructions attached to or furnished with the product, KitchenAid will pay for Factory Specified Parts... service if your complete model number and serial number. Outside the 50 United States and Canada, this limited warranty does not apply. This major appliance is designed to be provided by a KitchenAid designated service company. KITCHENAID® BUILT-IN OVEN & MICROWAVE WARRANTY LIMITED WARRANTY For ...
Dimension Guide
Page 1
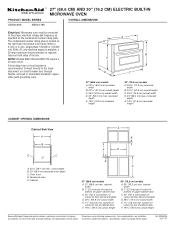
... height C. 29³⁄₄" (75.6 cm) overall width D. 23" (58.3 cm) max. Oven front D. Instructions packed with grounding wire). ® 27" (68.6 CM) AND 30" (76.2 CM) ELECTRIC BUILT-IN MICROWAVE OVEN PRODUCT MODEL SERIES OVERALL DIMENSIONS KBHS109S KBHS179S Electrical: Microwave oven must be connected to the proper electrical voltage and frequency as specified on both...
... height C. 29³⁄₄" (75.6 cm) overall width D. 23" (58.3 cm) max. Oven front D. Instructions packed with grounding wire). ® 27" (68.6 CM) AND 30" (76.2 CM) ELECTRIC BUILT-IN MICROWAVE OVEN PRODUCT MODEL SERIES OVERALL DIMENSIONS KBHS109S KBHS179S Electrical: Microwave oven must be connected to the proper electrical voltage and frequency as specified on both...
Installation Guide
Page 3
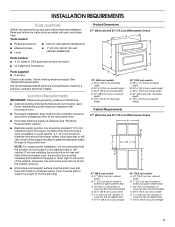
...of the cabinet; If you are shown must be located in a wall cabinet. See "Electrical Requirements." Product Dimensions 27" (68.6 cm) and 30" (76.2 cm) Microwave Ovens A B E D C 27" (68.6 cm) models A. 25 64.3 cm) recessed width B. 20 51.6 cm) overall height C. 26³⁄₄" (67... starting installation. recessed depth E. 18³⁄₄" (47.6 cm) recessed height Cabinet Requirements 27" (68.6 cm) and 30" (76.2 cm) Microwave Ovens A B F D E C 27" (68.6 cm) models A. 27" (68.6 cm) min. It is installed in the adjacent right or left corner of the ...
...of the cabinet; If you are shown must be located in a wall cabinet. See "Electrical Requirements." Product Dimensions 27" (68.6 cm) and 30" (76.2 cm) Microwave Ovens A B E D C 27" (68.6 cm) models A. 25 64.3 cm) recessed width B. 20 51.6 cm) overall height C. 26³⁄₄" (67... starting installation. recessed depth E. 18³⁄₄" (47.6 cm) recessed height Cabinet Requirements 27" (68.6 cm) and 30" (76.2 cm) Microwave Ovens A B F D E C 27" (68.6 cm) models A. 27" (68.6 cm) min. It is installed in the adjacent right or left corner of the ...
Installation Guide
Page 4
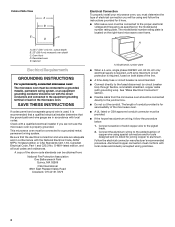
... directly to the pigtail leads. 2. This microwave oven must be connected to a grounded metal, permanent wiring system. Cabinet Side View A B E C D A. 23¹⁄₄" (59.1 cm) min. O-M91-latest edition, and all local codes and ordinances. Model/serial number plate ■ When a 4-wire... electrical connector manufacturer's recommended procedure. Be sure that the ground path and wire gauge are not sure the microwave oven is required, fused on the model/serial number rating plate. A A. Connect a section of copper wire using special connectors and/or tools designed...
... directly to the pigtail leads. 2. This microwave oven must be connected to a grounded metal, permanent wiring system. Cabinet Side View A B E C D A. 23¹⁄₄" (59.1 cm) min. O-M91-latest edition, and all local codes and ordinances. Model/serial number plate ■ When a 4-wire... electrical connector manufacturer's recommended procedure. Be sure that the ground path and wire gauge are not sure the microwave oven is required, fused on the model/serial number rating plate. A A. Connect a section of copper wire using special connectors and/or tools designed...


