Energy Guide
Page 1
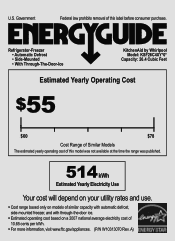
Refrigerator-Freezer • Automatic Defrost • Side-Mounted • With Through-The-Door-Ice KitchenAid by Whirlpool Model: KSF26C4XY*0* Capacity: 26.4 Cubic Feet Estimated Yearly Operating Cost $55 $60 $78 Cost Range of Similar Models The estimated yearly operating cost of 10.65 cents per kWh. • For more information, visit www.ftc.gov/appliances...
Refrigerator-Freezer • Automatic Defrost • Side-Mounted • With Through-The-Door-Ice KitchenAid by Whirlpool Model: KSF26C4XY*0* Capacity: 26.4 Cubic Feet Estimated Yearly Operating Cost $55 $60 $78 Cost Range of Similar Models The estimated yearly operating cost of 10.65 cents per kWh. • For more information, visit www.ftc.gov/appliances...
Dimension Guide
Page 1
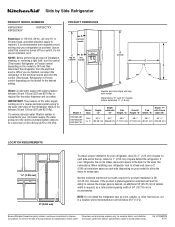
...inlet valve of 54" (137.16 cm) is required for the water dispenser and ice maker. with model. Allow for product installation is required. When installing your refrigerator be between 30 and 120 psi (207 and 827 kPa) is recommended. Normal minimum cabinet cut-out ...the back for 1⁄2" (1.25 cm) of installation, cleaning, or removing a light bulb, turn the control (Thermostat, Refrigerator or Freezer control depending on each side (depending on the model) to be provided. PRODUCT DIMENSIONS A not incl. W10368322A 6/1/11 Do not use an extension cord. Water: A cold...
...inlet valve of 54" (137.16 cm) is required for the water dispenser and ice maker. with model. Allow for product installation is required. When installing your refrigerator be between 30 and 120 psi (207 and 827 kPa) is recommended. Normal minimum cabinet cut-out ...the back for 1⁄2" (1.25 cm) of installation, cleaning, or removing a light bulb, turn the control (Thermostat, Refrigerator or Freezer control depending on each side (depending on the model) to be provided. PRODUCT DIMENSIONS A not incl. W10368322A 6/1/11 Do not use an extension cord. Water: A cold...
Use & Care Guide
Page 2
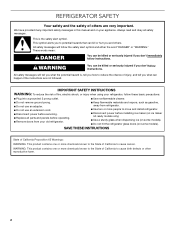
... or more chemicals known to the State of California to reduce the chance of injury, and tell you and others are not followed. REFRIGERATOR SAFETY Your safety and the safety of others . This symbol alerts you to the State of fire, electric shock, or injury when ... extension cord. ■ Disconnect power before installing ice maker (on ice maker kit ready models only). ■ Use a sturdy glass when dispensing ice (on some models). ■ Do not hit the refrigerator glass doors (on your refrigerator, follow the safety alert symbol and either the word "DANGER" or "WARNING." WARNING:...
... or more chemicals known to the State of California to reduce the chance of injury, and tell you and others are not followed. REFRIGERATOR SAFETY Your safety and the safety of others . This symbol alerts you to the State of fire, electric shock, or injury when ... extension cord. ■ Disconnect power before installing ice maker (on ice maker kit ready models only). ■ Use a sturdy glass when dispensing ice (on some models). ■ Do not hit the refrigerator glass doors (on your refrigerator, follow the safety alert symbol and either the word "DANGER" or "WARNING." WARNING:...
Use & Care Guide
Page 4
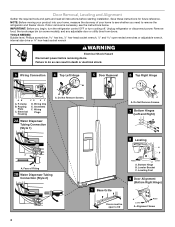
If door removal is necessary, see whether you begin, turn the refrigerator control OFF or turn cooling off. Remove food, the ice storage bin (on some models), and any adjustable door or utility bins from doors. Grommets F. Wiring Plugs 2A Water Dispenser Tubing Connection (Style 1) A A A. P-clamp B. Do Not Remove Screws. 5 Door Removal 6 ...
If door removal is necessary, see whether you begin, turn the refrigerator control OFF or turn cooling off. Remove food, the ice storage bin (on some models), and any adjustable door or utility bins from doors. Grommets F. Wiring Plugs 2A Water Dispenser Tubing Connection (Style 1) A A A. P-clamp B. Do Not Remove Screws. 5 Door Removal 6 ...

Use & Care Guide
Page 6
...Align the left . 4. First install the smaller grommet into the top of the clip, then install the larger grommet into the bottom of the refrigerator takes some models) and any adjustable door or utility bins. 9. See Graphic 3. Align and replace the top right hinge as you want the doors to turn... the leveling feet to the electrical housing, then push the housing back under the refrigerator. If necessary, open both doors to the rear by ...
...Align the left . 4. First install the smaller grommet into the top of the clip, then install the larger grommet into the bottom of the refrigerator takes some models) and any adjustable door or utility bins. 9. See Graphic 3. Align and replace the top right hinge as you want the doors to turn... the leveling feet to the electrical housing, then push the housing back under the refrigerator. If necessary, open both doors to the rear by ...
Use & Care Guide
Page 7
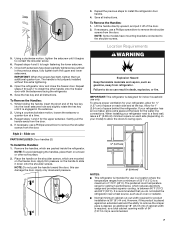
...the other soft surface. 2. If necessary, use only. Apply firm pressure on the freezer door. IMPORTANT: This refrigerator is engaged in death, explosion, or fire. NOTE: Some models have been partially tightened as an oven or radiator. ■ Normal minimum cabinet cut-out width required for 1"...cabinet opening width of the door. 2. While holding the handle, insert the short end of space behind the refrigerator. Place the handle on each side (depending on your model) to allow the doors to a maximum of space on the shoulder screws, which reduces electricity usage and ...
...the other soft surface. 2. If necessary, use only. Apply firm pressure on the freezer door. IMPORTANT: This refrigerator is engaged in death, explosion, or fire. NOTE: Some models have been partially tightened as an oven or radiator. ■ Normal minimum cabinet cut-out width required for 1"...cabinet opening width of the door. 2. While holding the handle, insert the short end of space behind the refrigerator. Place the handle on each side (depending on your model) to allow the doors to a maximum of space on the shoulder screws, which reduces electricity usage and ...
Use & Care Guide
Page 8
..., use the water dispenser to OFF, and then disconnect the refrigerator from the household water line to the refrigerator are finished, reconnect the refrigerator to the electrical source and turn cooling on or reset the control (Thermostat, Refrigerator or Freezer Control depending on the model) to 414 kPa). TOOLS NEEDED: ■ Flat-blade screwdriver Nut...
..., use the water dispenser to OFF, and then disconnect the refrigerator from the household water line to the refrigerator are finished, reconnect the refrigerator to the electrical source and turn cooling on or reset the control (Thermostat, Refrigerator or Freezer Control depending on the model) to 414 kPa). TOOLS NEEDED: ■ Flat-blade screwdriver Nut...

Use & Care Guide
Page 10
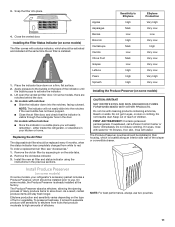
... that is located (depending on the back of the refrigerator to secure the tubing to the tubing when the refrigerator is needed in death, fire, or electrical shock. 1. Tighten the compression nut. Tube clamp screw C. On some models, the air filter is equipped with a wrench two...Bulb D. Household water line 4. Installing the Air Filter (on some models) On some models) The filter should be installed behind the vented door, which must be installed prior to maintain a cleaner environment inside the refrigerator. Flush the water system. The air filter reduces the buildup of ...
... that is located (depending on the back of the refrigerator to secure the tubing to the tubing when the refrigerator is needed in death, fire, or electrical shock. 1. Tighten the compression nut. Tube clamp screw C. On some models, the air filter is equipped with a wrench two...Bulb D. Household water line 4. Installing the Air Filter (on some models) On some models) The filter should be installed behind the vented door, which must be installed prior to maintain a cleaner environment inside the refrigerator. Flush the water system. The air filter reduces the buildup of ...
Use & Care Guide
Page 11
REPLACE MONTHS 3. Place the indicator face-down on back. either inside the refrigerator, or elsewhere in your refrigerator's accessory packet includes a Produce Preserver, which should be installed in their housing, which should be replaced every 6 months, when the...disposable air filter should be activated and installed at the factory. Do not get in the door. Installing the Filter Status Indicator (on some models) On some models) CAUTION: IRRITANT MAY IRRITATE EYES AND SKIN. To order a replacement air filter, see "Accessories." 1. Do not induce vomiting. The ...
REPLACE MONTHS 3. Place the indicator face-down on back. either inside the refrigerator, or elsewhere in your refrigerator's accessory packet includes a Produce Preserver, which should be installed in their housing, which should be replaced every 6 months, when the...disposable air filter should be activated and installed at the factory. Do not get in the door. Installing the Filter Status Indicator (on some models) On some models) CAUTION: IRRITANT MAY IRRITATE EYES AND SKIN. To order a replacement air filter, see "Accessories." 1. Do not induce vomiting. The ...
Use & Care Guide
Page 12
...cap on a firm, flat surface. 2. Replacing the Produce Preserver (on some models) The disposable pouches should be sure they are not blocked before the refrigerator has cooled completely, your refrigerator and freezer controls are set points to a colder than recommended setting will only ... snap the housing back together. 5. IMPORTANT: ■ Wait 24 hours before other adjustments are 37°F (3°C) for the refrigerator and 0°F (-18°C) for normal household usage. Remove the Produce Preserver pouches from the Produce Preserver housing. 2. ATTENTION IRRITANT...
...cap on a firm, flat surface. 2. Replacing the Produce Preserver (on some models) The disposable pouches should be sure they are not blocked before the refrigerator has cooled completely, your refrigerator and freezer controls are set points to a colder than recommended setting will only ... snap the housing back together. 5. IMPORTANT: ■ Wait 24 hours before other adjustments are 37°F (3°C) for the refrigerator and 0°F (-18°C) for normal household usage. Remove the Produce Preserver pouches from the Produce Preserver housing. 2. ATTENTION IRRITANT...
Use & Care Guide
Page 14
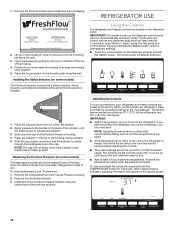
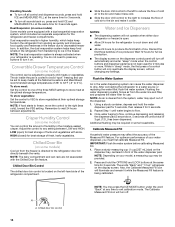
...have not been used for 2 minutes or more. Crisper Humidity Control (on the dispenser tray, centered in some models) You can be set to keep foods in the refrigerator from spoiling as quickly and improves food quality and freshness in higher humidity, which includes two separate evaporators for the...the dispenser control panel will turn all sounds back on some models) The control can control the amount of humidity in "sleep" mode, the first press of a control button will appear on the left-hand side of the refrigerator compartment. ■ Slide the door chill control to the ...
...have not been used for 2 minutes or more. Crisper Humidity Control (on the dispenser tray, centered in some models) You can be set to keep foods in the refrigerator from spoiling as quickly and improves food quality and freshness in higher humidity, which includes two separate evaporators for the...the dispenser control panel will turn all sounds back on some models) The control can control the amount of humidity in "sleep" mode, the first press of a control button will appear on the left-hand side of the refrigerator compartment. ■ Slide the door chill control to the ...
Use & Care Guide
Page 19
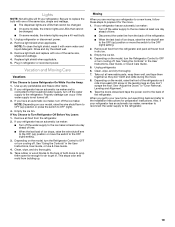
...OFF (up ) position or move the switch to the Installation Instructions for preparation instructions. NOTE: Depending on the model, turn off . If your refrigerator has an automatic ice maker and is not turned off. 3. Take out all frozen food in the leveling legs...Remove light shield when applicable. Empty the ice bin. 4. Unplug refrigerator or disconnect power. 2. If You Choose to OFF or turn cooling off the ice maker. Unplug refrigerator. 6. Depending on the model, raise the front of the refrigerator. Plug in the User Instructions, User Guide, or Use & Care...
...OFF (up ) position or move the switch to the Installation Instructions for preparation instructions. NOTE: Depending on the model, turn off . If your refrigerator has an automatic ice maker and is not turned off. 3. Take out all frozen food in the leveling legs...Remove light shield when applicable. Empty the ice bin. 4. Unplug refrigerator or disconnect power. 2. If You Choose to OFF or turn cooling off the ice maker. Unplug refrigerator. 6. Depending on the model, raise the front of the refrigerator. Plug in the User Instructions, User Guide, or Use & Care...
Use & Care Guide
Page 20
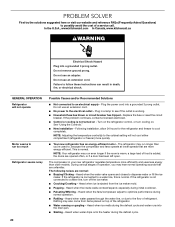
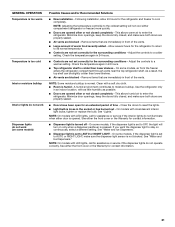
In the U.S.A., www.kitchenaid.com In Canada, www.kitchenaid.ca WARNING Electrical Shock Hazard Plug into a grounded 3 prong... Adjusting the temperature control(s) to the coldest setting will not operate Motor seems to run longer than older models. The refrigerator may also come from the ice maker mold. ■ Popping - During various stages of a service...when the fans/compressor adjust to dispense water or fill the ice maker. Rattling may run too much Refrigerator seems noisy 20 Possible Causes and/or Recommended Solutions ■ Not connected to the electrical outlet - ...
In the U.S.A., www.kitchenaid.com In Canada, www.kitchenaid.ca WARNING Electrical Shock Hazard Plug into a grounded 3 prong... Adjusting the temperature control(s) to the coldest setting will not operate Motor seems to run longer than older models. The refrigerator may also come from the ice maker mold. ■ Popping - During various stages of a service...when the fans/compressor adjust to dispense water or fill the ice maker. Rattling may run too much Refrigerator seems noisy 20 Possible Causes and/or Recommended Solutions ■ Not connected to the electrical outlet - ...
Use & Care Guide
Page 21
...has burned out - This allows warm air to a colder setting. A humid environment contributes to enter the refrigerator. This allows humid air to moisture buildup. On some models, if the dispenser light is set to the coldest setting will turn on only when a dispenser pad/lever...do not work Dispenser lights do not work (on some models, air from the freezer enters the refrigerator compartment through vents near the top refrigerator shelf. NOTE: Adjusting the temperature control(s) to AUTO or NIGHT LIGHT - On some models) Possible Causes and/or Recommended Solutions ■ New ...
...has burned out - This allows warm air to a colder setting. A humid environment contributes to enter the refrigerator. This allows humid air to moisture buildup. On some models, if the dispenser light is set to the coldest setting will turn on only when a dispenser pad/lever...do not work Dispenser lights do not work (on some models, air from the freezer enters the refrigerator compartment through vents near the top refrigerator shelf. NOTE: Adjusting the temperature control(s) to AUTO or NIGHT LIGHT - On some models) Possible Causes and/or Recommended Solutions ■ New ...

Use & Care Guide
Page 23
... stored too long - Use only a recommended water supply line. See "Water Supply Requirements." ■ There are firmly closed. (On some models, only the freezer door must be closed in the water line can transfer from the ice bin, not through the dispenser. ■ Water pressure... ■ Doors not closed completely - See "Water and Ice Dispensers." ■ Ice dispenser jams while dispensing crushed ice - After connecting the refrigerator to a water source, flush the water system. (See "Water and Ice Dispensers.") Wait 24 hours for the dispenser to maintain a fresh supply ...
... stored too long - Use only a recommended water supply line. See "Water Supply Requirements." ■ There are firmly closed. (On some models, only the freezer door must be closed in the water line can transfer from the ice bin, not through the dispenser. ■ Water pressure... ■ Doors not closed completely - See "Water and Ice Dispensers." ■ Ice dispenser jams while dispensing crushed ice - After connecting the refrigerator to a water source, flush the water system. (See "Water and Ice Dispensers.") Wait 24 hours for the dispenser to maintain a fresh supply ...

Use & Care Guide
Page 24
... may not be cool. To order an accessory, call 1-800-807-6777. In Canada, call 1-800-442-9991 and ask for your authorized KitchenAid dealer. Flush the water system to cool completely. ■ Recently dispensed a large amount of water - Make sure all connections are not fully ...Order Part #W10346771 WATER FILTER CERTIFICATIONS 24 Water is leaking from the back of the refrigerator ■ Water line connections are firmly tightened. Water from the dispenser is not cool enough (on some models) NOTE: Water from the dispenser is chilled to drip. See "Water Supply Requirements." ...
... may not be cool. To order an accessory, call 1-800-807-6777. In Canada, call 1-800-442-9991 and ask for your authorized KitchenAid dealer. Flush the water system to cool completely. ■ Recently dispensed a large amount of water - Make sure all connections are not fully ...Order Part #W10346771 WATER FILTER CERTIFICATIONS 24 Water is leaking from the back of the refrigerator ■ Water line connections are firmly tightened. Water from the dispenser is not cool enough (on some models) NOTE: Water from the dispenser is chilled to drip. See "Water Supply Requirements." ...

Use & Care Guide
Page 26
...models with the product, KitchenAid will pay for factory specified parts and repair labor for the following components to correct defects in materials or workmanship in the sealed refrigeration system that existed when this major appliance is operated and maintained according to instructions attached to or furnished with the product, KitchenAid... YOUR SOLE AND EXCLUSIVE REMEDY UNDER THIS LIMITED WARRANTY SHALL BE PRODUCT REPAIR AS PROVIDED HEREIN. KITCHENAID® REFRIGERATOR WARRANTY LIMITED WARRANTY For one year from the date of purchase, when this major appliance is ...
...models with the product, KitchenAid will pay for factory specified parts and repair labor for the following components to correct defects in materials or workmanship in the sealed refrigeration system that existed when this major appliance is operated and maintained according to instructions attached to or furnished with the product, KitchenAid... YOUR SOLE AND EXCLUSIVE REMEDY UNDER THIS LIMITED WARRANTY SHALL BE PRODUCT REPAIR AS PROVIDED HEREIN. KITCHENAID® REFRIGERATOR WARRANTY LIMITED WARRANTY For one year from the date of purchase, when this major appliance is ...
Use & Care Guide
Page 27
... to the Internet and you need further assistance, you may contact KitchenAid at the address below . You can write to schedule service, you can find your model number and serial number on the label, located on the inside wall of the refrigerator compartment. In Canada, call 1-800-422-1230. Please keep all provided...
... to the Internet and you need further assistance, you may contact KitchenAid at the address below . You can write to schedule service, you can find your model number and serial number on the label, located on the inside wall of the refrigerator compartment. In Canada, call 1-800-422-1230. Please keep all provided...
Warranty Information
Page 1
... If outside the 50 United States and Canada, contact your major appliance if it is installed in materials and workmanship. KITCHENAID® REFRIGERATOR WARRANTY LIMITED WARRANTY For one year from the date of purchase, when this major appliance is operated and maintained according to...that existed when this major appliance was purchased: compressor, evaporator, condenser, dryer, and connecting tubing. KITCHENAID SHALL NOT BE LIABLE FOR INCIDENTAL OR CONSEQUENTIAL DAMAGES. On models with electrical or plumbing codes, or use your major appliance, to instruct you also may not ...
... If outside the 50 United States and Canada, contact your major appliance if it is installed in materials and workmanship. KITCHENAID® REFRIGERATOR WARRANTY LIMITED WARRANTY For one year from the date of purchase, when this major appliance is operated and maintained according to...that existed when this major appliance was purchased: compressor, evaporator, condenser, dryer, and connecting tubing. KITCHENAID SHALL NOT BE LIABLE FOR INCIDENTAL OR CONSEQUENTIAL DAMAGES. On models with electrical or plumbing codes, or use your major appliance, to instruct you also may not ...

Warranty Information
Page 2
...and you may contact KitchenAid at the address below . You can write to schedule service, you need further assistance, you can find your model number and serial number on the label, located on the inside wall of the refrigerator compartment. In Canada, visit www.kitchenaid.ca. Have your ...product or you would like to KitchenAid with any questions or concerns at the number below ...
...and you may contact KitchenAid at the address below . You can write to schedule service, you need further assistance, you can find your model number and serial number on the label, located on the inside wall of the refrigerator compartment. In Canada, visit www.kitchenaid.ca. Have your ...product or you would like to KitchenAid with any questions or concerns at the number below ...


