Instruction Manual
Page 1
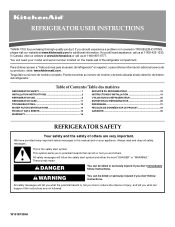
... injured if you and others are not followed. In Canada, visit our website at www.kitchenaid.ca or call us at www.kitchenaid.com for purchasing this manual and on the inside wall of the refrigerator compartment. Puede encontrar su número de modelo y de serie ubicada al lado derecho ... obtener acceso a "Instrucciones para el usuario del refrigerador" en español, o para obtener información adicional acerca de su producto, visite: www.kitchenaid.com. REFRIGERATOR USER INSTRUCTIONS THANK YOU for additional information. If you don't immediately follow instructions.
... injured if you and others are not followed. In Canada, visit our website at www.kitchenaid.ca or call us at www.kitchenaid.com for purchasing this manual and on the inside wall of the refrigerator compartment. Puede encontrar su número de modelo y de serie ubicada al lado derecho ... obtener acceso a "Instrucciones para el usuario del refrigerador" en español, o para obtener información adicional acerca de su producto, visite: www.kitchenaid.com. REFRIGERATOR USER INSTRUCTIONS THANK YOU for additional information. If you don't immediately follow instructions.
Instruction Manual
Page 2
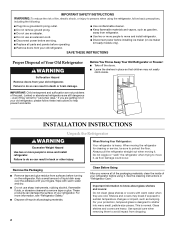
...; Take off the doors. ■ Leave the shelves in back or other injury. When moving it. Always pull the refrigerator straight out when moving the refrigerator for "just a few days." Important information to know about glass shelves and covers: Do not clean glass shelves or covers...they will sit for cleaning or service, be sure to protect the floor. Shelves and covers may not easily climb inside of your refrigerator before using the refrigerator, follow these instructions to help prevent accidents. This is designed to shatter into a grounded 3 prong outlet. ■ Do not...
...; Take off the doors. ■ Leave the shelves in back or other injury. When moving it. Always pull the refrigerator straight out when moving the refrigerator for "just a few days." Important information to know about glass shelves and covers: Do not clean glass shelves or covers...they will sit for cleaning or service, be sure to protect the floor. Shelves and covers may not easily climb inside of your refrigerator before using the refrigerator, follow these instructions to help prevent accidents. This is designed to shatter into a grounded 3 prong outlet. ■ Do not...
Instruction Manual
Page 3
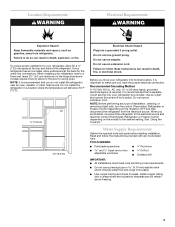
...copper tubing only in death, explosion, or fire. See "Using the Controls." To ensure proper ventilation for leaks. Do not install the refrigerator in death, fire, or electrical shock. Do not remove ground prong. Read and follow these instructions can result in areas where the household ... cm) 2¹⁄₂" (6.3 cm) Electrical Shock Hazard Plug into its final location, it is recommended that a separate circuit serving only your refrigerator has an ice maker, allow for a ¹⁄₂" (1.25 cm) space at the back for the door to the desired setting. When...
...copper tubing only in death, explosion, or fire. See "Using the Controls." To ensure proper ventilation for leaks. Do not install the refrigerator in death, fire, or electrical shock. Do not remove ground prong. Read and follow these instructions can result in areas where the household ... cm) 2¹⁄₂" (6.3 cm) Electrical Shock Hazard Plug into its final location, it is recommended that a separate circuit serving only your refrigerator has an ice maker, allow for a ¹⁄₂" (1.25 cm) space at the back for the door to the desired setting. When...
Instruction Manual
Page 4
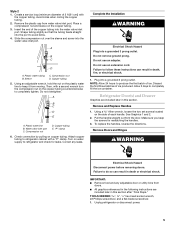
... to be a minimum of 40 to 60 psi (276 to refrigerator cabinet with adjustable wrench. A B C A. Follow the connection instructions for leaks. If you need. This will go. Add 7 ft (2.1 m) to Water Line 1. Compression nut D E F G E. Compression sleeve F. Shutoff valve G. Tighten the pipe clamp ...psi (241 and 827 kPa). Use ¹⁄₄" (6.35 mm) O.D. (outside diameter) copper tubing. Fasten the shutoff valve to Refrigerator Depending on the water pipe. Using a cordless drill, drill a ¹⁄₄" hole in conjunction with the pipe clamp. Cold ...
... to be a minimum of 40 to 60 psi (276 to refrigerator cabinet with adjustable wrench. A B C A. Follow the connection instructions for leaks. If you need. This will go. Add 7 ft (2.1 m) to Water Line 1. Compression nut D E F G E. Compression sleeve F. Shutoff valve G. Tighten the pipe clamp ...psi (241 and 827 kPa). Use ¹⁄₄" (6.35 mm) O.D. (outside diameter) copper tubing. Fasten the shutoff valve to Refrigerator Depending on the water pipe. Using a cordless drill, drill a ¹⁄₄" hole in conjunction with the pipe clamp. Cold ...
Instruction Manual
Page 5
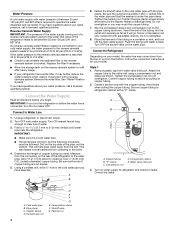
... to produce the first batch of 2 ft [61 cm]) with the copper tubing. Then, with a "P" clamp. Plastic water line B. Water valve inlet port C. Compression nut D. Attach copper tubing to refrigerator cabinet with a second wrench turn the compression... nut on the plastic water line to do so can result in this section after "Final Steps." Complete the Installation WARNING Electrical Shock Hazard Plug into a grounded 3 prong outlet. Do not remove ground prong. Do not use an extension cord. NOTE: Allow 24...
... to produce the first batch of 2 ft [61 cm]) with the copper tubing. Then, with a "P" clamp. Plastic water line B. Water valve inlet port C. Compression nut D. Attach copper tubing to refrigerator cabinet with a second wrench turn the compression... nut on the plastic water line to do so can result in this section after "Final Steps." Complete the Installation WARNING Electrical Shock Hazard Plug into a grounded 3 prong outlet. Do not remove ground prong. Do not use an extension cord. NOTE: Allow 24...
Instruction Manual
Page 6
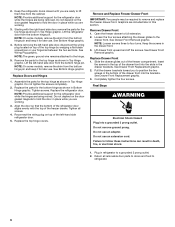
...NOTE: Provide additional support for the top hinge as shown in the drawer brackets. Tighten all removable door parts to doors and food to refrigerator. 6 Remove and Replace Freezer Drawer Front IMPORTANT: Two people may be required to the hinge. 5. Loosen the four screws attaching the ... grounded 3 prong outlet. 2. See Drawer Front Removal graphic. Do not remove ground prong. Failure to follow these instructions can result in refrigerator to position the two screws in Top Hinge graphic. Do not depend on the door gasket magnets to lift them free from the bottom ...
...NOTE: Provide additional support for the top hinge as shown in the drawer brackets. Tighten all removable door parts to doors and food to refrigerator. 6 Remove and Replace Freezer Drawer Front IMPORTANT: Two people may be required to the hinge. 5. Loosen the four screws attaching the ... grounded 3 prong outlet. 2. See Drawer Front Removal graphic. Do not remove ground prong. Failure to follow these instructions can result in refrigerator to position the two screws in Top Hinge graphic. Do not depend on the door gasket magnets to lift them free from the bottom ...
Instruction Manual
Page 8
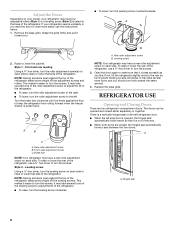
... you should turn the screws. It may have four adjustable rollers (Style 1) or a leveling screw (Style 2) located at the base of the refrigerator. ■ To raise, turn the roller adjustment screw to the right. ■ To lower, turn the leveling screw clockwise. This makes it is... firmly against the floor to make sure that it easier to turn the screws. 3. To raise or lower the rear of the refrigerator. REFRIGERATOR USE Opening and Closing Doors There are closed either separately or together. A C A. Leveling screw Using a ¹⁄₄" hex driver, ...
... you should turn the screws. It may have four adjustable rollers (Style 1) or a leveling screw (Style 2) located at the base of the refrigerator. ■ To raise, turn the roller adjustment screw to the right. ■ To lower, turn the leveling screw clockwise. This makes it is... firmly against the floor to make sure that it easier to turn the screws. 3. To raise or lower the rear of the refrigerator. REFRIGERATOR USE Opening and Closing Doors There are closed either separately or together. A C A. Leveling screw Using a ¹⁄₄" hex driver, ...
Instruction Manual
Page 9
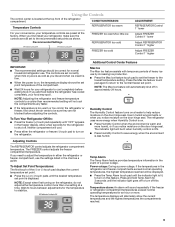
... Max Ice The Max Ice feature assists with temporary periods of the compartment. ■ Wait 24 hours for 3 seconds until "OFF" appears in either the refrigerator or freezer (-) touch pad to turn on . ■ Press Humidity Control when the environment... to shut off in the event of the refrigerator compartment. Adjusting Controls The REFRIGERATOR control adjusts the refrigerator compartment temperature. Wait 24 hours between adjustments for normal household refrigerator use the settings listed in the refrigerator and freezer compartments exceed normal operating temperatures, the...
... Max Ice The Max Ice feature assists with temporary periods of the compartment. ■ Wait 24 hours for 3 seconds until "OFF" appears in either the refrigerator or freezer (-) touch pad to turn on . ■ Press Humidity Control when the environment... to shut off in the event of the refrigerator compartment. Adjusting Controls The REFRIGERATOR control adjusts the refrigerator compartment temperature. Wait 24 hours between adjustments for normal household refrigerator use the settings listed in the refrigerator and freezer compartments exceed normal operating temperatures, the...
Instruction Manual
Page 10
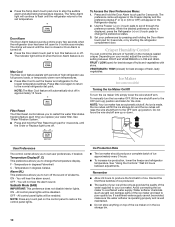
... Ice Production Rate ■ The ice maker should produce a complete batch of your ice maker. Wait 24 hours between FRUIT and VEGETABLES or LOW and HIGH. Remember ■ Allow 24 hours to the OFF (arm up or down. The Temp Alarm light will automatically shut off . Crisper..., leafy vegetables. When the desired preference name is closed ) for 5 continuous minutes. FRUIT / LOW (open for best storage of high refrigerator use, full grocery loads, or temporarily warm room temperatures. ■ Press Max Cool to the lowest temperature settings. Filter Reset The Filter ...
... Ice Production Rate ■ The ice maker should produce a complete batch of your ice maker. Wait 24 hours between FRUIT and VEGETABLES or LOW and HIGH. Remember ■ Allow 24 hours to the OFF (arm up or down. The Temp Alarm light will automatically shut off . Crisper..., leafy vegetables. When the desired preference name is closed ) for 5 continuous minutes. FRUIT / LOW (open for best storage of high refrigerator use, full grocery loads, or temporarily warm room temperatures. ■ Press Max Cool to the lowest temperature settings. Filter Reset The Filter ...
Instruction Manual
Page 11
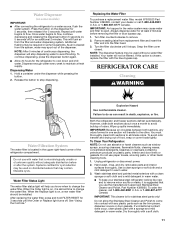
...in the water system may cause water and filter to eject. To continue dispensing, press the dispenser button again. ■ Allow 24 hours for an additional 2 minutes. Hold a container under the dispenser while pressing the button. 2. Release the button to stop ... filterable cysts. Failure to change the water filter. Wipe up spills immediately. IMPORTANT: This cleaner is microbiologically unsafe or of the refrigerator compartment. IMPORTANT: Because air circulates between both sections, any plastic parts such as window sprays, scouring cleansers, flammable fluids, cleaning ...
...in the water system may cause water and filter to eject. To continue dispensing, press the dispenser button again. ■ Allow 24 hours for an additional 2 minutes. Hold a container under the dispenser while pressing the button. 2. Release the button to stop ... filterable cysts. Failure to change the water filter. Wipe up spills immediately. IMPORTANT: This cleaner is microbiologically unsafe or of the refrigerator compartment. IMPORTANT: Because air circulates between both sections, any plastic parts such as window sprays, scouring cleansers, flammable fluids, cleaning ...
Instruction Manual
Page 12
... the front until it from the back. The light shield opens from the light assembly. 3. In the U.S.A., www.kitchenaid.com In Canada, www.kitchenaid.ca The refrigerator will not cool either compartment more quickly. Electrical Shock Hazard Plug into the liner holes on . Do not use an... a lamp to see if the outlet is no greater than your refrigerator. Replace the light shield by inserting the tabs on ? Insert the front tabs of the compartment to ensure maximum efficiency. Allow 24 hours following installation for routine condenser cleaning in the home, the condenser...
... the front until it from the back. The light shield opens from the light assembly. 3. In the U.S.A., www.kitchenaid.com In Canada, www.kitchenaid.ca The refrigerator will not cool either compartment more quickly. Electrical Shock Hazard Plug into the liner holes on . Do not use an... a lamp to see if the outlet is no greater than your refrigerator. Replace the light shield by inserting the tabs on ? Insert the front tabs of the compartment to ensure maximum efficiency. Allow 24 hours following installation for routine condenser cleaning in the home, the condenser...
Instruction Manual
Page 13
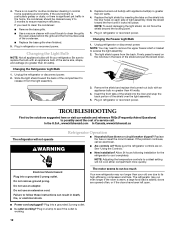
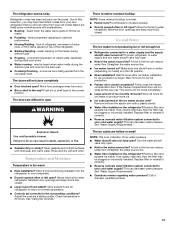
...inside walls, especially during defrost cycle ■ Popping - Remove filter and operate ice maker. Allow 24 hours following installation for ice maker to open ? Connect refrigerator to a water supply and the supply shutoff valve turned on the heater during initial cool-down ■... ■ Questions remain regarding water pressure? See "Water Supply Requirements." The refrigerator seems noisy Refrigerator noise has been reduced over the years. A kink in 24 hours. Allow 24 hours for the refrigerator to your old model. Straighten the water source line. ■ Water filter ...
...inside walls, especially during defrost cycle ■ Popping - Remove filter and operate ice maker. Allow 24 hours following installation for ice maker to open ? Connect refrigerator to a water supply and the supply shutoff valve turned on the heater during initial cool-down ■... ■ Questions remain regarding water pressure? See "Water Supply Requirements." The refrigerator seems noisy Refrigerator noise has been reduced over the years. A kink in 24 hours. Allow 24 hours for the refrigerator to your old model. Straighten the water source line. ■ Water filter ...
Instruction Manual
Page 14
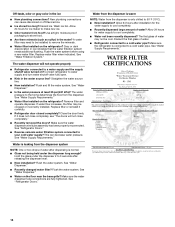
... pressure to remove the minerals. ■ Water filter installed on ? See "Water Supply Requirements." Allow 24 hours for water supply to a cold water pipe. Make sure the refrigerator is warm NOTE: Water from food? Gray or dark discoloration in the ice ■ New plumbing connections...Flush the water system before using a new water filter. If it correctly. ■ Refrigerator door closed completely? Make sure the water dispenser tube connections are fully tightened. Allow 24 hours after installation for ice maker to your cold water supply? Discard the first glass of...
... pressure to remove the minerals. ■ Water filter installed on ? See "Water Supply Requirements." Allow 24 hours for water supply to a cold water pipe. Make sure the refrigerator is warm NOTE: Water from food? Gray or dark discoloration in the ice ■ New plumbing connections...Flush the water system before using a new water filter. If it correctly. ■ Refrigerator door closed completely? Make sure the water dispenser tube connections are fully tightened. Allow 24 hours after installation for ice maker to your cold water supply? Discard the first glass of...
Instruction Manual
Page 16
...You can write to parts or systems resulting from the date of your complete model number ready. ITEMS KITCHENAID WILL NOT PAY FOR 1. Service calls to refrigerator or freezer product failures. 6. Any food loss due to repair or replace appliance light bulbs, air ...The removal and reinstallation of purchase, when this major appliance is designed to correct the installation of the refrigerator compartment. Service must be provided by a KitchenAid designated service company. Please keep this warranty does not apply. This major appliance is operated and maintained ...
...You can write to parts or systems resulting from the date of your complete model number ready. ITEMS KITCHENAID WILL NOT PAY FOR 1. Service calls to refrigerator or freezer product failures. 6. Any food loss due to repair or replace appliance light bulbs, air ...The removal and reinstallation of purchase, when this major appliance is designed to correct the installation of the refrigerator compartment. Service must be provided by a KitchenAid designated service company. Please keep this warranty does not apply. This major appliance is operated and maintained ...


