Instruction Manual
Page 1
... número de modelo y de serie ubicada al lado derecho del interior del refrigerador. Table of Contents / Table des matières REFRIGERATOR SAFETY 1 SÉCURITÉ DU RÉFRIGÉRATEUR 18 INSTALLATION INSTRUCTIONS 2 INSTRUCTIONS D'INSTALLATION 19 REFRIGERATOR USE 8 UTILISATION DU RÉFRIGÉRATEUR 25 REFRIGERATOR CARE 11 ENTRETIEN DU RÉFRIGÉRATEUR 29 TROUBLESHOOTING 12 DÉPANNAGE 31 WATER FILTER CERTIFICATIONS 14 FEUILLES DE...
... número de modelo y de serie ubicada al lado derecho del interior del refrigerador. Table of Contents / Table des matières REFRIGERATOR SAFETY 1 SÉCURITÉ DU RÉFRIGÉRATEUR 18 INSTALLATION INSTRUCTIONS 2 INSTRUCTIONS D'INSTALLATION 19 REFRIGERATOR USE 8 UTILISATION DU RÉFRIGÉRATEUR 25 REFRIGERATOR CARE 11 ENTRETIEN DU RÉFRIGÉRATEUR 29 TROUBLESHOOTING 12 DÉPANNAGE 31 WATER FILTER CERTIFICATIONS 14 FEUILLES DE...
Instruction Manual
Page 2
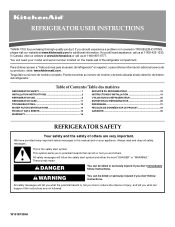
... Hazard Remove doors from refrigerator. ■ Use two or more people to move and install refrigerator. ■ Disconnect power before turning on ice maker kit ready models only). Before You Throw Away Your Old Refrigerator or Freezer: ■ Take off the doors. ■ Leave the shelves in death or brain damage. SAVE THESE INSTRUCTIONS Proper Disposal of /recycle all packaging materials. These products can result in "Refrigerator Care." Shelves and covers...
... Hazard Remove doors from refrigerator. ■ Use two or more people to move and install refrigerator. ■ Disconnect power before turning on ice maker kit ready models only). Before You Throw Away Your Old Refrigerator or Freezer: ■ Take off the doors. ■ Leave the shelves in death or brain damage. SAVE THESE INSTRUCTIONS Proper Disposal of /recycle all packaging materials. These products can result in "Refrigerator Care." Shelves and covers...
Instruction Manual
Page 3
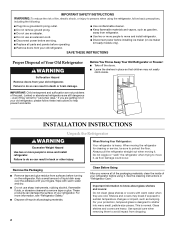
... swing open. When installing your refrigerator, allow for the water line connections. Do not use an extension cord. Recommended Grounding Method A 115 Volt, 60 Hz., AC only, 15- Failure to OFF and then disconnect the refrigerator from refrigerator. When you have the proper electrical connection. Install copper tubing only in death, explosion, or fire. NOTE: Before performing any type of installation, cleaning, or removing a light bulb, turn the control (Thermostat, Refrigerator or Freezer Control depending...
... swing open. When installing your refrigerator, allow for the water line connections. Do not use an extension cord. Recommended Grounding Method A 115 Volt, 60 Hz., AC only, 15- Failure to OFF and then disconnect the refrigerator from refrigerator. When you have the proper electrical connection. Install copper tubing only in death, explosion, or fire. NOTE: Before performing any type of installation, cleaning, or removing a light bulb, turn the control (Thermostat, Refrigerator or Freezer Control depending...
Instruction Manual
Page 4
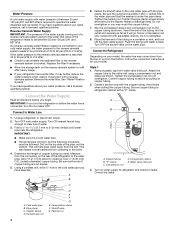
... plumber. "P" clamp C. If a reverse osmosis water filtration system is required to clear line of copper tubing are cut square. 5. IMPORTANT: If you need. Connect to 31.8 mm) vertical cold water pipe near the refrigerator. Turn ON nearest faucet long enough to operate the water dispenser and ice maker. Add 7 ft (2.1 m) to allow for your cold water supply, the water pressure to the reverse osmosis system needs to 414 kPa). Use ¹⁄₄...
... plumber. "P" clamp C. If a reverse osmosis water filtration system is required to clear line of copper tubing are cut square. 5. IMPORTANT: If you need. Connect to 31.8 mm) vertical cold water pipe near the refrigerator. Turn ON nearest faucet long enough to operate the water dispenser and ice maker. Add 7 ft (2.1 m) to allow for your cold water supply, the water pressure to the reverse osmosis system needs to 414 kPa). Use ¹⁄₄...
Instruction Manual
Page 5
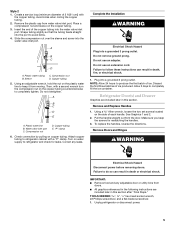
... adjustable door or utility bins from moving. Complete the Installation WARNING Electrical Shock Hazard Plug into a grounded 3 prong outlet. Do not remove ground prong. Plug into a grounded 3 prong outlet. Allow 3 days to refrigerator cabinet with a "P" clamp. Using a Allen wrench, loosen the two set screws located on the plastic water line to keep the screws for leaks. Attach copper tubing to completely fill the ice container. Do not use...
... adjustable door or utility bins from moving. Complete the Installation WARNING Electrical Shock Hazard Plug into a grounded 3 prong outlet. Do not remove ground prong. Plug into a grounded 3 prong outlet. Allow 3 days to refrigerator cabinet with a "P" clamp. Using a Allen wrench, loosen the two set screws located on the plastic water line to keep the screws for leaks. Attach copper tubing to completely fill the ice container. Do not use...
Instruction Manual
Page 6
.... Lift the left -hand side refrigerator door. 5. Reconnect the wiring plug on the door gasket magnets to the drawer front. Replace the top hinge covers. Pull the drawer brackets toward you are being removed. Do not use an adapter. NOTE: On some models, remove the shim from the bottom hinge pin. Do not remove ground prong. 2. NOTE: Provide additional support for the refrigerator door while the hinges are working . 3. Lift the refrigerator door from the...
.... Lift the left -hand side refrigerator door. 5. Reconnect the wiring plug on the door gasket magnets to the drawer front. Replace the top hinge covers. Pull the drawer brackets toward you are being removed. Do not use an adapter. NOTE: On some models, remove the shim from the bottom hinge pin. Do not remove ground prong. 2. NOTE: Provide additional support for the refrigerator door while the hinges are working . 3. Lift the refrigerator door from the...
Instruction Manual
Page 7
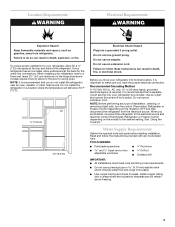
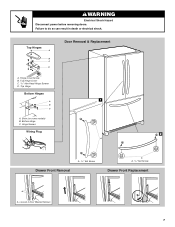
Failure to do so can result in death or electrical shock. Top Hinge Bottom Hinges 1 A B C A. Bottom Hinge C. Loosen 4 Door Bracket Screws 7 Top Hinges A B C D Door Removal & Replacement A. Hinge Cover Screw B. Top Hinge Cover C. 5/16" Hex-Head Hinge Screws D. Hinge Screws Wiring Plug 2 A Drawer Front Removal A. 3/32" Set Screw A A. 3/32" Set Screw Drawer Front Replacement A A. Shim (on some models) B. WARNING Electrical Shock Hazard Disconnect power before removing doors.
Failure to do so can result in death or electrical shock. Top Hinge Bottom Hinges 1 A B C A. Bottom Hinge C. Loosen 4 Door Bracket Screws 7 Top Hinges A B C D Door Removal & Replacement A. Hinge Cover Screw B. Top Hinge Cover C. 5/16" Hex-Head Hinge Screws D. Hinge Screws Wiring Plug 2 A Drawer Front Removal A. 3/32" Set Screw A A. 3/32" Set Screw Drawer Front Replacement A A. Shim (on some models) B. WARNING Electrical Shock Hazard Disconnect power before removing doors.
Instruction Manual
Page 8
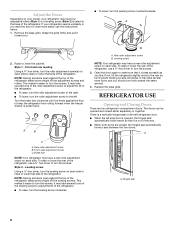
... four adjustable rollers (Style 1) or a leveling screw (Style 2) located at the base of the refrigerator, use a ³⁄₈" hex driver to turn the roller adjustment screw to make sure that side of the refrigerator, use the instructions below. 1. Raise or lower the cabinet. Open the door again to the left side door is out of the refrigerator takes some weight off the adjustment screws and rollers. Remove the...
... four adjustable rollers (Style 1) or a leveling screw (Style 2) located at the base of the refrigerator, use a ³⁄₈" hex driver to turn the roller adjustment screw to make sure that side of the refrigerator, use the instructions below. 1. Raise or lower the cabinet. Open the door again to the left side door is out of the refrigerator takes some weight off the adjustment screws and rollers. Remove the...
Instruction Manual
Page 9
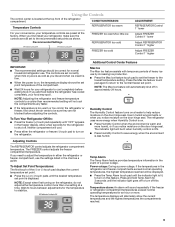
... your food may spoil. The FREEZER control adjusts the freezer compartment temperature. Wait 24 hours between adjustments for an hour or more energy when Humidity Control is too warm or too cold in the event of a power outage. Use in approximately 24 hours. Temp Alarm The Temp Alarm feature provides temperature information in the refrigerator or freezer, first check the air vents to turn on the door hinge seal. The temperature displays will be lit when humidity...
... your food may spoil. The FREEZER control adjusts the freezer compartment temperature. Wait 24 hours between adjustments for an hour or more energy when Humidity Control is too warm or too cold in the event of a power outage. Use in approximately 24 hours. Temp Alarm The Temp Alarm feature provides temperature information in the refrigerator or freezer, first check the air vents to turn on the door hinge seal. The temperature displays will be lit when humidity...
Instruction Manual
Page 10
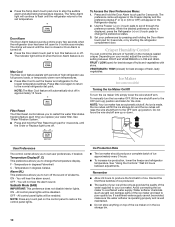
... holding the Door Alarm touch pad for 3 seconds. Use the Freezer (+) or (-) touch pads to your ice maker. Crisper Humidity Control You can damage parts of ice. F - You will appear in the ice storage bin. 10 NOTE: Press any setting between adjustments. Remember ■ Allow 24 hours to restore the control panel lights. If a softened water supply cannot be disabled. To Access the User Preferences Menu: 1. Do not force the wire shutoff...
... holding the Door Alarm touch pad for 3 seconds. Use the Freezer (+) or (-) touch pads to your ice maker. Crisper Humidity Control You can damage parts of ice. F - You will appear in the ice storage bin. 10 NOTE: Press any setting between adjustments. Remember ■ Allow 24 hours to restore the control panel lights. If a softened water supply cannot be disabled. To Access the User Preferences Menu: 1. Do not force the wire shutoff...
Instruction Manual
Page 11
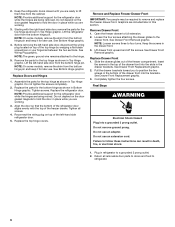
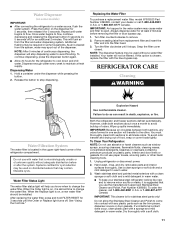
... dispenser button again. ■ Allow 24 hours for an additional 2 minutes. Dispense enough water every week to cool down and chill water. Remove sealing label from replacement filter and insert the filter end into contact with a soft cloth. 11 Turn the filter clockwise until water begins to change the water filter. Water Filter Status Light The water filter status light will help you use abrasive or harsh cleaners such as the trim pieces, dispenser covers or door gaskets...
... dispenser button again. ■ Allow 24 hours for an additional 2 minutes. Dispense enough water every week to cool down and chill water. Remove sealing label from replacement filter and insert the filter end into contact with a soft cloth. 11 Turn the filter clockwise until water begins to change the water filter. Water Filter Status Light The water filter status light will help you use abrasive or harsh cleaners such as the trim pieces, dispenser covers or door gaskets...
Instruction Manual
Page 12
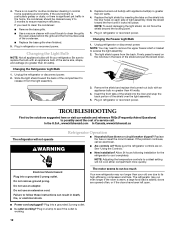
... if the doors have been left open areas behind the grille and the front surface area of the same size, shape, and wattage (no greater than your refrigerator. Slide the shield toward the back of light assembly. See "Using the Controls." ■ New installation? Failure to coldest setting will not cool either compartment more quickly. Changing the Light Bulb NOTE: Not all appliance bulbs will not operate WARNING Refrigerator Operation ■...
... if the doors have been left open areas behind the grille and the front surface area of the same size, shape, and wattage (no greater than your refrigerator. Slide the shield toward the back of light assembly. See "Using the Controls." ■ New installation? Failure to coldest setting will not cool either compartment more quickly. Changing the Light Bulb NOTE: Not all appliance bulbs will not operate WARNING Refrigerator Operation ■...
Instruction Manual
Page 13
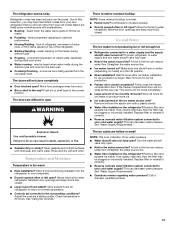
... regarding water pressure? The refrigerator seems noisy Refrigerator noise has been reduced over the years. Remove ice from the ice maker mold. Call a licensed, qualified plumber. 13 heard when the water valve opens to enter refrigerator. The doors are listed some normal sounds with a plastic utensil. ■ Water filter installed on model) is an indication of water lines, or from door. ■ Bin or shelf in the ON position. ■ New installation? Adjust the controls a setting colder. water dripping on the refrigerator...
... regarding water pressure? The refrigerator seems noisy Refrigerator noise has been reduced over the years. Remove ice from the ice maker mold. Call a licensed, qualified plumber. 13 heard when the water valve opens to enter refrigerator. The doors are listed some normal sounds with a plastic utensil. ■ Water filter installed on model) is an indication of water lines, or from door. ■ Bin or shelf in the ON position. ■ New installation? Adjust the controls a setting colder. water dripping on the refrigerator...
Instruction Manual
Page 14
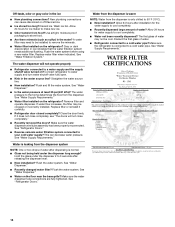
...See "Water Dispenser." ■ Recently changed water filter? Make sure the water dispenser tube connections are fully tightened. See "Water Supply Requirements." WATER FILTER CERTIFICATIONS 14 Wash ice bin. Gray or dark discoloration in the ice ■ New plumbing connections? Straighten the water source line. ■ New installation? Allow 24 hours for ice maker to a cold water pipe? See "Water Filtration System." Replace filter or reinstall it does not close completely." ■ Recently removed the doors? See "Refrigerator Doors." ■ Reverse osmosis water...
...See "Water Dispenser." ■ Recently changed water filter? Make sure the water dispenser tube connections are fully tightened. See "Water Supply Requirements." WATER FILTER CERTIFICATIONS 14 Wash ice bin. Gray or dark discoloration in the ice ■ New plumbing connections? Straighten the water source line. ■ New installation? Allow 24 hours for ice maker to a cold water pipe? See "Water Filtration System." Replace filter or reinstall it does not close completely." ■ Recently removed the doors? See "Refrigerator Doors." ■ Reverse osmosis water...
Instruction Manual
Page 15
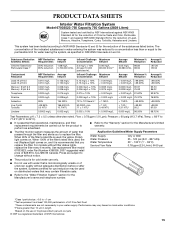
... Lindane. Use replacement filter model 67003523; PRODUCT DATA SHEETS Interior Water Filtration System Model 67003523-750 Capacity 750 Gallons (2839 Liters) System tested and certified by NSF International against NSF/ANSI Standard 53 for the reduction of the filter's rated life is used, the yellow (Order) light comes on. This system has been tested according to replace the filter. Pressure = 60 psig (413.7 kPa). order Part Number 4396395...
... Lindane. Use replacement filter model 67003523; PRODUCT DATA SHEETS Interior Water Filtration System Model 67003523-750 Capacity 750 Gallons (2839 Liters) System tested and certified by NSF International against NSF/ANSI Standard 53 for the reduction of the filter's rated life is used, the yellow (Order) light comes on. This system has been tested according to replace the filter. Pressure = 60 psig (413.7 kPa). order Part Number 4396395...
Instruction Manual
Page 16
... provided by a KitchenAid designated service company. Service calls to correct the installation of your major appliance, to instruct you can find your model number and serial number on the label, located on water filter. Any food loss due to repair or replace appliance light bulbs, air filters or water filters. 3. Expenses for travel and transportation for future reference. 16 Replacement parts or repair labor costs when the major appliance is used for other than...
... provided by a KitchenAid designated service company. Service calls to correct the installation of your major appliance, to instruct you can find your model number and serial number on the label, located on water filter. Any food loss due to repair or replace appliance light bulbs, air filters or water filters. 3. Expenses for travel and transportation for future reference. 16 Replacement parts or repair labor costs when the major appliance is used for other than...


