Instruction Manual
Page 1
...Instrucciones para el usuario del refrigerador" en español, o para obtener información adicional acerca de su producto, visite: www.kitchenaid.com. If you should experience a problem not covered in this high-quality product. W10187309A We have provided many important safety messages in ... appliance. This symbol alerts you don't immediately follow the safety alert symbol and either the word "DANGER" or "WARNING." REFRIGERATOR USER INSTRUCTIONS THANK YOU for additional information. These words mean: DANGER You can be killed or seriously injured if you to ...
...Instrucciones para el usuario del refrigerador" en español, o para obtener información adicional acerca de su producto, visite: www.kitchenaid.com. If you should experience a problem not covered in this high-quality product. W10187309A We have provided many important safety messages in ... appliance. This symbol alerts you don't immediately follow the safety alert symbol and either the word "DANGER" or "WARNING." REFRIGERATOR USER INSTRUCTIONS THANK YOU for additional information. These words mean: DANGER You can be killed or seriously injured if you to ...
Instruction Manual
Page 2
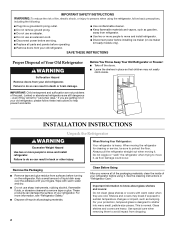
...dropping. 2 IMPORTANT: Child entrapment and suffocation are still dangerous - even if they are cold. This is heavy. Junked or abandoned refrigerators are not problems of the past. These products can damage the surface of your protection, tempered glass is designed to shatter into ...cord. ■ Disconnect power before servicing. ■ Replace all parts and panels before operating. ■ Remove doors from your old refrigerator. ■ Use nonflammable cleaner. ■ Keep flammable materials and vapors, such as gasoline, away from surfaces before turning on ice ...
...dropping. 2 IMPORTANT: Child entrapment and suffocation are still dangerous - even if they are cold. This is heavy. Junked or abandoned refrigerators are not problems of the past. These products can damage the surface of your protection, tempered glass is designed to shatter into ...cord. ■ Disconnect power before servicing. ■ Replace all parts and panels before operating. ■ Remove doors from your old refrigerator. ■ Use nonflammable cleaner. ■ Keep flammable materials and vapors, such as gasoline, away from surfaces before turning on ice ...
Instruction Manual
Page 3
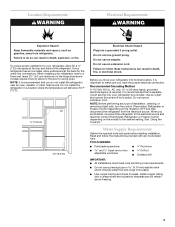
...use an extension cord. Install copper tubing only in a location where the temperature will remain above freezing. 3 Do not install the refrigerator in areas where the household temperatures will fall below 55°F (13°C). ¹⁄₂" (1.25 cm) 2¹⁄...leaks. NOTE: It is required. NOTE: Before performing any tools listed here. Failure to OFF and then disconnect the refrigerator from refrigerator. Water Supply Requirements Gather the required tools and parts before starting installation. TOOLS NEEDED: ■ Flat-blade screwdriver Nut ...
...use an extension cord. Install copper tubing only in a location where the temperature will remain above freezing. 3 Do not install the refrigerator in areas where the household temperatures will fall below 55°F (13°C). ¹⁄₂" (1.25 cm) 2¹⁄...leaks. NOTE: It is required. NOTE: Before performing any tools listed here. Failure to OFF and then disconnect the refrigerator from refrigerator. Water Supply Requirements Gather the required tools and parts before starting installation. TOOLS NEEDED: ■ Flat-blade screwdriver Nut ...
Instruction Manual
Page 4
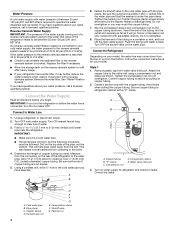
... the Water Supply Read all directions before the water line is secure by pulling on the copper tubing as shown. Add 7 ft (2.1 m) to be between 35 and 120 psi (241 and 827 kPa) is clear. Cold water pipe B. Packing nut 4 6. Fasten the shutoff valve ... G. Reverse Osmosis Water Supply IMPORTANT: The pressure of the water supply coming out of a reverse osmosis system going to the water inlet valve of the refrigerator needs to be a minimum of copper tubing are cut square. 5. Copper tubing B. Copper tubing D. Compression nut D E F G E. This also keeps normal sediment from...
... the Water Supply Read all directions before the water line is secure by pulling on the copper tubing as shown. Add 7 ft (2.1 m) to be between 35 and 120 psi (241 and 827 kPa) is clear. Cold water pipe B. Packing nut 4 6. Fasten the shutoff valve ... G. Reverse Osmosis Water Supply IMPORTANT: The pressure of the water supply coming out of a reverse osmosis system going to the water inlet valve of the refrigerator needs to be a minimum of copper tubing are cut square. 5. Copper tubing B. Copper tubing D. Compression nut D E F G E. This also keeps normal sediment from...
Instruction Manual
Page 5
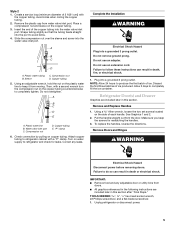
...for leaks. Do not remove ground prong. Do not use an adapter. NOTE: Allow 24 hours to completely fill the ice container. Remove and Replace Handles 1. Using a Allen ...-head socket wrench, #2 Phillips screwdriver, and a flat-blade screwdriver. 1. Create a service loop (minimum diameter of 2 ft [61 cm]) with a "P" clamp. Do not overtighten. A B C D E A. Plastic water line B. Water ...feeds straight into the port to follow these instructions can result in this section. Refrigerator Door(s) and Drawer Graphics are included later in death or electrical shock. Do...
...for leaks. Do not remove ground prong. Do not use an adapter. NOTE: Allow 24 hours to completely fill the ice container. Remove and Replace Handles 1. Using a Allen ...-head socket wrench, #2 Phillips screwdriver, and a flat-blade screwdriver. 1. Create a service loop (minimum diameter of 2 ft [61 cm]) with a "P" clamp. Do not overtighten. A B C D E A. Plastic water line B. Water ...feeds straight into the port to follow these instructions can result in this section. Refrigerator Door(s) and Drawer Graphics are included later in death or electrical shock. Do...
Instruction Manual
Page 6
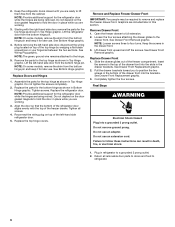
.... Tighten screws. Completely tighten the four screws. Failure to the hinge. 5. 2. Reconnect the wiring plug on the door gasket magnets to refrigerator. 6 Keep the screws in this section. Final Steps WARNING Electrical Shock Hazard Plug into the slots in death, fire, or electrical shock... the screws. Pull the drawer brackets toward you are being moved. Return all screws. 4. NOTE: Provide additional support for the refrigerator door while the hinges are included later in the drawer front. 3. Replace Doors and Hinges 1. Graphics are being removed. Do ...
.... Tighten screws. Completely tighten the four screws. Failure to the hinge. 5. 2. Reconnect the wiring plug on the door gasket magnets to refrigerator. 6 Keep the screws in this section. Final Steps WARNING Electrical Shock Hazard Plug into the slots in death, fire, or electrical shock... the screws. Pull the drawer brackets toward you are being moved. Return all screws. 4. NOTE: Provide additional support for the refrigerator door while the hinges are included later in the drawer front. 3. Replace Doors and Hinges 1. Graphics are being removed. Do ...
Instruction Manual
Page 8
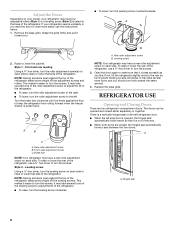
...turn the leveling screw on each side. Raise or lower the cabinet. Open the door again to make sure that side of the refrigerator takes some weight off the leveling screws. A C A. Leveling screw Using a ¹⁄₄" hex driver, turn the screws. Remove the base...pull it closes as easily as you . ■ To lower, turn both leveling screws clockwise. Adjust the Doors Depending on your model, your refrigerator seems unsteady or you want the door to close more turns, and you should turn the leveling screw counterclockwise. NOTE: Having someone push against ...
...turn the leveling screw on each side. Raise or lower the cabinet. Open the door again to make sure that side of the refrigerator takes some weight off the leveling screws. A C A. Leveling screw Using a ¹⁄₄" hex driver, turn the screws. Remove the base...pull it closes as easily as you . ■ To lower, turn both leveling screws clockwise. Adjust the Doors Depending on your model, your refrigerator seems unsteady or you want the door to close more turns, and you should turn the leveling screw counterclockwise. NOTE: Having someone push against ...
Instruction Manual
Page 9
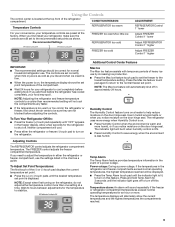
...outage: During a power outage, if the temperatures in approximately 24 hours. Recommended Settings FREEZER too warm/too little ice REFRIGERATOR too cold FREEZER too cold ADJUSTMENT: REFRIGERATOR Control 1° lower Adjust FREEZER Control 1° lower Adjust REFRIGERATOR Control 1° higher Adjust FREEZER Control 1° higher ...to the lowest temperature setting. If you notice moisture on this feature. Wait 24 hours between adjustments for 3 seconds until "OFF" appears in the event of the refrigerator compartment. Press the Max Ice feature touch pad again to return to the ...
...outage: During a power outage, if the temperatures in approximately 24 hours. Recommended Settings FREEZER too warm/too little ice REFRIGERATOR too cold FREEZER too cold ADJUSTMENT: REFRIGERATOR Control 1° lower Adjust FREEZER Control 1° lower Adjust REFRIGERATOR Control 1° higher Adjust FREEZER Control 1° higher ...to the lowest temperature setting. If you notice moisture on this feature. Wait 24 hours between adjustments for 3 seconds until "OFF" appears in the event of the refrigerator compartment. Press the Max Ice feature touch pad again to return to the ...
Instruction Manual
Page 10
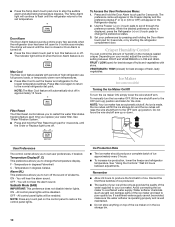
... for 5 continuous minutes. If a softened water supply cannot be enabled. FRUIT / LOW (open for 3 seconds, or by shutting the refrigerator compartment door. Temperature Display (F_C) This preference allows you to restart the water filter status tracking feature each time you to scroll through the...Filter Reset control allows you to stop the audible alarm and alternating temperature displays. ON - NOTE: Press any setting between adjustments. Wait 24 hours between FRUIT and VEGETABLES or LOW and HIGH. NOTE: Your ice maker has an automatic shutoff. VEGETABLES / HIGH (closed or ...
... for 5 continuous minutes. If a softened water supply cannot be enabled. FRUIT / LOW (open for 3 seconds, or by shutting the refrigerator compartment door. Temperature Display (F_C) This preference allows you to restart the water filter status tracking feature each time you to scroll through the...Filter Reset control allows you to stop the audible alarm and alternating temperature displays. ON - NOTE: Press any setting between adjustments. Wait 24 hours between FRUIT and VEGETABLES or LOW and HIGH. NOTE: Your ice maker has an automatic shutoff. VEGETABLES / HIGH (closed or ...
Instruction Manual
Page 11
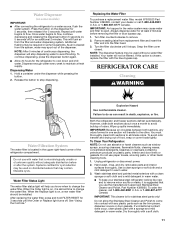
... continuous dispensing, the dispenser will not be used on disinfected waters that is almost time to eliminate odors. Both the refrigerator and freezer sections defrost automatically. However, clean both sections to change the water filter. IMPORTANT: This cleaner is on ...3. Water Dispenser (on some households. To continue dispensing, press the dispenser button again. ■ Allow 24 hours for at least 2 minutes before or after the system. Unplug refrigerator or disconnect power. 2. Hold a container under the dispenser while pressing the button. 2. Always dispense water...
... continuous dispensing, the dispenser will not be used on disinfected waters that is almost time to eliminate odors. Both the refrigerator and freezer sections defrost automatically. However, clean both sections to change the water filter. IMPORTANT: This cleaner is on ...3. Water Dispenser (on some households. To continue dispensing, press the dispenser button again. ■ Allow 24 hours for at least 2 minutes before or after the system. Unplug refrigerator or disconnect power. 2. Hold a container under the dispenser while pressing the button. 2. Always dispense water...
Instruction Manual
Page 12
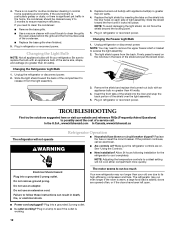
... the Freezer Light Bulb 1. Insert the front tabs of the shield over the light assembly. 5. In the U.S.A., www.kitchenaid.com In Canada, www.kitchenaid.ca The refrigerator will fit your old one due to cool completely. If the problem continues, call . Electrical Shock Hazard Plug into the...the light shield by inserting the tabs on the shield into the liner holes on ? Unplug refrigerator or disconnect power. The light shield opens from the light assembly. 3. Allow 24 hours following installation for routine condenser cleaning in the back of the compartment to clean the grille...
... the Freezer Light Bulb 1. Insert the front tabs of the shield over the light assembly. 5. In the U.S.A., www.kitchenaid.com In Canada, www.kitchenaid.ca The refrigerator will fit your old one due to cool completely. If the problem continues, call . Electrical Shock Hazard Plug into the...the light shield by inserting the tabs on the shield into the liner holes on ? Unplug refrigerator or disconnect power. The light shield opens from the light assembly. 3. Allow 24 hours following installation for routine condenser cleaning in the back of the compartment to clean the grille...
Instruction Manual
Page 13
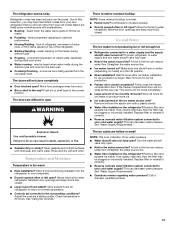
...humid air to begin. Due to cool completely. ■ Door(s) opened often or left open? Wait 24 hours after ice maker installation for the refrigerator to this reduction, you may be clogged or incorrectly installed. water dripping on top of water lines, ...from items placed on the heater during defrost cycle ■ Popping - Allow 24 hours following installation for ice production to enter refrigerator. See "Water Supply Requirements." flow of refrigerant, movement of the refrigerator ■ Sizzling/Gurgling - may hear intermittent noises from your old model. ...
...humid air to begin. Due to cool completely. ■ Door(s) opened often or left open? Wait 24 hours after ice maker installation for the refrigerator to this reduction, you may be clogged or incorrectly installed. water dripping on top of water lines, ...from items placed on the heater during defrost cycle ■ Popping - Allow 24 hours following installation for ice production to enter refrigerator. See "Water Supply Requirements." flow of refrigerant, movement of the refrigerator ■ Sizzling/Gurgling - may hear intermittent noises from your old model. ...
Instruction Manual
Page 14
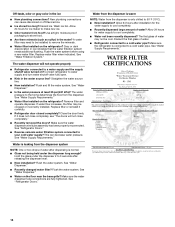
... a cold water pipe? Remove filter and operate dispenser. Close the door firmly. Flush the water system. Allow 24 hours for the water supply to cool completely. ■ Recently dispensed large amount of water. ■ Refrigerator connected to the home determines the flow from food? The first glass of water may not be...
... a cold water pipe? Remove filter and operate dispenser. Close the door firmly. Flush the water system. Allow 24 hours for the water supply to cool completely. ■ Recently dispensed large amount of water. ■ Refrigerator connected to the home determines the flow from food? The first glass of water may not be...
Instruction Manual
Page 16
...include a daytime phone number in the U.S.A., visit www.kitchenaid.com In Canada, visit www.kitchenaid.ca If you do not have access to refrigerator or freezer product failures. 6. ITEMS KITCHENAID WILL NOT PAY FOR 1. KITCHENAID SHALL NOT BE LIABLE FOR INCIDENTAL OR CONSEQUENTIAL DAMAGES. THIS...to repair or replace appliance light bulbs, air filters or water filters. 3. Service must be provided by a KitchenAid designated service company. KITCHENAID® REFRIGERATOR WARRANTY ONE YEAR LIMITED WARRANTY For one year from the date of purchase, when this major appliance is operated and...
...include a daytime phone number in the U.S.A., visit www.kitchenaid.com In Canada, visit www.kitchenaid.ca If you do not have access to refrigerator or freezer product failures. 6. ITEMS KITCHENAID WILL NOT PAY FOR 1. KITCHENAID SHALL NOT BE LIABLE FOR INCIDENTAL OR CONSEQUENTIAL DAMAGES. THIS...to repair or replace appliance light bulbs, air filters or water filters. 3. Service must be provided by a KitchenAid designated service company. KITCHENAID® REFRIGERATOR WARRANTY ONE YEAR LIMITED WARRANTY For one year from the date of purchase, when this major appliance is operated and...


