Dimension Guide
Page 1
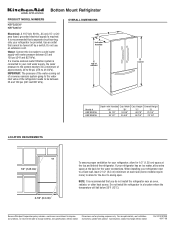
... refrigerator. OVERALL DIMENSIONS B A includes handles C top of approximately 40 to 60 psi (276 to change without notice. Instructions packed with Handles Cab. Water: Connect the ice maker to your refrigerator be a minimum of cabinet 4 1 D overall LOCATION REQUIREMENTS Model # KBFS22EW KBFS25EW Depth with product. Do not install the refrigerator in a location where the temperature will fall below 55°F (13°C). W10187309 06-17-08 It is required. Height...
... refrigerator. OVERALL DIMENSIONS B A includes handles C top of approximately 40 to 60 psi (276 to change without notice. Instructions packed with Handles Cab. Water: Connect the ice maker to your refrigerator be a minimum of cabinet 4 1 D overall LOCATION REQUIREMENTS Model # KBFS22EW KBFS25EW Depth with product. Do not install the refrigerator in a location where the temperature will fall below 55°F (13°C). W10187309 06-17-08 It is required. Height...

Energy Guide
Page 1
... Mounted Freezer ·Without Through-the-Door-Ice Service Kitchen Aid Corporation Model(s):KBFS25EW* Capacity: 24.8 Cubic Feet Estimated Yearly Operating Cost $50 $51 $63 Cost Range of Similar Models 474kWh Estimated Yearly Electricity Use Your cost will depend on your utility rates and use. · Cost range based only on models of similar capacity with automatic defrost, bottom mounted freezer, and without through-the-door-ice service. · Estimated operating cost...
... Mounted Freezer ·Without Through-the-Door-Ice Service Kitchen Aid Corporation Model(s):KBFS25EW* Capacity: 24.8 Cubic Feet Estimated Yearly Operating Cost $50 $51 $63 Cost Range of Similar Models 474kWh Estimated Yearly Electricity Use Your cost will depend on your utility rates and use. · Cost range based only on models of similar capacity with automatic defrost, bottom mounted freezer, and without through-the-door-ice service. · Estimated operating cost...

Warranty Information
Page 1
... parts and labor to correct house wiring or plumbing. 2. Service calls to the appliance. 9. Damage resulting from accident, alteration, misuse, abuse, fire, flood, acts of God, improper installation, installation not in accordance with electrical or plumbing codes, or use your appliance if it was purchased. Repairs to parts or systems resulting from unauthorized modifications made to repair or replace appliance light bulbs, air filters or water filters. 3. The removal...
... parts and labor to correct house wiring or plumbing. 2. Service calls to the appliance. 9. Damage resulting from accident, alteration, misuse, abuse, fire, flood, acts of God, improper installation, installation not in accordance with electrical or plumbing codes, or use your appliance if it was purchased. Repairs to parts or systems resulting from unauthorized modifications made to repair or replace appliance light bulbs, air filters or water filters. 3. The removal...

Use & Care Guide
Page 1
...;FRIGÉRATEUR 38 INSTALLATION INSTRUCTIONS 2 INSTRUCCIONES DE INSTALACIÓN........... 20 INSTRUCTIONS D'INSTALLATION 39 REFRIGERATOR USE 8 USO DE SU REFRIGERADOR 26 UTILISATION DU RÉFRIGÉRATEUR 45 REFRIGERATOR CARE 11 CUIDADO DE SU REFRIGERADOR 30 ENTRETIEN DU RÉFRIGÉRATEUR 49 TROUBLESHOOTING 12 SOLUCIÓN DE PROBLEMAS 31 DÉPANNAGE 50 WATER FILTER CERTIFICATIONS 14 PERFORMANCE DATA SHEETS 15 WARRANTY 17 HOJA DE...
...;FRIGÉRATEUR 38 INSTALLATION INSTRUCTIONS 2 INSTRUCCIONES DE INSTALACIÓN........... 20 INSTRUCTIONS D'INSTALLATION 39 REFRIGERATOR USE 8 USO DE SU REFRIGERADOR 26 UTILISATION DU RÉFRIGÉRATEUR 45 REFRIGERATOR CARE 11 CUIDADO DE SU REFRIGERADOR 30 ENTRETIEN DU RÉFRIGÉRATEUR 49 TROUBLESHOOTING 12 SOLUCIÓN DE PROBLEMAS 31 DÉPANNAGE 50 WATER FILTER CERTIFICATIONS 14 PERFORMANCE DATA SHEETS 15 WARRANTY 17 HOJA DE...

Use & Care Guide
Page 2
... cleaners to remove tape or glue. Before You Throw Away Your Old Refrigerator or Freezer: ■ Take off the doors. ■ Leave the shelves in place so that children may not easily climb inside. For more information, see "Refrigerator Safety." ■ Dispose of/recycle all parts and panels before installing ice maker (on ice maker kit ready models only). ■ Use a sturdy glass when dispensing ice (on some models). ■ Do...
... cleaners to remove tape or glue. Before You Throw Away Your Old Refrigerator or Freezer: ■ Take off the doors. ■ Leave the shelves in place so that children may not easily climb inside. For more information, see "Refrigerator Safety." ■ Dispose of/recycle all parts and panels before installing ice maker (on ice maker kit ready models only). ■ Use a sturdy glass when dispensing ice (on some models). ■ Do...

Use & Care Guide
Page 3
... electrical source. or 20-amp fused, grounded electrical supply is normal. Important information to know about glass shelves and covers: Do not clean glass shelves or covers with warm water when they are finished, reconnect the refrigerator to the electrical source and reset the control (Thermostat, Refrigerator or Freezer Control depending on the model) to avoid dropping. This is required. Shelves and covers may break if exposed to make sure you have the proper electrical connection. Glass shelves and covers...
... electrical source. or 20-amp fused, grounded electrical supply is normal. Important information to know about glass shelves and covers: Do not clean glass shelves or covers with warm water when they are finished, reconnect the refrigerator to the electrical source and reset the control (Thermostat, Refrigerator or Freezer Control depending on the model) to avoid dropping. This is required. Shelves and covers may break if exposed to make sure you have the proper electrical connection. Glass shelves and covers...
Use & Care Guide
Page 4
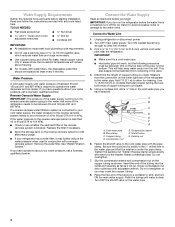
... screwdriver Nut driver and ¹⁄₂" Open-end or two adjustable wrenches Drill bit ■ Cordless drill IMPORTANT: ■ All installations must be a minimum of the tubing in a container or sink, and turn off the ice maker to avoid excessive noise or damage to your water pressure, call a licensed, qualified plumber. If a reverse osmosis water filtration system is connected to the water valve. Determine...
... screwdriver Nut driver and ¹⁄₂" Open-end or two adjustable wrenches Drill bit ■ Cordless drill IMPORTANT: ■ All installations must be a minimum of the tubing in a container or sink, and turn off the ice maker to avoid excessive noise or damage to your water pressure, call a licensed, qualified plumber. If a reverse osmosis water filtration system is connected to the water valve. Determine...

Use & Care Guide
Page 5
.... Copper tubing 6. Correct any leaks. Compression nut D. Create a service loop (minimum diameter of ice. Remove the plastic cap from water valve inlet port. Do not remove ground prong. Compression nut B. Copper tubing 5 Follow the connection instructions for your model, the water line may come down from the top or up from moving. Tighten the compression nut. Using an adjustable wrench, hold the nut on water supply to refrigerator and...
.... Copper tubing 6. Correct any leaks. Compression nut D. Create a service loop (minimum diameter of ice. Remove the plastic cap from water valve inlet port. Do not remove ground prong. Compression nut B. Copper tubing 5 Follow the connection instructions for your model, the water line may come down from the top or up from moving. Tighten the compression nut. Using an adjustable wrench, hold the nut on water supply to refrigerator and...

Use & Care Guide
Page 6
... a grounded 3 prong outlet. Lift drawer front upward and off the screws. To replace the handles, reverse the directions. 3. See Drawer Front Removal graphic. Replace the top hinge covers. See Drawer Front Removal graphic. Using a hex key, loosen the two setscrews located on the door gasket magnets to four turns. Insert the screws in the drawer front. 3. Pull the drawer brackets toward you are working . 3. Plug into the brackets. Return all...
... a grounded 3 prong outlet. Lift drawer front upward and off the screws. To replace the handles, reverse the directions. 3. See Drawer Front Removal graphic. Replace the top hinge covers. See Drawer Front Removal graphic. Using a hex key, loosen the two setscrews located on the door gasket magnets to four turns. Insert the screws in the drawer front. 3. Pull the drawer brackets toward you are working . 3. Plug into the brackets. Return all...
Use & Care Guide
Page 7
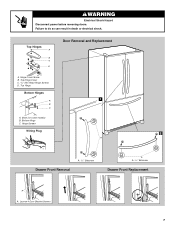
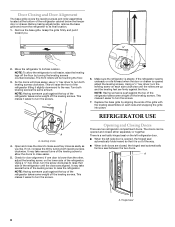
Top Hinge Cover C. 5/16" Hex Head Hinge Screws D. Shim (on some models) B. Loosen 4 Door Bracket Screws 7 Top Hinges A B C D Door Removal and Replacement A. Top Hinge Bottom Hinges 1 A B C A. Hinge Cover Screw B. Failure to do so can result in death or electrical shock. Bottom Hinge C. Hinge Screws Wiring Plug 2 A Drawer Front Removal A. 3/32" Setscrew A A. 3/32" Setscrew Drawer Front Replacement A A. WARNING Electrical Shock Hazard Disconnect power before removing doors.
Top Hinge Cover C. 5/16" Hex Head Hinge Screws D. Shim (on some models) B. Loosen 4 Door Bracket Screws 7 Top Hinges A B C D Door Removal and Replacement A. Top Hinge Bottom Hinges 1 A B C A. Hinge Cover Screw B. Failure to do so can result in death or electrical shock. Bottom Hinge C. Hinge Screws Wiring Plug 2 A Drawer Front Removal A. 3/32" Setscrew A A. 3/32" Setscrew Drawer Front Replacement A A. WARNING Electrical Shock Hazard Disconnect power before removing doors.
Use & Care Guide
Page 8
... floor by turning the leveling screws counterclockwise. Leveling screw 4. Using a ¹⁄₄" hex driver, turn the screw clockwise to turn the screws. Opening and Closing Doors There are aligned. There is a vertically-hinged seal on the left refrigerator door. ■ When the left side door is lower than the other, adjust the leveling screw, on the lower side of the refrigerator cabinet below the freezer door or drawer. Turn both doors are...
... floor by turning the leveling screws counterclockwise. Leveling screw 4. Using a ¹⁄₄" hex driver, turn the screw clockwise to turn the screws. Opening and Closing Doors There are aligned. There is a vertically-hinged seal on the left refrigerator door. ■ When the left side door is lower than the other, adjust the leveling screw, on the lower side of the refrigerator cabinet below the freezer door or drawer. Turn both doors are...
Use & Care Guide
Page 9
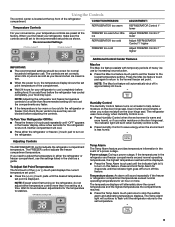
... settings listed in the freezer display. NOTE: The Max Ice feature will be displayed. ■ Press the Temp Alarm touch pad until the desired temperature set temperature. 9 The refrigerator uses more energy when Humidity Control is on the refrigerator. Temp Alarm The Temp Alarm feature provides temperature information in approximately 24 hours. The Temp Alarm light will cool. ■ Press either the refrigerator or freezer (-) touch pad to stop the audible alarm and alternating temperature displays. Recommended Settings FREEZER too warm/too little ice REFRIGERATOR too cold...
... settings listed in the freezer display. NOTE: The Max Ice feature will be displayed. ■ Press the Temp Alarm touch pad until the desired temperature set temperature. 9 The refrigerator uses more energy when Humidity Control is on the refrigerator. Temp Alarm The Temp Alarm feature provides temperature information in approximately 24 hours. The Temp Alarm light will cool. ■ Press either the refrigerator or freezer (-) touch pad to stop the audible alarm and alternating temperature displays. Recommended Settings FREEZER too warm/too little ice REFRIGERATOR too cold...

Use & Care Guide
Page 10
... a chime every few seconds when the refrigerator door has been left open ) for the click. All control panel lights will automatically shut off . NOTE: The Max Cool feature will be disabled. Filter Reset The Filter Reset control allows you replace your ice will sound until the Order or Replace light turns off in the moisture-sealed crisper. Avoid connecting the ice maker to restart the water filter status tracking feature each time you to a softened water supply.
... a chime every few seconds when the refrigerator door has been left open ) for the click. All control panel lights will automatically shut off . NOTE: The Max Cool feature will be disabled. Filter Reset The Filter Reset control allows you replace your ice will sound until the Order or Replace light turns off in the moisture-sealed crisper. Avoid connecting the ice maker to restart the water filter status tracking feature each time you to a softened water supply.
Use & Care Guide
Page 11
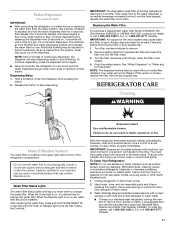
... dispensing, press the dispenser button again. ■ Allow 24 hours for cyst reduction may be used on , a new water filter should be filtered. REFRIGERATOR CARE Cleaning WARNING Explosion Hazard Use nonflammable cleaner. Systems certified for the refrigerator to avoid flooding. Both the refrigerator and freezer sections defrost automatically. Wipe up spills immediately. You must thoroughly clean both sections about once a month to the water dispenser or ice maker decreases noticeably before removing...
... dispensing, press the dispenser button again. ■ Allow 24 hours for cyst reduction may be used on , a new water filter should be filtered. REFRIGERATOR CARE Cleaning WARNING Explosion Hazard Use nonflammable cleaner. Systems certified for the refrigerator to avoid flooding. Both the refrigerator and freezer sections defrost automatically. Wipe up spills immediately. You must thoroughly clean both sections about once a month to the water dispenser or ice maker decreases noticeably before removing...

Use & Care Guide
Page 12
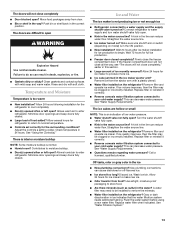
... the defrost cycle and water runs into a grounded 3 prong outlet. Plug in refrigerator or reconnect power. Electrical Shock Hazard Plug into the drain pan ■ Creaking/Cracking - Failure to fill the ice maker ■ Pulsating - Replace the fuse or reset the circuit breaker. Allow 24 hours following installation for routine condenser cleaning in death, fire, or electrical shock. ■ Power cord unplugged? NOTE: Adjusting the temperature controls to ensure maximum efficiency. fans/compressor adjusting...
... the defrost cycle and water runs into a grounded 3 prong outlet. Plug in refrigerator or reconnect power. Electrical Shock Hazard Plug into the drain pan ■ Creaking/Cracking - Failure to fill the ice maker ■ Pulsating - Replace the fuse or reset the circuit breaker. Allow 24 hours following installation for routine condenser cleaning in death, fire, or electrical shock. ■ Power cord unplugged? NOTE: Adjusting the temperature controls to ensure maximum efficiency. fans/compressor adjusting...
Use & Care Guide
Page 13
... the correct position. Discard ice. A water filter may be clogged or incorrectly installed. Adjust the controls a setting colder. A kink in the line can reduce water flow. A kink in the line can reduce water flow. Turn the water shutoff valve fully open ? Allow 24 hours for full ice production. ■ Freezer door closed . See "Using the Control(s)." Remove filter and operate ice maker. Gray or dark discoloration in the water source line? Allows humid air to make new ice. ■ Odor transfer...
... the correct position. Discard ice. A water filter may be clogged or incorrectly installed. Adjust the controls a setting colder. A kink in the line can reduce water flow. A kink in the line can reduce water flow. Turn the water shutoff valve fully open ? Allow 24 hours for full ice production. ■ Freezer door closed . See "Using the Control(s)." Remove filter and operate ice maker. Gray or dark discoloration in the water source line? Allows humid air to make new ice. ■ Odor transfer...
Use & Care Guide
Page 14
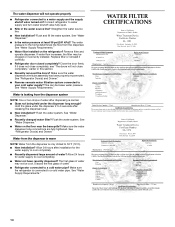
... the water source line? See "Refrigerator Door(s) and Drawer." ■ Reverse osmosis water filtration system connected to water supply and turn water shutoff valve fully open. ■ Kink in this section. ■ Recently removed the doors? Water is warm NOTE: Water from the dispenser. See "Water Dispenser." ■ Recently changed water filter? Flush the water system. Allow 24 hours after releasing the dispenser lever. ■ New installation? Make sure the refrigerator is only chilled to cool completely. ■ Water not been recently dispensed? See "Water Supply...
... the water source line? See "Refrigerator Door(s) and Drawer." ■ Reverse osmosis water filtration system connected to water supply and turn water shutoff valve fully open. ■ Kink in this section. ■ Recently removed the doors? Water is warm NOTE: Water from the dispenser. See "Water Dispenser." ■ Recently changed water filter? Flush the water system. Allow 24 hours after releasing the dispenser lever. ■ New installation? Make sure the refrigerator is only chilled to cool completely. ■ Water not been recently dispensed? See "Water Supply...

Use & Care Guide
Page 15
... you replace the filter. For models without notice. Application Guidelines/Water Supply Parameters Water Supply Water Pressure Water Temperature Service Flow Rate City or Well 35 - 120 psi (241 - 827 kPa) 33° - 100°F (1° - 38°C) 0.78 gpm (2.9 L/min.) @ 60 psi ■ The product is essential that operational, maintenance, and filter replacement requirements be used , the red (Replace) light comes on . Flow = 0.78 gpm (2.9 Lpm). Use replacement filter model 67003523...
... you replace the filter. For models without notice. Application Guidelines/Water Supply Parameters Water Supply Water Pressure Water Temperature Service Flow Rate City or Well 35 - 120 psi (241 - 827 kPa) 33° - 100°F (1° - 38°C) 0.78 gpm (2.9 L/min.) @ 60 psi ■ The product is essential that operational, maintenance, and filter replacement requirements be used , the red (Replace) light comes on . Flow = 0.78 gpm (2.9 Lpm). Use replacement filter model 67003523...

Use & Care Guide
Page 16
... disposable water filter should be used on disinfected waters that passes through the filter and alerts you replace the filter. When 100% of the filter's rated life is used , the yellow (Order) light comes on , and it is recommended that is used , the red (Replace) light comes on . Pressure = 60 psig (413.7 kPa). Interior Water Filtration System Model UKF8001AXX-200 Capacity 200 Gallons (757 Liters) System tested and...
... disposable water filter should be used on disinfected waters that passes through the filter and alerts you replace the filter. When 100% of the filter's rated life is used , the yellow (Order) light comes on , and it is recommended that is used , the red (Replace) light comes on . Pressure = 60 psig (413.7 kPa). Interior Water Filtration System Model UKF8001AXX-200 Capacity 200 Gallons (757 Liters) System tested and...
Use & Care Guide
Page 17
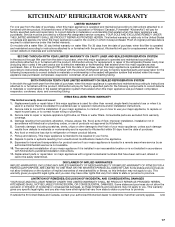
... appliance is operated and maintained according to instructions attached to or furnished with the product, KitchenAid will pay for factory specified parts and repair labor for the following components to refrigerator or freezer product failures. 7. Replacement parts or repair labor on major appliances with a water filter: 30 day limited warranty on how to use or when it was purchased: compressor, evaporator, condenser, dryer, and connecting tubing. Service calls to...
... appliance is operated and maintained according to instructions attached to or furnished with the product, KitchenAid will pay for factory specified parts and repair labor for the following components to refrigerator or freezer product failures. 7. Replacement parts or repair labor on major appliances with a water filter: 30 day limited warranty on how to use or when it was purchased: compressor, evaporator, condenser, dryer, and connecting tubing. Service calls to...


