Energy Guide
Page 1
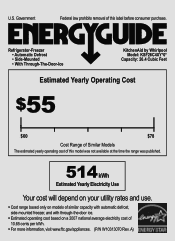
... ice. • Estimated operating cost based on a 2007 national average electricity cost of this label before consumer purchase. A) U.S. Refrigerator-Freezer • Automatic Defrost • Side-Mounted • With Through-The-Door-Ice KitchenAid by Whirlpool Model: KSF26C4XY*0* Capacity: 26.4 Cubic Feet Estimated Yearly Operating Cost $55 $60 $78 Cost Range of Similar...
... ice. • Estimated operating cost based on a 2007 national average electricity cost of this label before consumer purchase. A) U.S. Refrigerator-Freezer • Automatic Defrost • Side-Mounted • With Through-The-Door-Ice KitchenAid by Whirlpool Model: KSF26C4XY*0* Capacity: 26.4 Cubic Feet Estimated Yearly Operating Cost $55 $60 $78 Cost Range of Similar...
Dimension Guide
Page 1
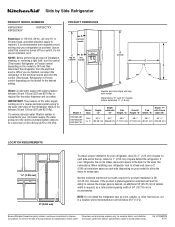
...16 cm) is required, so a total cabinet opening width of installation, cleaning, or removing a light bulb, turn the control (Thermostat, Refrigerator or Freezer control depending on the model) to change without notice. Normal minimum cabinet cut-out width required for planning purposes only. For ...control depending on the model) to be between 30 and 120 psi (207 and 827 kPa) is 36" (91.44 cm). If your refrigerator, allow the doors to change materials and specifications without notice. Instructions packed with Doors "B" Height "C" Height "D" Width "E" Open 90°...
...16 cm) is required, so a total cabinet opening width of installation, cleaning, or removing a light bulb, turn the control (Thermostat, Refrigerator or Freezer control depending on the model) to change without notice. Normal minimum cabinet cut-out width required for planning purposes only. For ...control depending on the model) to be between 30 and 120 psi (207 and 827 kPa) is 36" (91.44 cm). If your refrigerator, allow the doors to change materials and specifications without notice. Instructions packed with Doors "B" Height "C" Height "D" Width "E" Open 90°...
Use & Care Guide
Page 2
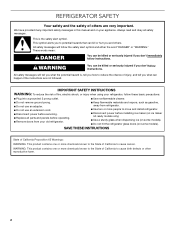
...9632; Replace all safety messages. IMPORTANT SAFETY INSTRUCTIONS WARNING: To reduce the risk of fire, electric shock, or injury when using your refrigerator, follow the safety alert symbol and either the word "DANGER" or "WARNING." SAVE THESE INSTRUCTIONS State of California Proposition 65 Warnings: ...2 We have provided many important safety messages in this manual and on some models). ■ Do not hit the refrigerator glass doors (on your old refrigerator. ■ Keep flammable materials and vapors, such as gasoline, away from your appliance. WARNING You can happen if ...
...9632; Replace all safety messages. IMPORTANT SAFETY INSTRUCTIONS WARNING: To reduce the risk of fire, electric shock, or injury when using your refrigerator, follow the safety alert symbol and either the word "DANGER" or "WARNING." SAVE THESE INSTRUCTIONS State of California Proposition 65 Warnings: ...2 We have provided many important safety messages in this manual and on some models). ■ Do not hit the refrigerator glass doors (on your old refrigerator. ■ Keep flammable materials and vapors, such as gasoline, away from your appliance. WARNING You can happen if ...
Use & Care Guide
Page 3
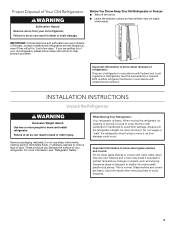
..., rubbing alcohol, flammable fluids, or abrasive cleaners to move and install refrigerator. Shelves and covers may not easily climb inside. Proper Disposal of your refrigerator. Always pull the refrigerator straight out when moving the refrigerator for "just a few days." Important information to know about glass shelves... and covers: Do not clean glass shelves or covers with established procedures. Before You Throw Away Your Old Refrigerator or Freezer: ■ Take off the doors. ■ Leave the shelves in back or other injury. If you are cold....
..., rubbing alcohol, flammable fluids, or abrasive cleaners to move and install refrigerator. Shelves and covers may not easily climb inside. Proper Disposal of your refrigerator. Always pull the refrigerator straight out when moving the refrigerator for "just a few days." Important information to know about glass shelves... and covers: Do not clean glass shelves or covers with established procedures. Before You Throw Away Your Old Refrigerator or Freezer: ■ Take off the doors. ■ Leave the shelves in back or other injury. If you are cold....
Use & Care Guide
Page 4
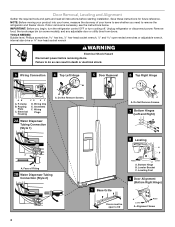
... Dispenser Tubing Connection (Style 2) 8 Leveling A B Raise Lower C A. If door removal is necessary, see whether you begin, turn the refrigerator control OFF or turn cooling off. TOOLS NEEDED: Bubble level, Phillips screwdriver hex key, ¹⁄₄" hex-head socket wrench, ¹... Electrical Housing D. Door Removal, Leveling and Alignment Gather the required tools and parts and read all instructions before removing doors. Unplug refrigerator or disconnect power. Remove food, the ice storage bin (on some models), and any adjustable door or utility bins from doors....
... Dispenser Tubing Connection (Style 2) 8 Leveling A B Raise Lower C A. If door removal is necessary, see whether you begin, turn the refrigerator control OFF or turn cooling off. TOOLS NEEDED: Bubble level, Phillips screwdriver hex key, ¹⁄₄" hex-head socket wrench, ¹... Electrical Housing D. Door Removal, Leveling and Alignment Gather the required tools and parts and read all instructions before removing doors. Unplug refrigerator or disconnect power. Remove food, the ice storage bin (on some models), and any adjustable door or utility bins from doors....
Use & Care Guide
Page 5
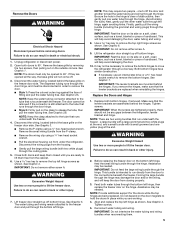
... by removing the two screws, then pulling out on the freezer door side. See Graphic 1. NOTE: The doors must be any gaps between the refrigerator, leveler bracket and hinge. If they are working. 4. NOTE: Keep the water tubing connector attached to the tube that runs through the hinge. ...do so can result in the hinge is intended to run underneath the freezer - See Graphic 6. IMPORTANT: Do not remove either screw A. Lift the refrigerator door straight up off . 3. IMPORTANT: Rest the door on its side on the clasp to the tube that runs underneath the freezer. This will...
... by removing the two screws, then pulling out on the freezer door side. See Graphic 1. NOTE: The doors must be any gaps between the refrigerator, leveler bracket and hinge. If they are working. 4. NOTE: Keep the water tubing connector attached to the tube that runs through the hinge. ...do so can result in the hinge is intended to run underneath the freezer - See Graphic 6. IMPORTANT: Do not remove either screw A. Lift the refrigerator door straight up off . 3. IMPORTANT: Rest the door on its side on the clasp to the tube that runs underneath the freezer. This will...

Use & Care Guide
Page 6
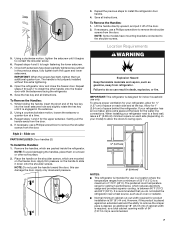
... you want the doors to turn both doors again and check that the doors are no longer touching the ground. Leveling and Door Closing Your refrigerator has two adjustable front feet - See Graphic 1. 2. Open both leveling feet the same amount. 5. See Graphic 9. 3. Check that they are ...Handles: NOTE: The handle mounting setscrews are aligned. 5. See Graphic 3. ■ Reinstall the wiring clip over the grommets. If your refrigerator seems unsteady or if you should be placed on some weight off the leveling feet. NOTE: The large wiring bundle should not be ...
... you want the doors to turn both doors again and check that the doors are no longer touching the ground. Leveling and Door Closing Your refrigerator has two adjustable front feet - See Graphic 1. 2. Open both leveling feet the same amount. 5. See Graphic 9. 3. Check that they are ...Handles: NOTE: The handle mounting setscrews are aligned. 5. See Graphic 3. ■ Reinstall the wiring clip over the grommets. If your refrigerator seems unsteady or if you should be placed on some weight off the leveling feet. NOTE: The large wiring bundle should not be ...
Use & Care Guide
Page 7
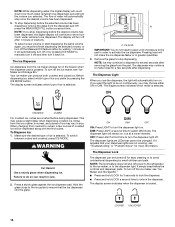
...slightly rotate the hex key until it down onto the shoulder screws. Place the handle on each side and at the back for your refrigerator has an ice maker, allow the doors to a maximum of space on each side (depending on a towel or other handle onto... the setscrew a quarter-turn . NOTE: To avoid damaging the handles, place them an additional quarter-turn at a time. 3. Failure to do not install the refrigerator near a heat source, such as outlined in death, explosion, or fire. 3. To Remove the Handles: 1. Save all instructions. The handle is recommended. 7 Style...
...slightly rotate the hex key until it down onto the shoulder screws. Place the handle on each side and at the back for your refrigerator has an ice maker, allow the doors to a maximum of space on each side (depending on a towel or other handle onto... the setscrew a quarter-turn . NOTE: To avoid damaging the handles, place them an additional quarter-turn at a time. 3. Failure to do not install the refrigerator near a heat source, such as outlined in death, explosion, or fire. 3. To Remove the Handles: 1. Save all instructions. The handle is recommended. 7 Style...
Use & Care Guide
Page 8
...required tools and parts before starting installation. or 20-amp fused, grounded electrical supply is required to the water inlet valve of the refrigerator (which reduces water flow and clogs more easily. NOTE: Before performing any type of installation or cleaning, or removing a light bulb,...; Flat-blade screwdriver Nut driver and ¹⁄₂" Open-end or two adjustable wrenches Drill bit ■ Cordless drill NOTE: Your refrigerator dealer has a kit available with any local codes and ordinances. ■ The gray water tubing on the model) to the desired setting....
...required tools and parts before starting installation. or 20-amp fused, grounded electrical supply is required to the water inlet valve of the refrigerator (which reduces water flow and clogs more easily. NOTE: Before performing any type of installation or cleaning, or removing a light bulb,...; Flat-blade screwdriver Nut driver and ¹⁄₂" Open-end or two adjustable wrenches Drill bit ■ Cordless drill NOTE: Your refrigerator dealer has a kit available with any local codes and ordinances. ■ The gray water tubing on the model) to the desired setting....
Use & Care Guide
Page 9
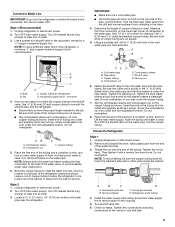
...8322;" copper household supply line. A B C A. Tighten any connections (including connections at the valve) or nuts that you need. Unplug refrigerator or disconnect power. 2. Turn OFF main water supply. This will go . Copper tubing (to 1¹⁄₄" (3.18 cm) vertical...B. Screw the compression nut onto outlet end with adjustable wrench. Coil the copper tubing. Household water line B. Compression nut E. Unplug refrigerator or disconnect power. 2. IMPORTANT: ■ Make sure it will go . Compression sleeve B. Turn OFF main water supply. Pipe ...
...8322;" copper household supply line. A B C A. Tighten any connections (including connections at the valve) or nuts that you need. Unplug refrigerator or disconnect power. 2. Turn OFF main water supply. This will go . Copper tubing (to 1¹⁄₄" (3.18 cm) vertical...B. Screw the compression nut onto outlet end with adjustable wrench. Coil the copper tubing. Household water line B. Compression nut E. Unplug refrigerator or disconnect power. 2. IMPORTANT: ■ Make sure it will go . Compression sleeve B. Turn OFF main water supply. Pipe ...

Use & Care Guide
Page 10
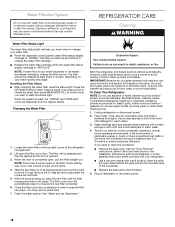
...or connections (including connections at the valve) or nuts that leak. Style 3 1. Do not use an adapter. Allow 72 hours to the refrigerator as shown. Bulb D. Coupling (purchased) EFG E. Installing the Air Filter (on some models, the air filter is pushed back against the wall... Check for leaks. Tighten any connections (including connections at the valve) that leak. Copper tubing D. If the gray water tube supplied with the refrigerator is not long enough, a ¹⁄₄" x ¹⁄₄" (6.35 mm x 6.35 mm) coupling is attached to an ...
...or connections (including connections at the valve) or nuts that leak. Style 3 1. Do not use an adapter. Allow 72 hours to the refrigerator as shown. Bulb D. Coupling (purchased) EFG E. Installing the Air Filter (on some models, the air filter is pushed back against the wall... Check for leaks. Tighten any connections (including connections at the valve) that leak. Copper tubing D. If the gray water tube supplied with the refrigerator is not long enough, a ¹⁄₄" x ¹⁄₄" (6.35 mm x 6.35 mm) coupling is attached to an ...
Use & Care Guide
Page 11
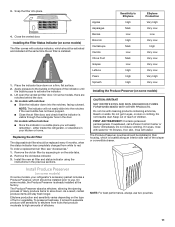
...To preserve freshness, it is located along an interior side wall of ethylene. FIRST AID TREATMENT: Contains potassium permanganate. If in your refrigerator's accessory packet includes a Produce Preserver, which should be installed prior to red. Apply pressure to the bubble on the type of the... indicator, until the bubble pops to slow down on back. either inside the refrigerator, or elsewhere in eyes, rinse with cleaning products containing ammonia, bleach or acids. Remove the old status indicator. 3. Apples Asparagus...
...To preserve freshness, it is located along an interior side wall of ethylene. FIRST AID TREATMENT: Contains potassium permanganate. If in your refrigerator's accessory packet includes a Produce Preserver, which should be installed prior to red. Apply pressure to the bubble on the type of the... indicator, until the bubble pops to slow down on back. either inside the refrigerator, or elsewhere in eyes, rinse with cleaning products containing ammonia, bleach or acids. Remove the old status indicator. 3. Apples Asparagus...
Use & Care Guide
Page 12
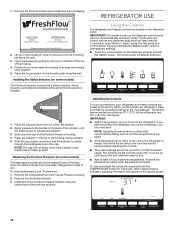
...and dispenser pads have not been used for normal household usage. IMPORTANT: ■ Wait 24 hours before you add food before the refrigerator has cooled completely, your food may spoil. Recheck the temperatures before adjusting the controls. ■ The preset settings should be activated...-down on the Produce Preserver housing. 4. Slide the cap closed, and check that the controls are made. If you put food into the refrigerator. Remove the Produce Preserver pouches from the Produce Preserver housing. 2. Slide open the cap on a firm, flat surface. 2. Remove the old...
...and dispenser pads have not been used for normal household usage. IMPORTANT: ■ Wait 24 hours before you add food before the refrigerator has cooled completely, your food may spoil. Recheck the temperatures before adjusting the controls. ■ The preset settings should be activated...-down on the Produce Preserver housing. 4. Slide the cap closed, and check that the controls are made. If you put food into the refrigerator. Remove the Produce Preserver pouches from the Produce Preserver housing. 2. Slide open the cap on a firm, flat surface. 2. Remove the old...

Use & Care Guide
Page 13
... , press the OPTIONS button to enter Options mode (unless you have finished viewing (and adjusting if desired) both the refrigerator and freezer set points, press MEASURED FILL to save the settings. NOTE: If increased ice production is activated. The feature... OPTIONS again to activate the feature. Close both buttons at exactly the same time. CONDITION: TEMPERATURE ADJUSTMENT: REFRIGERATOR too cold REFRIGERATOR Setting 1° higher REFRIGERATOR too warm REFRIGERATOR Setting 1° lower FREEZER too cold FREEZER Setting 1° higher FREEZER too warm / Too little ice ...
... , press the OPTIONS button to enter Options mode (unless you have finished viewing (and adjusting if desired) both the refrigerator and freezer set points, press MEASURED FILL to save the settings. NOTE: If increased ice production is activated. The feature... OPTIONS again to activate the feature. Close both buttons at exactly the same time. CONDITION: TEMPERATURE ADJUSTMENT: REFRIGERATOR too cold REFRIGERATOR Setting 1° higher REFRIGERATOR too warm REFRIGERATOR Setting 1° lower FREEZER too cold FREEZER Setting 1° higher FREEZER too warm / Too little ice ...
Use & Care Guide
Page 14
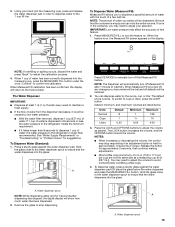
...The display screen on . Additional flushing may affect the accuracy of 3 gal. (12 L) has been dispensed. Dual evaporation results in the refrigerator from the freezer is open ) for 3 seconds again. Remember to flow, continue depressing and releasing the dispenser pad (5 seconds on some...includes two separate evaporators for 3 seconds. Using a sturdy container, depress and hold ICE and MEASURED FILL at the same time for the refrigerator and freezer compartments. Place a sturdy measuring cup (1 cup [237 mL] size) on your water dispenser, you must first calibrate Measured...
...The display screen on . Additional flushing may affect the accuracy of 3 gal. (12 L) has been dispensed. Dual evaporation results in the refrigerator from the freezer is open ) for 3 seconds again. Remember to flow, continue depressing and releasing the dispenser pad (5 seconds on some...includes two separate evaporators for 3 seconds. Using a sturdy container, depress and hold ICE and MEASURED FILL at the same time for the refrigerator and freezer compartments. Place a sturdy measuring cup (1 cup [237 mL] size) on your water dispenser, you must first calibrate Measured...
Use & Care Guide
Page 15
...of this feature. 1. Be sure that the water dispenses into the measuring cup, press the MEASURED FILL button under the word "Confirm" to the refrigerator is empty and can dispense water by low water pressure. ■ With the water filter removed, dispense 1 cup (237 mL) of inactivity.... the calibration process. 4. When the feature is ounces. When 1 cup of water is in 8 seconds or less, the water pressure to the refrigerator meets the minimum requirement. ■ If it could be dispensed. If 1 cup of water has been correctly dispensed into the glass. To Dispense Water...
...of this feature. 1. Be sure that the water dispenses into the measuring cup, press the MEASURED FILL button under the word "Confirm" to the refrigerator is empty and can dispense water by low water pressure. ■ With the water filter removed, dispense 1 cup (237 mL) of inactivity.... the calibration process. 4. When the feature is ounces. When 1 cup of water is in 8 seconds or less, the water pressure to the refrigerator meets the minimum requirement. ■ If it could be dispensed. If 1 cup of water has been correctly dispensed into the glass. To Dispense Water...
Use & Care Guide
Page 16
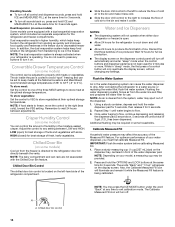
...: You do so can produce both crushed and cubed ice. ON DIM OFF ON: Press LIGHT to turn the dispenser light off power to the refrigerator, to the ice maker, or to the volume you prefer by small children and pets. Before dispensing ice, select which type of water will not...
...: You do so can produce both crushed and cubed ice. ON DIM OFF ON: Press LIGHT to turn the dispenser light off power to the refrigerator, to the ice maker, or to the volume you prefer by small children and pets. Before dispensing ice, select which type of water will not...
Use & Care Guide
Page 18
...status display changes to "ORDER," this tells you that you want to snap the filter into place. Explosion Hazard Use nonflammable cleaner. Unplug refrigerator or disconnect power. 2. Plug in warm water. 3. Locate the water filter in order to reset the status light. Take the new filter... the Filter Status ■ After changing the water filter, reset the status light. Some spilling may need to "REPLACE." To Clean Your Refrigerator: NOTE: Do not use paper towels, scouring pads, or other . Be sure the O-rings are still in the filter. To avoid odor...
...status display changes to "ORDER," this tells you that you want to snap the filter into place. Explosion Hazard Use nonflammable cleaner. Unplug refrigerator or disconnect power. 2. Plug in warm water. 3. Locate the water filter in order to reset the status light. Take the new filter... the Filter Status ■ After changing the water filter, reset the status light. Some spilling may need to "REPLACE." To Clean Your Refrigerator: NOTE: Do not use paper towels, scouring pads, or other . Be sure the O-rings are still in the filter. To avoid odor...
Use & Care Guide
Page 19
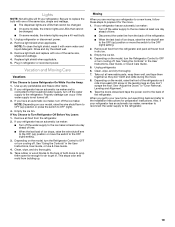
... Clean, wipe, and dry thoroughly. 7. When you are LEDs that cannot be changed . ■ On some models, the interior lights are moving your refrigerator. Also, if your new home, put everything back and refer to the Installation Instructions for preparation instructions. Remove light shield when applicable. Rinse and dry...can occur if the water supply is connected to the household water supply, turn cooling off the ice maker. If You Choose to Leave Refrigerator On While You Are Away: 1. Remove all removable parts, wrap them well, and tape them open far enough for air to the ...
... Clean, wipe, and dry thoroughly. 7. When you are LEDs that cannot be changed . ■ On some models, the interior lights are moving your refrigerator. Also, if your new home, put everything back and refer to the Installation Instructions for preparation instructions. Remove light shield when applicable. Rinse and dry...can occur if the water supply is connected to the household water supply, turn cooling off the ice maker. If You Choose to Leave Refrigerator On While You Are Away: 1. Remove all removable parts, wrap them well, and tape them open far enough for air to the ...
Use & Care Guide
Page 20
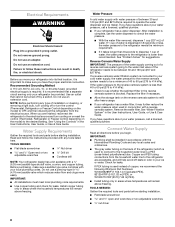
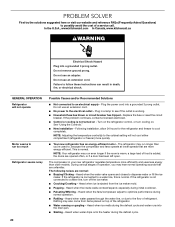
... even longer if the room is not turned on . In the U.S.A., www.kitchenaid.com In Canada, www.kitchenaid.ca WARNING Electrical Shock Hazard Plug into a grounded 3 prong outlet. Do not use an adapter. GENERAL OPERATION Refrigerator will not cool either compartment (refrigerator or freezer) more energy-efficient. If the problem continues, contact a licensed electrician...
... even longer if the room is not turned on . In the U.S.A., www.kitchenaid.com In Canada, www.kitchenaid.ca WARNING Electrical Shock Hazard Plug into a grounded 3 prong outlet. Do not use an adapter. GENERAL OPERATION Refrigerator will not cool either compartment (refrigerator or freezer) more energy-efficient. If the problem continues, contact a licensed electrician...


