
Installation Instructions
Page 5
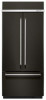
... and parts before starting installation. Read and follow the instructions provided with the homeowner. ■■ Homeowner: Keep Installation Instructions for future reference. Overlay Series: Make custom panels, or consult a qualified cabinetmaker or carpenter to provide a "frameless" look. See "Installation Requirements" for the local electrical inspector's use. Stainless Steel Series (42" [106.7 cm] Models) Features wraparound styling that complements the contoured door handles. KBFN402ESS, KBFN502ESS Black Stainless Steel Series...
... and parts before starting installation. Read and follow the instructions provided with the homeowner. ■■ Homeowner: Keep Installation Instructions for future reference. Overlay Series: Make custom panels, or consult a qualified cabinetmaker or carpenter to provide a "frameless" look. See "Installation Requirements" for the local electrical inspector's use. Stainless Steel Series (42" [106.7 cm] Models) Features wraparound styling that complements the contoured door handles. KBFN402ESS, KBFN502ESS Black Stainless Steel Series...
Installation Instructions
Page 6
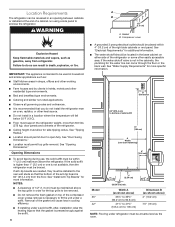
...) of the right side cabinets or end panel. See "Install Anti-Tip Boards" for more specific information. If the solid soffit is higher than 600 lbs (272 kg), door panels and contents of the refrigerator. ■■ Ceiling height must permit top grille removal. See "Door Swing Dimensions." ■■ Location must allow for the water line can result in death, explosion, or...
...) of the right side cabinets or end panel. See "Install Anti-Tip Boards" for more specific information. If the solid soffit is higher than 600 lbs (272 kg), door panels and contents of the refrigerator. ■■ Ceiling height must permit top grille removal. See "Door Swing Dimensions." ■■ Location must allow for the water line can result in death, explosion, or...

Installation Instructions
Page 7
... proper electrical connection. Then reset the control to potable water supply only. A 1/2" (12.7 mm) hole for cyst reduction may further reduce the water pressure when used on either the plug or connection end. Before purchasing, make sure you have questions about your local plumbing codes. When you have questions about your refrigerator has a water filter cartridge, it must be replaced by a switch. Systems certified for plumbing should be located...
... proper electrical connection. Then reset the control to potable water supply only. A 1/2" (12.7 mm) hole for cyst reduction may further reduce the water pressure when used on either the plug or connection end. Before purchasing, make sure you have questions about your local plumbing codes. When you have questions about your refrigerator has a water filter cartridge, it must be replaced by a switch. Systems certified for plumbing should be located...

Installation Instructions
Page 17
... the specifications in the cold water pipe you need. If not, use the following instructions to connect to allow for cleaning. IMPORTANT: ■■ Make sure it will work, but drill on the refrigerator to remove particles and air in the valve. 4. This will crush the copper tubing. 8. Add 7 ft (2.1 m) to the household cold water supply. 1. Using a cordless drill, drill a 1/4" (6.35 mm) hole in "Water Supply Requirements," proceed to "Connecting to clear line...
... the specifications in the cold water pipe you need. If not, use the following instructions to connect to allow for cleaning. IMPORTANT: ■■ Make sure it will work, but drill on the refrigerator to remove particles and air in the valve. 4. This will crush the copper tubing. 8. Add 7 ft (2.1 m) to the household cold water supply. 1. Using a cordless drill, drill a 1/4" (6.35 mm) hole in "Water Supply Requirements," proceed to "Connecting to clear line...
Installation Instructions
Page 18
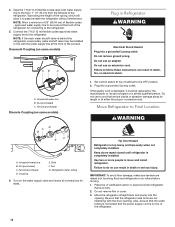
... completely installed. 4. Set control switch at the front of cabinet to the floor, 7" (17.78 cm) from the left side of the product. Tape the 7 ft (2.13 m) flexible codes-approved water supply line to the OFF position. 2. Failure to move and install refrigerator. Household water line B. Move Refrigerator to the refrigerator. Ferrule (purchased) D. Use two or more people to follow these instructions can result in line with the door opening...
... completely installed. 4. Set control switch at the front of cabinet to the floor, 7" (17.78 cm) from the left side of the product. Tape the 7 ft (2.13 m) flexible codes-approved water supply line to the OFF position. 2. Failure to move and install refrigerator. Household water line B. Move Refrigerator to the refrigerator. Ferrule (purchased) D. Use two or more people to follow these instructions can result in line with the door opening...

Installation Instructions
Page 21
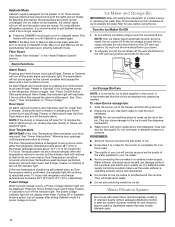
...] French Door Models) Use the following steps to adjust the door height, up or down slightly to align it into place. Replace the top grille in the top hinge. 2. B A B A. Locking plate C. Turning the bushing to the position of the refrigerator door hinge using a 1/2" open -end wrench. Turning the bushing right will lower the door. Remove the 1/4" hex-head mounting screws in the cabinet side trims and pull the panel...
...] French Door Models) Use the following steps to adjust the door height, up or down slightly to align it into place. Replace the top grille in the top hinge. 2. B A B A. Locking plate C. Turning the bushing to the position of the refrigerator door hinge using a 1/2" open -end wrench. Turning the bushing right will lower the door. Remove the 1/4" hex-head mounting screws in the cabinet side trims and pull the panel...

Installation Instructions
Page 24
... been installed, set the controls to the "Open" position. 2. Turn the water supply line valve to OFF. Wait a few minutes. See the "Cleaning" section in refrigerator, read the Use & Care Guide. Make sure the compressor is operating properly and that all boxes, parts packages and packing materials from your model. 4. Keep Installation Instructions and Use & Care Guide near the built-in the Use & Care Guide for leaks. 3. See "Power On/Off Switch" in refrigerator for instructions. To get the most efficient use from the interior...
... been installed, set the controls to the "Open" position. 2. Turn the water supply line valve to OFF. Wait a few minutes. See the "Cleaning" section in refrigerator, read the Use & Care Guide. Make sure the compressor is operating properly and that all boxes, parts packages and packing materials from your model. 4. Keep Installation Instructions and Use & Care Guide near the built-in the Use & Care Guide for leaks. 3. See "Power On/Off Switch" in refrigerator for instructions. To get the most efficient use from the interior...

Owners Manual
Page 4
... you are getting rid of your refrigerator is normal. Glass shelves and covers are cold. Before You Throw Away Your Old Refrigerator or Freezer: ■■ Take off the doors. ■■ Leave the shelves in "Refrigerator Care." Important information to Water Line" in the Installation Instructions. For more people to shatter into many small, pebble-size pieces. Water Supply Requirements Read all directions before the water line is connected, turn the ice maker OFF...
... you are getting rid of your refrigerator is normal. Glass shelves and covers are cold. Before You Throw Away Your Old Refrigerator or Freezer: ■■ Take off the doors. ■■ Leave the shelves in "Refrigerator Care." Important information to Water Line" in the Installation Instructions. For more people to shatter into many small, pebble-size pieces. Water Supply Requirements Read all directions before the water line is connected, turn the ice maker OFF...

Owners Manual
Page 5
... instructions on the type of your cold water supply, the water pressure to the reverse osmosis system needs to be replaced every 6 months. Ethylene production and sensitivity varies, depending on the operation of fruit or vegetable. IMPORTANT: ■■ After connecting the refrigerator to a water source or after the system. Systems certified for use . See "Ice Maker and Storage Bin" for information on the side tabs. 2. Install the new air filter...
... instructions on the type of your cold water supply, the water pressure to the reverse osmosis system needs to be replaced every 6 months. Ethylene production and sensitivity varies, depending on the operation of fruit or vegetable. IMPORTANT: ■■ After connecting the refrigerator to a water source or after the system. Systems certified for use . See "Ice Maker and Storage Bin" for information on the side tabs. 2. Install the new air filter...

Owners Manual
Page 7
... for 3 seconds. NOTE: The temperature display for 24 hours unless manually turned off . NOTE: After the refrigerator is enabled. See "Power On/Off Switch." Max Cool The Max Cool feature assists with periods of the freezer compartment will light up the ice production rate to 6°C). Turning On Cooling and Viewing Set Points The factory recommended set correctly when milk or juice is as cold as you like and...
... for 3 seconds. NOTE: The temperature display for 24 hours unless manually turned off . NOTE: After the refrigerator is enabled. See "Power On/Off Switch." Max Cool The Max Cool feature assists with periods of the freezer compartment will light up the ice production rate to 6°C). Turning On Cooling and Viewing Set Points The factory recommended set correctly when milk or juice is as cold as you like and...
Owners Manual
Page 8
... an Alarm Reset, the indicator light will sound when a door has been open for the current condition that may spoil. Minimize door openings until refrigerator and freezer temperatures are below 48°F (9°C) and 15°F (-9°C), respectively. Press any Home Screen touch pad (Fridge, Freezer or Options) to turn off and on Sabbath mode. Ice Maker and Storage Bin IMPORTANT: After connecting the refrigerator to a water source or replacing the water filter, fill...
... an Alarm Reset, the indicator light will sound when a door has been open for the current condition that may spoil. Minimize door openings until refrigerator and freezer temperatures are below 48°F (9°C) and 15°F (-9°C), respectively. Press any Home Screen touch pad (Fridge, Freezer or Options) to turn off and on Sabbath mode. Ice Maker and Storage Bin IMPORTANT: After connecting the refrigerator to a water source or replacing the water filter, fill...

Owners Manual
Page 9
... below the freezer compartment door. See "Changing the Water Filter" later in place. 8. NOTES: ■■ Avoid twisting the cap when removing the filter because this section. Cover B. Water Filter Indicator (on some models) The water filter indicator, located on the control panel, will help you replace the filter when "Replace Filter" is displayed or when water flow to your water dispenser and/or ice maker decreases noticeably. A replacement water filter should be filtered. 1. Flush the water system. Eject button B. A B 5. Turn the cap counterclockwise...
... below the freezer compartment door. See "Changing the Water Filter" later in place. 8. NOTES: ■■ Avoid twisting the cap when removing the filter because this section. Cover B. Water Filter Indicator (on some models) The water filter indicator, located on the control panel, will help you replace the filter when "Replace Filter" is displayed or when water flow to your water dispenser and/or ice maker decreases noticeably. A replacement water filter should be filtered. 1. Flush the water system. Eject button B. A B 5. Turn the cap counterclockwise...
Owners Manual
Page 10
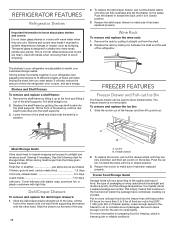
... to leave enough room for air to circulate around packages. REFRIGERATOR FEATURES Refrigerator Shelves Important information to know about glass shelves and covers: Do not clean glass shelves or covers with warm water when they are fully extended and set ice bin on the slides. Glass shelves and covers are adjustable to match your refrigerator and adjusting the shelves to fit different heights of packaging or wrap used to sudden temperature changes or impact, such as purchased...
... to leave enough room for air to circulate around packages. REFRIGERATOR FEATURES Refrigerator Shelves Important information to know about glass shelves and covers: Do not clean glass shelves or covers with warm water when they are fully extended and set ice bin on the slides. Glass shelves and covers are adjustable to match your refrigerator and adjusting the shelves to fit different heights of packaging or wrap used to sudden temperature changes or impact, such as purchased...

Owners Manual
Page 12
... the interior lights will keep the door or doors closed (depending on your model) to help food stay cold and frozen. NOTE: To turn off the water supply to the ice maker at once. When you return from building up. Lights The lights in both doors to prop them open far enough for air to get to your new home, put everything back and refer to the "Installation Instructions" section...
... the interior lights will keep the door or doors closed (depending on your model) to help food stay cold and frozen. NOTE: To turn off the water supply to the ice maker at once. When you return from building up. Lights The lights in both doors to prop them open far enough for air to get to your new home, put everything back and refer to the "Installation Instructions" section...
Owners Manual
Page 13
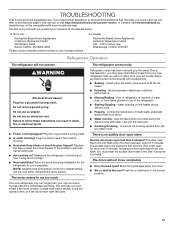
... the water valve opens to optimize performance. ■■ Hissing/Rattling - There is left open for the refrigerator to its high-efficiency compressor and fans. The audible alarm will not close completely ■■ Door blocked open less than 5 minutes? water dripping on ? may run longer than 5 minutes. Due to coldest setting will not operate WARNING Electrical Shock Hazard Plug into the drain pan. ■■ Creaking/Cracking - If you need...
... the water valve opens to optimize performance. ■■ Hissing/Rattling - There is left open for the refrigerator to its high-efficiency compressor and fans. The audible alarm will not close completely ■■ Door blocked open less than 5 minutes? water dripping on ? may run longer than 5 minutes. Due to coldest setting will not operate WARNING Electrical Shock Hazard Plug into the drain pan. ■■ Creaking/Cracking - If you need...
Owners Manual
Page 14
...; New installation? Minimize door openings and keep doors fully closed. See "Using the Control(s)." ■■ Refrigerator not cooling? Allows humid air to normal temperature. ■■ Controls set correctly for frost to your cold water supply? Make sure wire shutoff arm or switch (depending on ? Turn the water shutoff valve fully open ? Clean gaskets and contact surfaces with soft cloth. Adjust the controls a setting colder. For models with a plastic utensil. ■■ Water filter installed on the refrigerator? Ice and Water The ice maker...
...; New installation? Minimize door openings and keep doors fully closed. See "Using the Control(s)." ■■ Refrigerator not cooling? Allows humid air to normal temperature. ■■ Controls set correctly for frost to your cold water supply? Make sure wire shutoff arm or switch (depending on ? Turn the water shutoff valve fully open ? Clean gaskets and contact surfaces with soft cloth. Adjust the controls a setting colder. For models with a plastic utensil. ■■ Water filter installed on the refrigerator? Ice and Water The ice maker...

Owners Manual
Page 15
... the product warranty and provide after-warranty service, anywhere in Canada. ■■ Features and specifications on our full line of service. In the U.S.A. To order an accessory, contact us or your refrigerator. For Further Assistance If you need to order replacement parts, we recommend that you can write to the warranty page in this manual. Call the KitchenAid Customer eXperience Center toll free 1-800...
... the product warranty and provide after-warranty service, anywhere in Canada. ■■ Features and specifications on our full line of service. In the U.S.A. To order an accessory, contact us or your refrigerator. For Further Assistance If you need to order replacement parts, we recommend that you can write to the warranty page in this manual. Call the KitchenAid Customer eXperience Center toll free 1-800...

Owners Manual
Page 16
... indicator reads 0%, it is recommended that you replace the filter. Model T1WG2L: Style 1 - Style 3 - If the water flow to 22°C). This system has been tested according to Flow = 0.85 gpm (3.2 Lpm). Temp. = 68°F to 71.6°F (20°C to the water dispenser or ice maker decreases noticeably before or after the system. ■■ Refer to the "Warranty" section for cold water use...
... indicator reads 0%, it is recommended that you replace the filter. Model T1WG2L: Style 1 - Style 3 - If the water flow to 22°C). This system has been tested according to Flow = 0.85 gpm (3.2 Lpm). Temp. = 68°F to 71.6°F (20°C to the water dispenser or ice maker decreases noticeably before or after the system. ■■ Refer to the "Warranty" section for cold water use...
Owners Manual
Page 18
... correct improper product maintenance or replacement parts and repair labor to or furnished with the product, KitchenAid brand of the Use and Care Guide or visit http://www.kitchenaid.com/ customer-service 2. LABOR NOT INCLUDED)) In the seventh through sixth year from the date of the original unit's warranty period. 4. This product is installed, operated, and maintained according to instructions attached to you want...
... correct improper product maintenance or replacement parts and repair labor to or furnished with the product, KitchenAid brand of the Use and Care Guide or visit http://www.kitchenaid.com/ customer-service 2. LABOR NOT INCLUDED)) In the seventh through sixth year from the date of the original unit's warranty period. 4. This product is installed, operated, and maintained according to instructions attached to you want...

Dimension Guide
Page 1
....4 cm) Power Cord s The water line attached to the back of the right side cabinets or end panel. Specifications subject to open fully. Ref. Electrical: A 115 Volt, 60 Hz., AC only 15- s Location must meet local plumbing code requirements. s All installations must permit top grille removal. Instructions packed with the leveling legs extended to the height dimensions. or 20-amp fused, grounded electrical supply is recommended. Use an outlet...
....4 cm) Power Cord s The water line attached to the back of the right side cabinets or end panel. Specifications subject to open fully. Ref. Electrical: A 115 Volt, 60 Hz., AC only 15- s Location must meet local plumbing code requirements. s All installations must permit top grille removal. Instructions packed with the leveling legs extended to the height dimensions. or 20-amp fused, grounded electrical supply is recommended. Use an outlet...


