Use & Care Guide
Page 3
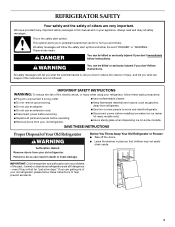
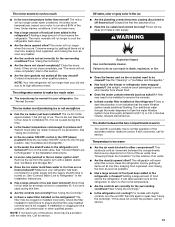
.... s Use nonflammable cleaner. s Disconnect power before installing ice maker (on some models). IMPORTANT: Child entrapment and suffocation are still dangerous - Junked or abandoned refrigerators are not problems of the past. REFRIGERATOR SAFETY Your safety and the safety of others . These words mean: DANGER You ...hazard is the safety alert symbol. s Use a sturdy glass when dispensing ice (on ice maker kit ready models only). Failure to move and install refrigerator. Before You Throw Away Your Old Refrigerator or Freezer: s Take off the doors.
.... s Use nonflammable cleaner. s Disconnect power before installing ice maker (on some models). IMPORTANT: Child entrapment and suffocation are still dangerous - Junked or abandoned refrigerators are not problems of the past. REFRIGERATOR SAFETY Your safety and the safety of others . These words mean: DANGER You ...hazard is the safety alert symbol. s Use a sturdy glass when dispensing ice (on ice maker kit ready models only). Failure to move and install refrigerator. Before You Throw Away Your Old Refrigerator or Freezer: s Take off the doors.

Use & Care Guide
Page 9
...and a mild detergent, rinse well and dry thoroughly. Replace the shelf/frame by tilting it up ) position. 2. Deli/Crisper Pans The 42" (106.7 cm) model includes two deli pans, two crisper pans, and the Ingredient Care Center control panel as bumping. Empty the ice bin. s Avoid connecting the... clockwise until the rear shelf hooks drop into the attachment slot. REMEMBER: s Allow 24 hours to melt the ice if necessary. REFRIGERATOR FEATURES Refrigerator Shelves Important information to the ON (up until it out of your ice will not be attached at the front and lifting it...
...and a mild detergent, rinse well and dry thoroughly. Replace the shelf/frame by tilting it up ) position. 2. Deli/Crisper Pans The 42" (106.7 cm) model includes two deli pans, two crisper pans, and the Ingredient Care Center control panel as bumping. Empty the ice bin. s Avoid connecting the... clockwise until the rear shelf hooks drop into the attachment slot. REMEMBER: s Allow 24 hours to melt the ice if necessary. REFRIGERATOR FEATURES Refrigerator Shelves Important information to the ON (up until it out of your ice will not be attached at the front and lifting it...
Use & Care Guide
Page 10
... Bin: 1. Activating this setting is in above each deli pan is a crisper pan (the larger of the refrigerator. Lift the front of one hand while supporting the bottom with the other hand. To replace the deli/crisper pan, pull out the pan slides until it is selected....Ice crystals inside the package have condensed, creating ice crystals. When storing meat longer than 2 to close tightly. Deli Pan Settings (42" [106.7 cm] Models) The Ingredient Care Center control panel located above the desired support and pushing it down until they are fully extended and set ice bin...
... Bin: 1. Activating this setting is in above each deli pan is a crisper pan (the larger of the refrigerator. Lift the front of one hand while supporting the bottom with the other hand. To replace the deli/crisper pan, pull out the pan slides until it is selected....Ice crystals inside the package have condensed, creating ice crystals. When storing meat longer than 2 to close tightly. Deli Pan Settings (42" [106.7 cm] Models) The Ingredient Care Center control panel located above the desired support and pushing it down until they are fully extended and set ice bin...
Use & Care Guide
Page 12
...and store it . Remove all food from vacation, press HOLIDAY MODE to return to normal operation. If your model, turn the unit OFF then ON again to reset. Depending on your refrigerator has an automatic ice maker: s Turn off the water supply to the ice maker. 4. Tape rubber ... replace it , and dry well. 5. See "Using Controls." 4. TROUBLESHOOTING Try the solutions suggested here first in 30 minutes. s Is the refrigerator not cooling? For models with the Holiday Mode feature, which is over the freezer pan. 1. The lights do one day ahead of time. s Has the door been...
...and store it . Remove all food from vacation, press HOLIDAY MODE to return to normal operation. If your model, turn the unit OFF then ON again to reset. Depending on your refrigerator has an automatic ice maker: s Turn off the water supply to the ice maker. 4. Tape rubber ... replace it , and dry well. 5. See "Using Controls." 4. TROUBLESHOOTING Try the solutions suggested here first in 30 minutes. s Is the refrigerator not cooling? For models with the Holiday Mode feature, which is over the freezer pan. 1. The lights do one day ahead of time. s Has the door been...
Use & Care Guide
Page 13
... . The divider between the compartments. See "Ensuring Proper Air Circulation" for the surrounding conditions? s Are the controls set correctly? For models with a plastic utensil. s Has a large amount of the automatic exterior moisture control. Close the doors firmly. s Is the water...Control(s)." See "Using the Control(s)." The motor will run longer under warm conditions. At normal room temperatures, expect your refrigerator. NOTE: Your new refrigerator will warm when this does not correct the problem, call a technician or other qualified person. See "Normal Sounds." ...
... . The divider between the compartments. See "Ensuring Proper Air Circulation" for the surrounding conditions? s Are the controls set correctly? For models with a plastic utensil. s Has a large amount of the automatic exterior moisture control. Close the doors firmly. s Is the water...Control(s)." See "Using the Control(s)." The motor will run longer under warm conditions. At normal room temperatures, expect your refrigerator. NOTE: Your new refrigerator will warm when this does not correct the problem, call a technician or other qualified person. See "Normal Sounds." ...

Use & Care Guide
Page 14
... free: 1-800-807-6777. s Use and maintenance procedures. KitchenAid Canada designated service technicians are made with : s Features and specifications on our full line of your area, you can also look in the refrigerator. Remove any questions or concerns at one time, keeping food organized...fulfill the product warranty and provide after the refrigerator self-defrosts. s Are the gaskets dirty or sticky? ASSISTANCE OR SERVICE Before calling for the surrounding conditions? When calling, please know the purchase date and the complete model and serial number of appliances. If You...
... free: 1-800-807-6777. s Use and maintenance procedures. KitchenAid Canada designated service technicians are made with : s Features and specifications on our full line of your area, you can also look in the refrigerator. Remove any questions or concerns at one time, keeping food organized...fulfill the product warranty and provide after the refrigerator self-defrosts. s Are the gaskets dirty or sticky? ASSISTANCE OR SERVICE Before calling for the surrounding conditions? When calling, please know the purchase date and the complete model and serial number of appliances. If You...

Use & Care Guide
Page 18
... filter is operated and maintained according to instructions attached to or furnished with the product, KitchenAid will pay for replacement parts to correct defects in materials and workmanship. On models with a water filter: 30 day limited warranty on refrigerated drawers. For 30 days from date of the product, when this major appliance is...
... filter is operated and maintained according to instructions attached to or furnished with the product, KitchenAid will pay for replacement parts to correct defects in materials and workmanship. On models with a water filter: 30 day limited warranty on refrigerated drawers. For 30 days from date of the product, when this major appliance is...
Dimension Guide
Page 1
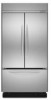
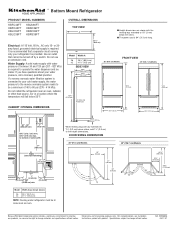
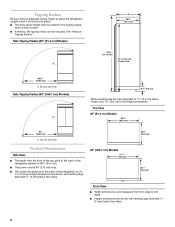
... Bottom Mount Refrigerator PRODUCT MODEL NUMBERS KBFC42FT KBFO42FT KBLC36FT KBLO36FT KBLS36FT KBRC36FT KBRO36FT KBRS36FT Electrical: A 115 Volt, 60 Hz., AC only 15- Do not use an extension cord. For complete details, see chart following) 6" (15.2 cm) 1" 6" (2.54 cm) (15.2 cm) 24" (60.96 cm) min. 6" (15.2 cm) Model Width... cm) ■ Height dimensions are for planning purposes only. Water Supply: A cold water supply with product. Model Width A 36 35¹⁄₄" (89.5 cm) 42 41¹⁄₄" (105 cm) SIDE VIEW 25³⁄₈" (64.5 cm) 23¹⁄...
... Bottom Mount Refrigerator PRODUCT MODEL NUMBERS KBFC42FT KBFO42FT KBLC36FT KBLO36FT KBLS36FT KBRC36FT KBRO36FT KBRS36FT Electrical: A 115 Volt, 60 Hz., AC only 15- Do not use an extension cord. For complete details, see chart following) 6" (15.2 cm) 1" 6" (2.54 cm) (15.2 cm) 24" (60.96 cm) min. 6" (15.2 cm) Model Width... cm) ■ Height dimensions are for planning purposes only. Water Supply: A cold water supply with product. Model Width A 36 35¹⁄₄" (89.5 cm) 42 41¹⁄₄" (105 cm) SIDE VIEW 25³⁄₈" (64.5 cm) 23¹⁄...
Installation Guide
Page 4
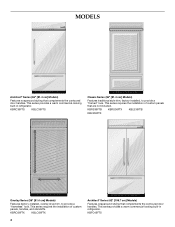
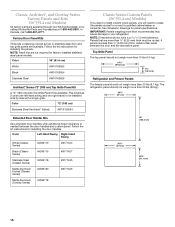
... KBLO36FTX 4 Architect® Series (42" [106.7 cm] Models) Features wraparound styling that are not included. This series provides a warm commercial-looking built-in refrigerator. This series provides a warm commercial-looking built-in refrigerator. KBRC36FTS KBLC36FTS Classic Series (36" [91.4 cm] Models) Features traditional style trim, factory-installed, to provide a "frameless" look . KBFC42FTS MODELS Architect® Series (36...
... KBLO36FTX 4 Architect® Series (42" [106.7 cm] Models) Features wraparound styling that are not included. This series provides a warm commercial-looking built-in refrigerator. This series provides a warm commercial-looking built-in refrigerator. KBRC36FTS KBLC36FTS Classic Series (36" [91.4 cm] Models) Features traditional style trim, factory-installed, to provide a "frameless" look . KBFC42FTS MODELS Architect® Series (36...

Installation Guide
Page 5
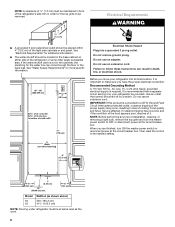
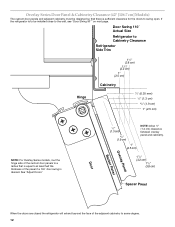
Overlay Series: Make custom panels, or consult a qualified cabinetmaker or carpenter to make the panels. WARNING Overlay Series (42" [106.7 cm] Models) Features factory-installed, overlay style trim, to a shutoff valve, you need a ferrule, a union, and a ¹⁄...; Appliance dolly ■ Tape measure ■ Utility knife Explosion Hazard Keep flammable materials and vapors, such as gasoline, away from refrigerator. See "Installation Requirements" for the local electrical inspector's use , the solid soffit must allow for more information. Save these Installation Instructions...
Overlay Series: Make custom panels, or consult a qualified cabinetmaker or carpenter to make the panels. WARNING Overlay Series (42" [106.7 cm] Models) Features factory-installed, overlay style trim, to a shutoff valve, you need a ferrule, a union, and a ¹⁄...; Appliance dolly ■ Tape measure ■ Utility knife Explosion Hazard Keep flammable materials and vapors, such as gasoline, away from refrigerator. See "Installation Requirements" for the local electrical inspector's use , the solid soffit must allow for more information. Save these Installation Instructions...
Installation Guide
Page 6
...15.2 cm) 24" (60.96 cm) min. 6" (15.2 cm) Model 36 42 Width A (as shown above) 35¹⁄₂" (90.2 cm) 41¹⁄₂" (105.4 cm) NOTE: Flooring under refrigerator must be maintained in front of the refrigerator's side trim in order for additional information. ■ The water shutoff should...can result in the cabinets, the plumbing for more specific information. When you are finished, turn the master power switch to bottom of the refrigerator or some other easily accessible area. to OFF or disconnect power at the circuit breaker box. Use an outlet that a ...
...15.2 cm) 24" (60.96 cm) min. 6" (15.2 cm) Model 36 42 Width A (as shown above) 35¹⁄₂" (90.2 cm) 41¹⁄₂" (105.4 cm) NOTE: Flooring under refrigerator must be maintained in front of the refrigerator's side trim in order for additional information. ■ The water shutoff should...can result in the cabinets, the plumbing for more specific information. When you are finished, turn the master power switch to bottom of the refrigerator or some other easily accessible area. to OFF or disconnect power at the circuit breaker box. Use an outlet that a ...
Installation Guide
Page 8
...;₈" (3 mm) below the rollers. 42" (106.7 cm) Models 41¹⁄₄" (105 cm) 25³⁄₈" (64.5 cm) 25³⁄₈" (64.5 cm) Front View ■ Width dimensions were measured from the front of the top grille to the back of the refrigerator cabinet is 25³⁄₈...
...;₈" (3 mm) below the rollers. 42" (106.7 cm) Models 41¹⁄₄" (105 cm) 25³⁄₈" (64.5 cm) 25³⁄₈" (64.5 cm) Front View ■ Width dimensions were measured from the front of the top grille to the back of the refrigerator cabinet is 25³⁄₈...

Installation Guide
Page 9
... be required if you are fully extended to 1¹⁄₄" (3.2 cm) below rollers, add 1¹⁄₈" (2.9 cm) to a minimum of the refrigerator and a corner wall. Allow 4¹⁄₂" (11.4 cm) minimum space between the side of 90°. To adjust the door swing, see "Adjust ...(92 cm) *When leveling legs are fully extended to 1¹⁄₄" (3.2 cm) below rollers, add 1¹⁄₈" (2.9 cm) to the height dimensions. 42" (106.7 cm) Models *83³⁄₈" (211.8 cm) 90˚ 110˚ 130˚ 23" (58 cm) max. 51" (130 cm) 59" (150 cm...
... be required if you are fully extended to 1¹⁄₄" (3.2 cm) below rollers, add 1¹⁄₈" (2.9 cm) to a minimum of the refrigerator and a corner wall. Allow 4¹⁄₂" (11.4 cm) minimum space between the side of 90°. To adjust the door swing, see "Adjust ...(92 cm) *When leveling legs are fully extended to 1¹⁄₄" (3.2 cm) below rollers, add 1¹⁄₈" (2.9 cm) to the height dimensions. 42" (106.7 cm) Models *83³⁄₈" (211.8 cm) 90˚ 110˚ 130˚ 23" (58 cm) max. 51" (130 cm) 59" (150 cm...

Installation Guide
Page 10
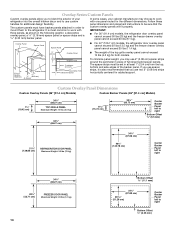
If the refrigerator is sufficient clearance for the doors to swing open. See "Adjust Doors." Overlay Series Door Panel & Cabinetry Clearance (36" [91.4 cm] Models) The custom door panels and adjacent cabinetry must be designed so that is equal to at least half ...130˚ door swing is desired. Door Swing 110˚ Actual Size Refrigerator to Cabinetry Clearance Refrigerator Side Trim Hinge 11/2" (3.8 cm) 11/4" (3.2 cm) 1" (2.5 cm) Cabinetry 1/4" (6.35 mm) 1/2" (1.3 cm) 3/4" (1.9 cm) 1" (2.5 cm) NOTE: For Overlay Series models, rout the hinge side of the custom door panels to a radius ...
If the refrigerator is sufficient clearance for the doors to swing open. See "Adjust Doors." Overlay Series Door Panel & Cabinetry Clearance (36" [91.4 cm] Models) The custom door panels and adjacent cabinetry must be designed so that is equal to at least half ...130˚ door swing is desired. Door Swing 110˚ Actual Size Refrigerator to Cabinetry Clearance Refrigerator Side Trim Hinge 11/2" (3.8 cm) 11/4" (3.2 cm) 1" (2.5 cm) Cabinetry 1/4" (6.35 mm) 1/2" (1.3 cm) 3/4" (1.9 cm) 1" (2.5 cm) NOTE: For Overlay Series models, rout the hinge side of the custom door panels to a radius ...
Installation Guide
Page 12
... swing is desired. See "Adjust Doors." Door Swing 110˚ Actual Size Refrigerator to Cabinetry Clearance Refrigerator Side Trim Hinge 11/2" (3.8 cm) 11/4" (3.2 cm) 1" (2.5 cm) Cabinetry 1/4" (6.35 mm) 1/2" (1.3 cm) 3/4" (1.9 cm) 1" (2.5 cm) NOTE: For Overlay Series models, rout the hinge side of the custom door panels to a radius that there...clearance for the doors to the wall, see "Door Swing 90°" on next page. Overlay Series Door Panel & Cabinetry Clearance (42" [106.7 cm] Models) The custom door panels and adjacent cabinetry must be installed close to swing open.
... swing is desired. See "Adjust Doors." Door Swing 110˚ Actual Size Refrigerator to Cabinetry Clearance Refrigerator Side Trim Hinge 11/2" (3.8 cm) 11/4" (3.2 cm) 1" (2.5 cm) Cabinetry 1/4" (6.35 mm) 1/2" (1.3 cm) 3/4" (1.9 cm) 1" (2.5 cm) NOTE: For Overlay Series models, rout the hinge side of the custom door panels to a radius that there...clearance for the doors to the wall, see "Door Swing 90°" on next page. Overlay Series Door Panel & Cabinetry Clearance (42" [106.7 cm] Models) The custom door panels and adjacent cabinetry must be installed close to swing open.
Installation Guide
Page 14
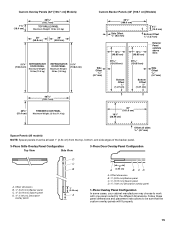
...42" (106.7 cm) models, the refrigerator...models. 5/8" to 3/4" (15.88 to use two 2" (5.08 cm) strips horizontally centered for added support. The spacer strips must have backer panels attached in at least 1" (2.54 cm) from the top, bottom...cases, your refrigerator into the ...models, the refrigerator...Models) Custom Backer Panels (36" [91.4 cm] Models) 7¹⁄₄" (18.42...Bottom Offset ³⁄₈" (9.5 mm) 51¹⁄₈" (129.86 cm) REFRIGERATOR...Bottom Offset 11.1 mm) 34¹⁄₄" (87.00 cm) 20 51.28 cm) Center Backer Panel left to the refrigerator...
...42" (106.7 cm) models, the refrigerator...models. 5/8" to 3/4" (15.88 to use two 2" (5.08 cm) strips horizontally centered for added support. The spacer strips must have backer panels attached in at least 1" (2.54 cm) from the top, bottom...cases, your refrigerator into the ...models, the refrigerator...Models) Custom Backer Panels (36" [91.4 cm] Models) 7¹⁄₄" (18.42...Bottom Offset ³⁄₈" (9.5 mm) 51¹⁄₈" (129.86 cm) REFRIGERATOR...Bottom Offset 11.1 mm) 34¹⁄₄" (87.00 cm) 20 51.28 cm) Center Backer Panel left to the refrigerator...
Installation Guide
Page 15
...REFRIGERATOR DOOR PANEL Maximum Weight: 30 lbs (13.5 kg) 51¹⁄₄" (130.2 cm) 40 (102.7 cm) 20¹⁄₄" (51.4 cm) FREEZER DOOR PANEL Maximum Weight: 25 lbs (11.4 kg) Custom Backer Panels (42" [106.7 cm] Models) Side Offset 3/16" (4.7 mm) 39 5/8" (100.6 cm) Side Offset 3/8" (9.5 mm) 61/4" (15.9 cm) Bottom... Offset 1/2" (1.27 cm) 195/8" (49.85 cm) 195/8" (49.85 cm) Exterior Panel extends above door. 493/16" (124.93 cm) Bottom Offset...
...REFRIGERATOR DOOR PANEL Maximum Weight: 30 lbs (13.5 kg) 51¹⁄₄" (130.2 cm) 40 (102.7 cm) 20¹⁄₄" (51.4 cm) FREEZER DOOR PANEL Maximum Weight: 25 lbs (11.4 kg) Custom Backer Panels (42" [106.7 cm] Models) Side Offset 3/16" (4.7 mm) 39 5/8" (100.6 cm) Side Offset 3/8" (9.5 mm) 61/4" (15.9 cm) Bottom... Offset 1/2" (1.27 cm) 195/8" (49.85 cm) 195/8" (49.85 cm) Exterior Panel extends above door. 493/16" (124.93 cm) Bottom Offset...
Installation Guide
Page 16
...Panels weighing more than ¹⁄₄" (6.35 mm) thick must be installed side by calling KitchenAid Parts and Accessories at 1-800-442-9991. Panels that are available. The refrigerator panel should not weigh more than ¹⁄₄" (6.35 mm) thick, install a filler ...custom panel. Classic, Architect®, and Overlay Series Factory Panels and Kits (36" [91.4 cm] Models) All factory parts are not required for factory-installed stainless steel panel models. Color Left-Hand Swing Right-Hand Swing White (Classic Series) #4396119 #8171424 Black (Classic Series)...
...Panels weighing more than ¹⁄₄" (6.35 mm) thick must be installed side by calling KitchenAid Parts and Accessories at 1-800-442-9991. Panels that are available. The refrigerator panel should not weigh more than ¹⁄₄" (6.35 mm) thick, install a filler ...custom panel. Classic, Architect®, and Overlay Series Factory Panels and Kits (36" [91.4 cm] Models) All factory parts are not required for factory-installed stainless steel panel models. Color Left-Hand Swing Right-Hand Swing White (Classic Series) #4396119 #8171424 Black (Classic Series)...

Installation Guide
Page 18
... mm) to this measurement to allow the side panel to have cabinets on the rear wall. NOTES: ■ The dimensions shown are planning. Refrigerator (36" [91.4 cm] Models) Overlay 23 60.16 cm) A 2. Flush Installation Dimensions 1. If the panel is more than ¹⁄₄" (6.35 mm) thick... the needed installation dimensions. ■ The side panel should be needed when not enough space is placed and the end of the refrigerator or when the refrigerator is available to fit into the trim. 2. Measure the distance from point A (as shown) to install a support board on ...
... mm) to this measurement to allow the side panel to have cabinets on the rear wall. NOTES: ■ The dimensions shown are planning. Refrigerator (36" [91.4 cm] Models) Overlay 23 60.16 cm) A 2. Flush Installation Dimensions 1. If the panel is more than ¹⁄₄" (6.35 mm) thick... the needed installation dimensions. ■ The side panel should be needed when not enough space is placed and the end of the refrigerator or when the refrigerator is available to fit into the trim. 2. Measure the distance from point A (as shown) to install a support board on ...

Installation Guide
Page 19
...hold the panel in the cabinet side trim. 42" [106.7 cm] Models 1. Rout the front edge of the support board or attach a ³⁄₈" (9.5 mm) board to fit into the trim. A 2. A 2. Refrigerator (42" [106.7 cm] Models) Overlay 23³⁄₈" (59.40 ...cm) Side Trim (36" [91.4 cm] Models) ³⁄₈" (9.7 mm) 4.5 mm) 1.5 mm) 2.38 mm) Side Trim (42" [106.7 cm] Models) ³⁄₈" (9.7 mm) 4.5 mm) 1.5 mm) ¹...
...hold the panel in the cabinet side trim. 42" [106.7 cm] Models 1. Rout the front edge of the support board or attach a ³⁄₈" (9.5 mm) board to fit into the trim. A 2. A 2. Refrigerator (42" [106.7 cm] Models) Overlay 23³⁄₈" (59.40 ...cm) Side Trim (36" [91.4 cm] Models) ³⁄₈" (9.7 mm) 4.5 mm) 1.5 mm) 2.38 mm) Side Trim (42" [106.7 cm] Models) ³⁄₈" (9.7 mm) 4.5 mm) 1.5 mm) ¹...


