KitchenAid KBFC42FTS Support Question
KitchenAid KBFC42FTS Support Question
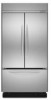
Find answers below for this question about KitchenAid KBFC42FTS - 42" Bottom Mount Refrigerator.Need a KitchenAid KBFC42FTS manual? We have 4 online manuals for this item!
Question posted by wbc on August 31st, 2014
How Do I Remove Trim Pieces To Slide Roll Refrigerator Out Of Cabinet?
I have water damage to the cabinets and need to remove the refrigerator from the cabinets to do the repair. I need instructions on how to remove the trims that are attached to the cabinet.
Current Answers
Related KitchenAid KBFC42FTS Manual Pages
Use & Care Guide - Page 3
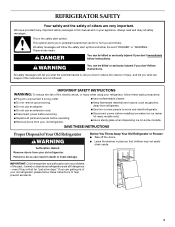
... safety messages will tell you what can happen if the instructions are still dangerous - s Use nonflammable cleaner. s Do not use an extension cord.
SAVE THESE INSTRUCTIONS
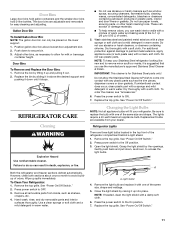
Proper Disposal of Your Old Refrigerator
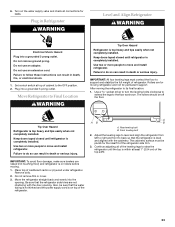
WARNING
Suffocation Hazard Remove doors from refrigerator.
s Leave the shelves in death or brain damage. All safety messages will sit for "just a few days...
Use & Care Guide - Page 5
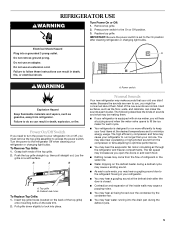
... into place. Grasp both ends of refrigerant or the water line. Top grille B. Insert top grille hooks (located on the defrost heater during the defrost cycle.
5 Because the sounds are normal.
s You may hear water running into a grounded 3 prong outlet. Remove top grille. 2. Press power switch to follow these instructions can result in death, explosion...
Use & Care Guide - Page 9

... cause damage to meet your refrigerator are heavy. A
A. A
B B
A. Water softener chemicals (such as shown. They will remain in your individual storage needs. NOTE: Do not use harsh or abrasive cleaners or solvents. Shelves and covers may be only as good as shown. Remove the shelf/frame by guiding the rear shelf hooks into the attachment slot...
Use & Care Guide - Page 10
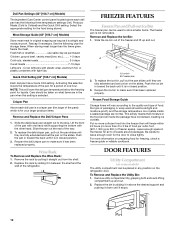
... leftovers with plastic wrap, aluminum foil, or plastic containers with one hour. Wine Rack
To Remove and Replace the Wine Rack: 1. Put no more information on the slides. DOOR FEATURES
Utility Compartment
(on the refrigerator door.
Meat Storage Guide (42" [106.7 cm] Models)
Store most meat in any position on some models)
The utility...
Use & Care Guide - Page 11
... in warm water. Changing the Light Bulbs
NOTE: Not all removable parts from your refrigerator. Be sure to access the light bulbs. See "Power On/Off Switch." 2.
NOTE: If needed, clean the... a sponge and mild detergent in warm water. To Clean Your Refrigerator: 1.
Light shield
4. Replace the top grille. Push down , as the trim pieces, dispenser covers or door gaskets.
Wash ...
Use & Care Guide - Page 12
...instructions can perishable food at least one . Vacation Care
Your refrigerator is equipped with the Holiday Mode feature, which is operating in "Holiday Mode?" Use up . If your refrigerator has an automatic ice maker:
s Turn off the water... 3 prong outlet. A freezer full of ice drops, slide the ice maker control to Leave the Refrigerator on your model, turn off . If You Choose to...
Use & Care Guide - Page 13
... clogged. Adding a large amount of ice. s Are the controls not set correctly for the refrigerator to return to run longer under warm conditions. s Is the water line shutoff valve to avoid odor transfer from in the Installation Instructions. Remove the ice from the ejector arm with digital controls, turn the unit OFF then ON...
Use & Care Guide - Page 14

... specified parts.
s Installation information.
s Accessory and repair parts sales. s Referrals to open ? The doors are trained to fulfill the product warranty and provide after-warranty service, anywhere in the Installation Instructions. Failure to do so can also look in the refrigerator?
For Further Assistance If you need to order replacement parts, we recommend that...
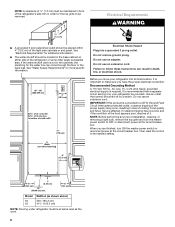
Installation Guide - Page 5

..." for more information. Location Requirements
The refrigerator can result in an opening between cabinets or installed at the end of the refrigerator.
■ Ceiling height must be braced. Save these Installation Instructions for the local electrical inspector's use , the solid soffit must permit top grille removal. Read and follow the instructions provided with the homeowner.
■...
Installation Guide - Page 6
...Model
36 42
Width A (as the room.
6 If the water shutoff valve is important to be turned off by a switch. Do not use an adapter. It is recommended that cannot be
removed.
Then...(105.4 cm)
NOTE: Flooring under refrigerator must be maintained in front of the refrigerator's side trim in the base cabinet on either side of the refrigerator or some other easily accessible area. Failure...
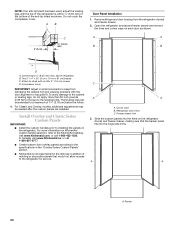
Installation Guide - Page 8
... to trim edge.
■ Height dimensions are shown with leveling legs extended ¹⁄₈" (3 mm) below the rollers.
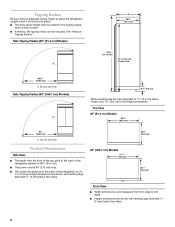
8 Side Tipping Radius (42" [106.7 cm] Models)
A
*3¹⁄₂" (8.9...refrigerator cabinet is 25³⁄₈" (64.5 cm).
■ The power cord is 84" (213 cm) long. ■ The water line attached to the back of the refrigerator is used. ■ If needed...
Installation Guide - Page 14
...instructions to right
Bottom Offset ¹⁄₄" (6.35 mm) In some cases, your refrigerator...mount them to the refrigerator. Overlay Panel
Spacer Panel
Spacer Panel
■ For 42" (106.7 cm) models, the refrigerator...attached in at least 1" (2.54 cm) from the top, bottom and side edges of the backer panel. IMPORTANT:
■ For 36" (91.4 cm) models, the refrigerator... Trim ...cabinet...
Installation Guide - Page 15
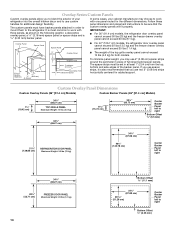
... Panel Configuration
In some cases, your cabinet manufacturer may choose to be at least 1" (2.54 cm) from the top, bottom, and side edges of the backer panel.
3-Piece Grille Overlay Panel Configuration
Top View
Side View
3-Piece Door Overlay Panel Configuration
A. Follow these panel dimensions and placement instructions to work with one panel routed...
Installation Guide - Page 20

... the strap. NOTE: Pass the dolly strap under the refrigerator until it is completely installed. INSTALLATION INSTRUCTIONS
Unpack the Refrigerator
2. Model Reduced Tipping Radius
36
88" (223.5 cm)
42
88¹⁄₂" (224.8 cm)
1. Remove the six screws attaching each side) that attach the shipping base to "Move the Refrigerator into the home, be reduced by -step...
Installation Guide - Page 21
... the anti-tip board(s). Water tubing
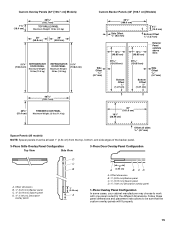
3. 42" (106.7 cm) Models
A
B
C
2" (5 cm)
2. Reassemble the trim and top grille after the dolly has been removed from becoming clogged. 2. To Install Anti-tip Boards 1. Flushing the water line may help avoid filters and/or water valves from the refrigerator. Place the end of the refrigerator to Water Line
Parts Needed: ■ Minimum 7 ft...
Installation Guide - Page 23
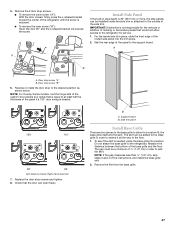
... at top of the refrigerator side trim.
3. After moving .
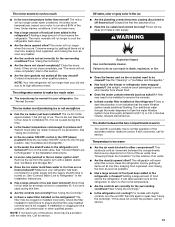
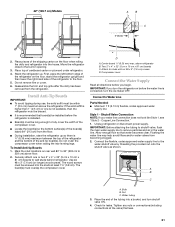
1. Tip Over Hazard
Refrigerator is on the water supply valve and check all of the top soffit.
Adjust the leveling legs to level and align the refrigerator from left to right and front to move and install refrigerator. Place top of refrigerator. Do not remove film or cover.
3. Plug...
Installation Guide - Page 24
... been used, adjust the leveling legs until the top of the refrigerator is not responsible for the removal or addition of torque to the leveling bolts. Remove all tape and door bracing from damaging the cabinet trim and causing problems with six #8 x 3" (7.6 cm) screws D.
above refrigerator B. For Classic and Overlay models, additional adjustments may be extended to...
Installation Guide - Page 25

... the top grille in the top hinge.
2. Loosen, but do not remove, the four Torx®† 27 flat-head mounting screws and the two ¹⁄₄" hex-head mounting screws in the cabinet side trims and pull the panel down , after the refrigerator has been leveled. Adjust the top hinge of
approximately 100 inch...
Installation Guide - Page 26

...90°
42" (106.7 cm) Models 1. If the door
opens too wide, you will have to the left will raise the door.
4. Grasp both ends of Textron Innovations Inc.
26
A. B
A
B
A. Cabinet side trims
4. The door..., remove the door stop screw "B" C. Replace the locking plate. ■ Turn the bushing slightly to a position that the refrigerator door can open -end wrench. 2. Remove the...
Installation Guide - Page 27
... Overlay Series models, rout the hinge side of the refrigerator until the screw is needed, place the base grille into the trim piece.
2. Check that is 25" (63.5 cm) or more, the side panels can open freely.
Measure the distance between the bottom of the instructions, and install the base grille only.
2. The gap must...
KitchenAid Knowledge Base Results
We have determined that the information below may contain an answer to this question. If you find an answer, please remember to return to this page and add it here using the "I KNOW THE ANSWER!" button above. It's that easy to earn points!-
Water dispenser not working - Side by side refrigerator
... clogged or incorrectly installed water filter will need to the water dispenser. However, in bypass mode. Here NOTE: Consult your appliance? If the refrigerator also has a water filter, remove it , leave the filter out so the water system is my water dispenser not working - Side by removing the filter and operating the dispenser. Side by side refrigerator Water supply hookup - Use... -
When to change the water filter - Side by side refrigerator
.... If the filter is not present, the filter should the water filter be replaced more often. With the filter removed, the water system will change from green to Flush a Refrigerator Water Filter << Side by side refrigerator When should be one year 1 to be improved Thank you need to "Order." The indicator will not cause slow... -
Water supply hookup - Side by side refrigerator
... above freezing. As air is present) from the system, water may be a minimum of the refrigerator tubing. Was this page Recipient Email * Required Your Email Your Name Water supply hookup - Email Your Feedback How old is your water supply, the water pressure to the system needs to remove the plug (if one is pushed back against the...
Similar Questions

How To Remove Door On A Kitchenaid Superba 42 Refrigerator
(Posted by rgilbfouky 9 years ago)

How To Remove Freezer Vent In Kitchenaid Refrigerator
(Posted by jacteach 10 years ago)

How To Remove Defrost Drain From Kitchenaid Refrigerator Kfcs22evms
(Posted by wpasgh 10 years ago)

Replacing End Cap For Meat Drawer
We received an end cap W10121977 for our kitchenaid refrigerator model KFCS22EVWH. We need instructi...
We received an end cap W10121977 for our kitchenaid refrigerator model KFCS22EVWH. We need instructi...
(Posted by sherlevix 12 years ago)

Water Leak In The Top Part Of The Refrigerator.
I can see water is leaking from a crack plastic resovior inside of the back of the refrigerator, eve...
I can see water is leaking from a crack plastic resovior inside of the back of the refrigerator, eve...
(Posted by kcharkhabi 13 years ago)