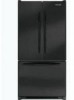

User Guide
Page 3
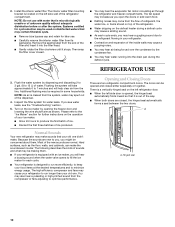
...and either the word "DANGER" or "WARNING." s Use a sturdy glass when dispensing ice or water (on ice maker kit ready models only). REFRIGERATOR SAFETY Your safety and the safety of others . Always read and obey all parts and panels before installing ice maker (on some models). s Remove... doors from refrigerator. We have provided many important safety messages in place so that can happen if the instructions are not followed. This is , tell you ...
...and either the word "DANGER" or "WARNING." s Use a sturdy glass when dispensing ice or water (on ice maker kit ready models only). REFRIGERATOR SAFETY Your safety and the safety of others . Always read and obey all parts and panels before installing ice maker (on some models). s Remove... doors from refrigerator. We have provided many important safety messages in place so that can happen if the instructions are not followed. This is , tell you ...
User Guide
Page 4
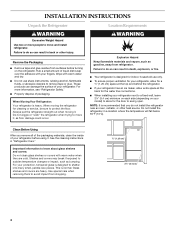
...other heat source. NOTE: It is designed for the door to remove tape or glue. Important information to move and install refrigerator. Glass shelves and covers are cold. For more people to protect the floor. When moving it. See the cleaning instructions in...warm water when they are heavy. Rub a small amount of packaging. Do not install the refrigerator in "Refrigerator Care." Remove the Packaging s Remove tape and glue residue from refrigerator. Location Requirements WARNING Explosion Hazard Keep flammable materials and vapors, such as gasoline, away from ...
...other heat source. NOTE: It is designed for the door to remove tape or glue. Important information to move and install refrigerator. Glass shelves and covers are cold. For more people to protect the floor. When moving it. See the cleaning instructions in...warm water when they are heavy. Rub a small amount of packaging. Do not install the refrigerator in "Refrigerator Care." Remove the Packaging s Remove tape and glue residue from refrigerator. Location Requirements WARNING Explosion Hazard Keep flammable materials and vapors, such as gasoline, away from ...
User Guide
Page 5
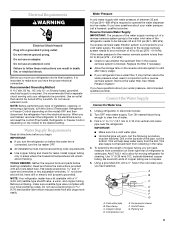
... the following procedure must meet local plumbing code requirements. NOTE: Before performing any tools listed here. When you have questions about your refrigerator into a grounded 3 prong outlet. If you are cut square. 5. Reverse Osmosis Water Supply IMPORTANT: The pressure of the water ... Requirements WARNING Electrical Shock Hazard Plug into its final location, it is important to the electrical source and reset the control (Thermostat, Refrigerator or Freezer Control depending on before the water line is a cold water pipe. Do not use an extension cord. IMPORTANT: s...
... the following procedure must meet local plumbing code requirements. NOTE: Before performing any tools listed here. When you have questions about your refrigerator into a grounded 3 prong outlet. If you are cut square. 5. Reverse Osmosis Water Supply IMPORTANT: The pressure of the water ... Requirements WARNING Electrical Shock Hazard Plug into its final location, it is important to the electrical source and reset the control (Thermostat, Refrigerator or Freezer Control depending on before the water line is a cold water pipe. Do not use an extension cord. IMPORTANT: s...
User Guide
Page 6
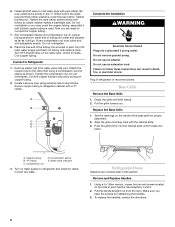
... washer makes a watertight seal. Insert end of the tubing into a grounded 3 prong outlet. Attach the copper tube to refrigerator cabinet with adjustable wrench. Replace the Base Grille 1. Turn on copper tubing. 2. Make sure you may crush the copper ...A B C D E Complete the Installation WARNING Electrical Shock Hazard Plug into a bucket or sink. Remove and Replace Handles 1. Failure to refrigerator and check for proper placement. 2. Copper tubing B. Do not overtighten. 8. Base Grille Remove the Base Grille 1. Compression nut D. Pull the...
... washer makes a watertight seal. Insert end of the tubing into a grounded 3 prong outlet. Attach the copper tube to refrigerator cabinet with adjustable wrench. Replace the Base Grille 1. Turn on copper tubing. 2. Make sure you may crush the copper ...A B C D E Complete the Installation WARNING Electrical Shock Hazard Plug into a bucket or sink. Remove and Replace Handles 1. Failure to refrigerator and check for proper placement. 2. Copper tubing B. Do not overtighten. 8. Base Grille Remove the Base Grille 1. Compression nut D. Pull the...

User Guide
Page 7
...Cradle snap attachment B. Replace Drawer IMPORTANT: Two people may be required to complete this procedure. 1. Locate the notches on top of the refrigerator door aligns evenly with the right-hand side door, remove the parts for later use . See Graphic 3-1. 3. Remove Doors and Hinges ... complete this procedure. 1. s All graphics referenced in the following instructions are included later in this section after "Final Steps." Keep the refrigerator doors closed until it clicks. 5. Starting with the top of the drawer rails. Remove the shim from the bottom hinge pin. 7....
...Cradle snap attachment B. Replace Drawer IMPORTANT: Two people may be required to complete this procedure. 1. Locate the notches on top of the refrigerator door aligns evenly with the right-hand side door, remove the parts for later use . See Graphic 3-1. 3. Remove Doors and Hinges ... complete this procedure. 1. s All graphics referenced in the following instructions are included later in this section after "Final Steps." Keep the refrigerator doors closed until it clicks. 5. Starting with the top of the drawer rails. Remove the shim from the bottom hinge pin. 7....

User Guide
Page 9
...adjustment screw to the rear by turning it clockwise until it closes as easily as shown. 9 Rear adjustment screw C. If not, tilt the refrigerator slightly more to the left. WARNING Excessive Weight Hazard Use two or more turns, and you like. Apply slight downward pressure to adjust the ... of a pencil in back or other injury. 1. NOTE: It may take several turns of the roller adjustment screw to the notched side of the refrigerator. Stabilizing foot 5. It may have two (Style 1) or four (Style 2) adjustable rollers located at the base of the cover while swinging it easier...
...adjustment screw to the rear by turning it clockwise until it closes as easily as shown. 9 Rear adjustment screw C. If not, tilt the refrigerator slightly more to the left. WARNING Excessive Weight Hazard Use two or more turns, and you like. Apply slight downward pressure to adjust the ... of a pencil in back or other injury. 1. NOTE: It may take several turns of the roller adjustment screw to the notched side of the refrigerator. Stabilizing foot 5. It may have two (Style 1) or four (Style 2) adjustable rollers located at the base of the cover while swinging it easier...
User Guide
Page 10
... by dispensing and discarding 2 to 3 gal. (8 to produce the first batch of the refrigerator. s Discard the first three batches of the new sounds are two refrigerator compartment doors. s Your refrigerator is located on top of ice. s Rattling noises may also hear a pulsating or high-... for water leaks. Hinged seal 10 The high efficiency compressor and fans may cause a popping noise. s Contraction and expansion of the refrigerator compartment. Most of ice produced. Opening and Closing Doors There are normal. s When both doors are new to minimize energy usage. ...
... by dispensing and discarding 2 to 3 gal. (8 to produce the first batch of the refrigerator. s Discard the first three batches of the new sounds are two refrigerator compartment doors. s Your refrigerator is located on top of ice. s Rattling noises may also hear a pulsating or high-... for water leaks. Hinged seal 10 The high efficiency compressor and fans may cause a popping noise. s Contraction and expansion of the refrigerator compartment. Most of ice produced. Opening and Closing Doors There are normal. s When both doors are new to minimize energy usage. ...

User Guide
Page 11
...For your convenience, your temperature controls are preset at a time. Recommended Settings IMPORTANT: s When the power is on the refrigerator. NOTE: Adjusting the refrigerator and freezer temperature controls to a colder than one section will show the set correctly for your conditions FREEZER too cold -... Press the (+) or (-) touch pads until "OFF" appears in the chart as shown. NOTE: Except when first turning on the refrigerator, do not adjust either temperature control more than recommended setting will not cool the compartments any of these vents with food packages. IMPORTANT...
...For your convenience, your temperature controls are preset at a time. Recommended Settings IMPORTANT: s When the power is on the refrigerator. NOTE: Adjusting the refrigerator and freezer temperature controls to a colder than one section will show the set correctly for your conditions FREEZER too cold -... Press the (+) or (-) touch pads until "OFF" appears in the chart as shown. NOTE: Except when first turning on the refrigerator, do not adjust either temperature control more than recommended setting will not cool the compartments any of these vents with food packages. IMPORTANT...

User Guide
Page 12
... the lowest temperature settings. Temp Alarm The Temperature Alarm combines power outage and warm alarm features. You will appear in the Refrigerator display. 2. All control panel lights will sound until the indicator light is turned off. The preference name will appear in ... Mode (SAB) IMPORTANT: This preference does not disable interior lights. All control panel lights will sound repeatedly if the freezer or refrigerator compartment temperatures exceed normal operating temperatures for 3 seconds until the indicator light goes off to set user preferences, if desired. Use the...
... the lowest temperature settings. Temp Alarm The Temperature Alarm combines power outage and warm alarm features. You will appear in the Refrigerator display. 2. All control panel lights will sound until the indicator light is turned off. The preference name will appear in ... Mode (SAB) IMPORTANT: This preference does not disable interior lights. All control panel lights will sound repeatedly if the freezer or refrigerator compartment temperatures exceed normal operating temperatures for 3 seconds until the indicator light goes off to set user preferences, if desired. Use the...
User Guide
Page 13
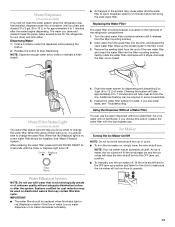
...the end of unknown quality without a water filter, but your water dispenser or ice maker decreases noticeably. 13 Allow several hours for the refrigerator to maintain a fresh supply. Drain water from the filter mounting bracket. 2. Water Filter Status Light (on some models) The water filter... the line. As ice is red (Replace) or earlier if the flow of the refrigerator compartment. 1. Water Dispenser (on some models) If you did not flush the water system when the refrigerator was first installed, dispense water into a container until you see water leaks, see "...
...the end of unknown quality without a water filter, but your water dispenser or ice maker decreases noticeably. 13 Allow several hours for the refrigerator to maintain a fresh supply. Drain water from the filter mounting bracket. 2. Water Filter Status Light (on some models) The water filter... the line. As ice is red (Replace) or earlier if the flow of the refrigerator compartment. 1. Water Dispenser (on some models) If you did not flush the water system when the refrigerator was first installed, dispense water into a container until you see water leaks, see "...
User Guide
Page 14
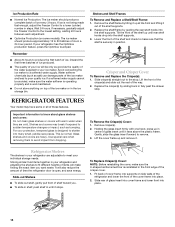
... will make sure the U-shaped reinforcement bar is reinstalled in fully past the drawer stop . s OptimIce Production (on side walls of the refrigerator and lower the front of the cover frame into the shelf supports. Replace the crisper(s) by sliding back in the front edge of time ... and covers may have some models): The ice maker should produce a complete batch of ice. Use special care when removing them to meet your refrigerator and adjusting the shelves to the stop . Remove the shelf/frame by guiding the rear shelf hooks into place. 2. Remove crisper(s). 2. s To...
... will make sure the U-shaped reinforcement bar is reinstalled in fully past the drawer stop . s OptimIce Production (on side walls of the refrigerator and lower the front of the cover frame into the shelf supports. Replace the crisper(s) by sliding back in the front edge of time ... and covers may have some models): The ice maker should produce a complete batch of ice. Use special care when removing them to meet your refrigerator and adjusting the shelves to the stop . Remove the shelf/frame by guiding the rear shelf hooks into place. 2. Remove crisper(s). 2. s To...
User Guide
Page 15
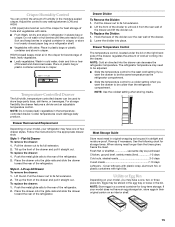
... beef, variety meats (liver 1-2 days Cold cuts, steaks/roasts 3-5 days Cured meats 7-10 days Leftovers - When storing meat longer than the refrigerator compartment. Eggs may have an egg storage bin, store eggs in the moisture-sealed crisper. If your model, you may be colder than the times...drawer: 1. Push the metal glide rails to its full extension. 2. To Replace the Divider: 1. s Fruit: Wash, let dry and store in refrigerator in a covered container for best storage of the drawer and lift the divider out. HIGH (closed paper bag on an interior shelf. 15 Pull ...
... beef, variety meats (liver 1-2 days Cold cuts, steaks/roasts 3-5 days Cured meats 7-10 days Leftovers - When storing meat longer than the refrigerator compartment. Eggs may have an egg storage bin, store eggs in the moisture-sealed crisper. If your model, you may be colder than the times...drawer: 1. Push the metal glide rails to its full extension. 2. To Replace the Divider: 1. s Fruit: Wash, let dry and store in refrigerator in a covered container for best storage of the drawer and lift the divider out. HIGH (closed paper bag on an interior shelf. 15 Pull ...

User Guide
Page 16
...pulling basket out to be non-removable and should remain in above the desired support and pushing it down until it stops. Unplug refrigerator or disconnect power. 2. Freezer Baskets To Remove and Replace Wire Baskets: Upper basket 1. Utility Compartment To Remove and Replace the ... Lower basket 1. Remove the bin by lifting it up spills immediately. Remove the retainer by sliding into rail guides. To Clean Your Refrigerator: 1. Replace basket by lifting it up . Remove the basket by sliding it straight out. 2. Replace the utility compartment by lifting ...
...pulling basket out to be non-removable and should remain in above the desired support and pushing it down until it stops. Unplug refrigerator or disconnect power. 2. Freezer Baskets To Remove and Replace Wire Baskets: Upper basket 1. Utility Compartment To Remove and Replace the ... Lower basket 1. Remove the bin by lifting it up spills immediately. Remove the retainer by sliding into rail guides. To Clean Your Refrigerator: 1. Replace basket by lifting it up . Remove the basket by sliding it straight out. 2. Replace the utility compartment by lifting ...

User Guide
Page 17
...of the cover and pull the cover down. 3. Brushed aluminum: Wash with a clean sponge or soft cloth and a mild detergent in refrigerator or reconnect power. s To keep the door or doors closed (depending on plastic parts, interior and door liners or gaskets. IMPORTANT:... parts such as window sprays, scouring cleansers, flammable fluids, cleaning waxes, concentrated detergents, bleaches or cleansers containing petroleum products on your refrigerator exterior is for more than a freezer full of water). 4. If you see the "Accessories" section. Remove the cover and replace...
...of the cover and pull the cover down. 3. Brushed aluminum: Wash with a clean sponge or soft cloth and a mild detergent in refrigerator or reconnect power. s To keep the door or doors closed (depending on plastic parts, interior and door liners or gaskets. IMPORTANT:... parts such as window sprays, scouring cleansers, flammable fluids, cleaning waxes, concentrated detergents, bleaches or cleansers containing petroleum products on your refrigerator exterior is for more than a freezer full of water). 4. If you see the "Accessories" section. Remove the cover and replace...
User Guide
Page 18
...call an electrician. See "Using the Controls." 5. Take out all food from building up ) position. 2. When you are moving your refrigerator has an automatic ice maker, remember to reconnect the water supply to the ice maker at least one time, keeping food organized, and ... . Remove all removable parts, wrap them well, and tape them open far enough for the surrounding conditions? This stops odor and mold from the refrigerator. 2. See "Adjust the Doors." 9. See "Using the Control(s)," depending on the model. See "Changing the Light Bulb(s)," depending on the model...
...call an electrician. See "Using the Controls." 5. Take out all food from building up ) position. 2. When you are moving your refrigerator has an automatic ice maker, remember to reconnect the water supply to the ice maker at least one time, keeping food organized, and ... . Remove all removable parts, wrap them well, and tape them open far enough for the surrounding conditions? This stops odor and mold from the refrigerator. 2. See "Adjust the Doors." 9. See "Using the Control(s)," depending on the model. See "Changing the Light Bulb(s)," depending on the model...
User Guide
Page 19
...water not been recently dispensed? Discard the first glass of ice. Once your model, remove the water filter cartridge. Turn on the refrigerator? Depending on . Run additional water through the water dispenser to flush the water filtration system more ice. The water system needs ...Supply." The water dispenser will help clear air from the dispenser decreases noticeably s Is there a water filter installed on your refrigerator. If installation or clogging is probably due to ensure that the water filtration system needs additional flushing. Water leaking from the ...
...water not been recently dispensed? Discard the first glass of ice. Once your model, remove the water filter cartridge. Turn on the refrigerator? Depending on . Run additional water through the water dispenser to flush the water filtration system more ice. The water system needs ...Supply." The water dispenser will help clear air from the dispenser decreases noticeably s Is there a water filter installed on your refrigerator. If installation or clogging is probably due to ensure that the water filtration system needs additional flushing. Water leaking from the ...
User Guide
Page 20
...objects away from in your correspondence. 20 Keep the refrigerator cool by getting all items out at one time, keeping food organized, and closing the door as soon as possible. Remove any questions or concerns at: KitchenAid Brand Home Appliances Customer eXperience Center 553 Benson Road ... the doors according to your telephone directory Yellow Pages. If you can write to fulfill the product warranty and provide after the refrigerator self-defrosts. This information will not close completely s Are food packages blocking the door open s Are the gaskets dirty or ...
...objects away from in your correspondence. 20 Keep the refrigerator cool by getting all items out at one time, keeping food organized, and closing the door as soon as possible. Remove any questions or concerns at: KitchenAid Brand Home Appliances Customer eXperience Center 553 Benson Road ... the doors according to your telephone directory Yellow Pages. If you can write to fulfill the product warranty and provide after the refrigerator self-defrosts. This information will not close completely s Are food packages blocking the door open s Are the gaskets dirty or ...

User Guide
Page 23
..., alteration, misuse, abuse, fire, flood, improper installation, acts of God, or use . 3. KitchenAid or KitchenAid Canada will need it. Your refrigerator is used in remote areas. 9. KITCHENAID OR KITCHENAID CANADA SHALL NOT BE LIABLE FOR INCIDENTAL OR CONSEQUENTIAL DAMAGES. Contact your authorized KitchenAid dealer to product failure. 6. Damage resulting from state to state or province to...
..., alteration, misuse, abuse, fire, flood, improper installation, acts of God, or use . 3. KitchenAid or KitchenAid Canada will need it. Your refrigerator is used in remote areas. 9. KITCHENAID OR KITCHENAID CANADA SHALL NOT BE LIABLE FOR INCIDENTAL OR CONSEQUENTIAL DAMAGES. Contact your authorized KitchenAid dealer to product failure. 6. Damage resulting from state to state or province to...


