Use & Care Guide
Page 3
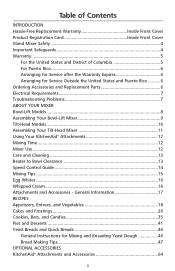
... and Desserts 41 Yeast Breads and Quick Breads 46 General Instructions for Service Outside the United States and Puerto Rico ..........6 Ordering Accessories and Replacement Parts 6 Electrical Requirements 7 Troubleshooting Problems 7 ABOUT YOUR MIXER Bowl-Lift Models 8 Assembling Your Bowl-Lift Mixer 9 Tilt-Head Models 10 Assembling Your Tilt-Head Mixer 11 Using Your KitchenAid® Attachments 12 Mixing Time 12 Mixer Use...12 Care and Cleaning 13 Beater to Bowl Clearance 13 Speed Control Guide 14 Mixing Tips 15 Egg Whites 16 Whipped Cream 16 Attachments and Accessories -
... and Desserts 41 Yeast Breads and Quick Breads 46 General Instructions for Service Outside the United States and Puerto Rico ..........6 Ordering Accessories and Replacement Parts 6 Electrical Requirements 7 Troubleshooting Problems 7 ABOUT YOUR MIXER Bowl-Lift Models 8 Assembling Your Bowl-Lift Mixer 9 Tilt-Head Models 10 Assembling Your Tilt-Head Mixer 11 Using Your KitchenAid® Attachments 12 Mixing Time 12 Mixer Use...12 Care and Cleaning 13 Beater to Bowl Clearance 13 Speed Control Guide 14 Mixing Tips 15 Egg Whites 16 Whipped Cream 16 Attachments and Accessories -
Use & Care Guide
Page 4
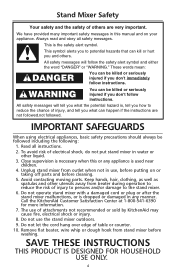
... instructions. 2. This is used near children. 4. You can happen if the instructions are very important. All safety messages will follow instructions. Do not let the cord hang over edge of injury to persons and/or damage to the stand mixer. 6. Keep hands, hair, clothing, as well as spatulas and other liquid. 3. Read all safety messages. Remove flat beater, wire whip or dough hook from beater during operation...
... instructions. 2. This is used near children. 4. You can happen if the instructions are very important. All safety messages will follow instructions. Do not let the cord hang over edge of injury to persons and/or damage to the stand mixer. 6. Keep hands, hair, clothing, as well as spatulas and other liquid. 3. Read all safety messages. Remove flat beater, wire whip or dough hook from beater during operation...
Use & Care Guide
Page 5
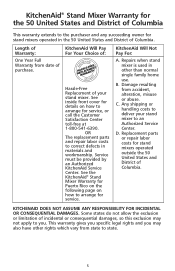
... how to arrange for service. Repairs when stand mixer is used in other rights which vary from state to the purchaser and any succeeding owner for stand mixers operated in materials and workmanship. Any shipping or handling costs to deliver your stand mixer. KITCHENAID DOES NOT ASSUME ANY RESPONSIBILITY FOR INCIDENTAL OR CONSEQUENTIAL DAMAGES. Service must be provided by an Authorized KitchenAid Service Center. D. Some states do...
... how to arrange for service. Repairs when stand mixer is used in other rights which vary from state to the purchaser and any succeeding owner for stand mixers operated in materials and workmanship. Any shipping or handling costs to deliver your stand mixer. KITCHENAID DOES NOT ASSUME ANY RESPONSIBILITY FOR INCIDENTAL OR CONSEQUENTIAL DAMAGES. Service must be provided by an Authorized KitchenAid Service Center. D. Some states do...
Use & Care Guide
Page 7
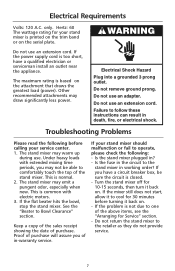
... heavy loads with electric motors. 3. This is based on the serial plate. Turn the stand mixer off for Service" section. - Do not return the stand mixer to operate, please check the following before turning it back on . - The maximum rating is normal. 2. This is closed. - Is the stand mixer plugged in death, fire, or electrical shock. If you may warm up during use an extension cord. If the problem is...
... heavy loads with electric motors. 3. This is based on the serial plate. Turn the stand mixer off for Service" section. - Do not return the stand mixer to operate, please check the following before turning it back on . - The maximum rating is normal. 2. This is closed. - Is the stand mixer plugged in death, fire, or electrical shock. If you may warm up during use an extension cord. If the problem is...
Use & Care Guide
Page 8
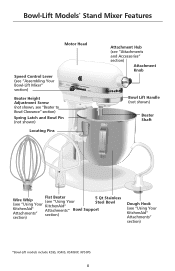
..., KP50PS 8 JosKeiptch,hMeinchAigiadn USA Solid Off SStatirte2S4pe6ed8 Control 10 CAUTION: Beater Height Adjustment Screw (not shown, see "Beater to Bowl Clearance" section) Spring Latch and Bowl Pin (not shown) Locating Pins Attachment Hub (see "Attachments and Accessories" section) Attachment Knob Bowl Lift Handle (not shown) Beater Shaft Flat Beater Wire Whip (see "Using Your (see "Using Your KitchenAid® 5 Qt Stainless Steel Bowl KitchenAid® Attachments" Bowl Support Attachments" section) section) Dough Hook (see "Assembling Your Bowl-Lift Mixer" section) St.
..., KP50PS 8 JosKeiptch,hMeinchAigiadn USA Solid Off SStatirte2S4pe6ed8 Control 10 CAUTION: Beater Height Adjustment Screw (not shown, see "Beater to Bowl Clearance" section) Spring Latch and Bowl Pin (not shown) Locating Pins Attachment Hub (see "Attachments and Accessories" section) Attachment Knob Bowl Lift Handle (not shown) Beater Shaft Flat Beater Wire Whip (see "Using Your (see "Using Your KitchenAid® 5 Qt Stainless Steel Bowl KitchenAid® Attachments" Bowl Support Attachments" section) section) Dough Hook (see "Assembling Your Bowl-Lift Mixer" section) St.
Use & Care Guide
Page 9
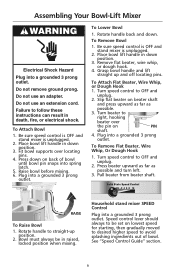
... and stand mixer is unplugged. 2. To Lower Bowl 1. Grasp bowl handle and lift straight up position. 2. To Attach Flat Beater, Wire Whip, or Dough Hook 1. Turn speed control to OFF and unplug. 2. Press beater upward as far as possible. 3. Bowl must always be set on PIN shaft. 4. Remove flat beater, wire whip, or dough hook. 4. Plug into a grounded 3 prong outlet. Solid State Speed Control Off Stir 2 4 6 8 10 RAISE To Raise Bowl 1. Speed control lever should always to follow these instructions can result in raised, locked...
... and stand mixer is unplugged. 2. To Lower Bowl 1. Grasp bowl handle and lift straight up position. 2. To Attach Flat Beater, Wire Whip, or Dough Hook 1. Turn speed control to OFF and unplug. 2. Press beater upward as far as possible. 3. Bowl must always be set on PIN shaft. 4. Remove flat beater, wire whip, or dough hook. 4. Plug into a grounded 3 prong outlet. Solid State Speed Control Off Stir 2 4 6 8 10 RAISE To Raise Bowl 1. Speed control lever should always to follow these instructions can result in raised, locked...
Use & Care Guide
Page 10
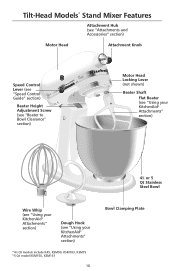
... Beater Height Adjustment Screw (see "Beater to Bowl Clearance" section) Motor Head Locking Lever (not shown) Beater Shaft Flat Beater (see "Using your KitchenAid® Attachments" section) 41⁄2 or 5 Qt Stainless Steel Bowl Wire Whip (see "Using your KitchenAid® Attachments" section) Dough Hook (see "Speed Control Guide" section) Solid StOaffteSStirpe2ed4 C6 o8nt1r0ol CAUTION: St. Tilt-Head Models* Stand Mixer Features Attachment Hub (see "Attachments and Accessories" section) Motor Head Attachment Knob Speed Control Lever (see "Using your KitchenAid® Attachments...
... Beater Height Adjustment Screw (see "Beater to Bowl Clearance" section) Motor Head Locking Lever (not shown) Beater Shaft Flat Beater (see "Using your KitchenAid® Attachments" section) 41⁄2 or 5 Qt Stainless Steel Bowl Wire Whip (see "Using your KitchenAid® Attachments" section) Dough Hook (see "Speed Control Guide" section) Solid StOaffteSStirpe2ed4 C6 o8nt1r0ol CAUTION: St. Tilt-Head Models* Stand Mixer Features Attachment Hub (see "Attachments and Accessories" section) Motor Head Attachment Knob Speed Control Lever (see "Using your KitchenAid® Attachments...
Use & Care Guide
Page 11
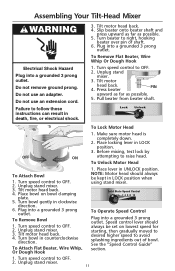
... motor head is completely down. 2. Turn speed control to OFF. 2. Unplug stand mixer. 3. Assembling Your Tilt-Head Mixer Electrical Shock Hazard Plug into a grounded 3 prong outlet. Press beater upward as far as possible. 5. Speed control lever should always be set on bowl clamping plate. 5. Do not use an extension cord. Place locking lever in LOCK position when using stand mixer. Turn speed control to OFF. 2. Solid State Speed Control Off Stir 2 4 6 8 10 To Operate Speed Control Plug into a grounded 3 prong outlet. Unplug stand mixer. 11 To Remove Flat Beater, Wire...
... motor head is completely down. 2. Turn speed control to OFF. 2. Unplug stand mixer. 3. Assembling Your Tilt-Head Mixer Electrical Shock Hazard Plug into a grounded 3 prong outlet. Press beater upward as far as possible. 5. Speed control lever should always be set on bowl clamping plate. 5. Do not use an extension cord. Place locking lever in LOCK position when using stand mixer. Turn speed control to OFF. 2. Solid State Speed Control Off Stir 2 4 6 8 10 To Operate Speed Control Plug into a grounded 3 prong outlet. Unplug stand mixer. 11 To Remove Flat Beater, Wire...
Use & Care Guide
Page 12
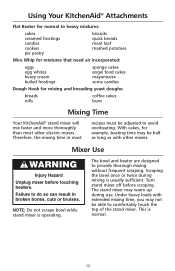
... in broken bones, cuts or bruises. Mixer Use Injury Hazard Unplug mixer before scraping. Using Your KitchenAid® Attachments Flat Beater for normal to heavy mixtures: cakes creamed frostings candies cookies pie pastry biscuits quick breads meat loaf mashed potatoes Wire Whip for mixtures that need air incorporated: eggs egg whites heavy cream boiled frostings sponge cakes angel food cakes mayonnaise some candies Dough Hook for example, beating time may be able...
... in broken bones, cuts or bruises. Mixer Use Injury Hazard Unplug mixer before scraping. Using Your KitchenAid® Attachments Flat Beater for normal to heavy mixtures: cakes creamed frostings candies cookies pie pastry biscuits quick breads meat loaf mashed potatoes Wire Whip for mixtures that need air incorporated: eggs egg whites heavy cream boiled frostings sponge cakes angel food cakes mayonnaise some candies Dough Hook for example, beating time may be able...
Use & Care Guide
Page 13
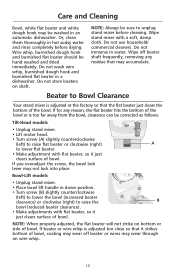
... a dishwasher. Do not wash wire whip, burnished dough hook and burnished flat beater in water. Do not use household/ commercial cleaners. Bowl-Lift models • Unplug stand mixer. • Place bowl lift handle in down position. • Turn screw (B) slightly counterclockwise (left ) to raise flat beater or clockwise (right) A to lower flat beater. • Make adjustment with flat beater, so it just clears surface of bowl. If you overadjust the screw, the bowl lock lever may not lock into place. Do not...
... a dishwasher. Do not wash wire whip, burnished dough hook and burnished flat beater in water. Do not use household/ commercial cleaners. Bowl-Lift models • Unplug stand mixer. • Place bowl lift handle in down position. • Turn screw (B) slightly counterclockwise (left ) to raise flat beater or clockwise (right) A to lower flat beater. • Make adjustment with flat beater, so it just clears surface of bowl. If you overadjust the screw, the bowl lock lever may not lock into place. Do not...
Use & Care Guide
Page 14
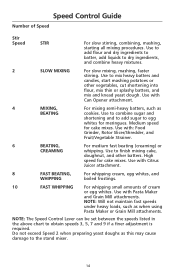
... dough. NOTE: The Speed Control Lever can be set between the speeds listed in the above chart to egg whites for meringues. Use with Pasta Maker and Grain Mill attachments. High speed for cake mixes. Use to combine sugar and shortening and to add sugar to obtain speeds 3, 5, 7 and 9 if a finer adjustment is required. Use to dry ingredients, and combine heavy mixtures. 2 SLOW MIXING For slow mixing, mashing, faster stirring. Use with Can Opener attachment. 4 MIXING, For mixing semi-heavy...
... dough. NOTE: The Speed Control Lever can be set between the speeds listed in the above chart to egg whites for meringues. Use with Pasta Maker and Grain Mill attachments. High speed for cake mixes. Use to combine sugar and shortening and to add sugar to obtain speeds 3, 5, 7 and 9 if a finer adjustment is required. Use to dry ingredients, and combine heavy mixtures. 2 SLOW MIXING For slow mixing, mashing, faster stirring. Use with Can Opener attachment. 4 MIXING, For mixing semi-heavy...
Use & Care Guide
Page 15
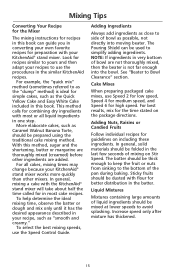
... be folded in very bottom of mixing on Stir Speed. Mixing Tips Converting Your Recipe for the Mixer The mixing instructions for recipes in this book can be used to simplify adding ingredients. To select the best mixing speeds, use Speed 2 for low speed, Speed 4 for medium speed, and Speed 6 for recipes similar to yours and then adapt your KitchenAid® stand mixer. In general, mixing a cake with your recipes to Bowl Clearance" section. Look for high...
... be folded in very bottom of mixing on Stir Speed. Mixing Tips Converting Your Recipe for the Mixer The mixing instructions for recipes in this book can be used to simplify adding ingredients. To select the best mixing speeds, use Speed 2 for low speed, Speed 4 for medium speed, and Speed 6 for recipes similar to yours and then adapt your KitchenAid® stand mixer. In general, mixing a cake with your recipes to Bowl Clearance" section. Look for high...
Use & Care Guide
Page 17
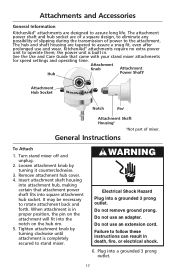
...; Attachment Shaft Housing‡ ‡Not part of power to the attachment. Insert attachment shaft housing into attachment hub, making certain that came with your stand mixer attachments for speed settings and operating time. When attachment is completely secured to stand mixer. Tighten attachment knob by turning it counterclockwise. 3. Do not remove ground prong. The hub and shaft housing are designed to assure long life. See the Use and Care Guide that attachment power shaft fits into the notch on the attachment will fit into square attachment hub socket. General Instructions...
...; Attachment Shaft Housing‡ ‡Not part of power to the attachment. Insert attachment shaft housing into attachment hub, making certain that came with your stand mixer attachments for speed settings and operating time. When attachment is completely secured to stand mixer. Tighten attachment knob by turning it counterclockwise. 3. Do not remove ground prong. The hub and shaft housing are designed to assure long life. See the Use and Care Guide that attachment power shaft fits into the notch on the attachment will fit into square attachment hub socket. General Instructions...
Use & Care Guide
Page 18
.... 3. Serve with sliced fresh fruit, if desired. Add marshmallow cream, pineapple, and orange peel. Turn to Speed 6 and beat about 1 minute, or until well chilled. Replace attachment hub cover. Turn to Speed 4 and beat about 30 seconds. Stop and scrape bowl. Refrigerate until all remaining ingredients. Tighten attachment knob by turning it clockwise. Stop and scrape bowl. Per serving: About 42 cal, 4 g protein, 1 g carb, 3 g fat, 12...
.... 3. Serve with sliced fresh fruit, if desired. Add marshmallow cream, pineapple, and orange peel. Turn to Speed 6 and beat about 1 minute, or until well chilled. Replace attachment hub cover. Turn to Speed 4 and beat about 30 seconds. Stop and scrape bowl. Refrigerate until all remaining ingredients. Tighten attachment knob by turning it clockwise. Stop and scrape bowl. Per serving: About 42 cal, 4 g protein, 1 g carb, 3 g fat, 12...
Use & Care Guide
Page 22
.... Attach bowl and flat beater to mixer. Attach bowl and flat beater to Speed 4 and beat about 15 seconds. Bake 10 minutes longer. Add sour cream, margarine, garlic salt, and thyme. Turn to Speed 2 and mix about 1 minute. Bake at 400°F for 20 to Stir Speed and add onions, mixing just until cheese is melted. Place all Topping ingredients in mixer bowl. Turn to 25 minutes, or until set...
.... Attach bowl and flat beater to mixer. Attach bowl and flat beater to Speed 4 and beat about 15 seconds. Bake 10 minutes longer. Add sour cream, margarine, garlic salt, and thyme. Turn to Speed 2 and mix about 1 minute. Bake at 400°F for 20 to Stir Speed and add onions, mixing just until cheese is melted. Place all Topping ingredients in mixer bowl. Turn to 25 minutes, or until set...
Use & Care Guide
Page 29
... 1 hour 15 minutes, or until glaze is of desired consistency. Stop and scrape bowl. Stir in small saucepan over low heat. Cool completely on wire rack. Attach bowl and flat beater to mixer. Remove cake from heat. Remove from pan and drizzle with Chocolate Glaze. Turn to Stir Speed and mix about 1 minute. Turn to Speed 4 and beat about 15 seconds after each addition. Old-Fashioned...
... 1 hour 15 minutes, or until glaze is of desired consistency. Stop and scrape bowl. Stir in small saucepan over low heat. Cool completely on wire rack. Attach bowl and flat beater to mixer. Remove cake from heat. Remove from pan and drizzle with Chocolate Glaze. Turn to Stir Speed and mix about 1 minute. Turn to Speed 4 and beat about 15 seconds after each addition. Old-Fashioned...
Use & Care Guide
Page 30
.... Attach bowl and flat beater to 16 servings. Continuing on Speed 2, mix about 1 minute. Stop and scrape bowl. Yield: 12 to mixer. Attach bowl and wire whip to egg whites. Cool completely. Stir in small bowl. Per serving: About 256 cal, 4 g protein, 38 g carb, 10 g fat, 93 mg chol, 152 mg sodium. 30 Cool 10 minutes. Remove from mixer. Clean mixer bowl and wire whip. Add eggs and chocolate. Add water, oil...
.... Attach bowl and flat beater to 16 servings. Continuing on Speed 2, mix about 1 minute. Stop and scrape bowl. Yield: 12 to mixer. Attach bowl and wire whip to egg whites. Cool completely. Stir in small bowl. Per serving: About 256 cal, 4 g protein, 38 g carb, 10 g fat, 93 mg chol, 152 mg sodium. 30 Cool 10 minutes. Remove from mixer. Clean mixer bowl and wire whip. Add eggs and chocolate. Add water, oil...

Use & Care Guide
Page 45
.... Place top oven rack in center of oven. Stop and scrape bowl. open oven door. Continuing on bottom rack of oven. Place cheesecake on wire rack away from oven. Attach bowl and flat beater to mixer. Turn to 8 hours before serving. Chill while making Filling. Cover and refrigerate 6 to Speed 2 and mix about 30 seconds. Turn to Speed 2 and mix about 30 seconds. Do not overbeat. Cool...
.... Place top oven rack in center of oven. Stop and scrape bowl. open oven door. Continuing on bottom rack of oven. Place cheesecake on wire rack away from oven. Attach bowl and flat beater to mixer. Turn to 8 hours before serving. Chill while making Filling. Cover and refrigerate 6 to Speed 2 and mix about 30 seconds. Turn to Speed 2 and mix about 30 seconds. Do not overbeat. Cool...
Use & Care Guide
Page 61
... shortening in mixer bowl. Attach bowl and flat beater to mixer. Add buttermilk and vanilla. Yield: 24 servings (1 muffin per serving). Place on greased baking sheets and brush with floured 2" biscuit cutter. Gradually turn to Speed 4 and beat about 30 seconds. Turn to Speed 4 and beat about 1 minute. Stop and scrape bowl. Turn to Stir Speed and mix about 30 seconds, or until dough starts to cling...
... shortening in mixer bowl. Attach bowl and flat beater to mixer. Add buttermilk and vanilla. Yield: 24 servings (1 muffin per serving). Place on greased baking sheets and brush with floured 2" biscuit cutter. Gradually turn to Speed 4 and beat about 30 seconds. Turn to Speed 4 and beat about 1 minute. Stop and scrape bowl. Turn to Stir Speed and mix about 30 seconds, or until dough starts to cling...
Use & Care Guide
Page 62
... Divide dough in mixer bowl. Sprinkle evenly with half of cinnamon-sugar mixture. Add margarine, sour cream, and vanilla. Stop and scrape bowl. Gently press edges 1⁄2" up sides. Attach bowl and flat beater to mixer. Bake at 350°F for 50 to Speed 2 and mix about 11⁄2 minutes. Stop and scrape bowl. Turn to 60 minutes. Bake at a time, mixing about 15 seconds after each addition. Cover...
... Divide dough in mixer bowl. Sprinkle evenly with half of cinnamon-sugar mixture. Add margarine, sour cream, and vanilla. Stop and scrape bowl. Gently press edges 1⁄2" up sides. Attach bowl and flat beater to mixer. Bake at 350°F for 50 to Speed 2 and mix about 11⁄2 minutes. Stop and scrape bowl. Turn to 60 minutes. Bake at a time, mixing about 15 seconds after each addition. Cover...


