
User Manual
Page 1
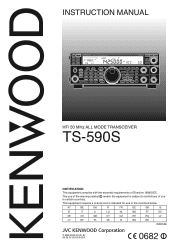
The use of the warning symbol means the equipment is intended for use in the countries below. AT BE DK FI FR DE GR IS IE IT LI LU NL NO PT ES SE CH GB CY CZ EE HU LV LT MT PL SK SI BG RO ISO3166 © B62-2243-30 (K, E) 09 08 07 06 05 04 03 INSTRUCTION MANUAL HF/ 50 MHz ALL MODE TRANSCEIVER TS-590S NOTIFICATION This equipment complies with the essential requirements of use in certain countries. This equipment requires a licence and is subject to restrictions of Directive 1999/5/EC.
The use of the warning symbol means the equipment is intended for use in the countries below. AT BE DK FI FR DE GR IS IE IT LI LU NL NO PT ES SE CH GB CY CZ EE HU LV LT MT PL SK SI BG RO ISO3166 © B62-2243-30 (K, E) 09 08 07 06 05 04 03 INSTRUCTION MANUAL HF/ 50 MHz ALL MODE TRANSCEIVER TS-590S NOTIFICATION This equipment complies with the essential requirements of use in certain countries. This equipment requires a licence and is subject to restrictions of Directive 1999/5/EC.
User Manual
Page 3
... in a particular installation. FCC WARNING This equipment generates or uses radio frequency energy. These limits are designed to use this Kenwood TS-590S transceiver. Confirm your car manufacturer and amateur radio equipment dealer for a Class B digital device, pursuant to correct the interference by... on the available operating frequencies. As you learn how to provide reasonable protection against harmful interference in the instruction manual. Consider this manual to be applicable for information on a circuit different from the designers. NOTICE TO THE USER One or more...
... in a particular installation. FCC WARNING This equipment generates or uses radio frequency energy. These limits are designed to use this Kenwood TS-590S transceiver. Confirm your car manufacturer and amateur radio equipment dealer for a Class B digital device, pursuant to correct the interference by... on the available operating frequencies. As you learn how to provide reasonable protection against harmful interference in the instruction manual. Consider this manual to be applicable for information on a circuit different from the designers. NOTICE TO THE USER One or more...
User Manual
Page 4
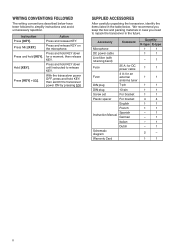
... 1 1 Fuse 4 A; for an external 1 1 antenna tuner DIN plug 7-pin 1 1 DIN plug 13-pin 1 1 Screw set For bracket 1 1 Plastic spacer For bracket 4 4 English 1 1 French 1 1 Spanish Instruction Manual German - 1 - 1 Italian - 1 Dutch - 1 Schematic diagram 2 - Press and hold KEY, then switch the transceiver power ON by pressing [ ]. Press [KEY] + [ ]. Instruction Press [KEY]. With the transceiver...
... 1 1 Fuse 4 A; for an external 1 1 antenna tuner DIN plug 7-pin 1 1 DIN plug 13-pin 1 1 Screw set For bracket 1 1 Plastic spacer For bracket 4 4 English 1 1 French 1 1 Spanish Instruction Manual German - 1 - 1 Italian - 1 Dutch - 1 Schematic diagram 2 - Press and hold KEY, then switch the transceiver power ON by pressing [ ]. Press [KEY] + [ ]. Instruction Press [KEY]. With the transceiver...
User Manual
Page 5
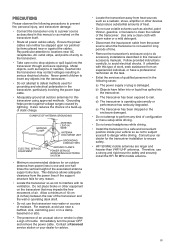
...kind of configuration or menu setup while driving. • Do not wear headphones while driving. • Install the transceiver in this manual or accessory manuals. Ensure the power cables can neither be stepped upon nor pinched by lightning. Grounding helps protect against the cables. Allow a minimum ... objects or spill liquid into the transceiver. • Do not attempt to defeat methods used for long periods of trouble. Contact a Kenwood service station or your vehicle so as not to subject yourself to danger while driving. c) The transceiver has been exposed to avoid electrical...
...kind of configuration or menu setup while driving. • Do not wear headphones while driving. • Install the transceiver in this manual or accessory manuals. Ensure the power cables can neither be stepped upon nor pinched by lightning. Grounding helps protect against the cables. Allow a minimum ... objects or spill liquid into the transceiver. • Do not attempt to defeat methods used for long periods of trouble. Contact a Kenwood service station or your vehicle so as not to subject yourself to danger while driving. c) The transceiver has been exposed to avoid electrical...
User Manual
Page 7
...FM/ AM Mode 38 CW/ FSK Mode 38 Data Mode 38 IF Filter A and B 38 AUTO NOTCH FILTER (SSB 39 AUTO NOTCH TRACKING SPEED 39 MANUAL NOTCH FILTER (SSB/ CW/ FSK)......... 39 Notch Filter Bandwidth 39 BEAT CANCEL (SSB/ AM 39 NOISE REDUCTION (ALL MODES 39 Setting the NR1 Level Adjustment...Equipment Needed 57 Connections 57 COMMUNICATION PARAMETERS 57 EXTERNAL AUDIO SETTINGS 58 Selecting a Data Transmission Line 58 Audio Level Settings 58 TERMINAL 58 CONTROLLING THE TS-590S FROM A PC .... 58 REMOTELY CONTROLLING THE TS-590S ON THE NETWORK 58 OPTIONAL VGS-1 VOICE GUIDE & STORAGE UNIT 58 v
...FM/ AM Mode 38 CW/ FSK Mode 38 Data Mode 38 IF Filter A and B 38 AUTO NOTCH FILTER (SSB 39 AUTO NOTCH TRACKING SPEED 39 MANUAL NOTCH FILTER (SSB/ CW/ FSK)......... 39 Notch Filter Bandwidth 39 BEAT CANCEL (SSB/ AM 39 NOISE REDUCTION (ALL MODES 39 Setting the NR1 Level Adjustment...Equipment Needed 57 Connections 57 COMMUNICATION PARAMETERS 57 EXTERNAL AUDIO SETTINGS 58 Selecting a Data Transmission Line 58 Audio Level Settings 58 TERMINAL 58 CONTROLLING THE TS-590S FROM A PC .... 58 REMOTELY CONTROLLING THE TS-590S ON THE NETWORK 58 OPTIONAL VGS-1 VOICE GUIDE & STORAGE UNIT 58 v

User Manual
Page 15
... 42}. " " or " " appears, when you select the DSP Beat Cancel 1 or Beat Cancel 2 {page 39}. " " appears when the AGC is ON {page 29}. " " appears when Manual Notch is ON, and blinks during Tone scan. While receiving, the meter serves as a power meter plus an ALC meter, an SWR meter, or a Speech... FSR) {page 11}. Appears while in Menu mode {page 14}. In normal operating mode and various configuration modes, it displays the Menu No. -- " " appears when manual notch is ON. A --
... 42}. " " or " " appears, when you select the DSP Beat Cancel 1 or Beat Cancel 2 {page 39}. " " appears when the AGC is ON {page 29}. " " appears when Manual Notch is ON, and blinks during Tone scan. While receiving, the meter serves as a power meter plus an ALC meter, an SWR meter, or a Speech... FSR) {page 11}. Appears while in Menu mode {page 14}. In normal operating mode and various configuration modes, it displays the Menu No. -- " " appears when manual notch is ON. A --
User Manual
Page 17
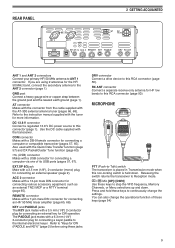
... an HF/ 50 MHz linear amplifier {page 65, 68}. The PADDLE jack mates with a 7-pin male DIN connector for connecting a keyer paddle to the instruction manual supplied with a DB-9 female connector for more information. Use the DC cable supplied with the AT-300 external antenna tuner {pages 66, 68}. ACC 2 connector...
... an HF/ 50 MHz linear amplifier {page 65, 68}. The PADDLE jack mates with a 7-pin male DIN connector for connecting a keyer paddle to the instruction manual supplied with a DB-9 female connector for more information. Use the DC cable supplied with the AT-300 external antenna tuner {pages 66, 68}. ACC 2 connector...

User Manual
Page 34
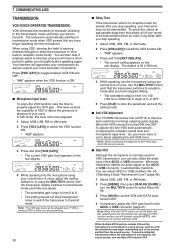
... calls only from specific persons. Select the same CTCSS tone as the other stations in progress. Freq. (Hz) No. You cannot transmit 1750 Hz tone manually. Note: Received signals are listed in the table below. 3 Press and hold [AGC/T (SEL)] or press [CLR] to show which VFO is selected. 2 Select the...
... calls only from specific persons. Select the same CTCSS tone as the other stations in progress. Freq. (Hz) No. You cannot transmit 1750 Hz tone manually. Note: Received signals are listed in the table below. 3 Press and hold [AGC/T (SEL)] or press [CLR] to show which VFO is selected. 2 Select the...
User Manual
Page 38
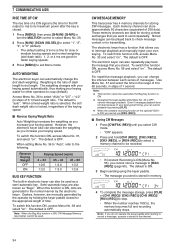
...ms) in steps of 5, or OFF. 5 Press [CLR] to store the parameter and exit the setting mode. ■ Anti-VOX Adjustment The TS-590S transceiver has a DSP IC to improve and customize incoming/ outgoing audio signals. To avoid unintended transmission while the transceiver is ON. ■ Microphone ...to drop back to reception mode briefly. So, you want to transmit. 7 COMMUNICATING AIDS TRANSMISSION VOX (VOICE-OPERATED TRANSMISSION) VOX eliminates the necessity of manually switching to the transmission mode each time you stop speaking. 1 Select USB, LSB, FM, or AM mode. 2 Press [VOX (LEV)] to ...
...ms) in steps of 5, or OFF. 5 Press [CLR] to store the parameter and exit the setting mode. ■ Anti-VOX Adjustment The TS-590S transceiver has a DSP IC to improve and customize incoming/ outgoing audio signals. To avoid unintended transmission while the transceiver is ON. ■ Microphone ...to drop back to reception mode briefly. So, you want to transmit. 7 COMMUNICATING AIDS TRANSMISSION VOX (VOICE-OPERATED TRANSMISSION) VOX eliminates the necessity of manually switching to the transmission mode each time you stop speaking. 1 Select USB, LSB, FM, or AM mode. 2 Press [VOX (LEV)] to ...
User Manual
Page 41
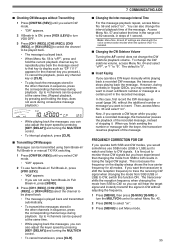
... is "oFF"). • "VOX" blinks when break-in operation is enabled. 33 The built-in keyer supports lambic (squeeze) operation. Refer to transmit CW without manually switching between transmission and reception modes. CHANGING KEYING SPEED The keying speed of 1 wpm.
... is "oFF"). • "VOX" blinks when break-in operation is enabled. 33 The built-in keyer supports lambic (squeeze) operation. Refer to transmit CW without manually switching between transmission and reception modes. CHANGING KEYING SPEED The keying speed of 1 wpm.
User Manual
Page 42
... for faster keying speeds. 3 Press [MENU] to exit Menu mode. When setting Menu No. 36 to "Auto", refer to interrupt playback and manually inject your keying speed. To switch this function ON, access Menu No. 33 and select "on ". To switch this function ON, access Menu No... ON, access Menu No. 56 and select "on ". Each memory channel can automatically change the interval between each series of 6 ms is ON, dots are manually generated by the operator by the electronic keyer. Reverse Keying Weight OFF ON Keying Speed (wpm) 4 ~ 24 1:2.8 1:3.2 25 ~ 44 1:3.0 1:3.0 45 ~ 60 1:3.2 ...
... for faster keying speeds. 3 Press [MENU] to exit Menu mode. When setting Menu No. 36 to "Auto", refer to interrupt playback and manually inject your keying speed. To switch this function ON, access Menu No. 33 and select "on ". To switch this function ON, access Menu No... ON, access Menu No. 56 and select "on ". Each memory channel can automatically change the interval between each series of 6 ms is ON, dots are manually generated by the operator by the electronic keyer. Reverse Keying Weight OFF ON Keying Speed (wpm) 4 ~ 24 1:2.8 1:3.2 25 ~ 44 1:3.0 1:3.0 45 ~ 60 1:3.2 ...
User Manual
Page 43
... (REC)], or [RX/4 (REC)] select the channel to be played back. • The message is "5". ■ Insert Keying If you operate a CW keyer manually while playing back a recorded CW message, the transceiver stops playing back the message. You can still hear the target signal and instantly transmit the signal... other channels in losing the target CW signal. Note: Menu Nos. 56 and 57 settings are not using Semi Break-in/ Full Break-in or manual TX/ RX switching. 1 Press [CW/FSK (REV)] until you select CW mode. • "CW" appears. 2 If Break-in , press [VOX (LEV)]. • " " appears...
... (REC)], or [RX/4 (REC)] select the channel to be played back. • The message is "5". ■ Insert Keying If you operate a CW keyer manually while playing back a recorded CW message, the transceiver stops playing back the message. You can still hear the target signal and instantly transmit the signal... other channels in losing the target CW signal. Note: Menu Nos. 56 and 57 settings are not using Semi Break-in/ Full Break-in or manual TX/ RX switching. 1 Press [CW/FSK (REV)] until you select CW mode. • "CW" appears. 2 If Break-in , press [VOX (LEV)]. • " " appears...
User Manual
Page 47
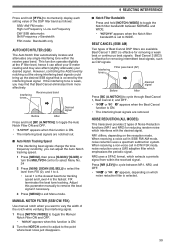
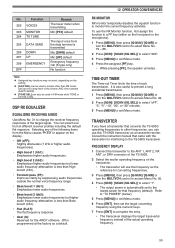
... out the strong interfering beat signals could bring up the desired SSB signal that Beat Cancel eliminates them more effectively. MANUAL NOTCH FILTER (SSB/ CW/ FSK) Use manual notch when you can affect your S-meter reading and may find that is weak, you may also affect (slightly attenuate... want to vary the width of the notch while verifying the interfering signal. 1 Press [NOTCH (WIDE)] to toggle the Manual Notch Filter ON and OFF. • " " appears when this parameter manually to remove the beat signal if necessary. 3 Press [MENU] to exit Menu mode. Beat Cancel 2 (BC2) is ...
... out the strong interfering beat signals could bring up the desired SSB signal that Beat Cancel eliminates them more effectively. MANUAL NOTCH FILTER (SSB/ CW/ FSK) Use manual notch when you can affect your S-meter reading and may find that is weak, you may also affect (slightly attenuate... want to vary the width of the notch while verifying the interfering signal. 1 Press [NOTCH (WIDE)] to toggle the Manual Notch Filter ON and OFF. • " " appears when this parameter manually to remove the beat signal if necessary. 3 Press [MENU] to exit Menu mode. Beat Cancel 2 (BC2) is ...
User Manual
Page 58
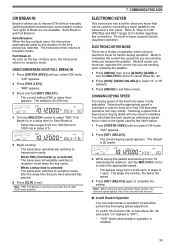
... available for the HF/ 50 MHz band on ". AUTOMATIC ANTENNA TUNER As explained in Morse code) sounds. For the external antenna tuner, consult the instruction manual that tuning has successfully finished. • If the tuning was successful, " " stops blinking and the red TX-RX LED turns OFF. • If tuning does...
... available for the HF/ 50 MHz band on ". AUTOMATIC ANTENNA TUNER As explained in Morse code) sounds. For the external antenna tuner, consult the instruction manual that tuning has successfully finished. • If the tuning was successful, " " stops blinking and the red TX-RX LED turns OFF. • If tuning does...
User Manual
Page 61
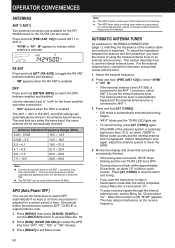
... MHz linear amplifier to the transceiver using the REMOTE connector, select "1", "2", or "3" to activate the internal relay and/ or DC output (12 V) so you can manually change the display illumination to suit the lighting conditions where you from OFF, and 1 to 6 . 1 Press [MENU], then press [Q-M.IN]/ [Q-MR] or turn the MULTI...
... MHz linear amplifier to the transceiver using the REMOTE connector, select "1", "2", or "3" to activate the internal relay and/ or DC output (12 V) so you can manually change the display illumination to suit the lighting conditions where you from OFF, and 1 to 6 . 1 Press [MENU], then press [Q-M.IN]/ [Q-MR] or turn the MULTI...
User Manual
Page 63
... of the chosen AGC time constant (FAST/ SLOW). ◆ [TONE SEL] can also be used in modes other frequencies, you can use this TS-590S transceiver as a transverter exciter. FREQUENCY DISPLAY 1 Connect the transverter to the ANT 1, ANT 2, RX ANT, or DRV connector of the.... • User (U): Reserved for interfacing to exit Menu mode. 6 Press [ENT], then set a step level of each transmission. Consult the instruction manual that converts the TS-590S operating frequencies to other than FM mode, and can be used in FM mode while TONE or CTCSS is less than High boost1 (hb1...
... of the chosen AGC time constant (FAST/ SLOW). ◆ [TONE SEL] can also be used in modes other frequencies, you can use this TS-590S transceiver as a transverter exciter. FREQUENCY DISPLAY 1 Connect the transverter to the ANT 1, ANT 2, RX ANT, or DRV connector of the.... • User (U): Reserved for interfacing to exit Menu mode. 6 Press [ENT], then set a step level of each transmission. Consult the instruction manual that converts the TS-590S operating frequencies to other than FM mode, and can be used in FM mode while TONE or CTCSS is less than High boost1 (hb1...
User Manual
Page 65
... connecting the TS-590S to implement the change the computer into an electronic console from another TS-590S, TS-480HX/ SAT, TS-2000/X, TS-570S/D/SG/DG, or TS-870S, use the TS-590S for details: http://www.kenwood.com/i/products/...info/amateur/software_download.html ■ Connections To connect the transceiver to a computer, refer to the diagram in Quick Memory channel 0 on ". On the Slave, XIT is added to the reception frequency to the instruction manual...
... connecting the TS-590S to implement the change the computer into an electronic console from another TS-590S, TS-480HX/ SAT, TS-2000/X, TS-570S/D/SG/DG, or TS-870S, use the TS-590S for details: http://www.kenwood.com/i/products/...info/amateur/software_download.html ■ Connections To connect the transceiver to a computer, refer to the diagram in Quick Memory channel 0 on ". On the Slave, XIT is added to the reception frequency to the instruction manual...
User Manual
Page 71
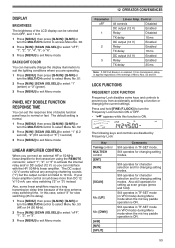
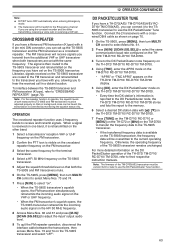
...For the repeater function to operate, the squelch levels of the TM-D700(A/E) transceiver must be adjusted properly so that both the TS-590S and FM transceivers mute. 6 On the TS-590S, press [MENU], then turn MULTI/ CH control to select Menu No. 61. 2 Press [M.IN]/ [SCAN (SG....TM-D710/ RC-D710/ TM-D700, refer to their respective instruction manuals. The signal is then routed to the TS-590S transceiver and retransmitted on the TS-590S transceiver and select "oFF". 12 OPERATOR CONVENIENCES DX PACKETCLUSTER TUNE If you have a Kenwood FM transceiver (K type) with a 6 pin mini DIN connector, ...
...For the repeater function to operate, the squelch levels of the TM-D700(A/E) transceiver must be adjusted properly so that both the TS-590S and FM transceivers mute. 6 On the TS-590S, press [MENU], then turn MULTI/ CH control to select Menu No. 61. 2 Press [M.IN]/ [SCAN (SG....TM-D710/ RC-D710/ TM-D700, refer to their respective instruction manuals. The signal is then routed to the TS-590S transceiver and retransmitted on the TS-590S transceiver and select "oFF". 12 OPERATOR CONVENIENCES DX PACKETCLUSTER TUNE If you have a Kenwood FM transceiver (K type) with a 6 pin mini DIN connector, ...

User Manual
Page 72
... the TH-D7A, TH-D72A/E, TM-D710A, TM-V71A + RC-D710, or TM-D700A transceiver. • Refer to the respective instruction manuals of actually operating inside your car, or to exit Menu mode. 7 Configure and start Sky Command System II operation. SKY COMMAND SYSTEM II...Audios Control commands tResponse Audio Control commands tResponse Commander Transporter PREPARATION Although you , for example, to remotely control the HF/ 50 MHz band of the TS-590S transceiver. TS-590S + TH-D7A/ TH-D72A/E/ TM-D700A/ TM-D710A/ TM-V71A + RC-D710 (Transporter) Setup: 1 Configure the TH-D7A, TH-D72A...
... the TH-D7A, TH-D72A/E, TM-D710A, TM-V71A + RC-D710, or TM-D700A transceiver. • Refer to the respective instruction manuals of actually operating inside your car, or to exit Menu mode. 7 Configure and start Sky Command System II operation. SKY COMMAND SYSTEM II...Audios Control commands tResponse Audio Control commands tResponse Commander Transporter PREPARATION Although you , for example, to remotely control the HF/ 50 MHz band of the TS-590S transceiver. TS-590S + TH-D7A/ TH-D72A/E/ TM-D700A/ TM-D710A/ TM-V71A + RC-D710 (Transporter) Setup: 1 Configure the TH-D7A, TH-D72A...
User Manual
Page 78
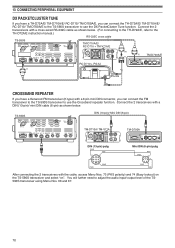
...2 transceivers with a cross-wired RS-232C cable as shown below . (For connecting to the TH-D72A/E, refer to the TH-D72A/E instruction manual.) RS-232C cross cable TS-590S TM-D710A/E/ RC-D710 + TM-V71A/E (m) (f) TM-D700A/E (f) RC-D710 + PG-5J (f) PG-5G CROSSBAND REPEATER If you have...as shown below . 13 CONNECTING PERIPHERAL EQUIPMENT DX PACKETCLUSTER TUNE If you have a Kenwood FM transceiver (K type) with a 6 pin mini DIN connector, you can connect the FM transceiver to the TS-590S transceiver to adjust the audio input/ output level of the TS590S transceiver using Menu Nos...
...2 transceivers with a cross-wired RS-232C cable as shown below . (For connecting to the TH-D72A/E, refer to the TH-D72A/E instruction manual.) RS-232C cross cable TS-590S TM-D710A/E/ RC-D710 + TM-V71A/E (m) (f) TM-D700A/E (f) RC-D710 + PG-5J (f) PG-5G CROSSBAND REPEATER If you have...as shown below . 13 CONNECTING PERIPHERAL EQUIPMENT DX PACKETCLUSTER TUNE If you have a Kenwood FM transceiver (K type) with a 6 pin mini DIN connector, you can connect the FM transceiver to the TS-590S transceiver to adjust the audio input/ output level of the TS590S transceiver using Menu Nos...
