
User Manual
Page 3
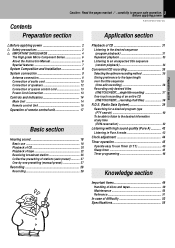
Before applying power 3 R-SE7/DP-SE7/X-SE7 (En) Preparation section Application section Preparation section Before applying power 2 Safety precautions 2 IMPORTANT SAFEGUARDS 4 The High grade Micro Component Series 6 About the Instruction Manual 6 Special features 7 System Composition and Installation 8 System connection 9 Antenna connection 9 ... of tape 22 Receiving broadcast station 26 Collective presetting of stations (auto preset 27 One-by-one presetting (manual preset 27 Recording 28 Recording 28 Playback of CD 31 Listening in Pure A mode 43 Clock adjustment 44 ...
Before applying power 3 R-SE7/DP-SE7/X-SE7 (En) Preparation section Application section Preparation section Before applying power 2 Safety precautions 2 IMPORTANT SAFEGUARDS 4 The High grade Micro Component Series 6 About the Instruction Manual 6 Special features 7 System Composition and Installation 8 System connection 9 Antenna connection 9 ... of tape 22 Receiving broadcast station 26 Collective presetting of stations (auto preset 27 One-by-one presetting (manual preset 27 Recording 28 Recording 28 Playback of CD 31 Listening in Pure A mode 43 Clock adjustment 44 ...
User Manual
Page 4
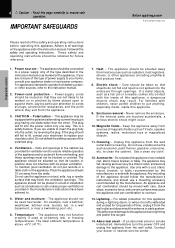
... into contact with a polarized alternating-current line plug (a plug having one way. If the internal parts are unable to the instruction manual. 2. Do not use a mounting accessory recommended by the manufacturer, or sold with care. Quick stops, excessive force, and uneven ... where they are not sure of the type of the type described in the instruction manual or as radiators, heat registers, stoves, or other ). IMPORTANT SAFEGUARDS Before applying power R-SE7/DP-SE7/X-SE7 (En) Preparation section Basic section Please read all the safety and operating instructions.
... into contact with a polarized alternating-current line plug (a plug having one way. If the internal parts are unable to the instruction manual. 2. Do not use a mounting accessory recommended by the manufacturer, or sold with care. Quick stops, excessive force, and uneven ... where they are not sure of the type of the type described in the instruction manual or as radiators, heat registers, stoves, or other ). IMPORTANT SAFEGUARDS Before applying power R-SE7/DP-SE7/X-SE7 (En) Preparation section Basic section Please read all the safety and operating instructions.
User Manual
Page 5
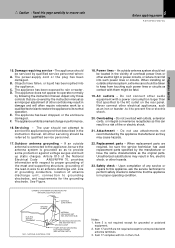
... parts are not required except for grounded or polarized equipment. 2. Upon completion of other servicing should be serviced by following the instruction manual. Item 17 complies with a power consumption larger than that described in wire to an antenna discharge unit, size of grounding conductors, ...are required, be taken to provide some protection against voltage surges and built up static charges. Before applying power 5 R-SE7/DP-SE7/X-SE7 (En) Preparation section Basic section 15. Caution : Read this page carefully to prevent fire or electric shock. 20.
... parts are not required except for grounded or polarized equipment. 2. Upon completion of other servicing should be serviced by following the instruction manual. Item 17 complies with a power consumption larger than that described in wire to an antenna discharge unit, size of grounding conductors, ...are required, be taken to provide some protection against voltage surges and built up static charges. Before applying power 5 R-SE7/DP-SE7/X-SE7 (En) Preparation section Basic section 15. Caution : Read this page carefully to prevent fire or electric shock. 20.
User Manual
Page 6
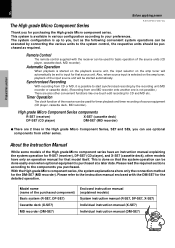
... equipment (CD player, cassette deck, MD recorder). Model name (name of the purchased component) Basic system (R-SE7, DP-SE7) Cassette deck (X-SE7) MD recorder (DM-SE7) Enclosed instruction manual (explained models) System instruction manual (R-SE7, DP-SE7, X-SE7) Individual instruction manual (X-SE7) Individual instruction manual (DM-SE7) Knowledge sections Please read the required sections according to the components you can be set to...
... equipment (CD player, cassette deck, MD recorder). Model name (name of the purchased component) Basic system (R-SE7, DP-SE7) Cassette deck (X-SE7) MD recorder (DM-SE7) Enclosed instruction manual (explained models) System instruction manual (R-SE7, DP-SE7, X-SE7) Individual instruction manual (X-SE7) Individual instruction manual (DM-SE7) Knowledge sections Please read the required sections according to the components you can be set to...

User Manual
Page 11
... used. 4.Be careful not to , or greater than, shown below. System connection 11 R-SE7/DP-SE7/X-SE7 (En) Caution regarding placement To maintain proper ventilation, be made, make sure that the power plug is connected, also read the instruction manual of the component. 2.Insert the optical-fiber cable straight into a wall AC outlet. Connect...
... used. 4.Be careful not to , or greater than, shown below. System connection 11 R-SE7/DP-SE7/X-SE7 (En) Caution regarding placement To maintain proper ventilation, be made, make sure that the power plug is connected, also read the instruction manual of the component. 2.Insert the optical-fiber cable straight into a wall AC outlet. Connect...
User Manual
Page 18
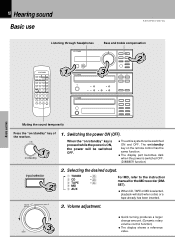
18 Hearing sound Basic use Hearing sound R-SE7/DP-SE7/X-SE7 (En) Listening through headphones Bass and treble compensation 2 1 3 Preparation section Basic section Application section Muting the sound temporarily Press the "on/standby" key ...247; The display shows a reference value. Knowledge sections Selecting the desired output. 1 TUNER 2 CD 3 TAPE 4 MD 5 AUX § ) ™ For MD, refer to the instruction manual for the MD recorder (DMSE7). ÷ When CD, TAPE or MD is switched OFF. (DIMMER function) input selector 2 volume control pure A 2. The on/standby key...
18 Hearing sound Basic use Hearing sound R-SE7/DP-SE7/X-SE7 (En) Listening through headphones Bass and treble compensation 2 1 3 Preparation section Basic section Application section Muting the sound temporarily Press the "on/standby" key ...247; The display shows a reference value. Knowledge sections Selecting the desired output. 1 TUNER 2 CD 3 TAPE 4 MD 5 AUX § ) ™ For MD, refer to the instruction manual for the MD recorder (DMSE7). ÷ When CD, TAPE or MD is switched OFF. (DIMMER function) input selector 2 volume control pure A 2. The on/standby key...

User Manual
Page 26
...One-by storing up to receive them by one-touch operations by -one presetting (manual preset) 2 1 Preparation section Basic section Application section Preset call ) Every time the key is received. Manual tuning : Press the key repeatedly or hold it depressed until a station is pressed..., the preset stations are switched over as follows. Select a station. Knowledge sections 26 Hearing sound Receiving broadcast station R-SE7/DP-SE7/X-SE7 (En) It is also ...
...One-by storing up to receive them by one-touch operations by -one presetting (manual preset) 2 1 Preparation section Basic section Application section Preset call ) Every time the key is received. Manual tuning : Press the key repeatedly or hold it depressed until a station is pressed..., the preset stations are switched over as follows. Select a station. Knowledge sections 26 Hearing sound Receiving broadcast station R-SE7/DP-SE7/X-SE7 (En) It is also ...

User Manual
Page 27
.... ÷ When a key is held depressed, preset stations will change during stereo reception Frequency display R-SE7 AUTO ST. auto/mono Each press alternates the mode. 1"AUTO" lit (Auto tuning) 2"AUTO" not lit (Manual tuning) Use the manual tuning mode when reception is pressed. 1Reception band/Frequency 2Preset number/Frequency 3 Clock Application section Knowledge...
.... ÷ When a key is held depressed, preset stations will change during stereo reception Frequency display R-SE7 AUTO ST. auto/mono Each press alternates the mode. 1"AUTO" lit (Auto tuning) 2"AUTO" not lit (Manual tuning) Use the manual tuning mode when reception is pressed. 1Reception band/Frequency 2Preset number/Frequency 3 Clock Application section Knowledge...
User Manual
Page 46
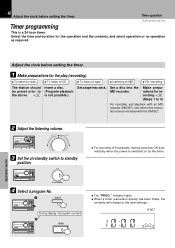
... ÷ When a timer reservation already has been made, the contents will change to the new settings. Timer operation Timer programming R-SE7/DP-SE7/X-SE7 (En) This is a 24 hour timer. Set a disc into deck. volume control pure A 3 Set the on by the timer...Select the time and duration for recording.• (Steps 1 to 4) For recording and playback with an MD recorder (DM-SE7), also refer to the instruction manual enclosed with the DM-SE7. 2 Adjust the listening volume. Preparation section Basic section ... 46 Adjust the clock before setting the timer. 1 Make ...
... ÷ When a timer reservation already has been made, the contents will change to the new settings. Timer operation Timer programming R-SE7/DP-SE7/X-SE7 (En) This is a 24 hour timer. Set a disc into deck. volume control pure A 3 Set the on by the timer...Select the time and duration for recording.• (Steps 1 to 4) For recording and playback with an MD recorder (DM-SE7), also refer to the instruction manual enclosed with the DM-SE7. 2 Adjust the listening volume. Preparation section Basic section ... 46 Adjust the clock before setting the timer. 1 Make ...

User Manual
Page 50
..., dry cloth. For the cleaning, use thinner, alcohol, etc., as these can cause discoloration. Do not use a cleaning cassette available in audio stores. Important Items R-SE7/DP-SE7/X-SE7 (En) Demagnetizing the head When the recording / playback head is magnetized, the sound quality will deteriorate. For details, read the instruction...
..., dry cloth. For the cleaning, use thinner, alcohol, etc., as these can cause discoloration. Do not use a cleaning cassette available in audio stores. Important Items R-SE7/DP-SE7/X-SE7 (En) Demagnetizing the head When the recording / playback head is magnetized, the sound quality will deteriorate. For details, read the instruction...
