

User Manual
Page 2
... refitted when replacing the fuse in accordance with the following code: Blue : Neutral Brown : Live Do not connect those leads to the earth terminal of products using lasers (Except for operation as Class 1. NO USER-SERVICEABLE PARTS INSIDE. THE EXCLAMATION POINT WITHIN AN EQUILATERAL TRIANGLE IS INTENDED TO ALERT THE USER TO THE PRESENCE OF IMPORTANT OPERATING AND MAINTENANCE (SERVICING) INSTRUCTIONS IN THE...
... refitted when replacing the fuse in accordance with the following code: Blue : Neutral Brown : Live Do not connect those leads to the earth terminal of products using lasers (Except for operation as Class 1. NO USER-SERVICEABLE PARTS INSIDE. THE EXCLAMATION POINT WITHIN AN EQUILATERAL TRIANGLE IS INTENDED TO ALERT THE USER TO THE PRESENCE OF IMPORTANT OPERATING AND MAINTENANCE (SERVICING) INSTRUCTIONS IN THE...
User Manual
Page 3
... System connection 4 -6 Unpacking 4 Loading batteries in the remote control unit 4 Connecting the accessories 5 Connecting other components 6 Adjusting the present time 7 Presetting radio stations 8 -9 Presetting stations automatically (AUTO PRESET 8 Presetting stations manually (MANUAL PRESET 9 Basic section Playback of CD 10 Playback of MD 12 Playback of TAPE 14 Receiving broadcast stations 16 Playing audio input from AUX component ..... 18 Recording CD onto MD (MD O.T.E 20 Recording CD onto TAPE (TAPE O.T.E 22 Application section Displayed information 26-27 Viewing the CD...
... System connection 4 -6 Unpacking 4 Loading batteries in the remote control unit 4 Connecting the accessories 5 Connecting other components 6 Adjusting the present time 7 Presetting radio stations 8 -9 Presetting stations automatically (AUTO PRESET 8 Presetting stations manually (MANUAL PRESET 9 Basic section Playback of CD 10 Playback of MD 12 Playback of TAPE 14 Receiving broadcast stations 16 Playing audio input from AUX component ..... 18 Recording CD onto MD (MD O.T.E 20 Recording CD onto TAPE (TAPE O.T.E 22 Application section Displayed information 26-27 Viewing the CD...

User Manual
Page 5
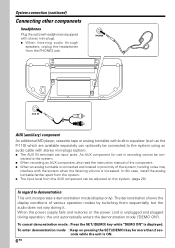
... a TV and power cords and orient it to the STANDBY mode (page 71) before plugging or unplugging the power cord. If a cord is plugged in a position as apart as possible from the wall power outlet. ÷ Do not install the speakers near a TV set. Otherwise, color irregularities due to insert each connection cord securely. Antenna assembly method AM loop antenna The provided antenna has been designed for indoor use.
... a TV and power cords and orient it to the STANDBY mode (page 71) before plugging or unplugging the power cord. If a cord is plugged in a position as apart as possible from the wall power outlet. ÷ Do not install the speakers near a TV set. Otherwise, color irregularities due to insert each connection cord securely. Antenna assembly method AM loop antenna The provided antenna has been designed for indoor use.
User Manual
Page 6
... the power supply fails and restores or the power cord is increased. To cancel demonstration mode : Press the SET/(DEMO) key while "DEMO ON" is ON. 6 EN To enter demonstration mode : Keep on this case, install the analog turntable farther apart from the system. ÷ The input level from the AUX component can optionally be connected to the system using an audio cable with stereo mini-plugs. ÷ When listening audio through speakers, unplug...
... the power supply fails and restores or the power cord is increased. To cancel demonstration mode : Press the SET/(DEMO) key while "DEMO ON" is ON. 6 EN To enter demonstration mode : Keep on this case, install the analog turntable farther apart from the system. ÷ The input level from the AUX component can optionally be connected to the system using an audio cable with stereo mini-plugs. ÷ When listening audio through speakers, unplug...
User Manual
Page 8
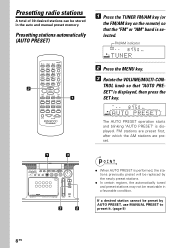
... the newly preset stations. ÷ In certain regions, the automatically tuned and preset stations may not be replaced by AUTO PRESET, use MANUAL PRESET to preset it. (page 9) 8 EN AUTO/MANU MD O.T.E. DISPLAY TIME DISPLAY TAPE O.T.E. SOUND TONE TIMER SLEEP MUTE VOLUME 1 1 Press the TUNER FM/AM key (or the FM/AM key on the remote) so that "AUTO PRESET" is performed, the stations previously preset will be receivable in the auto and manual preset memory. BASS The AUTO PRESET operation starts and blinking "AUTO PRESET" is selected...
... the newly preset stations. ÷ In certain regions, the automatically tuned and preset stations may not be replaced by AUTO PRESET, use MANUAL PRESET to preset it. (page 9) 8 EN AUTO/MANU MD O.T.E. DISPLAY TIME DISPLAY TAPE O.T.E. SOUND TONE TIMER SLEEP MUTE VOLUME 1 1 Press the TUNER FM/AM key (or the FM/AM key on the remote) so that "AUTO PRESET" is performed, the stations previously preset will be receivable in the auto and manual preset memory. BASS The AUTO PRESET operation starts and blinking "AUTO PRESET" is selected...
User Manual
Page 9
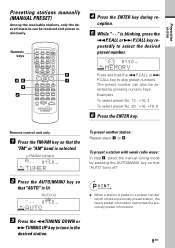
... to tune in a preset number which stores a previously preset station, the newly preset information overwrites the previously preset information. 9 EN Preparation section Presetting stations manually (MANUAL PRESET) Among the receivable stations, only the desired stations can also be received and preset individually. STEREO MEMORY EX. FM/AM indicator TUNER EX. To preset a station with weak radio wave : In step 2, select the manual tuning mode by pressing numeric keys. BASS 2 Press the AUTO/MANU key so that "AUTO" turns off...
... to tune in a preset number which stores a previously preset station, the newly preset information overwrites the previously preset information. 9 EN Preparation section Presetting stations manually (MANUAL PRESET) Among the receivable stations, only the desired stations can also be received and preset individually. STEREO MEMORY EX. FM/AM indicator TUNER EX. To preset a station with weak radio wave : In step 2, select the manual tuning mode by pressing numeric keys. BASS 2 Press the AUTO/MANU key so that "AUTO" turns off...
User Manual
Page 15
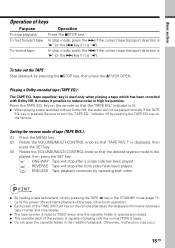
... displayed, then press the SET key. (3) Rotate the VOLUME/MULTI-CONTROL knob so that "TAPE RVS.?" To fast forward tape To rewind tape In stop mode, press the ¢ if the current tape transport direction is "3" (or the 4 key if it is "2"). It makes it possible to "0000" every time the cassette holder is opened and closed. ÷ The cassette deck of the system...
... displayed, then press the SET key. (3) Rotate the VOLUME/MULTI-CONTROL knob so that "TAPE RVS.?" To fast forward tape To rewind tape In stop mode, press the ¢ if the current tape transport direction is "3" (or the 4 key if it is "2"). It makes it possible to "0000" every time the cassette holder is opened and closed. ÷ The cassette deck of the system...
User Manual
Page 16
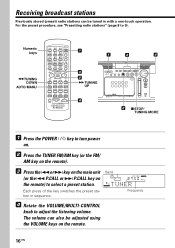
...station. BASS Frequency 4 Rotate the VOLUME/MULTI-CONTROL knob to 9). CLEAR/DELETE SET P.CALL ENTER TUNING DOWN 1 CD FM/AM TUNING UP 1 7 STOP MD TAPE23 TAPE EQ. Band STEREO TUNER EX. For the preset procedure, see "Presetting radio stations" (page 8 to adjust the listening volume. SOUND TONE TIMER SLEEP MUTE VOLUME 1 3 2 ¡TUNING UP 4 1 3 4 TAPE 2 7 STOP/ TUNING MODE 1 Press the POWER on. Each press of the key switches the preset station in with a one-touch operation. DISPLAY TIME DISPLAY TAPE O.T.E. Receiving broadcast stations Previously stored (preset...
...station. BASS Frequency 4 Rotate the VOLUME/MULTI-CONTROL knob to 9). CLEAR/DELETE SET P.CALL ENTER TUNING DOWN 1 CD FM/AM TUNING UP 1 7 STOP MD TAPE23 TAPE EQ. Band STEREO TUNER EX. For the preset procedure, see "Presetting radio stations" (page 8 to adjust the listening volume. SOUND TONE TIMER SLEEP MUTE VOLUME 1 3 2 ¡TUNING UP 4 1 3 4 TAPE 2 7 STOP/ TUNING MODE 1 Press the POWER on. Each press of the key switches the preset station in with a one-touch operation. DISPLAY TIME DISPLAY TAPE O.T.E. Receiving broadcast stations Previously stored (preset...

User Manual
Page 17
... on the remote. Auto tuning : Each press of the key tunes the next station automatically. TUNER EX. Manual tuning : Press and hold the key until the next station is in a good condition. BASS "AUTO" is lit in auto tuning mode "TUNED" is lit when a station is received "STEREO" is lit when a stereo station is received STEREO Frequency display ÷ When the unit is tuned. Basic section To tune a radio station using numeric keys : Input the preset number of the desired station using the...
... on the remote. Auto tuning : Each press of the key tunes the next station automatically. TUNER EX. Manual tuning : Press and hold the key until the next station is in a good condition. BASS "AUTO" is lit in auto tuning mode "TUNED" is lit when a station is received "STEREO" is lit when a stereo station is received STEREO Frequency display ÷ When the unit is tuned. Basic section To tune a radio station using numeric keys : Input the preset number of the desired station using the...
User Manual
Page 18
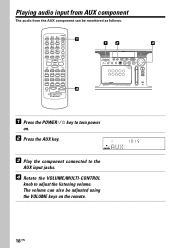
.... SOUND TONE TIMER SLEEP MUTE VOLUME 1 4 12 TAPE 4 1 Press the POWER on the remote. 18 EN Playing audio input from AUX component The audio from the AUX component can also be monitored as follows. AUTO/MANU MD O.T.E. DISPLAY TIME DISPLAY TAPE O.T.E. key to adjust the listening volume. The volume can be adjusted using the VOLUME keys on . 2 Press the AUX key. BASS 3 Play the component connected to the AUX input jacks. 4 Rotate the VOLUME/MULTI-CONTROL knob to turn power AUX EX. CLEAR/DELETE SET P.CALL ENTER TUNING DOWN 1 CD FM...
.... SOUND TONE TIMER SLEEP MUTE VOLUME 1 4 12 TAPE 4 1 Press the POWER on the remote. 18 EN Playing audio input from AUX component The audio from the AUX component can also be monitored as follows. AUTO/MANU MD O.T.E. DISPLAY TIME DISPLAY TAPE O.T.E. key to adjust the listening volume. The volume can be adjusted using the VOLUME keys on . 2 Press the AUX key. BASS 3 Play the component connected to the AUX input jacks. 4 Rotate the VOLUME/MULTI-CONTROL knob to turn power AUX EX. CLEAR/DELETE SET P.CALL ENTER TUNING DOWN 1 CD FM...

User Manual
Page 29
... the audio temporarily (MUTE) The audio being played can be adjusted. AUX VOLUME / MULTI-CONTROL TAPE Main unit only SET MENU 1 Press the AUX key to switch muting on or off. SOUND TONE TIMER SLEEP MUTE VOLUME Remote control unit only Press the MUTE key to select the AUX input. 2 Play the connected AUX compo- BASS 5 Rotate the VOLUME/MULTI-CON- CLEAR/DELETE SET P.CALL ENTER TUNING DOWN 1 CD FM/AM TUNING UP 1 7 STOP MD TAPE23 TAPE EQ. MUTE POWER...
... the audio temporarily (MUTE) The audio being played can be adjusted. AUX VOLUME / MULTI-CONTROL TAPE Main unit only SET MENU 1 Press the AUX key to switch muting on or off. SOUND TONE TIMER SLEEP MUTE VOLUME Remote control unit only Press the MUTE key to select the AUX input. 2 Play the connected AUX compo- BASS 5 Rotate the VOLUME/MULTI-CON- CLEAR/DELETE SET P.CALL ENTER TUNING DOWN 1 CD FM/AM TUNING UP 1 7 STOP MD TAPE23 TAPE EQ. MUTE POWER...

User Manual
Page 34
.../DELETE SET P.CALL ENTER TUNING DOWN 1 CD FM/AM TUNING UP 1 7 STOP MD TAPE23 TAPE EQ. DISPLAY TIME DISPLAY TAPE O.T.E. SOUND TONE TIMER SLEEP MUTE VOLUME VOLUME/ 7 STOP MULTI-CONTROL MENU SET TAPE 1 Make preparation for recording. If the program play or random play mode is displayed, then press the SET key. is activated, cancel it before proceeding. 7 STOP MD O.T.E. REC SPEED ? "HIGH-SPEED" lit CD≥MD HIGH EX. BASS 4 Rotate the VOLUME/MULTI-CON- The CD and...
.../DELETE SET P.CALL ENTER TUNING DOWN 1 CD FM/AM TUNING UP 1 7 STOP MD TAPE23 TAPE EQ. DISPLAY TIME DISPLAY TAPE O.T.E. SOUND TONE TIMER SLEEP MUTE VOLUME VOLUME/ 7 STOP MULTI-CONTROL MENU SET TAPE 1 Make preparation for recording. If the program play or random play mode is displayed, then press the SET key. is activated, cancel it before proceeding. 7 STOP MD O.T.E. REC SPEED ? "HIGH-SPEED" lit CD≥MD HIGH EX. BASS 4 Rotate the VOLUME/MULTI-CON- The CD and...

User Manual
Page 38
... the system is pressed during recording, recording pauses after leaving a no-sound section of recording only the normal (TYPE I) tapes. CD : Press the CD 6 key. If a CD or MD has already been loaded in synchronism with the start of tape recording can record any music source including CD and radio. 7 STOP VOLUME / AUX 4 MULTI-CONTROL 4 Start playing the source to be used. The CD player or MD recorder enters pause (play -pause) mode...
... the system is pressed during recording, recording pauses after leaving a no-sound section of recording only the normal (TYPE I) tapes. CD : Press the CD 6 key. If a CD or MD has already been loaded in synchronism with the start of tape recording can record any music source including CD and radio. 7 STOP VOLUME / AUX 4 MULTI-CONTROL 4 Start playing the source to be used. The CD player or MD recorder enters pause (play -pause) mode...

User Manual
Page 54
The system is activated (ON time). timer works only once after the start of the day. Tape : Load a cassette tape. blinking O.T.T. SOUND TONE TIMER SLEEP MUTE VOLUME POWER SET VOLUME POWER VOLUME / MULTI-CONTROL MENU SET 7 Setting 1 Make preparations according to the source to adjust the listening volume. AUX component : Make the required preparation for playback by simply setting the desired time of timer playback. TROL knob so that "O.T.T. BASS 5 Rotate the VOLUME/MULTI-CON- EX. TROL knob to select the time at the adjusted volume. 3 Press...
The system is activated (ON time). timer works only once after the start of the day. Tape : Load a cassette tape. blinking O.T.T. SOUND TONE TIMER SLEEP MUTE VOLUME POWER SET VOLUME POWER VOLUME / MULTI-CONTROL MENU SET 7 Setting 1 Make preparations according to the source to adjust the listening volume. AUX component : Make the required preparation for playback by simply setting the desired time of timer playback. TROL knob so that "O.T.T. BASS 5 Rotate the VOLUME/MULTI-CON- EX. TROL knob to select the time at the adjusted volume. 3 Press...

User Manual
Page 56
... EN AUX component : Make the required preparation for the AUX source component connected to select the figure of minute in the same way as above. 6 Select the time to start timer play the selected source at the selected time period. or "PROG.2 SET?" Set in the same way as the ON time. SOUND TONE TIMER SLEEP POWER SET POWER VOLUME / MULTI-CONTROL MENU SET TAPE 7 Setting 1 Make preparations according to the source to play - MD : Load an MD. Program No. Timer playback using program timer Use...
... EN AUX component : Make the required preparation for the AUX source component connected to select the figure of minute in the same way as above. 6 Select the time to start timer play the selected source at the selected time period. or "PROG.2 SET?" Set in the same way as the ON time. SOUND TONE TIMER SLEEP POWER SET POWER VOLUME / MULTI-CONTROL MENU SET TAPE 7 Setting 1 Make preparations according to the source to play - MD : Load an MD. Program No. Timer playback using program timer Use...

User Manual
Page 57
... adjust the time of the desired station, then press the SET key. To check or change the timer setting : Restart the procedure from step 1 again. ÷ Be sure to switch the power off . "AI PLAY" : The listening volume increases gradually from "CD", "MD", "TAPE", "TUNER" (radio) and "AUX"(AUX component). 9 To listen to radio broadcasting, Rotate the VOLUME/MULTI-CONTROL knob to be set so that their operating periods do not overlap. The program timer...
... adjust the time of the desired station, then press the SET key. To check or change the timer setting : Restart the procedure from step 1 again. ÷ Be sure to switch the power off . "AI PLAY" : The listening volume increases gradually from "CD", "MD", "TAPE", "TUNER" (radio) and "AUX"(AUX component). 9 To listen to radio broadcasting, Rotate the VOLUME/MULTI-CONTROL knob to be set so that their operating periods do not overlap. The program timer...

User Manual
Page 58
... to be recorded onto an MD or tape during timer playback. DISPLAY TIME DISPLAY TAPE O.T.E. If "AUX" is selected, this operation is selected 1 MD REC SOUND TONE TIMER SLEEP MUTE VOLUME POWER SET VOLUME POWER VOLUME / MULTI-CONTROL MENU SET TAPE 7 Setting 1 Make preparation for recording. Timer recording using program timer The audio of "Timer playback using program timer" (page 56). 3 Rotate the VOLUME/MULTI-CON- "TUNER": Radio "AUX" : AUX input source 5 To record a radio station, rotate the VOLUME/MULTI-CONTROL knob to select preset station to select "REC", then press the...
... to be recorded onto an MD or tape during timer playback. DISPLAY TIME DISPLAY TAPE O.T.E. If "AUX" is selected, this operation is selected 1 MD REC SOUND TONE TIMER SLEEP MUTE VOLUME POWER SET VOLUME POWER VOLUME / MULTI-CONTROL MENU SET TAPE 7 Setting 1 Make preparation for recording. Timer recording using program timer The audio of "Timer playback using program timer" (page 56). 3 Rotate the VOLUME/MULTI-CON- "TUNER": Radio "AUX" : AUX input source 5 To record a radio station, rotate the VOLUME/MULTI-CONTROL knob to select preset station to select "REC", then press the...

User Manual
Page 59
... lit. The program timer is erroneous. mote repeatedly until the program number to the STANDBY mode. Program No. Application section Timer 7 Execution 7 Press the TIMER key on the remote repeatedly until new timer information is set the next time. ÷ When the STANDBY/TIMER indicator is blinking in green, the timer setting or clock setting is activated and recording will start when the set so that their operating periods do not output audio during timer recording. ÷...
... lit. The program timer is erroneous. mote repeatedly until the program number to the STANDBY mode. Program No. Application section Timer 7 Execution 7 Press the TIMER key on the remote repeatedly until new timer information is set the next time. ÷ When the STANDBY/TIMER indicator is blinking in green, the timer setting or clock setting is activated and recording will start when the set so that their operating periods do not output audio during timer recording. ÷...

User Manual
Page 60
... the MENU key. 2 Rotate the VOLUME/MULTI-CON- EX. SET ?" blinking A.P.S. A.P.S. BASS ON "A.P.S." DISPLAY TIME DISPLAY TAPE O.T.E. This facility is convenient for the SLEEP time has elapsed, the system is turned off automatically. AUTO/MANU MD O.T.E. VOLUME / MULTI-CONTROL MENU SET TAPE Remote control unit only Press the SLEEP key repeatedly until the system is turned off can be selected in stop mode or with its volume set to "0" while the selected input is "TUNER" or "AUX". TROL...
... the MENU key. 2 Rotate the VOLUME/MULTI-CON- EX. SET ?" blinking A.P.S. A.P.S. BASS ON "A.P.S." DISPLAY TIME DISPLAY TAPE O.T.E. This facility is convenient for the SLEEP time has elapsed, the system is turned off automatically. AUTO/MANU MD O.T.E. VOLUME / MULTI-CONTROL MENU SET TAPE Remote control unit only Press the SLEEP key repeatedly until the system is turned off can be selected in stop mode or with its volume set to "0" while the selected input is "TUNER" or "AUX". TROL...
User Manual
Page 65
Amplifier / Speaker section The clock display blinks without changing the figures. \ Adjust the present time again. (page 7) Timer operation is not possible. \ If the present time has not been adjusted or there was a power failure, adjust the present time. (page 7) \ Set the timer ON time and OFF time. (pages 54 to 60) \ Press the TIMER key on the remote to activate the timer. (pages 55, 57 and 59) Radio stations cannot be received. \ Connect the provided AM loop...
Amplifier / Speaker section The clock display blinks without changing the figures. \ Adjust the present time again. (page 7) Timer operation is not possible. \ If the present time has not been adjusted or there was a power failure, adjust the present time. (page 7) \ Set the timer ON time and OFF time. (pages 54 to 60) \ Press the TIMER key on the remote to activate the timer. (pages 55, 57 and 59) Radio stations cannot be received. \ Connect the provided AM loop...


