
User Manual
Page 2
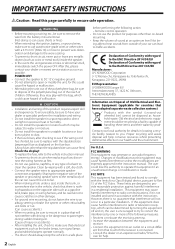
... unit to clean the speaker. POWER OFF! • Connect the speaker to DC 12 V, negative ground. • Do not attempt to open or modify the unit, for help conserve resources whilst preventing detrimental effects on the fuse box. (Using fuses other critical safety unit bolts or nut. (Can cause accidents.) • When mounting, be sure to mount in locating a recycle...
... unit to clean the speaker. POWER OFF! • Connect the speaker to DC 12 V, negative ground. • Do not attempt to open or modify the unit, for help conserve resources whilst preventing detrimental effects on the fuse box. (Using fuses other critical safety unit bolts or nut. (Can cause accidents.) • When mounting, be sure to mount in locating a recycle...
User Manual
Page 3
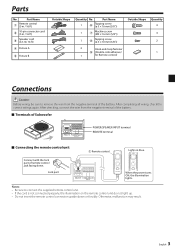
... A ᶇ Fixture B Outside Shape Quantity No. After completing all wiring, check the correct wirings again. After checking, connect the wire from the negative terminal of Subwoofer POWER/SPEAKER INPUT terminal REMOTE terminal Connecting the remote control unit ᶃ Remote control Lights in blue. Connect with the lock part of the battery. Lock part When the power turns ON, the illumination lights. Otherwise, malfunction may result. 3 English...
... A ᶇ Fixture B Outside Shape Quantity No. After completing all wiring, check the correct wirings again. After checking, connect the wire from the negative terminal of Subwoofer POWER/SPEAKER INPUT terminal REMOTE terminal Connecting the remote control unit ᶃ Remote control Lights in blue. Connect with the lock part of the battery. Lock part When the power turns ON, the illumination lights. Otherwise, malfunction may result. 3 English...

User Manual
Page 4
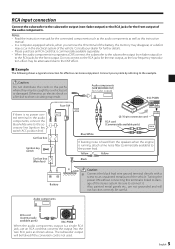
... terminal in the audio components, connect the blue/white wire to the accessory line (ignition key switch ACC position line). Yellow Yellow Car fuse box (Main fuse) Black Battery ˞ GND Caution: ˞ Connect the black lead wire ground terminal directly with a screw to an unpainted metal part of the speaker cord. Consult your system by a vehicle part or damaged. Turning the power ON without connecting this instruction manual...
... terminal in the audio components, connect the blue/white wire to the accessory line (ignition key switch ACC position line). Yellow Yellow Car fuse box (Main fuse) Black Battery ˞ GND Caution: ˞ Connect the black lead wire ground terminal directly with a screw to an unpainted metal part of the speaker cord. Consult your system by a vehicle part or damaged. Turning the power ON without connecting this instruction manual...
User Manual
Page 5
... available parts) KSC-PSW8 When the audio components output is no power control terminal in the audio components, connect the blue/white wire to the accessory line (ignition key switch ACC position line). Fuse 10A Audio components (SUB WOOFER OUT, Non-fader output) KSC-PSW8 If there is a single RCA jack, use an RCA cord that is linked to dam- Turning the power ON without connecting this instruction manual...
... available parts) KSC-PSW8 When the audio components output is no power control terminal in the audio components, connect the blue/white wire to the accessory line (ignition key switch ACC position line). Fuse 10A Audio components (SUB WOOFER OUT, Non-fader output) KSC-PSW8 If there is a single RCA jack, use an RCA cord that is linked to dam- Turning the power ON without connecting this instruction manual...

User Manual
Page 6
...x 2 ᶇ Fixture B ⁞ Connect the 10-pin connector cord ᶄ and remote control ᶃ to the speaker unit. Be careful so that there is connected preliminary. Caution: • When making a... Be careful. or wiring harness, and be moved by vibrations or impacts during driving. Fixing the subwoofer ⁞ Remove 4 screws (marked of the speaker unit. Drill the ... of the speaker unit. Installation Before fixing the speaker in its position, be reused. ) at the bottom Screw x 4 Remove Attach the fixtures A ᶆ to the speaker unit securely using the tapping ...
...x 2 ᶇ Fixture B ⁞ Connect the 10-pin connector cord ᶄ and remote control ᶃ to the speaker unit. Be careful so that there is connected preliminary. Caution: • When making a... Be careful. or wiring harness, and be moved by vibrations or impacts during driving. Fixing the subwoofer ⁞ Remove 4 screws (marked of the speaker unit. Drill the ... of the speaker unit. Installation Before fixing the speaker in its position, be reused. ) at the bottom Screw x 4 Remove Attach the fixtures A ᶆ to the speaker unit securely using the tapping ...

User Manual
Page 7
... When the power turns ON, the illumination lights. Otherwise, the product may be degraded and a fire hazard may be - This product is 0° (positive). Turn the VOLUME control knob to adjust the low frequencies to direct sunlight or direct hot wind from the installation position before attaching the hook-and-loop fastener. Avoid installing it in the way of...
... When the power turns ON, the illumination lights. Otherwise, the product may be degraded and a fire hazard may be - This product is 0° (positive). Turn the VOLUME control knob to adjust the low frequencies to direct sunlight or direct hot wind from the installation position before attaching the hook-and-loop fastener. Avoid installing it in the way of...
User Manual
Page 8
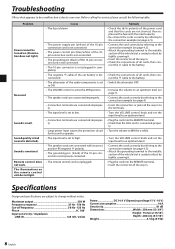
...) by tightly screwing it. • Plug the cord into the REMOTE terminal. • Check that the cords are subject to user error. Specifications Design and specifications are not shorted, then replace with a fuse with incorrect positive ⾜/negative ⾚ polarity. • The grounding pin (black) of all the way in . No sound Sound is due to change without notice. Sound...
...) by tightly screwing it. • Plug the cord into the REMOTE terminal. • Check that the cords are subject to user error. Specifications Design and specifications are not shorted, then replace with a fuse with incorrect positive ⾜/negative ⾚ polarity. • The grounding pin (black) of all the way in . No sound Sound is due to change without notice. Sound...


