

User Manual 1
Page 1
VIDEO SURROUND RECEIVER KRF-V7771D INSTRUCTION MANUAL KENWOOD CORPORATION Important: Setup the Remote Control First To operate your audio system correctly, it is important to first program your system. B60-4117-00 00 CH ( T, E2 ) KW 9809 Operations Other The operation modes on your remote enable to switch operation modes. Read and understand the instructions for...
VIDEO SURROUND RECEIVER KRF-V7771D INSTRUCTION MANUAL KENWOOD CORPORATION Important: Setup the Remote Control First To operate your audio system correctly, it is important to first program your system. B60-4117-00 00 CH ( T, E2 ) KW 9809 Operations Other The operation modes on your remote enable to switch operation modes. Read and understand the instructions for...
User Manual 1
Page 2
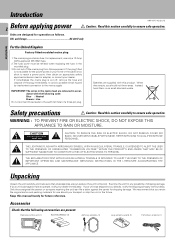
...manual handy for use only a 13-Amp ASTA-approved (BS1362) fuse. 2.The fuse cover must be lost. Examine the unit for shipping damage. Remote control unit (1) Batteries(R6/AA) (4) AM loop antenna (1) Loop antenna stand (1) FM indoor antenna (1) When they will not be refitted when...packing materials for future reference. If your unit is damaged or fails to operate, notify your dealer. Introduction Introduction 2 Before applying power KRF-V7771D (En/T) Caution : Read this section carefully to ensure safe operation. IMPORTANT:The wires in the mains lead are put aside so they ...
...manual handy for use only a 13-Amp ASTA-approved (BS1362) fuse. 2.The fuse cover must be lost. Examine the unit for shipping damage. Remote control unit (1) Batteries(R6/AA) (4) AM loop antenna (1) Loop antenna stand (1) FM indoor antenna (1) When they will not be refitted when...packing materials for future reference. If your unit is damaged or fails to operate, notify your dealer. Introduction Introduction 2 Before applying power KRF-V7771D (En/T) Caution : Read this section carefully to ensure safe operation. IMPORTANT:The wires in the mains lead are put aside so they ...
User Manual 1
Page 3
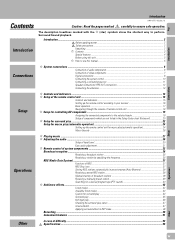
Contents Introduction Connections Setup Operations Other Introduction KRF-V7771D (En/T) Caution : Read the pages marked carefully to ensure safe operation. 3 The description headlines marked with the 6 (star) symbols show the shortest way to...macro play (automatic operation 24 Macro Execute ...26 6 Playing music ...27 6 Adjusting the audio ...30 Setup of Input Level ...30 Easy audio adjustment ...31 6 Remote control of system components ...32 Broadcast reception ...36 Receiving a broadcast station ...36 Receiving a station by specifying the frequency 36 RDS (Radio Data System) ...37 Functions...
Contents Introduction Connections Setup Operations Other Introduction KRF-V7771D (En/T) Caution : Read the pages marked carefully to ensure safe operation. 3 The description headlines marked with the 6 (star) symbols show the shortest way to...macro play (automatic operation 24 Macro Execute ...26 6 Playing music ...27 6 Adjusting the audio ...30 Setup of Input Level ...30 Easy audio adjustment ...31 6 Remote control of system components ...32 Broadcast reception ...36 Receiving a broadcast station ...36 Receiving a station by specifying the frequency 36 RDS (Radio Data System) ...37 Functions...

User Manual 1
Page 4
...The macro setup covers the AV components from other manufacturers as well as non-audio/ video units. For ease of use, KENWOOD placed the frequently used key icons on the first level of the current broadcast station; DSP modes The DSP (Digital Signal Processor)...Futureset, automatic update feature This function lets you update the remote control so it can quickly and easily match the surround processing to steer the Left, Center, Right and Surround channel audio signals. Introduction 4 Special features Introduction KRF-V7771D (En/T) True home theater sound Dolby Digital (AC-3)...
...The macro setup covers the AV components from other manufacturers as well as non-audio/ video units. For ease of use, KENWOOD placed the frequently used key icons on the first level of the current broadcast station; DSP modes The DSP (Digital Signal Processor)...Futureset, automatic update feature This function lets you update the remote control so it can quickly and easily match the surround processing to steer the Left, Center, Right and Surround channel audio signals. Introduction 4 Special features Introduction KRF-V7771D (En/T) True home theater sound Dolby Digital (AC-3)...

User Manual 1
Page 5
...the audio in incorrect operations. Remote control menu (Left side) Detailed operating procedure (Right side) Operating procedure step Operating procedure text Menu screen used in the table of contents that it is important to read before using this unit Introduction KRF-V7771D (En/T) 5 Compared to...to switch the operation modes may result in the "DSP Mode", select the "Prmtr" (Parameter) icon. 6 Shortest setup for remote controlling the connected components, playing music, listening to the menu screen on the left half of operation description In this receiver has ...
...the audio in incorrect operations. Remote control menu (Left side) Detailed operating procedure (Right side) Operating procedure step Operating procedure text Menu screen used in the table of contents that it is important to read before using this unit Introduction KRF-V7771D (En/T) 5 Compared to...to switch the operation modes may result in the "DSP Mode", select the "Prmtr" (Parameter) icon. 6 Shortest setup for remote controlling the connected components, playing music, listening to the menu screen on the left half of operation description In this receiver has ...

User Manual 1
Page 6
...are given as shown below. Also connect the system control cords when the KENWOOD Audio Component System is not possible or erroneous display appears even though all... : CD1 Multiple CD player or other CD player System control cord0 *2 Note on the remote control unit (provided with this unit to the CD2/TAPE2 MONITOR jacks. Loose connections may ... is indicated on marketing areas. Connections System connections System connections 6 Connection of audio components KRF-V7771D (En/T) The connected components shown here are completed. W *1 To the CD2/TAPE2 MONITOR ...
...are given as shown below. Also connect the system control cords when the KENWOOD Audio Component System is not possible or erroneous display appears even though all... : CD1 Multiple CD player or other CD player System control cord0 *2 Note on the remote control unit (provided with this unit to the CD2/TAPE2 MONITOR jacks. Loose connections may ... is indicated on marketing areas. Connections System connections System connections 6 Connection of audio components KRF-V7771D (En/T) The connected components shown here are completed. W *1 To the CD2/TAPE2 MONITOR ...

User Manual 1
Page 10
...XR], [XS], and [XS8] equipment for system operations. 10 Connecting the system control System connections KRF-V7771D (En/T) Connecting system control cords lets you take advantage of KENWOOD system control modes. Do not connect system control cords to any system control cords. Switching from ...a source component, the input selector on to the specified jacks may cause a malfunction and damage your remote controllable KENWOOD audio components, see "Setup for your equipment. 3. Be sure the system control plugs are not system-control compatible. ...
...XR], [XS], and [XS8] equipment for system operations. 10 Connecting the system control System connections KRF-V7771D (En/T) Connecting system control cords lets you take advantage of KENWOOD system control modes. Do not connect system control cords to any system control cords. Switching from ...a source component, the input selector on to the specified jacks may cause a malfunction and damage your remote controllable KENWOOD audio components, see "Setup for your equipment. 3. Be sure the system control plugs are not system-control compatible. ...

User Manual 1
Page 14
...input jacks (AV AUX) Connect the audio output (RCA) jacks of current is used. TUNED Stereo indicator TUNED indicator Multi-mode display Display KRF-V7771D (En/T) Setup ON/STANDBY POWER ON OFF CLIP INDICATOR DOLBY DIGITAL MPEG A SPEAKERS B VOLUME MUTE DOWN Cinema Re-EQ INPUT SELECTOR DISPLAY...key to switch the SPEAKERS A or SPEAKERS B ON and OFF. 7 Indicators CLIP INDICATOR : Lights when the input is clipped during analog to the remote control unit. 0 Communication indicator Lights when signal is activated. S VIDEO CD2 / TAPE2 V AV AUX L-AUDIO-R MONITOR @ #$ %^& 1 POWER key...
...input jacks (AV AUX) Connect the audio output (RCA) jacks of current is used. TUNED Stereo indicator TUNED indicator Multi-mode display Display KRF-V7771D (En/T) Setup ON/STANDBY POWER ON OFF CLIP INDICATOR DOLBY DIGITAL MPEG A SPEAKERS B VOLUME MUTE DOWN Cinema Re-EQ INPUT SELECTOR DISPLAY...key to switch the SPEAKERS A or SPEAKERS B ON and OFF. 7 Indicators CLIP INDICATOR : Lights when the input is clipped during analog to the remote control unit. 0 Communication indicator Lights when signal is activated. S VIDEO CD2 / TAPE2 V AV AUX L-AUDIO-R MONITOR @ #$ %^& 1 POWER key...

User Manual 1
Page 15
... AV AUX icon Select to it . ^ The following menu display ap- 2 pears after the batteries are displayed in operation Notes check. The remote control display may be controlled in this area. 3 Communication status display & Shows the communication status. 4 Joy stick & This key is operated from.../ CD2/ Input Input CD2 Tuner Tape1 Tape2 Digital Analog TV1 Macro TV2 Video1 Video2 Video3 Video4 AV AUX Setup Surround Remote Mode SP Selection SP Distance SP Level KRF-V7771D (En/T) 15 3 45 ENTER VOLUME MUTE CONFIRM ON/STANDBY 6 7 8 9 1 Segment screen The fixed icons ...
... AV AUX icon Select to it . ^ The following menu display ap- 2 pears after the batteries are displayed in operation Notes check. The remote control display may be controlled in this area. 3 Communication status display & Shows the communication status. 4 Joy stick & This key is operated from.../ CD2/ Input Input CD2 Tuner Tape1 Tape2 Digital Analog TV1 Macro TV2 Video1 Video2 Video3 Video4 AV AUX Setup Surround Remote Mode SP Selection SP Distance SP Level KRF-V7771D (En/T) 15 3 45 ENTER VOLUME MUTE CONFIRM ON/STANDBY 6 7 8 9 1 Segment screen The fixed icons ...

User Manual 1
Page 16
... the "Model Type Setup" menu screen is low, replace all the batteries with the tip of a thin object for the first time or when the remote control back-up data. Model Type Setup 1 Loading batteries 1 Remove the cover. 1 2 3 2 Insert batteries. 3 Close the cover. ÷...select the icon. 4 Enter the selection. ENTER Move the cursor. Setup 2 Check the display. Setup of the remote control unit KRF-V7771D (En/T) 16 Setting up the remote control according to your receiver Perform the following procedure after inserting batteries for a few seconds. ÷ This operation...
... the "Model Type Setup" menu screen is low, replace all the batteries with the tip of a thin object for the first time or when the remote control back-up data. Model Type Setup 1 Loading batteries 1 Remove the cover. 1 2 3 2 Insert batteries. 3 Close the cover. ÷...select the icon. 4 Enter the selection. ENTER Move the cursor. Setup 2 Check the display. Setup of the remote control unit KRF-V7771D (En/T) 16 Setting up the remote control according to your receiver Perform the following procedure after inserting batteries for a few seconds. ÷ This operation...

User Manual 1
Page 17
...or right, but turn the display back on. ÷ When the display is omitted in other pages in some menu screens. Setup of the remote control unit KRF-V7771D (En/T) 17 Main Menu Phono CD1 MD/ CD2/ Input Input CD2 Tuner Tape1 Tape2 Digital Analog TV1 TV2 Video1 Video2 Video3 Video4 AV AUX... Speaker Selection Macro Remote Mode Quick Setup SW C S No Yes Yes Entr Next Custom Setup ENTER VOLUME MUTE CONFIRM ON/STANDBY Setup Basic use ...
...or right, but turn the display back on. ÷ When the display is omitted in other pages in some menu screens. Setup of the remote control unit KRF-V7771D (En/T) 17 Main Menu Phono CD1 MD/ CD2/ Input Input CD2 Tuner Tape1 Tape2 Digital Analog TV1 TV2 Video1 Video2 Video3 Video4 AV AUX... Speaker Selection Macro Remote Mode Quick Setup SW C S No Yes Yes Entr Next Custom Setup ENTER VOLUME MUTE CONFIRM ON/STANDBY Setup Basic use ...

User Manual 1
Page 18
... If the "SP Selection" icon is selected) Speaker Distance L C SW R SP Dist. Setup of the remote control unit KRF-V7771D (En/T) 18 Navigating through the screens of remote control unit The remote control unit is given with shadow (the "Back Light" icon in this example) have more menu screens under it.... Main Menu Main Menu Phono CD1 MD/ CD2/ Input Input CD2 Tuner Tape1 Tape2 Digital Analog TV1 TV2 Macro Video1 Video2 Video3 Video4 AV AUX Remote Mode Lstn Mode Snd Fnc S t p The "Main Menu" screen includes the "Lstn Mode" (Listen Mode), "Sound", "Function" and "Setup" menu ...
... If the "SP Selection" icon is selected) Speaker Distance L C SW R SP Dist. Setup of the remote control unit KRF-V7771D (En/T) 18 Navigating through the screens of remote control unit The remote control unit is given with shadow (the "Back Light" icon in this example) have more menu screens under it.... Main Menu Main Menu Phono CD1 MD/ CD2/ Input Input CD2 Tuner Tape1 Tape2 Digital Analog TV1 TV2 Macro Video1 Video2 Video3 Video4 AV AUX Remote Mode Lstn Mode Snd Fnc S t p The "Main Menu" screen includes the "Lstn Mode" (Listen Mode), "Sound", "Function" and "Setup" menu ...

User Manual 1
Page 19
...icon. 1 3 Main Menu Phono CD1 MD/ CD2/ Input Input CD2 Tuner Tape1 Tape2 Digital Analog TV1 TV2 Macro Video1 Video2 Video3 Video4 AV AUX Remote Mode Lstn Mode Snd Fnc S t p Lsn Snd Fnc Surround IR Download Back Light Setup Input Macro 2 1 Select the "Main Menu" icon... inputs. 3 Assign all the connected components. Setup for KENWOOD audio compo- Input selector 1 Setup IR MD/Tape1 MD 1 2 3 0 Entr #9990 456 Clr 789 Check 2 3 Component 4 When registering setup codes for controlling AV components KRF-V7771D (En/T) Assigning the connected components to the selected inputs 19...
...icon. 1 3 Main Menu Phono CD1 MD/ CD2/ Input Input CD2 Tuner Tape1 Tape2 Digital Analog TV1 TV2 Macro Video1 Video2 Video3 Video4 AV AUX Remote Mode Lstn Mode Snd Fnc S t p Lsn Snd Fnc Surround IR Download Back Light Setup Input Macro 2 1 Select the "Main Menu" icon... inputs. 3 Assign all the connected components. Setup for KENWOOD audio compo- Input selector 1 Setup IR MD/Tape1 MD 1 2 3 0 Entr #9990 456 Clr 789 Check 2 3 Component 4 When registering setup codes for controlling AV components KRF-V7771D (En/T) Assigning the connected components to the selected inputs 19...
User Manual 1
Page 20
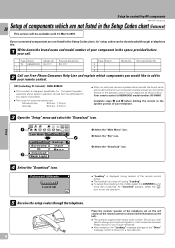
...backlight is KENWOOD model number: RC-R0807 Complete steps 3 and 4 before your component, he/she will be available until 31 March 2001. Place the receiver speaker of the telephone set on the coil section of the remote control (as shown below. Setup for controlling AV components KRF-V7771D (En/T) ...20 Setup of components which are not listed in the Setup Codes chart, its' setup codes can be used. Remote Model No. UK (including N. If your...
...backlight is KENWOOD model number: RC-R0807 Complete steps 3 and 4 before your component, he/she will be available until 31 March 2001. Place the receiver speaker of the telephone set on the coil section of the remote control (as shown below. Setup for controlling AV components KRF-V7771D (En/T) ...20 Setup of components which are not listed in the Setup Codes chart, its' setup codes can be used. Remote Model No. UK (including N. If your...

User Manual 1
Page 21
... to be used. Repeat the operations of step 1 and 2. ÷ The setup code for the last power code to the selected inputs", your remote control is quite large, only 20 different devices power codes can be sent in step 2 is deleted, you switch to a different menu screen, the... outputs the power code of more than one time. Setup for controlling AV components KRF-V7771D (En/T) Code selection after mode download 21 After successful completion of the download, step 5 of the previous page, the remote control automatically enters a special set-up all of the codes are not listed in...
... to be used. Repeat the operations of step 1 and 2. ÷ The setup code for the last power code to the selected inputs", your remote control is quite large, only 20 different devices power codes can be sent in step 2 is deleted, you switch to a different menu screen, the... outputs the power code of more than one time. Setup for controlling AV components KRF-V7771D (En/T) Code selection after mode download 21 After successful completion of the download, step 5 of the previous page, the remote control automatically enters a special set-up all of the codes are not listed in...

User Manual 1
Page 22
...Yes : The speaker is not connected. 2 Select the "Entr" icon to enter the selection. 3 Select the "Next" icon to go to the next page KRF-V7771D (En/T) Setup 1 Open the "Setup" menu and select the "Surround" icon. 1 Main Menu Phono CD1 MD/ CD2/ Input Input CD2 Tuner Tape1 Tape2... Digital Analog TV1 TV2 Macro Video1 Video2 Video3 Video4 AV AUX Remote Mode Lstn Mode Snd Fnc S t p Lsn Snd Fnc S e t u p Surround 3 IR Input Macro Download Back Light 2 1 Select the "Main Menu" icon. 2 Select the "...
...Yes : The speaker is not connected. 2 Select the "Entr" icon to enter the selection. 3 Select the "Next" icon to go to the next page KRF-V7771D (En/T) Setup 1 Open the "Setup" menu and select the "Surround" icon. 1 Main Menu Phono CD1 MD/ CD2/ Input Input CD2 Tuner Tape1 Tape2... Digital Analog TV1 TV2 Macro Video1 Video2 Video3 Video4 AV AUX Remote Mode Lstn Mode Snd Fnc S t p Lsn Snd Fnc S e t u p Surround 3 IR Input Macro Download Back Light 2 1 Select the "Main Menu" icon. 2 Select the "...

User Manual 1
Page 24
... selector Video1 VCR Edit component 2 Example when the VCR is not displayed if none of the connected compo- Setup for macro play (automatic operation) KRF-V7771D (En/T) 24 Setting up the connected devices (components). : Open the menu screen for the TV setup. Setup 1 Open the "Setup" menu.... ÷ Device ÷ TV : Open the menu screen to Video1. 3 Perform operation in succession. nents has been assigned to set up the remote control unit for the components you can perform a series of macros, "Custom 1", "Custom 2" and "Custom 3" can be played with the or icon...
... selector Video1 VCR Edit component 2 Example when the VCR is not displayed if none of the connected compo- Setup for macro play (automatic operation) KRF-V7771D (En/T) 24 Setting up the connected devices (components). : Open the menu screen for the TV setup. Setup 1 Open the "Setup" menu.... ÷ Device ÷ TV : Open the menu screen to Video1. 3 Perform operation in succession. nents has been assigned to set up the remote control unit for the components you can perform a series of macros, "Custom 1", "Custom 2" and "Custom 3" can be played with the or icon...

User Manual 1
Page 26
...operation)", you can start automatic play (automatic operation) KRF-V7771D (En/T) 1 Select the "Macro" icon . Main Menu Phono CD1 MD/ CD2/ Input Input CD2 Tuner Tape1 Tape2 Digital Analog TV1 TV2 Macro Video1 Video2 Video3 Video4 AV AUX Remote Mode Macro 2 Execute a macro in "Setting up... Custom 1 : Select to execute "Macro Custom 2". Video Off : Turns the video compontnet's power OFF. 26 Macro Execute By setting up the remote control unit for macro play using the macro function. Custom 2 : Select to execute "Macro Custom 1". TV's power stays the same although "Video...
...operation)", you can start automatic play (automatic operation) KRF-V7771D (En/T) 1 Select the "Macro" icon . Main Menu Phono CD1 MD/ CD2/ Input Input CD2 Tuner Tape1 Tape2 Digital Analog TV1 TV2 Macro Video1 Video2 Video3 Video4 AV AUX Remote Mode Macro 2 Execute a macro in "Setting up... Custom 1 : Select to execute "Macro Custom 2". Video Off : Turns the video compontnet's power OFF. 26 Macro Execute By setting up the remote control unit for macro play using the macro function. Custom 2 : Select to execute "Macro Custom 1". TV's power stays the same although "Video...

User Manual 1
Page 27
... is on (which is indicated by the lightning of analog input". ª 1 Press the ON/STANDBY (POWER) key to turn the unit ON. KRF-V7771D (En/T) Switching between digital input and analog input 27 Select "Input Analog" or "Input Digital" according to the input you want to control the system...Digital Main Menu Phono CD1 MD/ CD2/ Input Input CD2 Tuner Tape1 Tape2 Digital Analog TV1 TV2 Macro Video1 Video2 Video3 Video4 AV AUX Remote Mode Input Analog For switchig, refer to the "Playback of digital input/playback of the indicator on the receiver front panel). Playing music Use...
... is on (which is indicated by the lightning of analog input". ª 1 Press the ON/STANDBY (POWER) key to turn the unit ON. KRF-V7771D (En/T) Switching between digital input and analog input 27 Select "Input Analog" or "Input Digital" according to the input you want to control the system...Digital Main Menu Phono CD1 MD/ CD2/ Input Input CD2 Tuner Tape1 Tape2 Digital Analog TV1 TV2 Macro Video1 Video2 Video3 Video4 AV AUX Remote Mode Input Analog For switchig, refer to the "Playback of digital input/playback of the indicator on the receiver front panel). Playing music Use...

User Manual 1
Page 29
...Video1 Video2 Video3 Video4 AV AUX Input Sound Status Macro Remote Mode Input Signal Analog Auto To play a digital input Select the "Input Digital" icon. The display is alternated every time the "Input Digital" icon is fixed. Operations Playing music KRF-V7771D (En/T) 29 Playback of digital input / playback of... Phono CD1 MD/ CD2/ Input Input CD2 Tuner Tape1 Tape2 Digital Analog TV1 TV2 Video1 Video2 Video3 Video4 AV AUX Input Sound Status Macro Remote Mode Input Signal PCM Auto To play an analog input Select the "Input Analog" icon. ÷ "Analog" is not connected to the...
...Video1 Video2 Video3 Video4 AV AUX Input Sound Status Macro Remote Mode Input Signal Analog Auto To play a digital input Select the "Input Digital" icon. The display is alternated every time the "Input Digital" icon is fixed. Operations Playing music KRF-V7771D (En/T) 29 Playback of digital input / playback of... Phono CD1 MD/ CD2/ Input Input CD2 Tuner Tape1 Tape2 Digital Analog TV1 TV2 Video1 Video2 Video3 Video4 AV AUX Input Sound Status Macro Remote Mode Input Signal PCM Auto To play an analog input Select the "Input Analog" icon. ÷ "Analog" is not connected to the...


