
Instruction Manual
Page 1
... space provided below. EXTERNAL MEDIA CONTROLLER KOS-A300 INSTRUCTION MANUAL Kenwood Corporation '~ ~~I~.-I H>'Radio® READY "!JREADY IOl Madefor @J iPod ~ AAC _ . Refer to read through this instruction manual. Windows TM Media'" Take the time to the model and serial numbers whenever you obtain the best performance from your new External Media Controller. Familiarity with installation and operation procedures will help...
... space provided below. EXTERNAL MEDIA CONTROLLER KOS-A300 INSTRUCTION MANUAL Kenwood Corporation '~ ~~I~.-I H>'Radio® READY "!JREADY IOl Madefor @J iPod ~ AAC _ . Refer to read through this instruction manual. Windows TM Media'" Take the time to the model and serial numbers whenever you obtain the best performance from your new External Media Controller. Familiarity with installation and operation procedures will help...
Instruction Manual
Page 2
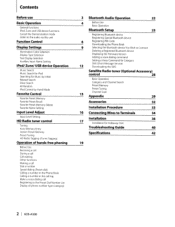
...iPod, Zune and USB device functions Cancel the Demonstration mode Listen to the audio via this unit Function Control Display Settings Illumination Color Selection Display Type Selection Text Display Selection Auxiliary Input Name Setting iPodl Zunel USB device... Accessory) control 28 Basic Operation Category and Channel Search Preset Memory Preset Tuning Channel Scan 15 Appendix 29 Accessories 32 Installation Procedure 33 16 Connecting Wires to Terminals 34 Installation 36 17 Installation for Hideaway Unit Troubleshooting Guide 40 Specifications 42 19 I 2 KOS-A300
...iPod, Zune and USB device functions Cancel the Demonstration mode Listen to the audio via this unit Function Control Display Settings Illumination Color Selection Display Type Selection Text Display Selection Auxiliary Input Name Setting iPodl Zunel USB device... Accessory) control 28 Basic Operation Category and Channel Search Preset Memory Preset Tuning Channel Scan 15 Appendix 29 Accessories 32 Installation Procedure 33 16 Connecting Wires to Terminals 34 Installation 36 17 Installation for Hideaway Unit Troubleshooting Guide 40 Specifications 42 19 I 2 KOS-A300
Instruction Manual
Page 3
...unit is stained, wipe it again with a clean soft dry cloth. ~ • Applying spray cleaner directly to explain more clearly how the controls are examples used . Cleaning the Unit If the this unit for the first time, cancel the (page 5). Do not use £WARNING To... using a volatile liquid such as thinner or alcohol may scratch the surface or erase printed characters. • If you experience problems during installation, consult your Kenwood dealer. • When you purchase optional accessories, check with your area. • Characters that they work with a dry soft cloth such...
...unit is stained, wipe it again with a clean soft dry cloth. ~ • Applying spray cleaner directly to explain more clearly how the controls are examples used . Cleaning the Unit If the this unit for the first time, cancel the (page 5). Do not use £WARNING To... using a volatile liquid such as thinner or alcohol may scratch the surface or erase printed characters. • If you experience problems during installation, consult your Kenwood dealer. • When you purchase optional accessories, check with your area. • Characters that they work with a dry soft cloth such...
Instruction Manual
Page 30
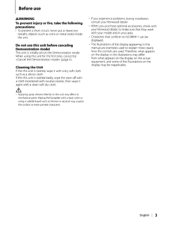
... certified for conformity with this unit. You need to control playback and selection of music by an audio player. 30 I KOS-A300 Normal playback is not guaranteed when a cable other than...XM. About the Bluetooth Audio player This unit conforms to the following URL: http://www.kenwood.com/bt/information/ @2 • The units supporting the Bluetooth function have no compensation...HR300 • KTC-HR200 Bluetooth unit (Optional Accessory) that this unit is powered. • Install the USB device in abnormal playback. Refer to transfer data such as a phone book between units....
... certified for conformity with this unit. You need to control playback and selection of music by an audio player. 30 I KOS-A300 Normal playback is not guaranteed when a cable other than...XM. About the Bluetooth Audio player This unit conforms to the following URL: http://www.kenwood.com/bt/information/ @2 • The units supporting the Bluetooth function have no compensation...HR300 • KTC-HR200 Bluetooth unit (Optional Accessory) that this unit is powered. • Install the USB device in abnormal playback. Refer to transfer data such as a phone book between units....
Instruction Manual
Page 33
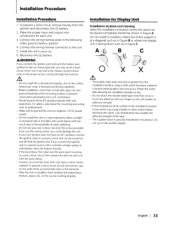
...not have an ACC position, connect the ignition wires to prevent screws from penetrating into such component. Installation for Display Unit Installation location and cleaning Select for installation a location where the stand can be placed completely horizontal shown in locations where the entire support is ... power source that in Figure C. Do not install in Figure A. If the temperature of the surface of water splashing. Install the unit in a spot exposed to the power source running through the fuse box. & Do not install the controller and display unit on and off with battery ...
...not have an ACC position, connect the ignition wires to prevent screws from penetrating into such component. Installation for Display Unit Installation location and cleaning Select for installation a location where the stand can be placed completely horizontal shown in locations where the entire support is ... power source that in Figure C. Do not install in Figure A. If the temperature of the surface of water splashing. Install the unit in a spot exposed to the power source running through the fuse box. & Do not install the controller and display unit on and off with battery ...
Instruction Manual
Page 36
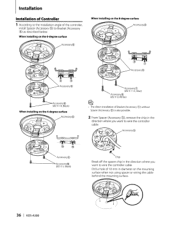
...) ~ ~ • The direct installation of the controller, install Spacer (Accessory @) to Bracket (Accessory @) as described below. When installing on the O-degree surface Accessory@ When installing on the 8-degree surface Accessory@ When installing on the mounting surface when not using spacer or wiring the cable behind the mounting surface. 36 I KOS-A300 Installation Installation of Controller 1 According to the installation angle of Bracket...
...) ~ ~ • The direct installation of the controller, install Spacer (Accessory @) to Bracket (Accessory @) as described below. When installing on the O-degree surface Accessory@ When installing on the 8-degree surface Accessory@ When installing on the mounting surface when not using spacer or wiring the cable behind the mounting surface. 36 I KOS-A300 Installation Installation of Controller 1 According to the installation angle of Bracket...
Instruction Manual
Page 37
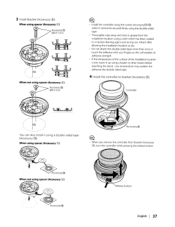
... this will weaken its adhesive strength. Low temperature may weaken the adhesive the double-sided tape. 4 Install the controller to dry. When using spacer (Accessory @l ~ Accessory@ (04 X 16.5) When not using spacer (Accessory @l ~ Accessory@ (04 X 4.5) ~ ~ Install the controller using the screws (Accessory(j])/@) when it using a double-sided tape (Accessory @) When using spacer (Accessory @l G ~- •...
... this will weaken its adhesive strength. Low temperature may weaken the adhesive the double-sided tape. 4 Install the controller to dry. When using spacer (Accessory @l ~ Accessory@ (04 X 16.5) When not using spacer (Accessory @l ~ Accessory@ (04 X 4.5) ~ ~ Install the controller using the screws (Accessory(j])/@) when it using a double-sided tape (Accessory @) When using spacer (Accessory @l G ~- •...
Instruction Manual
Page 38
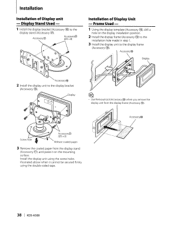
... from the display stand (Accessory @), and paste it cannot be secured firmly using the double-sided tape. 38 I KOS-A300 InstaIlation Installation of Display Unit - Accessory@ 2 Install the display unit to the display stand (Accessory @). Accessory@ Installation of Display unit - Accessory@ ~ """ Accessory@ (03 x 8) Release coated paper 3 Remove the coated paper from the display frame (Accessory...
... from the display stand (Accessory @), and paste it cannot be secured firmly using the double-sided tape. 38 I KOS-A300 InstaIlation Installation of Display Unit - Accessory@ 2 Install the display unit to the display stand (Accessory @). Accessory@ Installation of Display unit - Accessory@ ~ """ Accessory@ (03 x 8) Release coated paper 3 Remove the coated paper from the display frame (Accessory...
Instruction Manual
Page 39
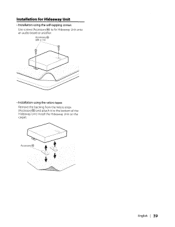
Install the Hideaway Unit on the carpet. Installation for Hideaway Unit • Installation using the velcro tapes Remove the backing from the Velcro strips (Accessory@) and attach it to fix Hideaway Unit onto an audio board or another. English I 39 Accessory@ (04 x 16) • Installation using the self-tapping screws Use screws (Accessory@) to the bottom of the Hideaway Unit.
Install the Hideaway Unit on the carpet. Installation for Hideaway Unit • Installation using the velcro tapes Remove the backing from the Velcro strips (Accessory@) and attach it to fix Hideaway Unit onto an audio board or another. English I 39 Accessory@ (04 x 16) • Installation using the self-tapping screws Use screws (Accessory@) to the bottom of the Hideaway Unit.
Instruction Manual
Page 43
... with safety and regulatory standards. Kenwood Corporation 2967-3, ISHIKAWA-MACHI, HACHIOJI-SHI TOKYO, JAPAN KENWOOD CORP. FCC NOTE This equipment...equipment does cause harmful interference to radio or television reception, which the receiver is not installed and used in the instruction manual. Location: Bottom Panel FCC WARNING This equipment may ...Dolby Laboratories. English I 43 The "AAC" logo is a trademark of Apple Inc. ACAUTION Use of controls or adjustments or performance of procedures other countries. CERTIFIES THIS EQUIPMENT CONFORMS TO DHHS REGULATIONS NO.21 CFR ...
... with safety and regulatory standards. Kenwood Corporation 2967-3, ISHIKAWA-MACHI, HACHIOJI-SHI TOKYO, JAPAN KENWOOD CORP. FCC NOTE This equipment...equipment does cause harmful interference to radio or television reception, which the receiver is not installed and used in the instruction manual. Location: Bottom Panel FCC WARNING This equipment may ...Dolby Laboratories. English I 43 The "AAC" logo is a trademark of Apple Inc. ACAUTION Use of controls or adjustments or performance of procedures other countries. CERTIFIES THIS EQUIPMENT CONFORMS TO DHHS REGULATIONS NO.21 CFR ...
Instruction Manual
Page 51
.... b.lnstallation or removal of Ihe fault(s). e. Tel: 0800-7717270 www.kenwood.com.br CANADA KENWOOD ELECTRONICS CANADA INC, KENWOOD WARRANTY KENWOOD ELECTRONICS CANADA iNC. (hereinalter called "KENWOOD"). which are warranted lor a period of original purchase. anlennas. cables. ... PARTICULAR PURPOSE. INSTALLATION OR REMOVAl CHARGES. OR 2. Ifaproblem develops during shipping (claims should occur within the warranty period. party. U.S.A. KENWOOD LIMITED WARRANTY FOR CAR STEREO COMPONENTS HOW LONG IS THE WARRANTY Kenwood U.S.A. Corporalion ("Kenwood") warranls this ...
.... b.lnstallation or removal of Ihe fault(s). e. Tel: 0800-7717270 www.kenwood.com.br CANADA KENWOOD ELECTRONICS CANADA INC, KENWOOD WARRANTY KENWOOD ELECTRONICS CANADA iNC. (hereinalter called "KENWOOD"). which are warranted lor a period of original purchase. anlennas. cables. ... PARTICULAR PURPOSE. INSTALLATION OR REMOVAl CHARGES. OR 2. Ifaproblem develops during shipping (claims should occur within the warranty period. party. U.S.A. KENWOOD LIMITED WARRANTY FOR CAR STEREO COMPONENTS HOW LONG IS THE WARRANTY Kenwood U.S.A. Corporalion ("Kenwood") warranls this ...


