Instruction Manual
Page 2
... 13 Speaker setting DTA (Digital Time Alignment) setting X'Over setting Preset Equalizer curve select Manual Equalizer Control Preset position selection Manual position setting Audio Preset...Radio tuner (Optional Accessory) control 41 Basic Operation Category and Channel Search Preset Memory Preset Tuning Channel Scan Direct Access Tuning Basic Operations of remote control 43 Appendix 45 24 Accessories/ Installation Procedure 50 Connecting Wires to Terminals 51 Installation/Removing the Unit 52 25 Troubleshooting Guide 54 Specifications 57 2 | KDC-X993/ KDC-HD942U/ KDC...
... 13 Speaker setting DTA (Digital Time Alignment) setting X'Over setting Preset Equalizer curve select Manual Equalizer Control Preset position selection Manual position setting Audio Preset...Radio tuner (Optional Accessory) control 41 Basic Operation Category and Channel Search Preset Memory Preset Tuning Channel Scan Direct Access Tuning Basic Operations of remote control 43 Appendix 45 24 Accessories/ Installation Procedure 50 Connecting Wires to Terminals 51 Installation/Removing the Unit 52 25 Troubleshooting Guide 54 Specifications 57 2 | KDC-X993/ KDC-HD942U/ KDC...
Instruction Manual
Page 3
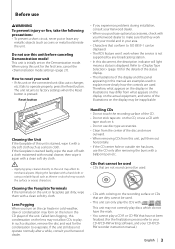
The unit returns to factory settings when the Reset button is initially set on the Demonstration mode. Wiping the faceplate with a hard cloth or using this unit is not supported by any metallic objects (such as a silicon cloth. on the CD, or use a CD with tape stuck on it again with a .... • Clean from the center of the disc and move outward. • When removing CDs from what appears on the display in your Kenwood dealer to operate properly, press the Reset button. Handling CDs • Do not touch the recording surface of this unit for the first time, cancel the...
The unit returns to factory settings when the Reset button is initially set on the Demonstration mode. Wiping the faceplate with a hard cloth or using this unit is not supported by any metallic objects (such as a silicon cloth. on the CD, or use a CD with tape stuck on it again with a .... • Clean from the center of the disc and move outward. • When removing CDs from what appears on the display in your Kenwood dealer to operate properly, press the Reset button. Handling CDs • Do not touch the recording surface of this unit for the first time, cancel the...
Instruction Manual
Page 4
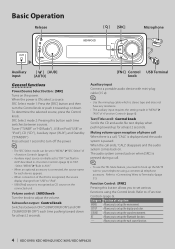
... mode 2: Pressing this button allows you to hook up the each source function. 4 | KDC-X993/ KDC-HD942U/ KDC-X693/ KDC-MP642U Tuner ("TUNER" or "HD Radio") , USB or iPod ("USB" or "iPod"), CD ("CD") , Auxiliary input ("AUX"), and Standby ("STANDBY") Press at least 1 second to set in "MENU" > "SRC Select" of (page 6). • Auxiliary input source is stereo type...
... mode 2: Pressing this button allows you to hook up the each source function. 4 | KDC-X993/ KDC-HD942U/ KDC-X693/ KDC-MP642U Tuner ("TUNER" or "HD Radio") , USB or iPod ("USB" or "iPod"), CD ("CD") , Auxiliary input ("AUX"), and Standby ("STANDBY") Press at least 1 second to set in "MENU" > "SRC Select" of (page 6). • Auxiliary input source is stereo type...
Instruction Manual
Page 5
.... • For KDC-X993: Switches as follows each time this button is first to (page 45). Favorite Control: Control knob You can recall the various registered functions by selecting "MENU" >"Mic Gain" of and "MENU" >"NR Level" of (page 6). ⁄ • 3 inch CD cannot be recognized due... to the low microphone volume or noises in the vehicle, adjust the microphone settings by turning the Control knob. Refer to insert using an adapter can recall and playback the playlist...
.... • For KDC-X993: Switches as follows each time this button is first to (page 45). Favorite Control: Control knob You can recall the various registered functions by selecting "MENU" >"Mic Gain" of and "MENU" >"NR Level" of (page 6). ⁄ • 3 inch CD cannot be recognized due... to the low microphone volume or noises in the vehicle, adjust the microphone settings by turning the Control knob. Refer to insert using an adapter can recall and playback the playlist...
Instruction Manual
Page 6
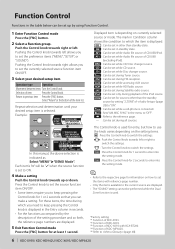
.... : Can be set while HD Radio source. : Can be set during Satellite radio source. : Can be set for 1 or 2 seconds so that you to previous item Press the [FNC] button. Pushing the Control knob towards right or left allows you can be "✓" when the source function is used . *Factory setting * Function of KDC-X993. * Function...
.... : Can be set while HD Radio source. : Can be set during Satellite radio source. : Can be set for 1 or 2 seconds so that you to previous item Press the [FNC] button. Pushing the Control knob towards right or left allows you can be "✓" when the source function is used . *Factory setting * Function of KDC-X993. * Function...
Instruction Manual
Page 7
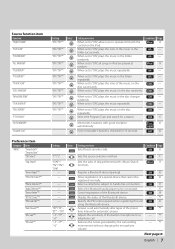
..."DISC RANDOM" "MAGAZINE RDM" "TRACK REPEAT" "DISC REPEAT" "PTY SEARCH" "AUTO MEMORY" "Channel Scan" Preference item Category Item "MENU" "Security Set"/ "Security Clear" "SRC Select" "Skip Search" "Device Regist"* "SPCL DVC Select"* "Phone Selection"* "Audio Selection"* "Device ... and search for a telephone call automatically after lapse of skip performed with . Every receivable Channel is checked for automatic answer. Sets/Resets security code. Allow registration of the Bluetooth device. - * - 1 sec. Specify the PIN code required when ...
..."DISC RANDOM" "MAGAZINE RDM" "TRACK REPEAT" "DISC REPEAT" "PTY SEARCH" "AUTO MEMORY" "Channel Scan" Preference item Category Item "MENU" "Security Set"/ "Security Clear" "SRC Select" "Skip Search" "Device Regist"* "SPCL DVC Select"* "Phone Selection"* "Audio Selection"* "Device ... and search for a telephone call automatically after lapse of skip performed with . Every receivable Channel is checked for automatic answer. Sets/Resets security code. Allow registration of the Bluetooth device. - * - 1 sec. Specify the PIN code required when ...
Instruction Manual
Page 8
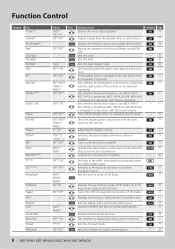
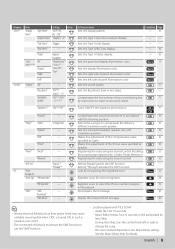
... to enable demonstration. - 27 8 | KDC-X993/ KDC-HD942U/ KDC-X693/ KDC-MP642U clock. "OFF"/ "ON"* DSI (Disabled System Indicator) of HD Radio. * "DIGITAL"/ 1 sec. "MNAL2" "1" - Specifies whether to AUX source. Condition Page * Output a beep from the speaker when a call comes in AUX" "CD Read" "DEMO Mode" Setting Entry "Front"*/ "F-R"/ "F-L" "ON"*/ "OFF" Setting overview Specify the voice output...
... to enable demonstration. - 27 8 | KDC-X993/ KDC-HD942U/ KDC-X693/ KDC-MP642U clock. "OFF"/ "ON"* DSI (Disabled System Indicator) of HD Radio. * "DIGITAL"/ 1 sec. "MNAL2" "1" - Specifies whether to AUX source. Condition Page * Output a beep from the speaker when a call comes in AUX" "CD Read" "DEMO Mode" Setting Entry "Front"*/ "F-R"/ "F-L" "ON"*/ "OFF" Setting overview Specify the voice output...
Instruction Manual
Page 9
... part picked by recognizing the registered voice. 23 Recognize" "Voice Tag" "PB Name Edit" - English | 9 Condition Page - 10 Sets the Type C spectrum analyzer display. Makes fine adjustment of the compensation value 30 specified at 30 Speaker. "Preset" "Recall" - "Memory...fields (such as from power lines) may cause unstable sound quality when CRSC is turned ON. "2" "OFF"/ "STEP1" / "2"/ "3"* Setting overview Sets the display pattern. Calls by Intro Skip. Compensates the low volume or bass sound being lost * by Sound Control. "Setup" "...
... part picked by recognizing the registered voice. 23 Recognize" "Voice Tag" "PB Name Edit" - English | 9 Condition Page - 10 Sets the Type C spectrum analyzer display. Makes fine adjustment of the compensation value 30 specified at 30 Speaker. "Preset" "Recall" - "Memory...fields (such as from power lines) may cause unstable sound quality when CRSC is turned ON. "2" "OFF"/ "STEP1" / "2"/ "3"* Setting overview Sets the display pattern. Calls by Intro Skip. Compensates the low volume or bass sound being lost * by Sound Control. "Setup" "...
Instruction Manual
Page 10
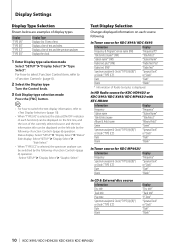
... "Blank" In CD & External disc source Information Disc title Track title Play time Spectrum analyzer & Clock ("TYPE [A]/[B]") or Clock ("TYPE [C]") Date Blank Display "Disc title" "Track title" "P-Time" "Speana/Clock" or "Clock" "Date" "Blank" 10 | KDC-X993/ KDC-HD942U/ KDC-X693/ KDC-MP642U Displays a ...10). • When "TYPE [A]" is selected, the status (ON/OFF indicator of text and video. In HD Radio source for KDC-HD942U or KDC-X993/ KDC-X693/ KDC-MP642U with KTC-HR300 Information Display Frequency "Frequency" Station name "Station Name" Title & Artist name "Title/Artist" ...
... "Blank" In CD & External disc source Information Disc title Track title Play time Spectrum analyzer & Clock ("TYPE [A]/[B]") or Clock ("TYPE [C]") Date Blank Display "Disc title" "Track title" "P-Time" "Speana/Clock" or "Clock" "Date" "Blank" 10 | KDC-X993/ KDC-HD942U/ KDC-X693/ KDC-MP642U Displays a ...10). • When "TYPE [A]" is selected, the status (ON/OFF indicator of text and video. In HD Radio source for KDC-HD942U or KDC-X993/ KDC-X693/ KDC-MP642U with KTC-HR300 Information Display Frequency "Frequency" Station name "Station Name" Title & Artist name "Title/Artist" ...
Instruction Manual
Page 11
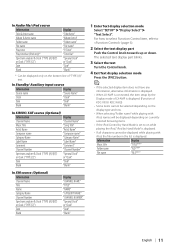
... File name "FILE***" English | 11 For how to select Function Control item, refer to on while playing the iPod, "iPod by Hand Mode is set to (page 6). 2 Select the text display part Push the Control knob towards up or down. The selected text display part blinks. 3 Select the text...while playing with iPod, the file number in the list is displayed. • If all characters cannot be displayed only on the bottom line of KDC-X993/ KDC-X693) • Some items cannot be selected depending on the display type and row. • When selecting "Folder name" while playing with iPod,...
... File name "FILE***" English | 11 For how to select Function Control item, refer to on while playing the iPod, "iPod by Hand Mode is set to (page 6). 2 Select the text display part Push the Control knob towards up or down. The selected text display part blinks. 3 Select the text...while playing with iPod, the file number in the list is displayed. • If all characters cannot be displayed only on the bottom line of KDC-X993/ KDC-X693) • Some items cannot be selected depending on the display type and row. • When selecting "Folder name" while playing with iPod,...
Instruction Manual
Page 12
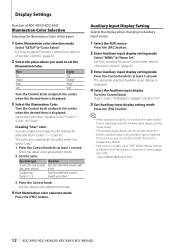
...or blue) or left. "Color10." Enter the detail color adjustment mode. 2. Auxiliary Input Display Setting Selects the display when changing to set only when the built-in AUX" 12 | KDC-X993/ KDC-HD942U/ KDC-X693/ KDC-MP642U To adjust color. Select the color from "Color1" - Creating "User" color You can... be set the Illumination Color Place All Display Right Left Display "All" "...
...or blue) or left. "Color10." Enter the detail color adjustment mode. 2. Auxiliary Input Display Setting Selects the display when changing to set only when the built-in AUX" 12 | KDC-X993/ KDC-HD942U/ KDC-X693/ KDC-MP642U To adjust color. Select the color from "Color1" - Creating "User" color You can... be set the Illumination Color Place All Display Right Left Display "All" "...
Instruction Manual
Page 13
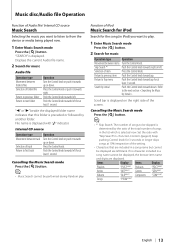
...knob towards up or down. Keep pushing Control knob for music Operation type Operation Movement between items Turn the Control knob. Internal CD source Operation type Movement between folders/files Selection of iPod Music Search for iPod Search for at least 1 second. Push the ...are included in (page 6). Displays the current Audio file name. 2 Search for music Audio file Operation type Movement between track Selection of the setting. • Characters that this folder is selected now. Push the Control knob towards up for at least 1 second. "8" or "7" beside ...
...knob towards up or down. Keep pushing Control knob for music Operation type Operation Movement between items Turn the Control knob. Internal CD source Operation type Movement between folders/files Selection of iPod Music Search for iPod Search for at least 1 second. Push the ...are included in (page 6). Displays the current Audio file name. 2 Search for music Audio file Operation type Movement between track Selection of the setting. • Characters that this folder is selected now. Push the Control knob towards up for at least 1 second. "8" or "7" beside ...
Instruction Manual
Page 25
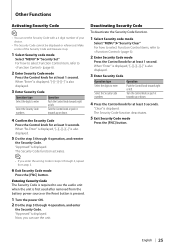
...Control knob for at least 1 second. Turn the Control knob or push it towards up . 1 Select Security code mode Select "MENU" > "Security Set" For how to select Function Control item, refer to enter Select the Security Code numbers Operation Push the Control knob towards right or left . "Clear...Security Code function deactivates. 5 Exit Security Code mode Press the [FNC] button. The Security Code function activates. ⁄ • If you can set the Security Code with a 4 digit number of the Security Code and treasure it up or down . 4 Confirm the Security Code Press the Control ...
...Control knob for at least 1 second. Turn the Control knob or push it towards up . 1 Select Security code mode Select "MENU" > "Security Set" For how to select Function Control item, refer to enter Select the Security Code numbers Operation Push the Control knob towards right or left . "Clear...Security Code function deactivates. 5 Exit Security Code mode Press the [FNC] button. The Security Code function activates. ⁄ • If you can set the Security Code with a 4 digit number of the Security Code and treasure it up or down . 4 Confirm the Security Code Press the Control ...
Instruction Manual
Page 26
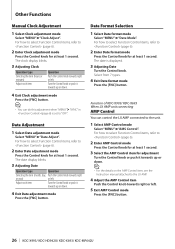
...the Control knob for at least 1 second. 3 Select the AMP Control item for at least 1 second. Function of KDC-X993/ KDC-X693 When LX AMP unit connecting AMP Control You can do this adjustment when "MENU" > "SYNC" in (page...Push the Control knob towards right or left. 5 Exit AMP Control mode Press the [FNC] button. 26 | KDC-X993/ KDC-HD942U/ KDC-X693/ KDC-MP642U Date Format Selection 1 Select Date format mode Select "MENU" > "Date Mode". For how to select Function... mode Select "MENU" > "Clock Adjust". The date is set to the unit. 1 Select AMP Control mode Select "MENU" > "AMS Control".
...the Control knob for at least 1 second. 3 Select the AMP Control item for at least 1 second. Function of KDC-X993/ KDC-X693 When LX AMP unit connecting AMP Control You can do this adjustment when "MENU" > "SYNC" in (page...Push the Control knob towards right or left. 5 Exit AMP Control mode Press the [FNC] button. 26 | KDC-X993/ KDC-HD942U/ KDC-X693/ KDC-MP642U Date Format Selection 1 Select Date format mode Select "MENU" > "Date Mode". For how to select Function... mode Select "MENU" > "Clock Adjust". The date is set to the unit. 1 Select AMP Control mode Select "MENU" > "AMS Control".

Instruction Manual
Page 27
... Demonstration mode Press the Control knob for 2 seconds or longer toggles the setting between "ON" and "OFF". 3 Exit Demonstration mode Press the [FNC] button. The faceplate is locked in until it . ¤ • The faceplate is a precision piece .... Drop open the faceplate. 2 Drawing the faceplate to left side pull it to deter theft. Theft Deterrent Faceplate The faceplate of water splashing. Demonstration mode setting Turning the demonstration mode ON/OFF. 1 Select Demonstration mode Select "MENU" > "DEMO Mode".
... Demonstration mode Press the Control knob for 2 seconds or longer toggles the setting between "ON" and "OFF". 3 Exit Demonstration mode Press the [FNC] button. The faceplate is locked in until it . ¤ • The faceplate is a precision piece .... Drop open the faceplate. 2 Drawing the faceplate to left side pull it to deter theft. Theft Deterrent Faceplate The faceplate of water splashing. Demonstration mode setting Turning the demonstration mode ON/OFF. 1 Select Demonstration mode Select "MENU" > "DEMO Mode".

Instruction Manual
Page 28
... the [AUD] knob for at least 1 second. 28 | KDC-X993/ KDC-HD942U/ KDC-X693/ KDC-MP642U Adjustment Item Display Range Volume offset "VOL-OFFSET" -8 - ±0 (AUX: -8- +8) Dual Zone System "2 ZONE" OFF/ON ⁄ • Volume offset: Sets each source's volume as follows; Adjust the volume of Front channel...15 - +15 Balance "BALANCE" Left 15 - Audio Setup You can adjust following Audio Control items; Audio Adjustments Audio Control You can set Sound system , such as a difference from the basic volume. • Dual Zone System Main source and sub source (Auxiliary input) ...
... the [AUD] knob for at least 1 second. 28 | KDC-X993/ KDC-HD942U/ KDC-X693/ KDC-MP642U Adjustment Item Display Range Volume offset "VOL-OFFSET" -8 - ±0 (AUX: -8- +8) Dual Zone System "2 ZONE" OFF/ON ⁄ • Volume offset: Sets each source's volume as follows; Adjust the volume of Front channel...15 - +15 Balance "BALANCE" Left 15 - Audio Setup You can adjust following Audio Control items; Audio Adjustments Audio Control You can set Sound system , such as a difference from the basic volume. • Dual Zone System Main source and sub source (Auxiliary input) ...
Instruction Manual
Page 29
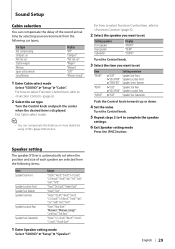
...⁄ • You can compensate the delay of each speaker are selected from the following items; Speaker setting The speaker X'Over is automatically set Item "FRONT" "REAR" "SUB W" Setting overview >"SIZE" Speaker Size Front >"LOCATION" Speaker Location Front >"TWEETER" Speaker Select Tweeter >"SIZE" Speaker ...center when the desired item is displayed. For how to select Function Control item, refer to complete the speaker settings. 6 Exit Speaker setting mode Press the [FNC] button. Item Speaker Size Front Speaker Location Front Speaker Size Tweeter Speaker Size Rear ...
...⁄ • You can compensate the delay of each speaker are selected from the following items; Speaker setting The speaker X'Over is automatically set Item "FRONT" "REAR" "SUB W" Setting overview >"SIZE" Speaker Size Front >"LOCATION" Speaker Location Front >"TWEETER" Speaker Select Tweeter >"SIZE" Speaker ...center when the desired item is displayed. For how to select Function Control item, refer to complete the speaker settings. 6 Exit Speaker setting mode Press the [FNC] button. Item Speaker Size Front Speaker Location Front Speaker Size Tweeter Speaker Size Rear ...
Instruction Manual
Page 30
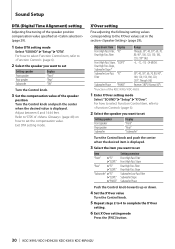
... 2 to 4 to the X'Over values set the compensation value. X'Over setting Fine adjusting the following setting values corresponding to complete the X'Over setting. 6 Exit X'Over setting mode Press the [FNC] button. 30 | KDC-X993/ KDC-HD942U/ KDC-X693/ KDC-MP642U For how to select Function Control item... position compensation value specified at (page 29). 1 Enter DTA setting mode Select "SOUND" > "Setup" > "DTA". Sound Setup DTA (Digital Time Alignment) setting Adjusting fine tuning of the KDC-X993/ KDC-X693. 1 Enter X'Over setting mode Select "SOUND" > "Setup" > "X'Over". For ...
... 2 to 4 to the X'Over values set the compensation value. X'Over setting Fine adjusting the following setting values corresponding to complete the X'Over setting. 6 Exit X'Over setting mode Press the [FNC] button. 30 | KDC-X993/ KDC-HD942U/ KDC-X693/ KDC-MP642U For how to select Function Control item... position compensation value specified at (page 29). 1 Enter DTA setting mode Select "SOUND" > "Setup" > "DTA". Sound Setup DTA (Digital Time Alignment) setting Adjusting fine tuning of the KDC-X993/ KDC-X693. 1 Enter X'Over setting mode Select "SOUND" > "Setup" > "X'Over". For ...
Instruction Manual
Page 31
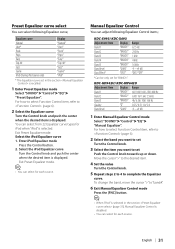
... 1 Enter Manual Equalizer Control mode Select "SOUND" > "Control" > "EQ" > "Manual Equalizer". Move the cursor ">" to the desired item. 4 Set the value Turn the Control knob. 5 Repeat steps 2 to 4 to set for each source. English | 31 KDC-X993/ KDC-X693 Adjustment Item Display Band 1 "BAND1" Band 2 "BAND2" Band 3 "BAND3" Band 4 "BAND4" Band 5 "BAND5" Band level "GAIN...
... 1 Enter Manual Equalizer Control mode Select "SOUND" > "Control" > "EQ" > "Manual Equalizer". Move the cursor ">" to the desired item. 4 Set the value Turn the Control knob. 5 Repeat steps 2 to 4 to set for each source. English | 31 KDC-X993/ KDC-X693 Adjustment Item Display Band 1 "BAND1" Band 2 "BAND2" Band 3 "BAND3" Band 4 "BAND4" Band 5 "BAND5" Band level "GAIN...
Instruction Manual
Page 32
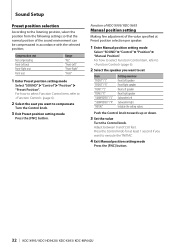
... "SOUND" > "Control" > "Position" > "Preset Position". Press the Control knob for at Preset position selection per speaker. 1 Enter Manual position setting mode Select "SOUND" > "Control" > "Position" > "Manual Position". Function of KDC-X993/ KDC-X693 Manual position setting Making fine adjustment of the sound environment can be compensated in accordance with the selected position; Adjust between 0 and...
... "SOUND" > "Control" > "Position" > "Preset Position". Press the Control knob for at Preset position selection per speaker. 1 Enter Manual position setting mode Select "SOUND" > "Control" > "Position" > "Manual Position". Function of KDC-X993/ KDC-X693 Manual position setting Making fine adjustment of the sound environment can be compensated in accordance with the selected position; Adjust between 0 and...


