Instruction Manual
Page 1
... the space provided below. KAC-X10D CLASS D MONO POWER AMPLIFIER 7 page 2-7 INSTRUCTION MANUAL AMPLIFICATEUR MONO CLASSE D 7 page 8-13 MODE D'EMPLOI AMPLIFICADOR DE POTENCIA CLASE D MONOFÓNICO 7 página 14-19 MANUAL DE INSTRUCCIONES Take the time to the model and serial numbers whenever you obtain the best performance from your Kenwood product at www.kenwoodusa...
... the space provided below. KAC-X10D CLASS D MONO POWER AMPLIFIER 7 page 2-7 INSTRUCTION MANUAL AMPLIFICATEUR MONO CLASSE D 7 page 8-13 MODE D'EMPLOI AMPLIFICADOR DE POTENCIA CLASE D MONOFÓNICO 7 página 14-19 MANUAL DE INSTRUCCIONES Take the time to the model and serial numbers whenever you obtain the best performance from your Kenwood product at www.kenwoodusa...
Instruction Manual
Page 2
... been tested and found to comply with the limits for help. However, there is no guarantee that are expressly approved in the instruction manual. NOTE This Class B digital apparatus complies with the prescribed rating. Cleaning the unit If the front panel gets dirty, turn the power... during installation, consult your Kenwood dealer. • If the unit does not seem to be working right, consult your Kenwood dealer. • Do not touch the unit during use a vehicle type (fireproof ) power wring cord with a current capacity greater than one power amplifier are going to be connected...
... been tested and found to comply with the limits for help. However, there is no guarantee that are expressly approved in the instruction manual. NOTE This Class B digital apparatus complies with the prescribed rating. Cleaning the unit If the front panel gets dirty, turn the power... during installation, consult your Kenwood dealer. • If the unit does not seem to be working right, consult your Kenwood dealer. • Do not touch the unit during use a vehicle type (fireproof ) power wring cord with a current capacity greater than one power amplifier are going to be connected...
Instruction Manual
Page 3
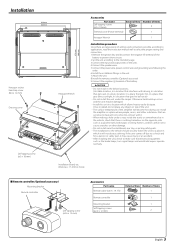
... that are large variety of settings and connections possible according to applications, read the instruction manual well to a shock and hits a person or safety part, it will not obstruct driving. Install the amplifier in a place where people, resins, and other damage. • Do not install near...Remote controller Self-tapping screw (ø2.6 × 12 mm) Accessories Part name Remote cable (6.0 m : 19.7 ft) External View Number of the amplifier will become hot during use. Installation 318 mm 258 mm Ø6 Hexagon socket head cap screw (M4 × 12 mm) Dressing cover Self-tapping...
... that are large variety of settings and connections possible according to applications, read the instruction manual well to a shock and hits a person or safety part, it will not obstruct driving. Install the amplifier in a place where people, resins, and other damage. • Do not install near...Remote controller Self-tapping screw (ø2.6 × 12 mm) Accessories Part name Remote cable (6.0 m : 19.7 ft) External View Number of the amplifier will become hot during use. Installation 318 mm 258 mm Ø6 Hexagon socket head cap screw (M4 × 12 mm) Dressing cover Self-tapping...
Instruction Manual
Page 6
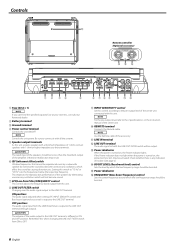
..."25 Hz" cuts the frequencies below the respective frequency. NOTE Use the Remote cable of the amplifier. Setting this when changing the LINE OUT FILTER switch from the LINE IN terminal is output to... The volume of the audio output to the LINE OUT terminal is different in the instruction manual of 1 ohm, connect speakers with this control according to the LINE OUT terminal. Remember this...(40 A × 1) NOTE If you can't find the specified capacity fuse at your store etc., consult your Kenwood dealer. 2 Battery terminal 3 Ground terminal 4 Power control terminal Controls the unit ON/OFF.
..."25 Hz" cuts the frequencies below the respective frequency. NOTE Use the Remote cable of the amplifier. Setting this when changing the LINE OUT FILTER switch from the LINE IN terminal is output to... The volume of the audio output to the LINE OUT terminal is different in the instruction manual of 1 ohm, connect speakers with this control according to the LINE OUT terminal. Remember this...(40 A × 1) NOTE If you can't find the specified capacity fuse at your store etc., consult your Kenwood dealer. 2 Battery terminal 3 Ground terminal 4 Power control terminal Controls the unit ON/OFF.


