
User Manual
Page 2
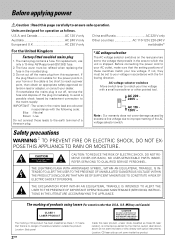
..., make sure that the setting positions of these switches match your voltage in accordance with the following code: Blue : Neutral Brown : Live Do not connect those leads to the earth terminal of a three-pin plug. * AC voltage selection The AC voltage selector switches on the rear panel are designed for the power points in accordance with optical instruments. REFER SERVICING TO QUALIFIED SERVICE...
..., make sure that the setting positions of these switches match your voltage in accordance with the following code: Blue : Neutral Brown : Live Do not connect those leads to the earth terminal of a three-pin plug. * AC voltage selection The AC voltage selector switches on the rear panel are designed for the power points in accordance with optical instruments. REFER SERVICING TO QUALIFIED SERVICE...

User Manual
Page 3
... for timer playback (AI timer playback) or timer recording. (With the AI timer playback, the playback volume increases gradually after the start of display and indicators showing the operations, but the audio itself does not change of timer playback.) ÷ Sleep timer : This timer turns the unit off automatically when the set /demo key during demonstration. "DEMO ON" (To execute demonstration): After turning power ON, press and hold the set/ demo...
... for timer playback (AI timer playback) or timer recording. (With the AI timer playback, the playback volume increases gradually after the start of display and indicators showing the operations, but the audio itself does not change of timer playback.) ÷ Sleep timer : This timer turns the unit off automatically when the set /demo key during demonstration. "DEMO ON" (To execute demonstration): After turning power ON, press and hold the set/ demo...
User Manual
Page 4
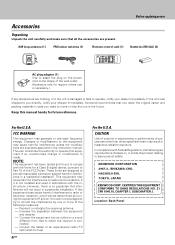
... indoor antenna (1) Remote control unit (1) Before applying power Batteries (R6/AA) (2) AC plug adaptor (1) Use to adapt the plug on , or inside the product relating to correct the interference by one or more of the wall outlet. (Accessory only for help. 4 EN For the U.S.A. Location: Back Panel Accessories Unpacking Unpack the unit carefully and make sure that interference will not occur in a particular installation...
... indoor antenna (1) Remote control unit (1) Before applying power Batteries (R6/AA) (2) AC plug adaptor (1) Use to adapt the plug on , or inside the product relating to correct the interference by one or more of the wall outlet. (Accessory only for help. 4 EN For the U.S.A. Location: Back Panel Accessories Unpacking Unpack the unit carefully and make sure that interference will not occur in a particular installation...
User Manual
Page 5
... 21 Channel space setting 21 Tuning to a non-preset radio station (Auto tuning, Manual tuning 22 One-by-one presetting (Manual preset 22 RDS (Radio Data System) (For U.K. Preparation section Before applying power 2 Safety precautions 2 Special features 3 Accessories 4 System connection 6 Connection of the System Accessories 6 Connection of Other Accessories (Commercially Available Parts 8 Controls and indicators 9 Display 9 Main unit 10 Operation of remote control unit 12 Basic section Basic use method 14 Playback of CD 16 Playback of TAPE 18 Receiving broadcast station...
... 21 Channel space setting 21 Tuning to a non-preset radio station (Auto tuning, Manual tuning 22 One-by-one presetting (Manual preset 22 RDS (Radio Data System) (For U.K. Preparation section Before applying power 2 Safety precautions 2 Special features 3 Accessories 4 System connection 6 Connection of the System Accessories 6 Connection of Other Accessories (Commercially Available Parts 8 Controls and indicators 9 Display 9 Main unit 10 Operation of remote control unit 12 Basic section Basic use method 14 Playback of CD 16 Playback of TAPE 18 Receiving broadcast station...

User Manual
Page 6
... to or greater than, shown below. If connection cords are completed. Top panel : 50 cm Back panel : 10 cm AM loop antenna The supplied antenna is for indoor use. ments, etc. ÷ Be sure to unplug the power cord from the main system, TV set, speaker cords and power cord, and set or PC monitor. Only plug the power cord into a power outlet once connections are plugged or unplugged with unclear positioning of...
... to or greater than, shown below. If connection cords are completed. Top panel : 50 cm Back panel : 10 cm AM loop antenna The supplied antenna is for indoor use. ments, etc. ÷ Be sure to unplug the power cord from the main system, TV set, speaker cords and power cord, and set or PC monitor. Only plug the power cord into a power outlet once connections are plugged or unplugged with unclear positioning of...

User Manual
Page 8
... the DIGITAL IN jack (OPTICAL). If their connections are plugged or unplugged with built-in the diagram. Audio output Audio cord Optical fiber cable Digital input MD recorder or DAT etc. * DIGITAL OUT OPTICAL cap -+ L R FRONT SPEAKERS (6-16 Ω) R L AUX INPUT DIGITAL OUT OPTICAL AM GND FM 75 Ω ANTENNA POWER cord TO WALL AC OUTLET ÷ In case an associated system component is connected, also read the instruction manual of Other Accessories (Commercially Available Parts) CAUTION Note on Connection Connect the components...
... the DIGITAL IN jack (OPTICAL). If their connections are plugged or unplugged with built-in the diagram. Audio output Audio cord Optical fiber cable Digital input MD recorder or DAT etc. * DIGITAL OUT OPTICAL cap -+ L R FRONT SPEAKERS (6-16 Ω) R L AUX INPUT DIGITAL OUT OPTICAL AM GND FM 75 Ω ANTENNA POWER cord TO WALL AC OUTLET ÷ In case an associated system component is connected, also read the instruction manual of Other Accessories (Commercially Available Parts) CAUTION Note on Connection Connect the components...
User Manual
Page 9
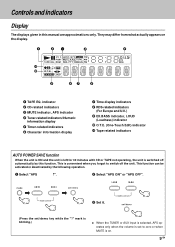
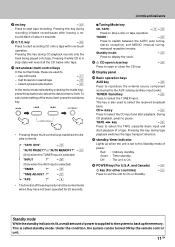
... display. 1 23 4 5 ! 0 9 87 6 1 TAPE EQ. Controls and indicators System connection Display The displays given in this function. They may differ from what actually appears on . 9 EN mark is blinking.) ÷ When the TUNER or AUX input is selected, APS operates only when the volume is set /demo key while the "?" indicator 2 CD-related indicators 3 MUTE indicator, APS indicator 4 Tuner-related indicators/Numeric information display 5 Timer-related indicators 6 Character information display 7 Time display...
... display. 1 23 4 5 ! 0 9 87 6 1 TAPE EQ. Controls and indicators System connection Display The displays given in this function. They may differ from what actually appears on . 9 EN mark is blinking.) ÷ When the TUNER or AUX input is selected, APS operates only when the volume is set /demo key while the "?" indicator 2 CD-related indicators 3 MUTE indicator, APS indicator 4 Tuner-related indicators/Numeric information display 5 Timer-related indicators 6 Character information display 7 Time display...

User Manual
Page 10
... is also used for volume adjustment. $ 6 mode key 9 Press to switch the function of the 4 and ¢ keys to normal mode. 7 set/demo key 39 Press to select EX. BASS or LOUD sound effect. 4 Remote sensor # This window receives signals from the remote control unit. 5 volume knob Turn this function, pressing any key enclosed in standby mode immediately start playback (or reception). 10 EN Press again to reset the function...
... is also used for volume adjustment. $ 6 mode key 9 Press to switch the function of the 4 and ¢ keys to normal mode. 7 set/demo key 39 Press to select EX. BASS or LOUD sound effect. 4 Remote sensor # This window receives signals from the remote control unit. 5 volume knob Turn this function, pressing any key enclosed in standby mode immediately start playback (or reception). 10 EN Press again to reset the function...
User Manual
Page 11
... a disc or tape operation. During CD playback, press to switch between the AUTO (auto tuning, stereo reception) and MONO (manual tuning, monaural reception) modes. This is On. ^ POWER key (For U.S.A. or "AUTO MEMORY ?" ¡ (Only when the TUNER input is selected) "INPUT ?" fl (Only when the AUX input is selected) "TIMER ?" · "TIME ADJUST ?" ‡ "APS ?" 9 • The function of power is supplied to the system to back up when the unit is also used to - TUNER...
... a disc or tape operation. During CD playback, press to switch between the AUTO (auto tuning, stereo reception) and MONO (manual tuning, monaural reception) modes. This is On. ^ POWER key (For U.S.A. or "AUTO MEMORY ?" ¡ (Only when the TUNER input is selected) "INPUT ?" fl (Only when the AUX input is selected) "TIMER ?" · "TIME ADJUST ?" ‡ "APS ?" 9 • The function of power is supplied to the system to back up when the unit is also used to - TUNER...
User Manual
Page 12
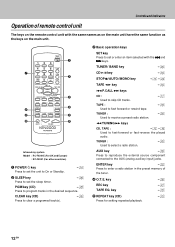
... a programed track(s). º 3 Basic operation keys SET key Press to enter a radio station in the desired sequence. ENTER key ™ Press to set the sleep timer. key REC key TAPE EQ. TUNER : ™ Used to fast-forward or fast-reverse the played audio. TUNER : Used to receive a preset radio station. & ( ) 1 TUNING ¡ keys CD, TAPE : &( Used to select a radio station. PGM key (CD) ª Press to the AUX (analog auxiliary input) jacks. TUNER/ BAND key ) CD 6 key ^ STOP 7/AUTO/MONO key &™ TAPE...
... a programed track(s). º 3 Basic operation keys SET key Press to enter a radio station in the desired sequence. ENTER key ™ Press to set the sleep timer. key REC key TAPE EQ. TUNER : ™ Used to fast-forward or fast-reverse the played audio. TUNER : Used to receive a preset radio station. & ( ) 1 TUNING ¡ keys CD, TAPE : &( Used to select a radio station. PGM key (CD) ª Press to the AUX (analog auxiliary input) jacks. TUNER/ BAND key ) CD 6 key ^ STOP 7/AUTO/MONO key &™ TAPE...
User Manual
Page 13
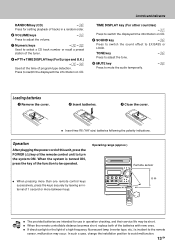
... to avoid malfunction. 13 EN In such a case, change the installation position to switch the displayed time information on CD. 9 SOUND key % Press to switch the sound effect to EX.BASS or LOUD. Operation After plugging the power cord of this unit, press the POWER ( ) key of the remote control unit to mute the audio temporarily. % Loading batteries 1 Remove the cover. 2 Insert batteries. 3 Close the cover. ÷ Insert two R6 ("AA...
... to avoid malfunction. 13 EN In such a case, change the installation position to switch the displayed time information on CD. 9 SOUND key % Press to switch the sound effect to EX.BASS or LOUD. Operation After plugging the power cord of this unit, press the POWER ( ) key of the remote control unit to mute the audio temporarily. % Loading batteries 1 Remove the cover. 2 Insert batteries. 3 Close the cover. ÷ Insert two R6 ("AA...

User Manual
Page 14
... (Standby mode of power). ÷ Pressing the TUNER/band, CD 6, TAPE 2 3 or AUX key also turns power on and starts playback (reception) of bass Muting the sound temporarily Tone adjustment Listening through headphone or Example: To select the CD input The volume decreases The volume increases 1. Volume adjustment. ÷ The display shows a reference value. 14 EN Volume display CD ^ TAPE * TUNER (Broadcasts) ) AUX (External input) [Adjusting the AUX input level fl] ÷ Pressing the TUNER/ band, CD 6, TAPE 2 3 or AUX key selects the corresponding input. Set...
... (Standby mode of power). ÷ Pressing the TUNER/band, CD 6, TAPE 2 3 or AUX key also turns power on and starts playback (reception) of bass Muting the sound temporarily Tone adjustment Listening through headphone or Example: To select the CD input The volume decreases The volume increases 1. Volume adjustment. ÷ The display shows a reference value. 14 EN Volume display CD ^ TAPE * TUNER (Broadcasts) ) AUX (External input) [Adjusting the AUX input level fl] ÷ Pressing the TUNER/ band, CD 6, TAPE 2 3 or AUX key selects the corresponding input. Set...

User Manual
Page 15
... off. Muting the sound temporarily Remote control unit only MUTE ÷ Press again to step 2 within 8 seconds.) Each press switches the modes as follows. 1 "EX.BASS" lights. Listening through headphone Insert the headphone plug into the headphone jack. ÷ Headphone with a stereo mini plug can be connected. ÷ The sound from all speakers are enhanced according to the current volume level. (Effective during low-volume listening.) 3 Both...
... off. Muting the sound temporarily Remote control unit only MUTE ÷ Press again to step 2 within 8 seconds.) Each press switches the modes as follows. 1 "EX.BASS" lights. Listening through headphone Insert the headphone plug into the headphone jack. ÷ Headphone with a stereo mini plug can be connected. ÷ The sound from all speakers are enhanced according to the current volume level. (Effective during low-volume listening.) 3 Both...
User Manual
Page 21
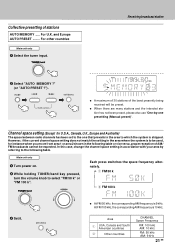
... the system is to be used, for U.S.A., Canada, U.K., Europe and Australia) The space between radio channels has been set to which the system is shipped. Main unit only 1 Turn power on. 2 While holding TUNER/band key pressed, turn the volume knob to the following table or vice versa, proper reception of stations AUTO MEMORY ..... Receiving PblraoyabdaccakstosftTaAtiPoEn 2 Select "AUTO MEMORY ?" (or "AUTO PRESET ?"). \ \ ÷ A maximum of 30 stations of...
... the system is to be used, for U.S.A., Canada, U.K., Europe and Australia) The space between radio channels has been set to which the system is shipped. Main unit only 1 Turn power on. 2 While holding TUNER/band key pressed, turn the volume knob to the following table or vice versa, proper reception of stations AUTO MEMORY ..... Receiving PblraoyabdaccakstosftTaAtiPoEn 2 Select "AUTO MEMORY ?" (or "AUTO PRESET ?"). \ \ ÷ A maximum of 30 stations of...

User Manual
Page 36
... press switches the display contents. ing level from the range of the AUX input source sounds at an equivalent level to the CD. 1 Press the AUX key. 2 Select "INPUT ?". \ \ (Press the set/demo key while the "?" "TIMER ?" mark is possible from the input source connected to the AUX input terminal. "TAPE RVS" "INPUT ?" Timer operation Adjusting the AUX Input Level This adjusts the input level for the external equipment (video deck etc.) connected to the AUX input jacks. "TIME ADJUST ?" Adjust so that the volume...
... press switches the display contents. ing level from the range of the AUX input source sounds at an equivalent level to the CD. 1 Press the AUX key. 2 Select "INPUT ?". \ \ (Press the set/demo key while the "?" "TIMER ?" mark is possible from the input source connected to the AUX input terminal. "TAPE RVS" "INPUT ?" Timer operation Adjusting the AUX Input Level This adjusts the input level for the external equipment (video deck etc.) connected to the AUX input jacks. "TIME ADJUST ?" Adjust so that the volume...

User Manual
Page 38
Timer operation Timer operation Sleep timer (SLEEP) The unit is turned OFF automatically after the set time has elapsed. ÷ Each press increases the timer period by 10 minutes. Sleep timer (SLEEP) Set the number of the TUNER or AUX input starts at the specified time. SLEEP ÷ The unit is turned OFF automatically after which the unit is activated to be set up so that the display is dimmed automatically while...
Timer operation Timer operation Sleep timer (SLEEP) The unit is turned OFF automatically after the set time has elapsed. ÷ Each press increases the timer period by 10 minutes. Sleep timer (SLEEP) Set the number of the TUNER or AUX input starts at the specified time. SLEEP ÷ The unit is turned OFF automatically after which the unit is activated to be set up so that the display is dimmed automatically while...

User Manual
Page 39
... displayed. (If you do not overlap. 2 Set the timer setting program number. 1 Select "TIMER ?". "TAPE RVS" \ \ "AUTO PRESET ?" "TIME ADJUST ?" (Press the set to the AUX input jacks. To listen to CD Insert a disc. (Program playback is not possible.) To listen to radio The station should be reserved independently in the selected timer, the setting will be overwritten by the new setting. For recording Make preparations for the play (recording). Continued on next page 39 EN Timer operation Setting...
... displayed. (If you do not overlap. 2 Set the timer setting program number. 1 Select "TIMER ?". "TAPE RVS" \ \ "AUTO PRESET ?" "TIME ADJUST ?" (Press the set to the AUX input jacks. To listen to CD Insert a disc. (Program playback is not possible.) To listen to radio The station should be reserved independently in the selected timer, the setting will be overwritten by the new setting. For recording Make preparations for the play (recording). Continued on next page 39 EN Timer operation Setting...

User Manual
Page 44
... cause problem such as this unit CD (12 cm, 8 cm), CD-R, CD-RW, and the audio part of the disc. Do not use a cassette with this system because they may cause malfunction. Please do not touch the playing surface. For A side For B side To re-record Apply tape only to either the playing side or the label side of CDV, CD-G, CD-EG and CD...
... cause problem such as this unit CD (12 cm, 8 cm), CD-R, CD-RW, and the audio part of the disc. Do not use a cassette with this system because they may cause malfunction. Please do not touch the playing surface. For A side For B side To re-record Apply tape only to either the playing side or the label side of CDV, CD-G, CD-EG and CD...
User Manual
Page 45
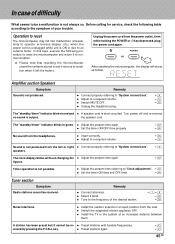
...; Connect antennas. ÷ Select a band. ÷ Tune to "Clock adjustment". ‡ ÷ Set the timer ON time and OFF time. , Tuner section Symptom Radio stations cannot be re- ÷ Preset stations with tunable frequencies. A station has been preset but it to "System connections". or After resetting the microcomputer, the display will show as follow: Amplifier section/Speakers Symptom Sound is output. Turn power off and re-connect no sound is not produced. The "standby/timer" indicator blinks in red and ÷ A speaker cord is...
...; Connect antennas. ÷ Select a band. ÷ Tune to "Clock adjustment". ‡ ÷ Set the timer ON time and OFF time. , Tuner section Symptom Radio stations cannot be re- ÷ Preset stations with tunable frequencies. A station has been preset but it to "System connections". or After resetting the microcomputer, the display will show as follow: Amplifier section/Speakers Symptom Sound is output. Turn power off and re-connect no sound is not produced. The "standby/timer" indicator blinks in red and ÷ A speaker cord is...

User Manual
Page 46
.... ÷ Use a cassette with new batteries. ÷ Operate the unit inside the remote controllable range. # # 46 EN e ÷ Wind the tape again by fast forwarding, rewinding or playing from other . *( Recording cannot be started by ÷ Press in stop mode. e Sound is recorded). r ÷ Close the holder completely. ÷ Set the input selector to the source to be played. ÷ Place the disc properly, with...
.... ÷ Use a cassette with new batteries. ÷ Operate the unit inside the remote controllable range. # # 46 EN e ÷ Wind the tape again by fast forwarding, rewinding or playing from other . *( Recording cannot be started by ÷ Press in stop mode. e Sound is recorded). r ÷ Close the holder completely. ÷ Set the input selector to the source to be played. ÷ Place the disc properly, with...


