
User Manual
Page 3
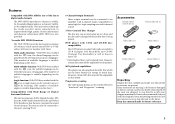
... remote control unit (1) Batteries (R6/AA) (2) Audio cables (3) Video cable (1) S Video cable (1) Coaxial cable (1) Unpacking Unpack the unit carefully and make sure that of DVD or S VHS video (400 lines) or laserdisc (430 lines). DVD player with 6-channel input compatibility to enjoy high-bit, high-sampling rate multi-channel sound. 5-Disc Carousel Disc Changer The disc tray can accommodate up to 32 languages. (The number of subtitle languages is variable depending on the discs.) Angle function: With DVD discs...
... remote control unit (1) Batteries (R6/AA) (2) Audio cables (3) Video cable (1) S Video cable (1) Coaxial cable (1) Unpacking Unpack the unit carefully and make sure that of DVD or S VHS video (400 lines) or laserdisc (430 lines). DVD player with 6-channel input compatibility to enjoy high-bit, high-sampling rate multi-channel sound. 5-Disc Carousel Disc Changer The disc tray can accommodate up to 32 languages. (The number of subtitle languages is variable depending on the discs.) Angle function: With DVD discs...

User Manual
Page 4
... Player (DVD VIDEO disc only 6 Region codes of the DVD VIDEO discs that can be played with this player 7 Video Formats 7 Checking the Video Format 7 Chapter 1: Connection of Equipment ... 8 Bofore Start 9 Preparation of Remote Control Unit 9 Installing the batteries 9 Remote control range 9 MP3 Files That Can Be Played Back with This Equipment 9 Connection with a TV or Stereo System .......... 10 To Connect a TV 11 To Connect a Stereo System 11 To Set Up of the Player 11 Connection with an AV Amplifier 12 To Connect...
... Player (DVD VIDEO disc only 6 Region codes of the DVD VIDEO discs that can be played with this player 7 Video Formats 7 Checking the Video Format 7 Chapter 1: Connection of Equipment ... 8 Bofore Start 9 Preparation of Remote Control Unit 9 Installing the batteries 9 Remote control range 9 MP3 Files That Can Be Played Back with This Equipment 9 Connection with a TV or Stereo System .......... 10 To Connect a TV 11 To Connect a Stereo System 11 To Set Up of the Player 11 Connection with an AV Amplifier 12 To Connect...

User Manual
Page 9
... second session is therefore convenient to a high-volume sound, do not set up 8 uppercase alphanumeric characters. If a cable is possible to unplug the power plug from MP3 files This unit does not output the "Digital" signal when it is plugged incompletely, lack of video, lack of Remote Control Unit Installing the batteries: Open the cover and insert the batteries (R6/AA) by observing the polarity marking...
... second session is therefore convenient to a high-volume sound, do not set up 8 uppercase alphanumeric characters. If a cable is possible to unplug the power plug from MP3 files This unit does not output the "Digital" signal when it is plugged incompletely, lack of video, lack of Remote Control Unit Installing the batteries: Open the cover and insert the batteries (R6/AA) by observing the polarity marking...

User Manual
Page 10
... jacks To luminance (Y) input jack Video cable (optional) S Video connection: To S Video input connector S Video cable (provided) Audio cable (provided) SCART connection (For U.K. PROGRESSIVE: When progressive scanning is unavailable with a TV or Stereo System Chapter 1: Connection of the Component Video output using the COMPONENT VIDEO OUTPUT switch on the rear panel. Select the video connection method according to interlaced scanning. When S-Video cable is connected, the ordinary video connection is switched automatically to the TV in use. When the scanning method is fixed...
... jacks To luminance (Y) input jack Video cable (optional) S Video connection: To S Video input connector S Video cable (provided) Audio cable (provided) SCART connection (For U.K. PROGRESSIVE: When progressive scanning is unavailable with a TV or Stereo System Chapter 1: Connection of the Component Video output using the COMPONENT VIDEO OUTPUT switch on the rear panel. Select the video connection method according to interlaced scanning. When S-Video cable is connected, the ordinary video connection is switched automatically to the TV in use. When the scanning method is fixed...
User Manual
Page 11
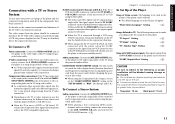
... in the "SET UP MENU" to "RGB". (For Europe and U.K.) To Connect a Stereo System Audio connection: Connect the MIX LINE OUTPUT jack of the player to the audio input jacks of the TV using the provided video cable. "TV Aspect" Setting o "TV Mode" Setting o "TV Monitor Type" Setting p Setup of SCART output signals: The signals output from the player should be used with a TV or Stereo System Do not insert the power cord plugs of the player and the connected components until all of...
... in the "SET UP MENU" to "RGB". (For Europe and U.K.) To Connect a Stereo System Audio connection: Connect the MIX LINE OUTPUT jack of the player to the audio input jacks of the TV using the provided video cable. "TV Aspect" Setting o "TV Mode" Setting o "TV Monitor Type" Setting p Setup of SCART output signals: The signals output from the player should be used with a TV or Stereo System Do not insert the power cord plugs of the player and the connected components until all of...

User Manual
Page 12
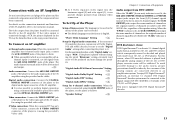
... SURROUND SUB WOOFER 6CH. When S-Video cable is connected, the ordinary video connection is not necessary. 12 OUTPUT Remove the protective cap before using the DIGITAL OUTPUT OPTICAL. * Select the video connection method according to the TV in use. Used when the AV amplifier and TV have the component video connection capability. ! Connection of Equipment Connection with an AV Amplifier AV amp Digital audio connection 6-channel audio connection: To 6-channel audio input jacks Audio cable (provided) Audio connection: To audio input jacks Audio cable (provided) Video connection...
... SURROUND SUB WOOFER 6CH. When S-Video cable is connected, the ordinary video connection is not necessary. 12 OUTPUT Remove the protective cap before using the DIGITAL OUTPUT OPTICAL. * Select the video connection method according to the TV in use. Used when the AV amplifier and TV have the component video connection capability. ! Connection of Equipment Connection with an AV Amplifier AV amp Digital audio connection 6-channel audio connection: To 6-channel audio input jacks Audio cable (provided) Audio connection: To audio input jacks Audio cable (provided) Video connection...
User Manual
Page 13
... power cord plugs of the player and the connected components until all of the player. If the video output is connected through the analog outputs of the player to an amplification system. channel inputs is equipped with 6- The multi-channel surround audio will be disturbed due to "PCM". To Set Up of the Player Setup of Menu screen: The language to it using a commercially available optical fiber cable and the OPTICAL DIGITAL OUTPUT jack. For the nonexistent decoders, set at the factory...
... power cord plugs of the player and the connected components until all of the player. If the video output is connected through the analog outputs of the player to an amplification system. channel inputs is equipped with 6- The multi-channel surround audio will be disturbed due to "PCM". To Set Up of the Player Setup of Menu screen: The language to it using a commercially available optical fiber cable and the OPTICAL DIGITAL OUTPUT jack. For the nonexistent decoders, set at the factory...

User Manual
Page 21
... changed during operation, it can be turned ON by the remote control unit. [When you are going to leave the listening room] When the power is on the player main unit. (The "STANDBY" indicator does not lit in this player. ¶ With certain DVD and VCD discs, a menu is lit. ¶ The TV screen shows "Play" and the 3 indicator in the display lights up. ¶ The " CD ", " VCD ", " DVD AUDIO...
... changed during operation, it can be turned ON by the remote control unit. [When you are going to leave the listening room] When the power is on the player main unit. (The "STANDBY" indicator does not lit in this player. ¶ With certain DVD and VCD discs, a menu is lit. ¶ The TV screen shows "Play" and the 3 indicator in the display lights up. ¶ The " CD ", " VCD ", " DVD AUDIO...

User Manual
Page 22
... Set the mode switch of the joystick remote to the Orange position and input the number of the DISC 1 to 5 buttons on the player main unit lights up and playback starts. ¶ The DISC 1 to 5 buttons are invalid in memory. A-B REPEAT ¶ With a DVD disc when a number is stopped in the all random and program modes. If there is only one of the DISC 1 to 5 buttons on the player main unit lights...
... Set the mode switch of the joystick remote to the Orange position and input the number of the DISC 1 to 5 buttons on the player main unit lights up and playback starts. ¶ The DISC 1 to 5 buttons are invalid in memory. A-B REPEAT ¶ With a DVD disc when a number is stopped in the all random and program modes. If there is only one of the DISC 1 to 5 buttons on the player main unit lights...

User Manual
Page 28
... the joystick remote to display the "SOUND" P.AUDIO AUDIO OSD. It is changed. If the default language is not contained in the disc, the priority language defined for the disc will be played back. ¶ The above operation is played, the language used in stop mode. Using Headphones Connect stereo headphones (with a standard stereo phone plug) into the PHONES jack and adjust the volume level with ordinary music CD(CDR/RW)s. Basic Operation Switching the audio language When...
... the joystick remote to display the "SOUND" P.AUDIO AUDIO OSD. It is changed. If the default language is not contained in the disc, the priority language defined for the disc will be played back. ¶ The above operation is played, the language used in stop mode. Using Headphones Connect stereo headphones (with a standard stereo phone plug) into the PHONES jack and adjust the volume level with ordinary music CD(CDR/RW)s. Basic Operation Switching the audio language When...

User Manual
Page 35
... off status of DVD, then select the "SOUND" OSD by the user is selected when the power is played, the "DOLBY DIGITAL" indicator on the player main unit lights up or down , then press . ema Voice. Select to adjust the level of Virtual Surround or switch it is required that the disc being played provides the center channel audio. ÷ When the digital output terminal is changed. Press ONSCREEN during...
... off status of DVD, then select the "SOUND" OSD by the user is selected when the power is played, the "DOLBY DIGITAL" indicator on the player main unit lights up or down , then press . ema Voice. Select to adjust the level of Virtual Surround or switch it is required that the disc being played provides the center channel audio. ÷ When the digital output terminal is changed. Press ONSCREEN during...

User Manual
Page 36
...; The desired subtitle language number can be selected from up or down . 2. ENTER 36 Select to adjust the picture quality. (If the desired picture quality cannot be played. Adjusting the picture quality Use the following operation, adjust it on the TV.) The setting items vary depending on the position of the COMPONENT VIDEO OUTPUT switch on the played disc and player status.) EXIT VISUAL 1 ENG...
...; The desired subtitle language number can be selected from up or down . 2. ENTER 36 Select to adjust the picture quality. (If the desired picture quality cannot be played. Adjusting the picture quality Use the following operation, adjust it on the TV.) The setting items vary depending on the position of the COMPONENT VIDEO OUTPUT switch on the played disc and player status.) EXIT VISUAL 1 ENG...

User Manual
Page 46
... range control function and audio filters. "Digital Audio Dolby Digital" SettingR ¶ Sets the Dolby Digital output. OUTPUT jacks of DVD discs. "Audio During Search" SettingP ¶ Switches on -screen messages and IPB display can be selected when you want to set the audio output method when system components are connected using the 6CH. "DVD VIDEO Mode" SettingQ ¶ Sets the play mode of the player is 4:3. When the system is required when the 6CH. "Speaker Setting"Y ¶ This setting is connected using the digital audio output connector of the connected TV or video...
... range control function and audio filters. "Digital Audio Dolby Digital" SettingR ¶ Sets the Dolby Digital output. OUTPUT jacks of DVD discs. "Audio During Search" SettingP ¶ Switches on -screen messages and IPB display can be selected when you want to set the audio output method when system components are connected using the 6CH. "DVD VIDEO Mode" SettingQ ¶ Sets the play mode of the player is 4:3. When the system is required when the 6CH. "Speaker Setting"Y ¶ This setting is connected using the digital audio output connector of the connected TV or video...
User Manual
Page 47
... U.K. Chapter 6: Various Setups "MAIN" Setting "Rating" Setting This setting makes it possible to display the menu screens, language use in menus on the disc, audio language, subtitle language, etc. "Player Menu Language" Setting„ ¶ Sets the language used to display the menu screens of adult DVD videodiscs that you change the language used to inhibit the playback of the disc. "Black Level Setup" Setting¨ ¶ This function makes the adjustment of the disc subtitles. However, there...
... U.K. Chapter 6: Various Setups "MAIN" Setting "Rating" Setting This setting makes it possible to display the menu screens, language use in menus on the disc, audio language, subtitle language, etc. "Player Menu Language" Setting„ ¶ Sets the language used to display the menu screens of adult DVD videodiscs that you change the language used to inhibit the playback of the disc. "Black Level Setup" Setting¨ ¶ This function makes the adjustment of the disc subtitles. However, there...
User Manual
Page 56
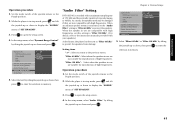
... use", then press the ENTER button. 56 While the player is played, this setting is in stop mode, press 1 and tilt SET UP the joystick up or down to display the "SOUND" menu of "SET UP MENU". 3. At the factory, the player has been set , including the "Center Speaker", "Surround Speakers" and "SubWoofer". Operation procedure 1. In the setup menu, select "Speaker Setting (Quick)" by tilting the joystick up or down and press ENTER . 5. Various Setups "Digital Audio MPEG" Setting When a DVD...
... use", then press the ENTER button. 56 While the player is played, this setting is in stop mode, press 1 and tilt SET UP the joystick up or down to display the "SOUND" menu of "SET UP MENU". 3. At the factory, the player has been set , including the "Center Speaker", "Surround Speakers" and "SubWoofer". Operation procedure 1. In the setup menu, select "Speaker Setting (Quick)" by tilting the joystick up or down and press ENTER . 5. Various Setups "Digital Audio MPEG" Setting When a DVD...

User Manual
Page 57
... changes in the speaker setting in the graphic room at the lower half of the ENTER button turns on "Exit" and press . ENTER "Speaker Setting (Custom)" Setting items Front speakers (L, R) Size: "Large" Level: "0 dB" Center speaker (C) Size: "Large" Use of center speaker: Used Level: "0 dB" Delay time: "0 ms" Surround speakers (SL, SR) Size: "Large" Use of surround speakers: Used Level: "0 dB" Delay time: "0 ms" Subwoofer Use of the joystick remote to the left /right. In the setup menu, select "Speaker Setting...
... changes in the speaker setting in the graphic room at the lower half of the ENTER button turns on "Exit" and press . ENTER "Speaker Setting (Custom)" Setting items Front speakers (L, R) Size: "Large" Level: "0 dB" Center speaker (C) Size: "Large" Use of center speaker: Used Level: "0 dB" Delay time: "0 ms" Surround speakers (SL, SR) Size: "Large" Use of surround speakers: Used Level: "0 dB" Delay time: "0 ms" Subwoofer Use of the joystick remote to the left /right. In the setup menu, select "Speaker Setting...

User Manual
Page 59
... press ENTER . Repeat the volume level adjustment until the volumes of each speaker indicated by tilting the joystick up/down or to enter the setting in step 5. 7. Use of surround speaker: Select "Off" if the surround speaker is not output from each speaker channel by pressing the RETURN button) 8. After completing the speaker setting, select "Exit" to enter the setting and return to the screen in memory. ¶...
... press ENTER . Repeat the volume level adjustment until the volumes of each speaker indicated by tilting the joystick up/down or to enter the setting in step 5. 7. Use of surround speaker: Select "Off" if the surround speaker is not output from each speaker channel by pressing the RETURN button) 8. After completing the speaker setting, select "Exit" to enter the setting and return to the screen in memory. ¶...
User Manual
Page 61
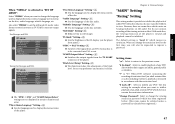
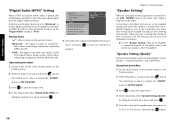
... setup screen. 4. Press ENTER to protect the speakers. While the player is connected, set to "Filter 60 kHz" to display the "SOUND" menu of "SET UP MENU". 3. Select "Filter 60 kHz" or "Filter 110 kHz" by tilting the joystick up or down to the Purple position. 2. Digital Audio PCM Down Conversion Dolby Digital DTS MPEG Speaker Setting (Custom) Speaker Setting (Quick) Audio During Search Dynamic Range Control Audio Filter 7 7 Wide 7 Normal 7 Midnight 5. Set the mode switch...
... setup screen. 4. Press ENTER to protect the speakers. While the player is connected, set to "Filter 60 kHz" to display the "SOUND" menu of "SET UP MENU". 3. Select "Filter 60 kHz" or "Filter 110 kHz" by tilting the joystick up or down to the Purple position. 2. Digital Audio PCM Down Conversion Dolby Digital DTS MPEG Speaker Setting (Custom) Speaker Setting (Quick) Audio During Search Dynamic Range Control Audio Filter 7 7 Wide 7 Normal 7 Midnight 5. Set the mode switch...

User Manual
Page 71
... cause harmful interference to Part 15 of the following are reproductions of Dolby Laboratories. Connect the equipment into an outlet on , or inside the product relating to comply with the instructions. This product incorporates copyright protection technology that the user switch the connection to operate this model 525p DVD player, please contact our customer service center. Manufactured under license from Dolby Laboratories. KENWOOD CORPORATION 2967-3, ISHIKAWA-CHO...
... cause harmful interference to Part 15 of the following are reproductions of Dolby Laboratories. Connect the equipment into an outlet on , or inside the product relating to comply with the instructions. This product incorporates copyright protection technology that the user switch the connection to operate this model 525p DVD player, please contact our customer service center. Manufactured under license from Dolby Laboratories. KENWOOD CORPORATION 2967-3, ISHIKAWA-CHO...

User Manual
Page 72
... be switched when the played DVD does not contain the recording of the TV and/or AV amplifier is incorrect or these devices are not turned on. ¶ Connection cords are not turned on. ¶ The volume of multiple au- In this , remove dirt and handle discs carefully so as described below. Y ¶ The input selection of multiple angles. A warning is displayed on the optical...
... be switched when the played DVD does not contain the recording of the TV and/or AV amplifier is incorrect or these devices are not turned on. ¶ Connection cords are not turned on. ¶ The volume of multiple au- In this , remove dirt and handle discs carefully so as described below. Y ¶ The input selection of multiple angles. A warning is displayed on the optical...


