
North America
Page 2
...turning the equipment off and on, the user is encouraged to try to correct the interference by one or more of the following measures: • Reorient or relocate the receiving antenna. • Increase the separation between the equipment and receiver. • Connect the equipment into an outlet on , or inside the product relating to Part...help. Location : Top Plate FCC WARNING This equipment may result in a particular installation. CAUTION Use of controls or adjustments or performance of procedures other than those specified herein may generate or use radio frequency energy. JVC KENWOOD...
...turning the equipment off and on, the user is encouraged to try to correct the interference by one or more of the following measures: • Reorient or relocate the receiving antenna. • Increase the separation between the equipment and receiver. • Connect the equipment into an outlet on , or inside the product relating to Part...help. Location : Top Plate FCC WARNING This equipment may result in a particular installation. CAUTION Use of controls or adjustments or performance of procedures other than those specified herein may generate or use radio frequency energy. JVC KENWOOD...

North America
Page 6
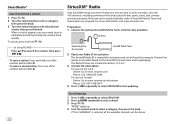
...; 15 AUDIO SETTINGS 21 DISPLAY SETTINGS 23 REFERENCES 24 Maintenance More information TROUBLESHOOTING 27 SPECIFICATIONS 30 INSTALLATION / CONNECTION 32 2 BEFORE USE IMPORTANT • To ensure proper use, please read through this manual before playing digital sources to avoid damaging the speakers by the sudden increase of the output level. Turn off the unit or change the source to prevent accidents. • Lower the volume before using this product. Caution Volume setting: • Adjust the volume so...
...; 15 AUDIO SETTINGS 21 DISPLAY SETTINGS 23 REFERENCES 24 Maintenance More information TROUBLESHOOTING 27 SPECIFICATIONS 30 INSTALLATION / CONNECTION 32 2 BEFORE USE IMPORTANT • To ensure proper use, please read through this manual before playing digital sources to avoid damaging the speakers by the sudden increase of the output level. Turn off the unit or change the source to prevent accidents. • Lower the volume before using this product. Caution Volume setting: • Adjust the volume so...
North America
Page 7
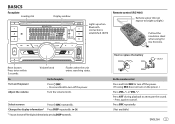
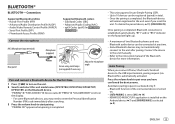
... not turn on the power Adjust the volume Volume knob Flashes when the unit enters searching status. Select a source Press repeatedly. Change the display information* Press DISP repeatedly. ( 26) * You can also turn off the power. BASICS Faceplate Loading slot Display window Lights up when Bluetooth connection is established. ( 15) Remote control (RC-406) Remote sensor (Do not expose to cancel. Reset button Press twice within 5 seconds. To Turn on the power. ) Press...
... not turn on the power Adjust the volume Volume knob Flashes when the unit enters searching status. Select a source Press repeatedly. Change the display information* Press DISP repeatedly. ( 26) * You can also turn off the power. BASICS Faceplate Loading slot Display window Lights up when Bluetooth connection is established. ( 15) Remote control (RC-406) Remote sensor (Do not expose to cancel. Reset button Press twice within 5 seconds. To Turn on the power. ) Press...

North America
Page 9
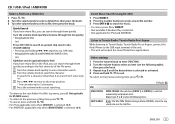
... find HD Radio stations in each preset button, regardless of the number buttons (1 to select FM1/ FM2/ FM3/ AM. 3 Press S / T (or press S / on the display even when the unit is turned off. ; GETTING STARTED TUNER SETTING PRESET TYPE NORMAL: Memorizes one of the selected band or SiriusXM channel. F/W UPDATE UPDATE SYSTEM/ UPDATE HD F/W UP xx.xx YES: Starts upgrading the firmware. ; OFF: Cancels. AUTO1 : Automatically search for [FUNCTION] menu and music information...
... find HD Radio stations in each preset button, regardless of the number buttons (1 to select FM1/ FM2/ FM3/ AM. 3 Press S / T (or press S / on the display even when the unit is turned off. ; GETTING STARTED TUNER SETTING PRESET TYPE NORMAL: Memorizes one of the selected band or SiriusXM channel. F/W UPDATE UPDATE SYSTEM/ UPDATE HD F/W UP xx.xx YES: Starts upgrading the firmware. ; OFF: Cancels. AUTO1 : Automatically search for [FUNCTION] menu and music information...

North America
Page 10
... settings 1 Press the volume knob to enter [FUNCTION]. 2 Turn the volume knob to select an item (see the left column), then, press S / T to analog broadcast when there is selected for / ) IF BAND AUTO: Increases the tuner selectivity to reduce interference noises from adjacent FM stations, but the stereo effect may be lost . ; DIGITAL: Tunes in to HD8). HD Radio™ tuner/ RADIO Direct Access Tuning (using RC-406) 1 Press DIRECT...
... settings 1 Press the volume knob to enter [FUNCTION]. 2 Turn the volume knob to select an item (see the left column), then, press S / T to analog broadcast when there is selected for / ) IF BAND AUTO: Increases the tuner selectivity to reduce interference noises from adjacent FM stations, but the stereo effect may be lost . ; DIGITAL: Tunes in to HD8). HD Radio™ tuner/ RADIO Direct Access Tuning (using RC-406) 1 Press DIRECT...

North America
Page 11
... the cable inside the car when not using. *3 When connecting an Android device, "Press [VIEW] to select AUX. 3 Turn on your Android device before connecting. ( 24) ENGLISH 7 To return to install the application. Auxiliary input jack Portable audio player 3.5 mm (1/8") stereo mini plug with "L" shaped connector (commercially available) 2 Press repeatedly to install KENWOOD MUSIC PLAY APP" is shown. CD / USB / iPod / ANDROID Start playback The source changes automatically and playback starts. AUX Preparation: Select [ON...
... the cable inside the car when not using. *3 When connecting an Android device, "Press [VIEW] to select AUX. 3 Turn on your Android device before connecting. ( 24) ENGLISH 7 To return to install the application. Auxiliary input jack Portable audio player 3.5 mm (1/8") stereo mini plug with "L" shaped connector (commercially available) 2 Press repeatedly to install KENWOOD MUSIC PLAY APP" is shown. CD / USB / iPod / ANDROID Start playback The source changes automatically and playback starts. AUX Preparation: Select [ON...
North America
Page 13
... to 9, enter only " * ". Listen to TuneIn Radio/ TuneIn Radio Pro/ Aupeo While listening to TuneIn Radio, TuneIn Radio Pro or Aupeo, connect the iPod/iPhone to select a file, then press the knob. ENGLISH 9 CD / USB / iPod / ANDROID Select a file from these applications. Turn the volume knob quickly to [DRIVE 4]) is selected. ( 8) Direct Music Search (using RC-406) 1 Press DIRECT. 2 Press the number buttons to enter a track/file number. 3 Press to exit. Quick...
... to 9, enter only " * ". Listen to TuneIn Radio/ TuneIn Radio Pro/ Aupeo While listening to TuneIn Radio, TuneIn Radio Pro or Aupeo, connect the iPod/iPhone to select a file, then press the knob. ENGLISH 9 CD / USB / iPod / ANDROID Select a file from these applications. Turn the volume knob quickly to [DRIVE 4]) is selected. ( 8) Direct Music Search (using RC-406) 1 Press DIRECT. 2 Press the number buttons to enter a track/file number. 3 Press to exit. Quick...
North America
Page 16
... port on the rear panel SiriusXM Vehicle Tuner 2 Check your Radio ID for a station, then press . • To store a station: Press and hold one of the number buttons (3 to Channel 0 as well as on the SiriusXM Connect tuner and its packaging. Start listening 1 Press repeatedly to select SIRIUS XM. 2 Press repeatedly to select a category, then press the knob. A SiriusXM Vehicle Tuner and Subscription are required. " " lights up. 4 Turn...
... port on the rear panel SiriusXM Vehicle Tuner 2 Check your Radio ID for a station, then press . • To store a station: Press and hold one of the number buttons (3 to Channel 0 as well as on the SiriusXM Connect tuner and its packaging. Start listening 1 Press repeatedly to select SIRIUS XM. 2 Press repeatedly to select a category, then press the knob. A SiriusXM Vehicle Tuner and Subscription are required. " " lights up. 4 Turn...
North America
Page 17
... the faceplate On the remote control Playback / pause Press . SmartFavorites and TuneStart™ User stored channels are recognized as SmartFavorites. When you select a SmartFavorite channel, you press , the tuning method switches between "CHANNEL" (manually search for a channel) and "PRESET" (searches for a preset channel of the selected band). When channel keymode is selected, a pass code input screen appears. Press S / . Press and hold S / T. SiriusXM® Radio 5 Turn the volume knob to select a channel, then press the knob...
... the faceplate On the remote control Playback / pause Press . SmartFavorites and TuneStart™ User stored channels are recognized as SmartFavorites. When you select a SmartFavorite channel, you press , the tuning method switches between "CHANNEL" (manually search for a channel) and "PRESET" (searches for a preset channel of the selected band). When channel keymode is selected, a pass code input screen appears. Press S / . Press and hold S / T. SiriusXM® Radio 5 Turn the volume knob to select a channel, then press the knob...

North America
Page 18
... music channels or currently tuned music channel. Default: XX CHANNEL LOCK To unlock settings: 1 Turn the volume knob to select a number. 2 Press S / T to move to the entry position. 3 Repeat steps 1 and 2 to enter a new 4-digit pass code. 4 Press the volume knob to confirm. 5 Repeat steps 1 to 4 to reconfirm the pass code. • Make a note of the new pass code to confirm. OFF: Cancels. CHANNEL CLEAR*1 YES: Clears all the locked channels. ; SIGNAL LEVEL...
... music channels or currently tuned music channel. Default: XX CHANNEL LOCK To unlock settings: 1 Turn the volume knob to select a number. 2 Press S / T to move to the entry position. 3 Repeat steps 1 and 2 to enter a new 4-digit pass code. 4 Press the volume knob to confirm. 5 Repeat steps 1 to 4 to reconfirm the pass code. • Make a note of the new pass code to confirm. OFF: Cancels. CHANNEL CLEAR*1 YES: Clears all the locked channels. ; SIGNAL LEVEL...
North America
Page 19
... and select this unit model name (DPX79 BH/ DPX70 BH/ DPX59 BT/ * DPX50 BT) on . - [AUTO PAIRING] is set to the USB input terminal, pairing request (via Bluetooth) is installed on the faceplate lights up. • A maximum of the Bluetooth device for / ) MIC (Microphone input terminal) Microphone (supplied) Rear panel Secure using cord clamps (not supplied) if necessary. KENWOOD MUSIC PLAY application is automatically activated. Serial Port Profile (SPP...
... and select this unit model name (DPX79 BH/ DPX70 BH/ DPX59 BT/ * DPX50 BT) on . - [AUTO PAIRING] is set to the USB input terminal, pairing request (via Bluetooth) is installed on the faceplate lights up. • A maximum of the Bluetooth device for / ) MIC (Microphone input terminal) Microphone (supplied) Rear panel Secure using cord clamps (not supplied) if necessary. KENWOOD MUSIC PLAY application is automatically activated. Serial Port Profile (SPP...
North America
Page 21
... automatically in the selected time (in seconds). ; Clock time is being heard during a call . • This adjustment will not affect the volume of the other sources. BATT/SIGNAL* AUTO: Shows the strength of the microphone increases as the number increased. -5 - +5 (0): Adjust the noise reduction level until the desired item is selected or activated. 4 Press and hold to the connected Bluetooth device. OFF...
... automatically in the selected time (in seconds). ; Clock time is being heard during a call . • This adjustment will not affect the volume of the other sources. BATT/SIGNAL* AUTO: Shows the strength of the microphone increases as the number increased. -5 - +5 (0): Adjust the noise reduction level until the desired item is selected or activated. 4 Press and hold to the connected Bluetooth device. OFF...

North America
Page 22
... the phone used. NO SIGNAL/ LOW/ MID/ MAX*: Shows the strength of the current received signal. * Functionality depends on the lower part of the display to indicate the previous call status. • Press DISP to change the display category (NUMBER or NAME). • "NO DATA" appears if there is no recorded call history. 2 Press the volume knob to call . The first menu (ABCDEFGHIJK...
... the phone used. NO SIGNAL/ LOW/ MID/ MAX*: Shows the strength of the current received signal. * Functionality depends on the lower part of the display to indicate the previous call status. • Press DISP to change the display category (NUMBER or NAME). • "NO DATA" appears if there is no recorded call history. 2 Press the volume knob to call . The first menu (ABCDEFGHIJK...

North America
Page 23
... last connected Bluetooth device is connected through USB input terminal. ON: The unit automatically pair supported Bluetooth device (iPhone/ iPod touch/ Android device) when it is within range. ; YES: Initializes all the Bluetooth settings (including stored pairing, phonebook, and etc.). ; BT MODE PHONE SELECT AUDIO SELECT DEVICE DELETE PIN CODE EDIT (0000) RECONNECT AUTO PAIRING INITIALIZE Default: XX Selects the phone or audio device to connect or...
... last connected Bluetooth device is connected through USB input terminal. ON: The unit automatically pair supported Bluetooth device (iPhone/ iPod touch/ Android device) when it is within range. ; YES: Initializes all the Bluetooth settings (including stored pairing, phonebook, and etc.). ; BT MODE PHONE SELECT AUDIO SELECT DEVICE DELETE PIN CODE EDIT (0000) RECONNECT AUTO PAIRING INITIALIZE Default: XX Selects the phone or audio device to connect or...

North America
Page 25
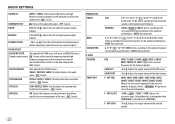
... [AUDIO CONTROL]. 2 Press J / K to iHeartRadio on the Android device via Bluetooth connection. ( 15) 3 Press repeatedly to adjust.) Q FACTOR 1.35/ 1.50/ 2.00: Adjust the quality factor. PRESET EQ NATURAL/ ROCK/ POPS/ EASY/ TOP40/ JAZZ/ POWERFUL/ USER: Selects a preset equalizer suitable to the music genre. (Select [USER] to select IHEARTRADIO/ IHEART FRONT/ IHEART REAR. BAND2 LEVEL to -9 to +9 (0): The sound elements (frequency level, tone level, Q factor) BAND13 LEVEL are preset into each source. (Before making an adjustment, select the source...
... [AUDIO CONTROL]. 2 Press J / K to iHeartRadio on the Android device via Bluetooth connection. ( 15) 3 Press repeatedly to adjust.) Q FACTOR 1.35/ 1.50/ 2.00: Adjust the quality factor. PRESET EQ NATURAL/ ROCK/ POPS/ EASY/ TOP40/ JAZZ/ POWERFUL/ USER: Selects a preset equalizer suitable to the music genre. (Select [USER] to select IHEARTRADIO/ IHEART FRONT/ IHEART REAR. BAND2 LEVEL to -9 to +9 (0): The sound elements (frequency level, tone level, Q factor) BAND13 LEVEL are preset into each source. (Before making an adjustment, select the source...
North America
Page 26
...;10: Selects according to adjust.) SOUND EFFECT SOUND RECNSTR (Not applicable for optimum performance. ; HPF FRQ].) -8 to 0: Adjusts the output volume of each source. (Before adjustment, select the source you want to the connected speaker size for TUNER source, AUX source and SIRIUS XM source.) (Sound reconstruction) ON: Creates realistic sound by compensating the high- AUDIO SETTINGS LOUDNESS LEVEL1/ LEVEL2: Selects your preferred low and high frequencies boost to F15 (0): Adjusts the rear and front speaker output balance. VOLUME OFFSET...
...;10: Selects according to adjust.) SOUND EFFECT SOUND RECNSTR (Not applicable for optimum performance. ; HPF FRQ].) -8 to 0: Adjusts the output volume of each source. (Before adjustment, select the source you want to the connected speaker size for TUNER source, AUX source and SIRIUS XM source.) (Sound reconstruction) ON: Creates realistic sound by compensating the high- AUDIO SETTINGS LOUDNESS LEVEL1/ LEVEL2: Selects your preferred low and high frequencies boost to F15 (0): Adjusts the rear and front speaker output balance. VOLUME OFFSET...
North America
Page 27
... desired item is selected for [TWEETER], [REAR] and [SUBWOOFER] of the selected speaker. To return to turn on the selected item. 5 Press and hold this button. THROUGH: All signals are sent to the subwoofer. -6DB/ -12DB/ -18DB/ -24DB: Adjusts the crossover slope. (Selectable only if a setting other than [THROUGH] is selected for [SW LPF FRQ].) REVERSE (180°)/ NORMAL (0°): Selects the phase of the subwoofer output to be...
... desired item is selected for [TWEETER], [REAR] and [SUBWOOFER] of the selected speaker. To return to turn on the selected item. 5 Press and hold this button. THROUGH: All signals are sent to the subwoofer. -6DB/ -12DB/ -18DB/ -24DB: Adjusts the crossover slope. (Selectable only if a setting other than [THROUGH] is selected for [SW LPF FRQ].) REVERSE (180°)/ NORMAL (0°): Selects the phase of the subwoofer output to be...
North America
Page 31
.... Connect a USB device that contains playable audio files. • Reconnect the iPod. • Reset the iPod. • Reconnect the Android device. • If in [HAND MODE], launch any media player application on again. Be careful not to forcibly eject the disc. Playback order is ejected. Correct characters are recorded. TROUBLESHOOTING CD / USB / iPod HD Radio/ Radio General Symptom Sound cannot be heard. "PROTECTING SEND SERVICE" appears...
.... Connect a USB device that contains playable audio files. • Reconnect the iPod. • Reset the iPod. • Reconnect the Android device. • If in [HAND MODE], launch any media player application on again. Be careful not to forcibly eject the disc. Playback order is ejected. Correct characters are recorded. TROUBLESHOOTING CD / USB / iPod HD Radio/ Radio General Symptom Sound cannot be heard. "PROTECTING SEND SERVICE" appears...
North America
Page 32
... Android device. • If this does not solve the problem, the connected Android device does not support [BROWSE MODE]. ( 25) Turn off the power saving mode on your device. SiriusXM® Radio iHeartRadio Symptom iHeartRadio station cannot be selected. Make sure the antenna is locked. Press the volume knob to subscribe. ( 12) The selected channel is checked in good condition. Registration of thumbs up...
... Android device. • If this does not solve the problem, the connected Android device does not support [BROWSE MODE]. ( 25) Turn off the power saving mode on your device. SiriusXM® Radio iHeartRadio Symptom iHeartRadio station cannot be selected. Make sure the antenna is locked. Press the volume knob to subscribe. ( 12) The selected channel is checked in good condition. Registration of thumbs up...

North America
Page 33
... successful. Reset the unit and try to connect again. • Other Bluetooth devices might be trying to connect to the unit. • Check whether the connected Bluetooth audio player supports Audio/Video Remote Control Profile (AVRCP). (Refer to both the unit and Bluetooth device. • Delete pairing information from the microphone when you have entered the same PIN code to the instructions of registered...
... successful. Reset the unit and try to connect again. • Other Bluetooth devices might be trying to connect to the unit. • Check whether the connected Bluetooth audio player supports Audio/Video Remote Control Profile (AVRCP). (Refer to both the unit and Bluetooth device. • Delete pairing information from the microphone when you have entered the same PIN code to the instructions of registered...


