
User Manual
Page 1
B60-5378-00 00 MA (E,Y) AP 0304 1 ESPAÑOL DEUTSCH ITALIANO DPC-X937/DPC-X637/DPC-X537 PORTABLE CD PLAYER INSTRUCTION MANUAL This instruction manual is for some models. Model availability and features (functions) may differ depending on the country and sales area.
B60-5378-00 00 MA (E,Y) AP 0304 1 ESPAÑOL DEUTSCH ITALIANO DPC-X937/DPC-X637/DPC-X537 PORTABLE CD PLAYER INSTRUCTION MANUAL This instruction manual is for some models. Model availability and features (functions) may differ depending on the country and sales area.
User Manual
Page 2
... the serial number, found on the back of the unit, in the spaces designated on this manual handy for information or service on the warranty card, and in the space provided below. Refer to operate, notify your dealer immediately. Recharger stand (1 DPC-X937/DPC-X637 only) AC adaptor (1 DPC-X937/DPC-X637 only) Rechargeable batteries (2 DPC-X937/DPC-X637 only) Batteries case (1 DPC-X937/DPC...
... the serial number, found on the back of the unit, in the spaces designated on this manual handy for information or service on the warranty card, and in the space provided below. Refer to operate, notify your dealer immediately. Recharger stand (1 DPC-X937/DPC-X637 only) AC adaptor (1 DPC-X937/DPC-X637 only) Rechargeable batteries (2 DPC-X937/DPC-X637 only) Batteries case (1 DPC-X937/DPC...

User Manual
Page 3
... 19 Turning the power off 19 Repeated playback 20 A-B repeat playback 21 Using Bookmarks 23 Menu control operations 25 Fast forward / fast reverse 26 Changing the sound mode 27 Selecting Play Mode 28 Programming tracks in desired order 29 Random playback 30 Intro Scan 30 Alarm mode 31 Sleep mode 33 Sound skip guard function (SHOCK GUARD 35 Convenient functions 36 Activating the operating tone (Beep 36 Setting continuous...
... 19 Turning the power off 19 Repeated playback 20 A-B repeat playback 21 Using Bookmarks 23 Menu control operations 25 Fast forward / fast reverse 26 Changing the sound mode 27 Selecting Play Mode 28 Programming tracks in desired order 29 Random playback 30 Intro Scan 30 Alarm mode 31 Sleep mode 33 Sound skip guard function (SHOCK GUARD 35 Convenient functions 36 Activating the operating tone (Beep 36 Setting continuous...

User Manual
Page 5
... removal - Power sources - IMPORTANT SAFEGUARDS Caution : Read this unit. Contact your dealer or nearest service center. 7. Particularly, never leave it with a cloth, etc. 6. Never remove the enclosure. Pay particular attention to cords at plugs, convenience receptacles, and the point where they are touched accidentally, a serious electric shock might occur. 4. If the internal parts are not likely to ensure safe operation...
... removal - Power sources - IMPORTANT SAFEGUARDS Caution : Read this unit. Contact your dealer or nearest service center. 7. Particularly, never leave it with a cloth, etc. 6. Never remove the enclosure. Pay particular attention to cords at plugs, convenience receptacles, and the point where they are touched accidentally, a serious electric shock might occur. 4. If the internal parts are not likely to ensure safe operation...
User Manual
Page 6
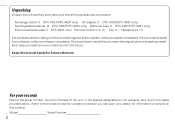
... - Avoid placing the appliance on the appliance. 10.Dust and moisture - The appliance should be unplugged from sources of magnetic fields such as TV sets, speaker systems, radios, motorized toys or magnetized objects. 6 13.Cleaning - E. Avoid places where is dusty or where the humidity... to operate normally or exhibits a marked change in performance. Use a clean dry cloth. 14.Nonuse periods - ESPAÑOL ITALIANO DEUTSCH 8. C. Do not use volatile solvents such as a shelf or in a wet basement, or near a swimming pool, etc. The power-supply cord or the plug has been...
... - Avoid placing the appliance on the appliance. 10.Dust and moisture - The appliance should be unplugged from sources of magnetic fields such as TV sets, speaker systems, radios, motorized toys or magnetized objects. 6 13.Cleaning - E. Avoid places where is dusty or where the humidity... to operate normally or exhibits a marked change in performance. Use a clean dry cloth. 14.Nonuse periods - ESPAÑOL ITALIANO DEUTSCH 8. C. Do not use volatile solvents such as a shelf or in a wet basement, or near a swimming pool, etc. The power-supply cord or the plug has been...
User Manual
Page 8
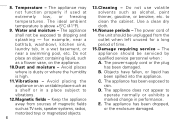
LINE OUT (OPTICAL) (Line out/Digital output jack) jack (DPC-X937 only) @ (Headphones/ Remote control unit) jack keys 6 HOLD 3 switch 7 0 PUSH OPEN key (Use to open top cover) 8 Side 67 89 0 !@ 8 DC IN (External power) jack (DPC-X537 only) 9 EXT BATT jack (DPC-X937 only) 0 Recharging terminals (DPC-X937/DPC-X637 only) ! ESPAÑOL ITALIANO DEUTSCH Names and functions of parts Main Unit Top 1 Rear 234 5 1 CHARGE (Battery charge) indicator 2 4 (Skip down) key 3 3/¢ (Play/Skip up) key 4 7 (Stop/Off) key 5 VOLUME +/-
LINE OUT (OPTICAL) (Line out/Digital output jack) jack (DPC-X937 only) @ (Headphones/ Remote control unit) jack keys 6 HOLD 3 switch 7 0 PUSH OPEN key (Use to open top cover) 8 Side 67 89 0 !@ 8 DC IN (External power) jack (DPC-X537 only) 9 EXT BATT jack (DPC-X937 only) 0 Recharging terminals (DPC-X937/DPC-X637 only) ! ESPAÑOL ITALIANO DEUTSCH Names and functions of parts Main Unit Top 1 Rear 234 5 1 CHARGE (Battery charge) indicator 2 4 (Skip down) key 3 3/¢ (Play/Skip up) key 4 7 (Stop/Off) key 5 VOLUME +/-

User Manual
Page 9
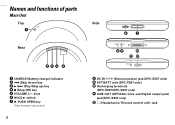
...; indicator 3 Timer-related indicator 4 Sound Mode indicator 5 Track number indicator 6 Playing time indicator Battery Type Blinking Timing Treatment Rechargeable batteries Alkaline batteries When the batteries is blinking. 9 Then recharge the batteries. DEUTSCH Remote Control LCD 7 Headphones jack 8 MEMU key/ 7 (Stop/Off) key/ 3/¢ (Play/Skip up/ Fast forward) key/ 4 (Skip down/Fast reverse) key 9 2 HOLD switch 0 REPEAT key ! keys Battery duration indicator The duration at which the battery indicator starts to blink is...
...; indicator 3 Timer-related indicator 4 Sound Mode indicator 5 Track number indicator 6 Playing time indicator Battery Type Blinking Timing Treatment Rechargeable batteries Alkaline batteries When the batteries is blinking. 9 Then recharge the batteries. DEUTSCH Remote Control LCD 7 Headphones jack 8 MEMU key/ 7 (Stop/Off) key/ 3/¢ (Play/Skip up/ Fast forward) key/ 4 (Skip down/Fast reverse) key 9 2 HOLD switch 0 REPEAT key ! keys Battery duration indicator The duration at which the battery indicator starts to blink is...
User Manual
Page 12
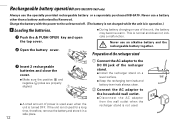
...; Install the recharger stand on a level surface. This is not used for a long time, therefore, remove the battery and store it in operation.) 1 Loading the batteries. 1 Push the 0 PUSH OPEN key and open the top cover. 2 Open the battery cover. 2 ÷ During battery charging or use a battery other than a battery authorized by Kenwood. Never use the specially provided rechargeable battery or a separately purchased NB-3A70. Rechargeable battery operation (DPC-X937/DPC-X637...
...; Install the recharger stand on a level surface. This is not used for a long time, therefore, remove the battery and store it in operation.) 1 Loading the batteries. 1 Push the 0 PUSH OPEN key and open the top cover. 2 Open the battery cover. 2 ÷ During battery charging or use a battery other than a battery authorized by Kenwood. Never use the specially provided rechargeable battery or a separately purchased NB-3A70. Rechargeable battery operation (DPC-X937/DPC-X637...
User Manual
Page 15
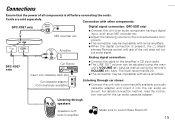
... an audio component having a digital input, such as an MD recorder etc. ÷ Adjust the listening volume on the connected audio component. ÷ This connection may be impossible with some amplifiers. phones/ Remote control unit) jack of all components is present, the (Head- Analog signal connection: ÷ Connect the cable to switch Bass Boost off before connecting the cords. The level recommends 20. ÷ This connection may be adjusted using the remote's VOLUME +/- For details connection method, read the instruction manual...
... an audio component having a digital input, such as an MD recorder etc. ÷ Adjust the listening volume on the connected audio component. ÷ This connection may be impossible with some amplifiers. phones/ Remote control unit) jack of all components is present, the (Head- Analog signal connection: ÷ Connect the cable to switch Bass Boost off before connecting the cords. The level recommends 20. ÷ This connection may be adjusted using the remote's VOLUME +/- For details connection method, read the instruction manual...
User Manual
Page 16
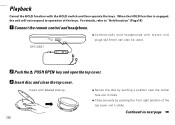
.... DPC-X937 ITALIANO ESPAÑOL 2 Push the 0 PUSH OPEN key and open the top cover. 3 Insert disc and close the top cover. DEUTSCH Playback Cancel the HOLD function with stereo mini plugs (φ3.5mm) can also be used. Continued on next page \ Insert with labeled side up. 16 ÷ Secure the disc by pushing a position near the center hole...
.... DPC-X937 ITALIANO ESPAÑOL 2 Push the 0 PUSH OPEN key and open the top cover. 3 Insert disc and close the top cover. DEUTSCH Playback Cancel the HOLD function with stereo mini plugs (φ3.5mm) can also be used. Continued on next page \ Insert with labeled side up. 16 ÷ Secure the disc by pushing a position near the center hole...

User Manual
Page 18
DEUTSCH ITALIANO Remote control Main unit ÷ Set the HOLD 3 switch on the main unit to engage the HOLD function for the main unit. (0 PUSH OPEN key also doesn't work.) ÷ Set the 2 HOLD switch on a train or when you are carrying it with the HOLD switch and then operate the keys. Remote control Main unit 3/¢ : Track number increases 4 : Track number decreases ÷ Each...
DEUTSCH ITALIANO Remote control Main unit ÷ Set the HOLD 3 switch on the main unit to engage the HOLD function for the main unit. (0 PUSH OPEN key also doesn't work.) ÷ Set the 2 HOLD switch on a train or when you are carrying it with the HOLD switch and then operate the keys. Remote control Main unit 3/¢ : Track number increases 4 : Track number decreases ÷ Each...

User Manual
Page 19
Remote control Main unit Turning the power off Press during playback status. If the top cover is opened between the stop and restart, playback restarts from the position where it has stopped. This function is not operated for about 2 minutes after it was stopped. ITALIANO ESPAÑOL 19 Remote control... Main unit Resume function When playback is stopped and then started again, it will automatically turn off between the stop and restart. ÷ The power will restart from the first track of the disc. ÷ The resume function is not engaged during program ...
Remote control Main unit Turning the power off Press during playback status. If the top cover is opened between the stop and restart, playback restarts from the position where it has stopped. This function is not operated for about 2 minutes after it was stopped. ITALIANO ESPAÑOL 19 Remote control... Main unit Resume function When playback is stopped and then started again, it will automatically turn off between the stop and restart. ÷ The power will restart from the first track of the disc. ÷ The resume function is not engaged during program ...

User Manual
Page 20
...) Return to a favorite track or disc. ESPAÑOL 20 The mode changes each time the REPEAT key is displayed. When in the normal playback mode : 1 One-track repeat ( ) The track being played or the selected track will be played repeatedly. 2 All-track repeat ( ) All tracks on the disc will be used while a bookmark is set or during playback or stop...
...) Return to a favorite track or disc. ESPAÑOL 20 The mode changes each time the REPEAT key is displayed. When in the normal playback mode : 1 One-track repeat ( ) The track being played or the selected track will be played repeatedly. 2 All-track repeat ( ) All tracks on the disc will be used while a bookmark is set or during playback or stop...
User Manual
Page 25
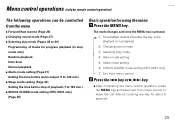
... Intro Scan Normal playback ÷ Alarm mode setting (Page 31) Setting the time before alarm output (1 to 120 min.) ÷ Sleep mode setting (Page 33) Setting the time before stop of tracks for program playback (in progress) 2 Changing sound mode 3 Selecting play mode 4 Alarm mode setting 5 Sleep mode setting 6 SHOCK GUARD mode setting (DPC-X937 only) 7 Exit from menu control 2Press the 4 key or 3/¢ key. ÷ After completing the menu control operation, press the MENU key and select exit from...
... Intro Scan Normal playback ÷ Alarm mode setting (Page 31) Setting the time before alarm output (1 to 120 min.) ÷ Sleep mode setting (Page 33) Setting the time before stop of tracks for program playback (in progress) 2 Changing sound mode 3 Selecting play mode 4 Alarm mode setting 5 Sleep mode setting 6 SHOCK GUARD mode setting (DPC-X937 only) 7 Exit from menu control 2Press the 4 key or 3/¢ key. ÷ After completing the menu control operation, press the MENU key and select exit from...
User Manual
Page 35
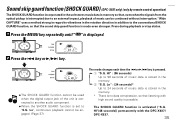
... to 24 seconds of music data is displayed. Lo", continuous playback cannot be used when the digital output jack of the unit is connected to another audio component. ÷ When the SHOCK GUARD function is set to 96 seconds of music data is stored in addition to the conventionalSHOCK GUARD function, so that listening with the DPC-X637/ DPC-X537. 35 HI" : (96 seconds...
... to 24 seconds of music data is displayed. Lo", continuous playback cannot be used when the digital output jack of the unit is connected to another audio component. ÷ When the SHOCK GUARD function is set to 96 seconds of music data is stored in addition to the conventionalSHOCK GUARD function, so that listening with the DPC-X637/ DPC-X537. 35 HI" : (96 seconds...
User Manual
Page 37
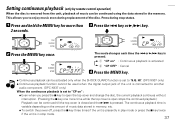
... pressed. Press during replacement of the disc. This allows you press the 7 key to "S.G. DEUTSCH Setting continuous playback (only by remote control operation) When the disc is removed from the unit, playback of music can be used when the digital output jack of the unit is connected to another audio component. (DPC-X937 only) When the continuous playback is set to open the top cover and change the disc, the current...
... pressed. Press during replacement of the disc. This allows you press the 7 key to "S.G. DEUTSCH Setting continuous playback (only by remote control operation) When the disc is removed from the unit, playback of music can be used when the digital output jack of the unit is connected to another audio component. (DPC-X937 only) When the continuous playback is set to open the top cover and change the disc, the current...

User Manual
Page 40
... hours and restart the operation after the condensation has dried up. Please do not use a cracked or deformed disc or a disc repaired with this unit and the outside. Caution on condensation Condensation (of playing back the Audio CD discs, CD-R/CD-RW (CD-DA) discs and discs carrying the marking. This unit may occur inside the unit when there is installed increases, etc. ESPAÑ...
... hours and restart the operation after the condensation has dried up. Please do not use a cracked or deformed disc or a disc repaired with this unit and the outside. Caution on condensation Condensation (of playing back the Audio CD discs, CD-R/CD-RW (CD-DA) discs and discs carrying the marking. This unit may occur inside the unit when there is installed increases, etc. ESPAÑ...

User Manual
Page 41
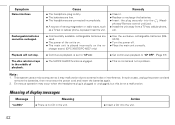
... occurred. ÷ The disc is dirty. ÷ The headphone plug is discon- nected. ÷ Set the switch to the minimum position on the unit. ÷ The digital connection is present. (DPC-X937 only) ÷ Insert the plug securely into the (Headphones/ Remote control unit) jack. ÷ Insert the plug securely into the (Headphones/ Remote control unit) jack. ÷ Adjust the volume on . ÷ The batteries are exhausted. ÷...
... occurred. ÷ The disc is dirty. ÷ The headphone plug is discon- nected. ÷ Set the switch to the minimum position on the unit. ÷ The digital connection is present. (DPC-X937 only) ÷ Insert the plug securely into the (Headphones/ Remote control unit) jack. ÷ Insert the plug securely into the (Headphones/ Remote control unit) jack. ÷ Adjust the volume on . ÷ The batteries are exhausted. ÷...
User Manual
Page 42
... plugged or unplugged; This system uses a microcomputer so it . ÷ Replace or recharge the batteries. ÷ Insert the plug securely into the unit. In such a case, unplug the power cord and remove the batteries, then re-connect the power cord and insert the batteries again. 2. Meaning of display messages Message Meaning "nodISC" ÷ There is normal and not a problem. Action ÷ Insert a CD into the (Head- The disc...
... plugged or unplugged; This system uses a microcomputer so it . ÷ Replace or recharge the batteries. ÷ Insert the plug securely into the unit. In such a case, unplug the power cord and remove the batteries, then re-connect the power cord and insert the batteries again. 2. Meaning of display messages Message Meaning "nodISC" ÷ There is normal and not a problem. Action ÷ Insert a CD into the (Head- The disc...
User Manual
Page 44
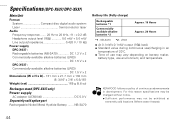
... locations (Where water freezes). DEUTSCH ITALIANO Specifications (DPC-X637/ DPC-X537) Main Unit Format System Compact disc digital audio system Laser Semiconductor laser Audio Frequency response ....... 20 Hz to 20 kHz, -9 ~+0.2 dB Headphone output level (16 5.0 mW + 5.0 mW Line output/impedance 0.420 V / 10 kΩ Power supply DPC-X637 : Rechargeable batteries (NB-3A70 DC 1.2 V x 2 Commercially-available alkaline batteries (LR03 DC 1.5 V x 2 DPC-X537 : Commercially-available alkaline batteries (LR03 DC 1.5 V x 2 Dimensions (W x H x D) .. 131 mm x 21...
... locations (Where water freezes). DEUTSCH ITALIANO Specifications (DPC-X637/ DPC-X537) Main Unit Format System Compact disc digital audio system Laser Semiconductor laser Audio Frequency response ....... 20 Hz to 20 kHz, -9 ~+0.2 dB Headphone output level (16 5.0 mW + 5.0 mW Line output/impedance 0.420 V / 10 kΩ Power supply DPC-X637 : Rechargeable batteries (NB-3A70 DC 1.2 V x 2 Commercially-available alkaline batteries (LR03 DC 1.5 V x 2 DPC-X537 : Commercially-available alkaline batteries (LR03 DC 1.5 V x 2 Dimensions (W x H x D) .. 131 mm x 21...


