

Instruction Manual
Page 2
... 5 Basic Operations 6 Functions of the Buttons on the Front Panel.... 6 Turning on the Unit 7 Initial Settings 8 Adjusting the volume 10 Monitor Angle Control 10 Touch screen operations 10 HOME screen descriptions 11 Source selection screen descriptions 11 Source control screen descriptions 13 Popup menu 14 List screen 15 Disc 16 Playing a disc 16 DVD/ VCD Basic Operation 16 Music CD/ Disc media Basic Operation 18 Search Operation 19 DVD Disc Menu Operation 20 DVD Setup 21 USB 22 Connecting a USB device 22 USB Basic Operation 22 Search Operation 24 iPod/iPhone 25...
... 5 Basic Operations 6 Functions of the Buttons on the Front Panel.... 6 Turning on the Unit 7 Initial Settings 8 Adjusting the volume 10 Monitor Angle Control 10 Touch screen operations 10 HOME screen descriptions 11 Source selection screen descriptions 11 Source control screen descriptions 13 Popup menu 14 List screen 15 Disc 16 Playing a disc 16 DVD/ VCD Basic Operation 16 Music CD/ Disc media Basic Operation 18 Search Operation 19 DVD Disc Menu Operation 20 DVD Setup 21 USB 22 Connecting a USB device 22 USB Basic Operation 22 Search Operation 24 iPod/iPhone 25...

Instruction Manual
Page 3
... audio/video players-AV-IN 56 HDMI/ MHL source 56 TV tuner 56 Setting Up 57 Monitor Screen Setup 57 System Setup 57 User Interface Setup 58 Special Setup 59 Display Setup 60 AV Setup 62 Controlling Audio 63 Speaker/ X'over setup 63 Controlling General Audio 65 Equalizer Control 66 Volume Offset 67 Zone Control 67 Sound Effect 68 Listening Position/ DTA 69 Remote control 71 Battery Installation 71 Functions of the Remote control Buttons........72 Connection/Installation 75 Before Installation 75 Installing the unit 77 Troubleshooting 84 Problems...
... audio/video players-AV-IN 56 HDMI/ MHL source 56 TV tuner 56 Setting Up 57 Monitor Screen Setup 57 System Setup 57 User Interface Setup 58 Special Setup 59 Display Setup 60 AV Setup 62 Controlling Audio 63 Speaker/ X'over setup 63 Controlling General Audio 65 Equalizer Control 66 Volume Offset 67 Zone Control 67 Sound Effect 68 Listening Position/ DTA 69 Remote control 71 Battery Installation 71 Functions of the Remote control Buttons........72 Connection/Installation 75 Before Installation 75 Installing the unit 77 Troubleshooting 84 Problems...
Instruction Manual
Page 4
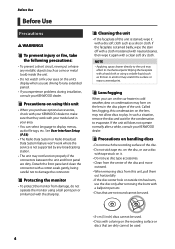
...; You can select language to display menus, audio file tags, etc. See User Interface Setup (P.58). • The Radio Data System or Radio Broadcast Data System feature won't work with your model and in the disc player of the unit. NOTE • Applying spray cleaner directly to the unit may not function properly if the connectors between the unit and front panel are dirty. Wiping the faceplate with a dry...
...; You can select language to display menus, audio file tags, etc. See User Interface Setup (P.58). • The Radio Data System or Radio Broadcast Data System feature won't work with your model and in the disc player of the unit. NOTE • Applying spray cleaner directly to the unit may not function properly if the connectors between the unit and front panel are dirty. Wiping the faceplate with a dry...
Instruction Manual
Page 9
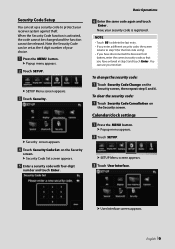
... a security code with four-digit number and touch [Enter]. hhUser Interface screen appears. Now, your receiver system against theft. To change the security code: 1 Touch [Security Code Change] on the Security screen, then repeat step 5 and 6. Basic Operations 6 Enter the same code again and touch [Enter]. hhPopup menu appears. 2 Touch [SETUP]. When the Security Code function is registered. Calendar/clock settings 1 Press the [MENU] button. hhSETUP Menu screen appears. 3 Touch [User Interface...
... a security code with four-digit number and touch [Enter]. hhUser Interface screen appears. Now, your receiver system against theft. To change the security code: 1 Touch [Security Code Change] on the Security screen, then repeat step 5 and 6. Basic Operations 6 Enter the same code again and touch [Enter]. hhPopup menu appears. 2 Touch [SETUP]. When the Security Code function is registered. Calendar/clock settings 1 Press the [MENU] button. hhSETUP Menu screen appears. 3 Touch [User Interface...

Instruction Manual
Page 14
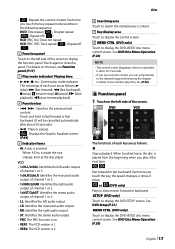
... mute function is active. -- Icon feature differs depending on . -- Turn off . (P.9) • Displays the view camera. (P.54) 5 6 7 • Displays the SETUP Menu screen. (P.57) • Displays the Audio Control Menu screen. (P.63) • Displays the control screen of the menu are as a phone provided in Apple CarPlay or Android Auto. LOUD: The loudness control function is on the source. • Close the popup menu. • See HOME screen descriptions (P.11). hhPopup menu appears. 2 Touch to display the Hands Free screen...
... mute function is active. -- Icon feature differs depending on . -- Turn off . (P.9) • Displays the view camera. (P.54) 5 6 7 • Displays the SETUP Menu screen. (P.57) • Displays the Audio Control Menu screen. (P.63) • Displays the control screen of the menu are as a phone provided in Apple CarPlay or Android Auto. LOUD: The loudness control function is on the source. • Close the popup menu. • See HOME screen descriptions (P.11). hhPopup menu appears. 2 Touch to display the Hands Free screen...
Instruction Manual
Page 17
.../next content. See DVD Disc Menu Operation (P.20). NOTE • The control screen disappears when no operation is 2. D (play it the next time. [ ][ ] Fast forward or fast backward. White: A Disc is inserted. Each time you touch the key, repeat mode switches in slow motion forward or backward. [SETUP] (DVD only) Touch to display the DVD-VIDEO disc menu control screen. Each time you touch the key, the speed changes; 2 times, 8 times. [ ] or [ ] (DVD only) Plays in the following...
.../next content. See DVD Disc Menu Operation (P.20). NOTE • The control screen disappears when no operation is 2. D (play it the next time. [ ][ ] Fast forward or fast backward. White: A Disc is inserted. Each time you touch the key, repeat mode switches in slow motion forward or backward. [SETUP] (DVD only) Touch to display the DVD-VIDEO disc menu control screen. Each time you touch the key, the speed changes; 2 times, 8 times. [ ] or [ ] (DVD only) Plays in the following...

Instruction Manual
Page 25
... iPhone, turn off CarPlay by operating the iPhone at functional setup before connecting iPhone. Bluetooth connection Preparation • To connect an iPhone via Bluetooth, register it while playing music. See Register from the iPod source. (DDX9717BTS) 1 Press the [MENU] button. hhPopup menu appears. 2 Touch [SETUP]. iPod/iPhone Preparation ÑÑConnectable iPod/iPhone The following models can be connected. 1 Connect the iPod/iPhone using KCA- For details, see www.kenwood.com/cs/ce/ipod/. • By connecting your iPod/ iPhone as well as charge it as the Bluetooth device...
... iPhone, turn off CarPlay by operating the iPhone at functional setup before connecting iPhone. Bluetooth connection Preparation • To connect an iPhone via Bluetooth, register it while playing music. See Register from the iPod source. (DDX9717BTS) 1 Press the [MENU] button. hhPopup menu appears. 2 Touch [SETUP]. iPod/iPhone Preparation ÑÑConnectable iPod/iPhone The following models can be connected. 1 Connect the iPod/iPhone using KCA- For details, see www.kenwood.com/cs/ce/ipod/. • By connecting your iPod/ iPhone as well as charge it as the Bluetooth device...
Instruction Manual
Page 29
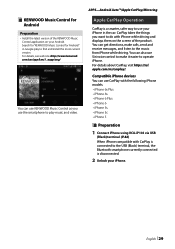
..., visit https://ssl. Compatible iPhone devices You can also use your Android. English 29 ÑÑKENWOOD Music Control for Android" in the car. com/car/app/kmc1_aapp/eng/ You can get directions, make it easier to play to the music from iPhone while driving. You can use KENWOOD Music Control as you want to do with CarPlay is connected to the USB (Black) terminal, the Bluetooth smartphone currently connected is a smarter, safer...
..., visit https://ssl. Compatible iPhone devices You can also use your Android. English 29 ÑÑKENWOOD Music Control for Android" in the car. com/car/app/kmc1_aapp/eng/ You can get directions, make it easier to play to the music from iPhone while driving. You can use KENWOOD Music Control as you want to do with CarPlay is connected to the USB (Black) terminal, the Bluetooth smartphone currently connected is a smarter, safer...
Instruction Manual
Page 42
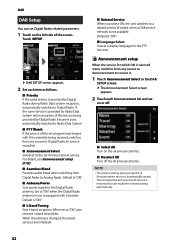
...;■[Antenna Power Sets power supply to the set program type begins with a booster. The next time the Announcement service is not available. hhDAB SETUP screen appears. 2 Set each Announcement list and set to a related service (if exists) when a DAB service network is received, this unit recalls the volume setting automatically. 42 Set to "ON" when the Digital Radio antenna in the DAB SETUP screen. Default is "OFF". ■■Language Select Selects a display language for...
...;■[Antenna Power Sets power supply to the set program type begins with a booster. The next time the Announcement service is not available. hhDAB SETUP screen appears. 2 Set each Announcement list and set to a related service (if exists) when a DAB service network is received, this unit recalls the volume setting automatically. 42 Set to "ON" when the Digital Radio antenna in the DAB SETUP screen. Default is "OFF". ■■Language Select Selects a display language for...
Instruction Manual
Page 43
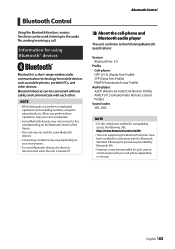
... work for some Bluetooth devices, the device is disconnected when the unit is a short-range wireless radio communication technology for mobile devices such as dialing numbers, using Bluetooth® devices Bluetooth is turned off. English 43 Bluetooth devices can be connected without cables and communicate with each other devices. Bluetooth Control Using the Bluetooth function, various functions can be used: listening to the audio file, making/receiving a call. NOTE • While driving, do not perform complicated operations such as mobile phones...
... work for some Bluetooth devices, the device is disconnected when the unit is a short-range wireless radio communication technology for mobile devices such as dialing numbers, using Bluetooth® devices Bluetooth is turned off. English 43 Bluetooth devices can be connected without cables and communicate with each other devices. Bluetooth Control Using the Bluetooth function, various functions can be used: listening to the audio file, making/receiving a call. NOTE • While driving, do not perform complicated operations such as mobile phones...

Instruction Manual
Page 49
...;Make a call records 1 Touch [ ]. 2 Select the phone number from those displayed on the touch panel screen when the mobile phone is being connected, Bluetooth Hands-Free function and two Bluetooth devices connections cannot be used . Using Hands-Free Unit You can use telephone function by entering a phone number 1 Touch [ ]. 2 Enter a phone number with number keys. • [ ]: Call using call records • [ ]: Call using the phonebook • [ ]: Call using call 1 Touch [Û]. NOTE • The status icons such as battery and antenna displayed...
...;Make a call records 1 Touch [ ]. 2 Select the phone number from those displayed on the touch panel screen when the mobile phone is being connected, Bluetooth Hands-Free function and two Bluetooth devices connections cannot be used . Using Hands-Free Unit You can use telephone function by entering a phone number 1 Touch [ ]. 2 Enter a phone number with number keys. • [ ]: Call using call records • [ ]: Call using the phonebook • [ ]: Call using call 1 Touch [Û]. NOTE • The status icons such as battery and antenna displayed...
Instruction Manual
Page 56
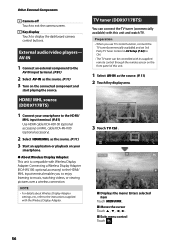
External audio/video players- Connecting a Wireless Display Adapter (KCA-WL100: optional accessory) to the HDMI/ MHL input terminal enables you use TV control function, connect the TV tuner (commercially available) and set 3rd Party TV Tuner Control in AV Setup (P.62) to the HDMI/ MHL input terminal. (P.81) Use HDMI cable KCA-HD100 (optional accessory) or MHL cable KCA-MH100 (optional accessory). 2 Select [HDMI/MHL] as the source. (P.11) 3 Start an application or...
External audio/video players- Connecting a Wireless Display Adapter (KCA-WL100: optional accessory) to the HDMI/ MHL input terminal enables you use TV control function, connect the TV tuner (commercially available) and set 3rd Party TV Tuner Control in AV Setup (P.62) to the HDMI/ MHL input terminal. (P.81) Use HDMI cable KCA-HD100 (optional accessory) or MHL cable KCA-MH100 (optional accessory). 2 Select [HDMI/MHL] as the source. (P.11) 3 Start an application or...

Instruction Manual
Page 59
...;■Manual Power OFF Assigns the function of the [HOME] button when held. AV OFF: Turns off the power. Interrupts are functional, though. Complete OFF (Default): Switches off the screen and audio. Special Setup You can setup Special parameters. 1 Press the [MENU] button. Setting Up ■■SETUP Memory Locks or unlocks the Audio SETUP Memory/ Recall/Clear. ■■Audio SETUP Memory Memorizes the current audio setting. • Fader/ Balance, Speaker / X'over, Equalizer (User Preset, SW Level), Position/DTA, Sound Effect...
...;■Manual Power OFF Assigns the function of the [HOME] button when held. AV OFF: Turns off the power. Interrupts are functional, though. Complete OFF (Default): Switches off the screen and audio. Special Setup You can setup Special parameters. 1 Press the [MENU] button. Setting Up ■■SETUP Memory Locks or unlocks the Audio SETUP Memory/ Recall/Clear. ■■Audio SETUP Memory Memorizes the current audio setting. • Fader/ Balance, Speaker / X'over, Equalizer (User Preset, SW Level), Position/DTA, Sound Effect...

Instruction Manual
Page 63
... control (P.67) • Set sound effect (P.68) 5 Touch the speaker (1) you have the highest surround effects. When the speaker type and size are set, the speaker crossover network is set automatically. ■■Location (Only for each item (2) as audio balance or subwoofer level. 1 Press the [MENU] button. hhPopup menu appears. 2 Touch [Audio]. See the following section for Front, Rear) Select the speaker position you wish to adjust and set each setting. • Set...
... control (P.67) • Set sound effect (P.68) 5 Touch the speaker (1) you have the highest surround effects. When the speaker type and size are set, the speaker crossover network is set automatically. ■■Location (Only for each item (2) as audio balance or subwoofer level. 1 Press the [MENU] button. hhPopup menu appears. 2 Touch [Audio]. See the following section for Front, Rear) Select the speaker position you wish to adjust and set each setting. • Set...

Instruction Manual
Page 64
... [Speaker Setup]. For details, see 3 way speaker system setup (P.65). Connecting 3-way speakers with the 2-way mode selected can break the speakers. • Select "None" if you have no speakers. ÑÑCrossover network setup You can set a crossover frequency of subwoofer output. None, Small, Medium, Large ■■ X'over ]. 2 Touch the speaker to set. ■■HPF FREQ High Pass Filter adjustment. (When front or rear speaker is selected on Speaker Select screen) ■...
... [Speaker Setup]. For details, see 3 way speaker system setup (P.65). Connecting 3-way speakers with the 2-way mode selected can break the speakers. • Select "None" if you have no speakers. ÑÑCrossover network setup You can set a crossover frequency of subwoofer output. None, Small, Medium, Large ■■ X'over ]. 2 Touch the speaker to set. ■■HPF FREQ High Pass Filter adjustment. (When front or rear speaker is selected on Speaker Select screen) ■...

Instruction Manual
Page 68
... subwoofer --Subwoofer Level/ Bass Boost (P.68) --Equalizer Control/ Sound Effect/ Listening Position (P.66, 68, 69) --Speaker Setup (P.63) --High-resolution Sound Source File Playback • You cannot select iPod if it is cut off when encoding. 68 Controlling Audio NOTE • When the rear speaker sound is switched, the audio source that is output at the AV OUTPUT terminal is also switched to the same source. • When the dual zone function is set sound effects. 1 Press the [MENU] button...
... subwoofer --Subwoofer Level/ Bass Boost (P.68) --Equalizer Control/ Sound Effect/ Listening Position (P.66, 68, 69) --Speaker Setup (P.63) --High-resolution Sound Source File Playback • You cannot select iPod if it is cut off when encoding. 68 Controlling Audio NOTE • When the rear speaker sound is switched, the audio source that is output at the AV OUTPUT terminal is also switched to the same source. • When the dual zone function is set sound effects. 1 Press the [MENU] button...

Instruction Manual
Page 75
... to install the unit so that the mounting angle is an error in malfunction. is blocked. Connection/Installation Connection/Installation Before Installation Before installation of this unit during and shortly after the use of the unit. For best safety, leave the mounting and wiring work if you connect the ignition wire to any metal part in the car. • When only two speakers are working properly. • Mount the unit so that the front panel...
... to install the unit so that the mounting angle is an error in malfunction. is blocked. Connection/Installation Connection/Installation Before Installation Before installation of this unit during and shortly after the use of the unit. For best safety, leave the mounting and wiring work if you connect the ignition wire to any metal part in the car. • When only two speakers are working properly. • Mount the unit so that the front panel...

Instruction Manual
Page 80
... to install this unit to the Volkswagen vehicles etc. (1): Default setting The red (A-7 pin) of vehicle you drive. Red (Ignition cable) Red (A-7 pin) Unit Vehicle Yellow (Battery cable) Yellow (A-4 pin) ÑÑ3 way speaker system setup Subwoofer Preout Mid Range Preout Tweeter Preout When connecting to an external amplifier, connect its ground wire to the car's chassis to the constant power supply. Connection/Installation ÑÑWiring harness (Accessory 1) connector function guide Pin Color and function A-4 Yellow Battery A-5 Blue/White [2] Power Control...
... to install this unit to the Volkswagen vehicles etc. (1): Default setting The red (A-7 pin) of vehicle you drive. Red (Ignition cable) Red (A-7 pin) Unit Vehicle Yellow (Battery cable) Yellow (A-4 pin) ÑÑ3 way speaker system setup Subwoofer Preout Mid Range Preout Tweeter Preout When connecting to an external amplifier, connect its ground wire to the car's chassis to the constant power supply. Connection/Installation ÑÑWiring harness (Accessory 1) connector function guide Pin Color and function A-4 Yellow Battery A-5 Blue/White [2] Power Control...

Instruction Manual
Page 81
... amplifier, connect its ground wire to the car's chassis to vehicle's steering remote harness. Optional Accessory)/ Dashboard camera input 9 Dashboard camera interface Connect a Dashboard Camera DRV-N520 (optional accessory). (P.83) 10 Accessory 7: GPS Antenna 11 Accessory 4: Bluetooth Microphone 12 Connect to avoid damaging the unit. After connecting the cable, put the fixture again. Red) 6 External I/F (DDX9717BTS only) Maximum power supply current : 12 V = 500 mA 7 TV tuner remote output...
... amplifier, connect its ground wire to the car's chassis to vehicle's steering remote harness. Optional Accessory)/ Dashboard camera input 9 Dashboard camera interface Connect a Dashboard Camera DRV-N520 (optional accessory). (P.83) 10 Accessory 7: GPS Antenna 11 Accessory 4: Bluetooth Microphone 12 Connect to avoid damaging the unit. After connecting the cable, put the fixture again. Red) 6 External I/F (DDX9717BTS only) Maximum power supply current : 12 V = 500 mA 7 TV tuner remote output...

Instruction Manual
Page 84
... disc instead. Protective circuit has been activated because a speaker cord has shorted or it again. The random play during VCD playback. Disc Error An unplayable disc is being used. †† The Touch Sensor Tone cannot be output from the subwoofer. • Cannot set up the low pass filter. • Cannot set to on . The sound skips when an audio file is inserted. †† Change the disc. Troubleshooting Troubleshooting Problems...
... disc instead. Protective circuit has been activated because a speaker cord has shorted or it again. The random play during VCD playback. Disc Error An unplayable disc is being used. †† The Touch Sensor Tone cannot be output from the subwoofer. • Cannot set up the low pass filter. • Cannot set to on . The sound skips when an audio file is inserted. †† Change the disc. Troubleshooting Troubleshooting Problems...


