
Instruction Manual
Page 2
Contents Before use 3 How to reset your unit 3 INTRODUCTIONS Initial Settings 5 Initial setup 5 Adjusting the panel angle 5 Updating the system 6 Activating the security function 7 Component names and functions 8 Setting the clock ... device/iPod/ iPhone 79 Connecting Other Products........80 Installing/Removing the Unit.....81 Specifications 83 KS-UBT1 (USB Bluetooth Adapter 86 2 DDX719/DDX7049BT/DDX419/DDX4049BT/DDX319/DDX3049
Contents Before use 3 How to reset your unit 3 INTRODUCTIONS Initial Settings 5 Initial setup 5 Adjusting the panel angle 5 Updating the system 6 Activating the security function 7 Component names and functions 8 Setting the clock ... device/iPod/ iPhone 79 Connecting Other Products........80 Installing/Removing the Unit.....81 Specifications 83 KS-UBT1 (USB Bluetooth Adapter 86 2 DDX719/DDX7049BT/DDX419/DDX4049BT/DDX319/DDX3049
Instruction Manual
Page 3
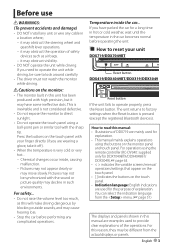
...the temperature is pressed (except the registered Bluetooth devices). Pictures may not appear clearly or may not be sure to operate properly, press the Reset button. For this reason, they may be different from the menu. (☞ page 51) The displays and panels shown in this will ...have parked the car for the purpose of safety devices such as this unit has been produced with your unit DDX719/DDX7049BT Reset button DDX419/DDX4049BT/DDX319/DDX3049 Reset button If the unit fails to look around carefully. • The driver must not watch the monitor while driving. How...
...the temperature is pressed (except the registered Bluetooth devices). Pictures may not appear clearly or may not be sure to operate properly, press the Reset button. For this reason, they may be different from the menu. (☞ page 51) The displays and panels shown in this will ...have parked the car for the purpose of safety devices such as this unit has been produced with your unit DDX719/DDX7049BT Reset button DDX419/DDX4049BT/DDX319/DDX3049 Reset button If the unit fails to look around carefully. • The driver must not watch the monitor while driving. How...
Instruction Manual
Page 5
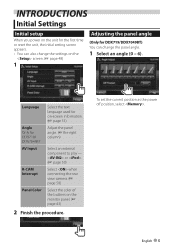
INTRODUCTIONS Initial Settings Initial setup When you power on the unit for the first time or reset the unit, the initial setting screen appears. • You can also change the settings on -screen information. (☞ page 51) Angle Only for DDX719/DDX7049BT) ...
INTRODUCTIONS Initial Settings Initial setup When you power on the unit for the first time or reset the unit, the initial setting screen appears. • You can also change the settings on -screen information. (☞ page 51) Angle Only for DDX719/DDX7049BT) ...
Instruction Manual
Page 6
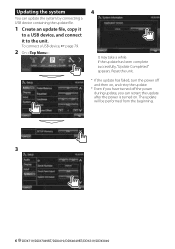
Reset the unit. * If the update has failed, turn the power off and then on . The update will be performed from the beginning. 3 6 DDX719/DDX7049BT/DDX419/DDX4049BT/DDX319/DDX3049 To connect a USB device, ☞ page 79. 2 On : 4 It may take a while. If the update has been complete successfully, "Update Completed" appears. Updating the...
Reset the unit. * If the update has failed, turn the power off and then on . The update will be performed from the beginning. 3 6 DDX719/DDX7049BT/DDX419/DDX4049BT/DDX319/DDX3049 To connect a USB device, ☞ page 79. 2 On : 4 It may take a while. If the update has been complete successfully, "Update Completed" appears. Updating the...
Instruction Manual
Page 8
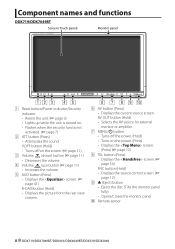
... (Tilts the monitor panel fully). • Opens/Closes the monitor panel. Component names and functions DDX719/DDX7049BT Screen (Touch panel) Monitor panel 1 Reset button/Power indicator/Security indicator • Resets the unit. (☞ page 3) • Lights up ) button (☞ page 11) • Increases the volume. 5 AUD button (Press) • Displays the screen... (Hold) • Displays the picture from the rear view camera. 6 AV button (Press) • Displays the current source screen. p Remote sensor 8 DDX719/DDX7049BT/DDX419/DDX4049BT/DDX319/DDX3049
... (Tilts the monitor panel fully). • Opens/Closes the monitor panel. Component names and functions DDX719/DDX7049BT Screen (Touch panel) Monitor panel 1 Reset button/Power indicator/Security indicator • Resets the unit. (☞ page 3) • Lights up ) button (☞ page 11) • Increases the volume. 5 AUD button (Press) • Displays the screen... (Hold) • Displays the picture from the rear view camera. 6 AV button (Press) • Displays the current source screen. p Remote sensor 8 DDX719/DDX7049BT/DDX419/DDX4049BT/DDX319/DDX3049
Instruction Manual
Page 9
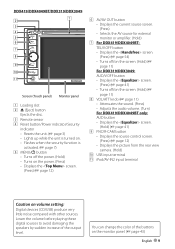
...CD/USB) produce very little noise compared with other sources. DDX419/DDX4049BT/DDX319/DDX3049 Screen (Touch panel) Monitor panel 1 Loading slot 2 0 (Eject) button Ejects the disc. 3 Remote sensor 4 Reset button/Power indicator/Security indicator • Resets the unit. (☞ page 3) • Lights up while the ...TEL/V.OFF button • Displays the screen. (Press) (☞ page 54) • Turns off/on the screen. (Hold) (☞ page 11) For DDX319/DDX3049: AUD/V.OFF button • Displays the screen. (Press) (☞ page 41) • Turns off/on the screen. (Hold) (☞ page 11...
...CD/USB) produce very little noise compared with other sources. DDX419/DDX4049BT/DDX319/DDX3049 Screen (Touch panel) Monitor panel 1 Loading slot 2 0 (Eject) button Ejects the disc. 3 Remote sensor 4 Reset button/Power indicator/Security indicator • Resets the unit. (☞ page 3) • Lights up while the ...TEL/V.OFF button • Displays the screen. (Press) (☞ page 54) • Turns off/on the screen. (Hold) (☞ page 11) For DDX319/DDX3049: AUD/V.OFF button • Displays the screen. (Press) (☞ page 41) • Turns off/on the screen. (Hold) (☞ page 11...
Instruction Manual
Page 10
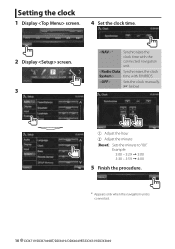
Sets the clock manually. (☞ below) 1 Adjust the hour 2 Adjust the minute [Reset]: Sets the minute to "00." Example: 3:00 - 3:29 = 3:00 3:30 - 3:59 = 4:00 5 Finish the procedure. * Appears only when the navigation unit is connected. 10 DDX719/DDX7049BT/DDX419/DDX4049BT/DDX319/DDX3049 Setting the clock 1 Display screen. 4 Set the clock time. 2 Display screen. 3 * Synchronizes the clock time with FM RBDS. time with the connected navigation unit.
Sets the clock manually. (☞ below) 1 Adjust the hour 2 Adjust the minute [Reset]: Sets the minute to "00." Example: 3:00 - 3:29 = 3:00 3:30 - 3:59 = 4:00 5 Finish the procedure. * Appears only when the navigation unit is connected. 10 DDX719/DDX7049BT/DDX419/DDX4049BT/DDX319/DDX3049 Setting the clock 1 Display screen. 4 Set the clock time. 2 Display screen. 3 * Synchronizes the clock time with FM RBDS. time with the connected navigation unit.

Instruction Manual
Page 22
... abnormal playback of 999 files per folder). • Make sure all important data has been backed up to the device. 22 DDX719/DDX7049BT/DDX419/DDX4049BT/DDX319/DDX3049 to the unit. • You cannot connect a computer or portable HDD to "USB" and playback starts. • All tracks in the USB device ... the USB input terminal. • To connect a USB device, ☞ page 79. Folder names : 50 characters - In this case, disconnect the USB device then reset this unit and the USB device. • Operation and power supply may not play JPEG/DivX/MPEG1/ MPEG2/MP3/WMA/WAV/AAC files stored in...
... abnormal playback of 999 files per folder). • Make sure all important data has been backed up to the device. 22 DDX719/DDX7049BT/DDX419/DDX4049BT/DDX319/DDX3049 to the unit. • You cannot connect a computer or portable HDD to "USB" and playback starts. • All tracks in the USB device ... the USB input terminal. • To connect a USB device, ☞ page 79. Folder names : 50 characters - In this case, disconnect the USB device then reset this unit and the USB device. • Operation and power supply may not play JPEG/DivX/MPEG1/ MPEG2/MP3/WMA/WAV/AAC files stored in...
Instruction Manual
Page 25
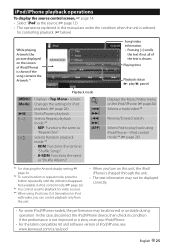
iPod/iPhone playback operations To display the source control screen, ☞ page 14. • Select "iPod" as the source. (☞ page 13) • The operations explained in this manual are under the condition when the unit is selected for controlling playback. (☞ below) While playing, Artwork (the picture displayed on the screen of iPod/iPhone) is shown if the song contains the Artwork.*1 Song/video information • Pressing [
iPod/iPhone playback operations To display the source control screen, ☞ page 14. • Select "iPod" as the source. (☞ page 13) • The operations explained in this manual are under the condition when the unit is selected for controlling playback. (☞ below) While playing, Artwork (the picture displayed on the screen of iPod/iPhone) is shown if the song contains the Artwork.*1 Song/video information • Pressing [
Instruction Manual
Page 52
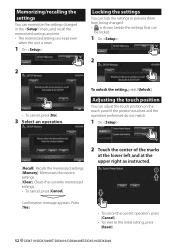
... locked. 1 On : 2 • To cancel, press [No]. 3 Select an operation. Confirmation message appears. Press [Yes]. • To cancel the current operation, press [Cancel]. • To reset to prevent them from being changed. • is shown beside the settings that can adjust the touch position on the touch panel if the position... can memorize the settings changed in the menu and recall the memorized settings anytime. • The memorized settings are kept even when the unit is reset. 1 On : 2 Locking the settings You can lock the settings to the initial setting, press...
... locked. 1 On : 2 • To cancel, press [No]. 3 Select an operation. Confirmation message appears. Press [Yes]. • To cancel the current operation, press [Cancel]. • To reset to prevent them from being changed. • is shown beside the settings that can adjust the touch position on the touch panel if the position... can memorize the settings changed in the menu and recall the memorized settings anytime. • The memorized settings are kept even when the unit is reset. 1 On : 2 Locking the settings You can lock the settings to the initial setting, press...
Instruction Manual
Page 54
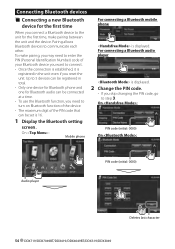
... code (initial: 0000) Deletes last character 54 DDX719/DDX7049BT/DDX419/DDX4049BT/DDX319/DDX3049 On : Mobile phone For connecting a Bluetooth mobile phone is 16. 1 Display the Bluetooth setting screen. Up to 5 devices can be registered in the unit even if you reset the unit. To make pairing between the unit and the device...
... code (initial: 0000) Deletes last character 54 DDX719/DDX7049BT/DDX419/DDX4049BT/DDX319/DDX3049 On : Mobile phone For connecting a Bluetooth mobile phone is 16. 1 Display the Bluetooth setting screen. Up to 5 devices can be registered in the unit even if you reset the unit. To make pairing between the unit and the device...
Instruction Manual
Page 71
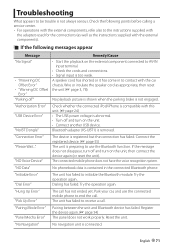
...again. "Hung Up Error" "Pick Up Error" The call . The connected mobile phone does not have the voice recognition system. English 71 Reset the unit. "Authorization Error" "USB Device Error" "No BT Dongle" Check whether the connected iPod/iPhone is compatible with the car chassis....Connect another USB device. If the message does not disappear, turn off and turn on the unit, then connect the device again (or reset the unit). Register the device again. (☞ page 54) The panel does not work properly. Troubleshooting What appears to initialize the ...
...again. "Hung Up Error" "Pick Up Error" The call . The connected mobile phone does not have the voice recognition system. English 71 Reset the unit. "Authorization Error" "USB Device Error" "No BT Dongle" Check whether the connected iPod/iPhone is compatible with the car chassis....Connect another USB device. If the message does not disappear, turn off and turn on the unit, then connect the device again (or reset the unit). Register the device again. (☞ page 54) The panel does not work properly. Troubleshooting What appears to initialize the ...
Instruction Manual
Page 73
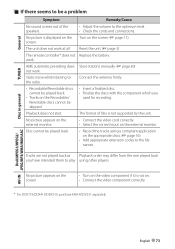
...• Connect the video cord correctly. • Select the correct input on . • Connect the video component correctly. * For DDX719/DDX419/DDX319, purchase KNA-RCDV331 separately. Turn on the Recordable/ Rewritable discs cannot be a problem Symptom Remedy/Cause No sound comes out of files is displayed... back. • Record the tracks using other players. Disc cannot be played back. • Tracks on the screen. (☞ page 11) Reset the unit. (☞ page 3) The remote controller* does not work. Tracks are not played back as Playback order may differ from the one...
...• Connect the video cord correctly. • Select the correct input on . • Connect the video component correctly. * For DDX719/DDX419/DDX319, purchase KNA-RCDV331 separately. Turn on the Recordable/ Rewritable discs cannot be a problem Symptom Remedy/Cause No sound comes out of files is displayed... back. • Record the tracks using other players. Disc cannot be played back. • Tracks on the screen. (☞ page 11) Reset the unit. (☞ page 3) The remote controller* does not work. Tracks are not played back as Playback order may differ from the one...
Instruction Manual
Page 74
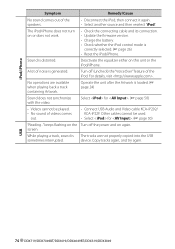
.... keeps flashing on this unit or the iPod/iPhone. USB 74 DDX719/DDX7049BT/DDX419/DDX4049BT/DDX319/DDX3049 iPod/iPhone Symptom Remedy/Cause No sound comes out of the iPod. Sound is correctly selected. (☞ page 26) • Reset the iPod/iPhone. Deactivate the equalizer either on the Turn off (uncheck) the "VoiceOver...
.... keeps flashing on this unit or the iPod/iPhone. USB 74 DDX719/DDX7049BT/DDX419/DDX4049BT/DDX319/DDX3049 iPod/iPhone Symptom Remedy/Cause No sound comes out of the iPod. Sound is correctly selected. (☞ page 26) • Reset the iPod/iPhone. Deactivate the equalizer either on the Turn off (uncheck) the "VoiceOver...

Instruction Manual
Page 76
... in a spot exposed to the instruction manual. ..........6 ..........1 4 9*3 ..........6 ..........1 (3m: 9.8 ft) 5 *1 DDX419/DDX4049BT/ DDX319/DDX3049 only. *2 DDX719/DDX7049BT only. ..........1 *3 DDX719/DDX7049BT/ DDX419/DDX4049BT only. After the Installation After the installation, perform the ...a power source with a constant voltage supply, such as with the same rating. 76 DDX719/DDX7049BT/DDX419/DDX4049BT/DDX319/DDX3049 battery. 8 Press the reset button. 9 Perform the Initial Setup. ..........1 2 7*2 ..........1 (2m: 6.5 ft) 3 8*2 ..........2 ..........2 2WARNING...
... in a spot exposed to the instruction manual. ..........6 ..........1 4 9*3 ..........6 ..........1 (3m: 9.8 ft) 5 *1 DDX419/DDX4049BT/ DDX319/DDX3049 only. *2 DDX719/DDX7049BT only. ..........1 *3 DDX719/DDX7049BT/ DDX419/DDX4049BT only. After the Installation After the installation, perform the ...a power source with a constant voltage supply, such as with the same rating. 76 DDX719/DDX7049BT/DDX419/DDX4049BT/DDX319/DDX3049 battery. 8 Press the reset button. 9 Perform the Initial Setup. ..........1 2 7*2 ..........1 (2m: 6.5 ft) 3 8*2 ..........2 ..........2 2WARNING...


