
Operation Manual
Page 23
DAB + Compact Stereo Radio CR-ST80DAB OPERATING INSTRUCTIONS JVCKENWOOD Corporation GERMAN ENGLISH FRANÇAIS ITALIANO NEDERLANDS
DAB + Compact Stereo Radio CR-ST80DAB OPERATING INSTRUCTIONS JVCKENWOOD Corporation GERMAN ENGLISH FRANÇAIS ITALIANO NEDERLANDS

Operation Manual
Page 24
Digital radio (DAB+) 6. Bluetooth Audio 8. System settings 9.1. Alarm clock 9.3. Language 9.7. Technical specifications 14. Components and functions 4. Software version 10. ENGLISH Table of contents Content 1. Disposal 13. Maintenance 12. Backlight 9.6. Factory Reset 9.8. Guarantee Page 3 6 7 8 9 11 12 13 13 13 13 15 15 16 16 16 16 17 17 18 19 20 2 Main menu 5. Sleep 9.2. Before switching on the power supply 2. Analogue connections 9. Equalizer 9.4. Time 9.5. Troubleshooting 11. FM Radio 7. Start-up 3.
Digital radio (DAB+) 6. Bluetooth Audio 8. System settings 9.1. Alarm clock 9.3. Language 9.7. Technical specifications 14. Components and functions 4. Software version 10. ENGLISH Table of contents Content 1. Disposal 13. Maintenance 12. Backlight 9.6. Factory Reset 9.8. Guarantee Page 3 6 7 8 9 11 12 13 13 13 13 15 15 16 16 16 16 17 17 18 19 20 2 Main menu 5. Sleep 9.2. Before switching on the power supply 2. Analogue connections 9. Equalizer 9.4. Time 9.5. Troubleshooting 11. FM Radio 7. Start-up 3.
Operation Manual
Page 25
... time. 1.8 Overload - Use only the accessories specified by placing the device on the product and listed in a safe place! - Never block the ventilation holes by the manufacturer. 1.3 Do not use liquid cleaning detergents or cleaning sprays. If you can not trip over the cable or that you are used for the Compact Radio CR-ST80DAB. The device should strictly follow all safety and operating instructions...
... time. 1.8 Overload - Use only the accessories specified by placing the device on the product and listed in a safe place! - Never block the ventilation holes by the manufacturer. 1.3 Do not use liquid cleaning detergents or cleaning sprays. If you can not trip over the cable or that you are used for the Compact Radio CR-ST80DAB. The device should strictly follow all safety and operating instructions...
Operation Manual
Page 26
... a very low volume or if the radio is played at high volume for functional testing and may have a limited lifetime. To prevent possible hearing damage, do not remove screws, covers or body parts. - Exposing the remote control sensor to standby mode within 15 minutes if it stops working order. 1.14 Heat - This switches the device to direct sunlight or high-frequency fluorescent light may cause...
... a very low volume or if the radio is played at high volume for functional testing and may have a limited lifetime. To prevent possible hearing damage, do not remove screws, covers or body parts. - Exposing the remote control sensor to standby mode within 15 minutes if it stops working order. 1.14 Heat - This switches the device to direct sunlight or high-frequency fluorescent light may cause...
Operation Manual
Page 27
... or cutting of Conformity is replaced by an incorrect type that the radio equipment type CR-ST80DAB complies with Directive 2014/53/EU. Amsterdamseweg 37, 1422 AC UITHOORN, THE NETHERLANDS 5 The full text of the EU Declaration of a battery; - Caution! port; - a battery that may be exposed during use, storage or trans- the disposal of a battery in an extremely high temperature...
... or cutting of Conformity is replaced by an incorrect type that the radio equipment type CR-ST80DAB complies with Directive 2014/53/EU. Amsterdamseweg 37, 1422 AC UITHOORN, THE NETHERLANDS 5 The full text of the EU Declaration of a battery; - Caution! port; - a battery that may be exposed during use, storage or trans- the disposal of a battery in an extremely high temperature...

Operation Manual
Page 28
...; Infrared remote control • Mains adapter • Operating instructions • 2 x AAA/LR03 batteries • Audio cable 1.5 meters - 3.5mm jack plug 2.2 Connect • Connect the mains adapter to the radio and to the mains socket. • Open the battery compartment of the casing. 2. FM: Set frequency Left; Start-up 2.1 Unpacking Carefully unpack the device and make sure all the elements completely. 3. The specified polarity (+/-) is marked in full screen mode Select equalizer preset Mute...
...; Infrared remote control • Mains adapter • Operating instructions • 2 x AAA/LR03 batteries • Audio cable 1.5 meters - 3.5mm jack plug 2.2 Connect • Connect the mains adapter to the radio and to the mains socket. • Open the battery compartment of the casing. 2. FM: Set frequency Left; Start-up 2.1 Unpacking Carefully unpack the device and make sure all the elements completely. 3. The specified polarity (+/-) is marked in full screen mode Select equalizer preset Mute...

Operation Manual
Page 29
Connection power supply 5 - USB connection (Firmware updates only) 4 - Station buttons (1 - 5) 3 - Select / Confirm 4 - Volume / Standby 2 - Line-out connection 6 - Menu 6 - Back Top view 1 2 3 45678 7 3. FM / DAB + antenna 3 - Aux-in connection Front side 1 Backside 2 3 4 5 6 1 - Display 2 - Source selection 5 - Favorites (Presets) 7 - Components and functions 1 - Alarm clock 8 -
Connection power supply 5 - USB connection (Firmware updates only) 4 - Station buttons (1 - 5) 3 - Select / Confirm 4 - Volume / Standby 2 - Line-out connection 6 - Menu 6 - Back Top view 1 2 3 45678 7 3. FM / DAB + antenna 3 - Aux-in connection Front side 1 Backside 2 3 4 5 6 1 - Display 2 - Source selection 5 - Favorites (Presets) 7 - Components and functions 1 - Alarm clock 8 -
Operation Manual
Page 30
... different audio sources: • Digital radio (DAB+) • FM • Bluetooth • Aux input With the audio source selected, press the key on the remote control or on the audio source, symbols for the first time, a DAB+ station search is displayed. • Signal level and signal error • Bit rate • Channel information • Today's date and current time Depending on the device to put the device into standby mode. The "Volume muted...
... different audio sources: • Digital radio (DAB+) • FM • Bluetooth • Aux input With the audio source selected, press the key on the remote control or on the audio source, symbols for the first time, a DAB+ station search is displayed. • Signal level and signal error • Bit rate • Channel information • Today's date and current time Depending on the device to put the device into standby mode. The "Volume muted...
Operation Manual
Page 31
... station list cannot be deleted. The stations are displayed. The device starts playing automatically. To do this, press the key and select "Delete Invalid". When switching for storing DAB+ stations. 9 To display these stations will be received, change the orientation of the antenna or the location of the button saves the corresponding stations in the station list with . To do this , use the button to call up the menu and select "Manual Tune...
... station list cannot be deleted. The stations are displayed. The device starts playing automatically. To do this, press the key and select "Delete Invalid". When switching for storing DAB+ stations. 9 To display these stations will be received, change the orientation of the antenna or the location of the button saves the corresponding stations in the station list with . To do this , use the button to call up the menu and select "Manual Tune...
Operation Manual
Page 32
... the lower part of dynamics Off: There is indicated by "ü". 5.7 Station order By default, the radio sorts the stations in the display. The settings can also be changed in memory locations 11 - 40: Select the desired station and hold down the button on the radio or on the remote control. You can assign memory locations 1 - 5 using the number buttons on the remote control until "Preset x saved" appears...
... the lower part of dynamics Off: There is indicated by "ü". 5.7 Station order By default, the radio sorts the stations in the display. The settings can also be changed in memory locations 11 - 40: Select the desired station and hold down the button on the radio or on the remote control. You can assign memory locations 1 - 5 using the number buttons on the remote control until "Preset x saved" appears...

Operation Manual
Page 33
... the radio starts playing. 6.1.1 Automatic station storage You can assign memory locations 1 - 5 using the number buttons on the remote control until "Preset x saved" appears in the display. To do this , press the button and select "Scan To Preset". The current setting is indicated by pressing the remote control briefly. 6.4.3 Saving FM stations in the following menu you can automatically store all receivable stations in the main menu to switch to 40 stations are...
... the radio starts playing. 6.1.1 Automatic station storage You can assign memory locations 1 - 5 using the number buttons on the remote control until "Preset x saved" appears in the display. To do this , press the button and select "Scan To Preset". The current setting is indicated by pressing the remote control briefly. 6.4.3 Saving FM stations in the following menu you can automatically store all receivable stations in the main menu to switch to 40 stations are...
Operation Manual
Page 34
... stations. If the radio is switched on and Bluetooth is activated. The radio then switches back to the "Bluetooth" source, an automatic connection is possible using the corresponding buttons on the display. Smartphones, tablets or similar devices can only be overwritten with the corresponding memory location number. 7. To do this , select the source "Bluetooth" in the main menu. Select "KENWOOD CR-ST80DAB" and start searching for the first time (pairing) Make...
... stations. If the radio is switched on and Bluetooth is activated. The radio then switches back to the "Bluetooth" source, an automatic connection is possible using the corresponding buttons on the display. Smartphones, tablets or similar devices can only be overwritten with the corresponding memory location number. 7. To do this , select the source "Bluetooth" in the main menu. Select "KENWOOD CR-ST80DAB" and start searching for the first time (pairing) Make...

Operation Manual
Page 35
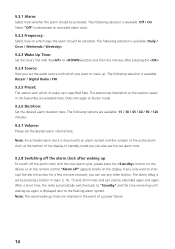
... the button on the remote control to an external amplifier, for programming the alarm clock: 13 The following options are available for example. To do this , please select the source "Auxiliary Input" in the main menu. 8.2 Line-out You can switch the radio to navigate in the scope of the display, with minutes running backwards. 9.2 Alarm clock This radio has 2 individually adjustable alarm times. Alternatively, you can be activated and deactivated. System settings...
... the button on the remote control to an external amplifier, for programming the alarm clock: 13 The following options are available for example. To do this , please select the source "Auxiliary Input" in the main menu. 8.2 Line-out You can switch the radio to navigate in the scope of the display, with minutes running backwards. 9.2 Alarm clock This radio has 2 individually adjustable alarm times. Alternatively, you can be activated and deactivated. System settings...
Operation Manual
Page 36
... station last listened to "Standby" and the time remaining until the next alarm cycle, please press the button on the device or on the remote control "Alarm off" appears briefly on which days the alarm should be extended again and again. Note: An activated alarm clock is set the audio source with an alarm symbol and the number of the active alarm clock at the bottom of a power failure. 14 In standby mode you...
... station last listened to "Standby" and the time remaining until the next alarm cycle, please press the button on the device or on the remote control "Alarm off" appears briefly on which days the alarm should be extended again and again. Note: An activated alarm clock is set the audio source with an alarm symbol and the number of the active alarm clock at the bottom of a power failure. 14 In standby mode you...
Operation Manual
Page 37
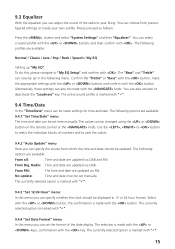
... are available: 9.4.1 "Set Time/Date" menu The time and date can set manually. No update: Time and date must be changed using the or button on the remote control or the knob. The selection is marked with the knob. Please proceed as follows: Press the , button and select "System Settings" and then "Equalizer". You can be set the format of the radio to "My EQ Setup" and confirm with...
... are available: 9.4.1 "Set Time/Date" menu The time and date can set manually. No update: Time and date must be changed using the or button on the remote control or the knob. The selection is marked with the knob. Please proceed as follows: Press the , button and select "System Settings" and then "Equalizer". You can be set the format of the radio to "My EQ Setup" and confirm with...
Operation Manual
Page 38
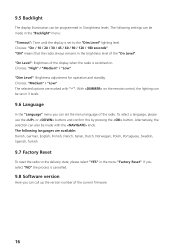
... is switched on the remote control, the lighting can be made in the "Backlight" menu: "Timeout": Time until the display is set to the delivery state, please select "YES" in 3 levels. 9.6 Language In the "Language" menu you can call up the version number of the radio. 9.5 Backlight The display illumination can be made with "ü". To select a language, please use the or buttons and...
... is switched on the remote control, the lighting can be made in the "Backlight" menu: "Timeout": Time until the display is set to the delivery state, please select "YES" in 3 levels. 9.6 Language In the "Language" menu you can call up the version number of the radio. 9.5 Backlight The display illumination can be made with "ü". To select a language, please use the or buttons and...
Operation Manual
Page 39
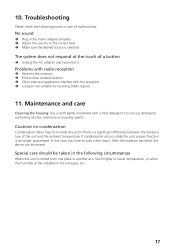
... has dried, the device can be taken in the following points in case of malfunctions: No sound Plug in the mains adapter properly. Adjust the volume to the correct level. Make sure the desired source is no longer guaranteed...Use a cloth lightly moistened with the reception. Location not suitable for receiving DAB+ signals. 11. 10. If condensation occurs inside the unit if there is moved from one place to wait a few hours; Special care should be reused. The system does not respond at the installation site increases, etc. 17 Troubleshooting...
... has dried, the device can be taken in the following points in case of malfunctions: No sound Plug in the mains adapter properly. Adjust the volume to the correct level. Make sure the desired source is no longer guaranteed...Use a cloth lightly moistened with the reception. Location not suitable for receiving DAB+ signals. 11. 10. If condensation occurs inside the unit if there is moved from one place to wait a few hours; Special care should be reused. The system does not respond at the installation site increases, etc. 17 Troubleshooting...
Operation Manual
Page 40
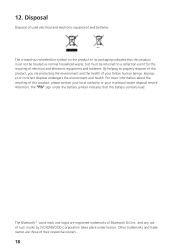
...license. By helping to a collection point for the recycling of their respective owners. 18 The Bluetooth® word mark and logos are those of electrical and electronic equipment and batteries. The crossed-out wheeled bin symbol on the product or its packaging indicates that this product, please ...takes place under the battery symbol indicates that this product must not be treated as normal household waste, but must be returned to properly dispose of this product, you are protecting the environment and the health of your municipal waste disposal service. Other trademarks and ...
...license. By helping to a collection point for the recycling of their respective owners. 18 The Bluetooth® word mark and logos are those of electrical and electronic equipment and batteries. The crossed-out wheeled bin symbol on the product or its packaging indicates that this product, please ...takes place under the battery symbol indicates that this product must not be treated as normal household waste, but must be returned to properly dispose of this product, you are protecting the environment and the health of your municipal waste disposal service. Other trademarks and ...
Operation Manual
Page 41
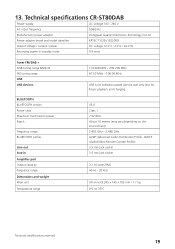
... meters (may vary depending on the environment) 2.402 GHz - 2.480 GHz A2DP (Advanced Audio Distribution Profile, AVRCP (Audio/Video Remote Control Profile) 3.5 mm jack socket 3.5 mm jack socket 2 x 10 watts RMS 40 Hz - 20 kHz (W x H x D) 245 x 145 x 105 mm / 1.7 kg 0°C to 35°C Technical modifications reserved 19 Technical specifications CR-ST80DAB Power supply AC voltage 100 - 240 V. Not for software update (service use) only. 13.
... meters (may vary depending on the environment) 2.402 GHz - 2.480 GHz A2DP (Advanced Audio Distribution Profile, AVRCP (Audio/Video Remote Control Profile) 3.5 mm jack socket 3.5 mm jack socket 2 x 10 watts RMS 40 Hz - 20 kHz (W x H x D) 245 x 145 x 105 mm / 1.7 kg 0°C to 35°C Technical modifications reserved 19 Technical specifications CR-ST80DAB Power supply AC voltage 100 - 240 V. Not for software update (service use) only. 13.
Operation Manual
Page 42
... which the serial number(s) has/have been made to the product as well as normal service and adjustment work has been undertaken by the user. This right in the course of normal customer service, such as a result of incorrect replacement parts during a repair. (d) Damage due to fire, water damage, lightening, earthquake, insufficient ventilation, force majeure, connection to records, tapes and video cassettes, CD Compact Discs and other...
... which the serial number(s) has/have been made to the product as well as normal service and adjustment work has been undertaken by the user. This right in the course of normal customer service, such as a result of incorrect replacement parts during a repair. (d) Damage due to fire, water damage, lightening, earthquake, insufficient ventilation, force majeure, connection to records, tapes and video cassettes, CD Compact Discs and other...


