

User Manual
Page 2
... supply. For replacement, use only a 13Amp ASTA-approved (BS1362) fuse. 2.The fuse cover must be refitted when replacing the fuse in your home or the cable is no danger of the plug immediately, to avoid a possible shock hazard by inadvertent connection to reach a power point, then obtain an appropriate safety approved extension lead or adapter, or consult your dealer. NO USER-SERVICEABLE PARTS...
... supply. For replacement, use only a 13Amp ASTA-approved (BS1362) fuse. 2.The fuse cover must be refitted when replacing the fuse in your home or the cable is no danger of the plug immediately, to avoid a possible shock hazard by inadvertent connection to reach a power point, then obtain an appropriate safety approved extension lead or adapter, or consult your dealer. NO USER-SERVICEABLE PARTS...
User Manual
Page 3
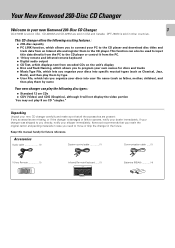
...-key remote and infrared remote keyboard ÷ Digital audio output ÷ CD Text, which displays text from the PC to the CD player or control it will not display the video portion You may not play them in other countries. Accessories Audio cable 1) System control cable 1) Communication cable ..... (1) Chapter 3 Chapter 4 Chapter 5 CONFIRM POWER C A B BEST SELECTION. This function can also be used to input title data directly from encoded CDs on the unit's display ÷ Disc and Track...
...-key remote and infrared remote keyboard ÷ Digital audio output ÷ CD Text, which displays text from the PC to the CD player or control it will not display the video portion You may not play them in other countries. Accessories Audio cable 1) System control cable 1) Communication cable ..... (1) Chapter 3 Chapter 4 Chapter 5 CONFIRM POWER C A B BEST SELECTION. This function can also be used to input title data directly from encoded CDs on the unit's display ÷ Disc and Track...
User Manual
Page 4
... 2 4 Before applying power 2 Safty precautions 2 Your New Kenwood 200-Disc CD Changer 3 Chapter 1 : Setting Up Your New CD Changer 5 Connecting to Other Devices 6 System Control Chaining 8 Setting Up the 10-Key Remote and Keyboard 9 10-Key Remote 9 Keyboard 9 Chapter 2 : Getting to know Your New CD Changer...... 10 Front Panel 11 Front Panel Displays 12 10-Key Remote and Keyboard 13 10-Key Remote 13 Keyboard 14 Chapter 3 : Loading and Playing Discs 16 Preparation 17...
... 2 4 Before applying power 2 Safty precautions 2 Your New Kenwood 200-Disc CD Changer 3 Chapter 1 : Setting Up Your New CD Changer 5 Connecting to Other Devices 6 System Control Chaining 8 Setting Up the 10-Key Remote and Keyboard 9 10-Key Remote 9 Keyboard 9 Chapter 2 : Getting to know Your New CD Changer...... 10 Front Panel 11 Front Panel Displays 12 10-Key Remote and Keyboard 13 10-Key Remote 13 Keyboard 14 Chapter 3 : Loading and Playing Discs 16 Preparation 17...

User Manual
Page 5
... plug in the room changes, condensation may damage the cabinet components. 5. Do not use either device to control the changer. Kenwood recommends having your receiver or amplifier. 3. Be sure to locate your changer on a level and stationary surface, or it will evaporate the condensation and return your changer to working order. q 9. Once you have finished making connections to your CD changer's precision optical pickup inspected periodically. All cables (except the digital optical cable...
... plug in the room changes, condensation may damage the cabinet components. 5. Do not use either device to control the changer. Kenwood recommends having your receiver or amplifier. 3. Be sure to locate your changer on a level and stationary surface, or it will evaporate the condensation and return your changer to working order. q 9. Once you have finished making connections to your CD changer's precision optical pickup inspected periodically. All cables (except the digital optical cable...

User Manual
Page 6
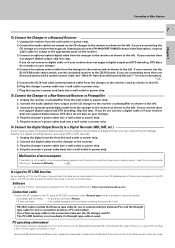
... the power lead until all cables firmly. This makes it possible to display the disc and track titles on the SL16 TEXT jack When using a KENWOOD Receiver equipped with the SL16 TEXT jack, connect it to the Receiver using the DIGITAL OUT jack. Note If your receiver has the SL16/XS8 mode select switch, set the connected receiver to use the PC LINK function. Plugging/unplugging connection cables without removal of the CD player is connected to an amplification system. When plugging...
... the power lead until all cables firmly. This makes it possible to display the disc and track titles on the SL16 TEXT jack When using a KENWOOD Receiver equipped with the SL16 TEXT jack, connect it to the Receiver using the DIGITAL OUT jack. Note If your receiver has the SL16/XS8 mode select switch, set the connected receiver to use the PC LINK function. Plugging/unplugging connection cables without removal of the CD player is connected to an amplification system. When plugging...
User Manual
Page 7
... stores. Plug the changer's power cable into a wall outlet or power strip. Connect the digital cable from the changer to the receiver as shown to the CD player, disc and track title data can be used . RS-232C cables include the Reverse type cable for use in communications between PCs and the Straight type cable for direct title inputs or control of 32 MB or more than one Kenwood device with a connector matching the...
... stores. Plug the changer's power cable into a wall outlet or power strip. Connect the digital cable from the changer to the receiver as shown to the CD player, disc and track title data can be used . RS-232C cables include the Reverse type cable for use in communications between PCs and the Straight type cable for direct title inputs or control of 32 MB or more than one Kenwood device with a connector matching the...
User Manual
Page 8
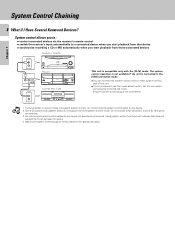
... 7 Some CD players and cassette decks do not connect the system control cable to any device not specified by Kenwood. Using system control functions with the [SL16] mode. Make sure system control plugs are firmly seated in a set the connected components to either system control jack of SL16 chained connections. 3. Do not connect system control cables to Other Devices 8 What if I Have Several Kenwood Devices? System control allows you to : ÷ control connected devices via the receiver's remote control ÷ switch the receiver's input automatically to a connected device when...
... 7 Some CD players and cassette decks do not connect the system control cable to any device not specified by Kenwood. Using system control functions with the [SL16] mode. Make sure system control plugs are firmly seated in a set the connected components to either system control jack of SL16 chained connections. 3. Do not connect system control cables to Other Devices 8 What if I Have Several Kenwood Devices? System control allows you to : ÷ control connected devices via the receiver's remote control ÷ switch the receiver's input automatically to a connected device when...
User Manual
Page 9
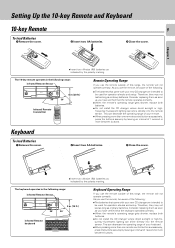
... the remote operates correctly. ÷ When the remote's operating range gets shorter, replace both batteries. ÷ Do not install the CD changer where direct sunlight or high-frequency fluorescent lighting can shine directly into the remote sensor. The 10-key remote operates in the following range: Infrared Remote Sensor TIMER PLAY OFF ON STANDBY POWER ON/STANDBY o PUSH OPEN ) DISPLAY RANDOM DISC SKIP CONFIRM REPEAT ^ & $ › 30° 30° 3 m (10 ft.) Infrared Remote keyboard REMOTE CONTROL...
... the remote operates correctly. ÷ When the remote's operating range gets shorter, replace both batteries. ÷ Do not install the CD changer where direct sunlight or high-frequency fluorescent lighting can shine directly into the remote sensor. The 10-key remote operates in the following range: Infrared Remote Sensor TIMER PLAY OFF ON STANDBY POWER ON/STANDBY o PUSH OPEN ) DISPLAY RANDOM DISC SKIP CONFIRM REPEAT ^ & $ › 30° 30° 3 m (10 ft.) Infrared Remote keyboard REMOTE CONTROL...

User Manual
Page 11
... a KENWOOD Receiver or optional) through this manual are selected at the time of character input. 7 CONFIRM button # DISPLAY 8 REPEAT button 9 Play/pause (6) button 0 Remote sensor ! They may differ from the remote control unit. Front Panel Operation of remote control unit DISPLAY Play indicator Text information display (The displays given in the standby mode, it can be turned ON from what actually appears on the display.) 11 Pause indicator CD-4700M/CD-4260M 0 DISPLAY o PUSH OPEN 0 Chapter 1 TIMER PLAY OFF ON STANDBY POWER ON/STANDBY DISPLAY DISC SKIP...
... a KENWOOD Receiver or optional) through this manual are selected at the time of character input. 7 CONFIRM button # DISPLAY 8 REPEAT button 9 Play/pause (6) button 0 Remote sensor ! They may differ from the remote control unit. Front Panel Operation of remote control unit DISPLAY Play indicator Text information display (The displays given in the standby mode, it can be turned ON from what actually appears on the display.) 11 Pause indicator CD-4700M/CD-4260M 0 DISPLAY o PUSH OPEN 0 Chapter 1 TIMER PLAY OFF ON STANDBY POWER ON/STANDBY DISPLAY DISC SKIP...
User Manual
Page 12
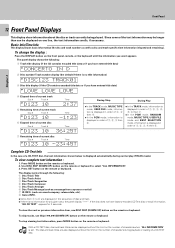
... 7. ÷ In the PGM mode, RANDOM mode, MUSIC TYPE, USER FILE mode and BEST SELECTION mode, information is displayed in the sequence of remote cForonntrtoPlaunneitl 12 Front Panel Displays Chapter 1 Chapter 2 This display show information about the disc or track currently being played. To stop viewing text information, press MODE button on one line, the text information scrolls, if necessary. With a CD-TEXT disc, disc and track titles can...
... 7. ÷ In the PGM mode, RANDOM mode, MUSIC TYPE, USER FILE mode and BEST SELECTION mode, information is displayed in the sequence of remote cForonntrtoPlaunneitl 12 Front Panel Displays Chapter 1 Chapter 2 This display show information about the disc or track currently being played. To stop viewing text information, press MODE button on one line, the text information scrolls, if necessary. With a CD-TEXT disc, disc and track titles can...
User Manual
Page 13
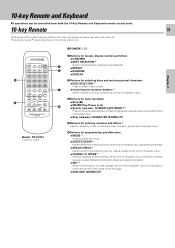
... CHARAC. /CHECK /P.MODE ' W MODE SET DISC SKIP DOWN UP CURSOR LEFT RIGHT 1 ¡ ENTER 7 6 CHARACTER DOWN UP 4 ¢ REMOTE CONTROL UNIT RC-P0714 Model : RC-P0714 Infrared ray system 1 POWER( ) 2 Buttons for modes, display control and letters ÷ CONFIRM ÷ BEST SELECTION * 1 Used for best selection registration and playback. ÷ REPEAT 2 ÷ RANDOM ÷ DISPLAY 3 Buttons for selecting discs and entering special characters ÷ DISC SELECTOR * Press to select a disc number. 3 ÷...
... CHARAC. /CHECK /P.MODE ' W MODE SET DISC SKIP DOWN UP CURSOR LEFT RIGHT 1 ¡ ENTER 7 6 CHARACTER DOWN UP 4 ¢ REMOTE CONTROL UNIT RC-P0714 Model : RC-P0714 Infrared ray system 1 POWER( ) 2 Buttons for modes, display control and letters ÷ CONFIRM ÷ BEST SELECTION * 1 Used for best selection registration and playback. ÷ REPEAT 2 ÷ RANDOM ÷ DISPLAY 3 Buttons for selecting discs and entering special characters ÷ DISC SELECTOR * Press to select a disc number. 3 ÷...
User Manual
Page 14
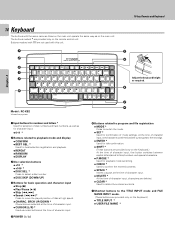
... switch the mode. ÷ SET * Used for title confirmation. ÷ SHIFT * (These buttons are provided only on the remote control unit. SRCH UP/DOWN * Characters are provided only on the main unit. SRCH DOWN DISC SKIP DOWN DISC SKIP UP ROOM B Chapter 2 Model : RC-KB2 Infrared ray system 3 4 Adjust the keyboard height as required. 6 3 4 Chapter 3 Chapter 4 Chapter 5 1 Input buttons for numbers and letters * Used for selection of disc numbers...
... switch the mode. ÷ SET * Used for title confirmation. ÷ SHIFT * (These buttons are provided only on the remote control unit. SRCH UP/DOWN * Characters are provided only on the main unit. SRCH DOWN DISC SKIP DOWN DISC SKIP UP ROOM B Chapter 2 Model : RC-KB2 Infrared ray system 3 4 Adjust the keyboard height as required. 6 3 4 Chapter 3 Chapter 4 Chapter 5 1 Input buttons for numbers and letters * Used for selection of disc numbers...

User Manual
Page 16
... 1 ÷ Normal Play, where you use an optional audio timer to control the changer. See "Repeated playback (REPEAT mode)" ™ ÷ Random Play, which plays the tracks on the loaded CDs in the order loaded Normal play (TRACK mode)" ( ÷ Repeat Play, which plays the tracks or discs over and over Repeat mode where the CD changer plays a par-ticular disc or set of simplicity, this manual provides standard remote instructions for easier text...
... 1 ÷ Normal Play, where you use an optional audio timer to control the changer. See "Repeated playback (REPEAT mode)" ™ ÷ Random Play, which plays the tracks on the loaded CDs in the order loaded Normal play (TRACK mode)" ( ÷ Repeat Play, which plays the tracks or discs over and over Repeat mode where the CD changer plays a par-ticular disc or set of simplicity, this manual provides standard remote instructions for easier text...

User Manual
Page 18
However, when the disc door is opened , do not attempt to the instruction manual provided with your receiver or LCD remote control unit. TION" is opened while "DISC DETEC- Each press switches the modes as "Loading discs in the carousel". To quit ALL DATA READ mode Press the 7 button. 1. MODE 2 Select "ALL DATA READ". SET To display the title on a LCD remote control unit (provided with a KENWOOD Receiver or optional), perform the...
However, when the disc door is opened , do not attempt to the instruction manual provided with your receiver or LCD remote control unit. TION" is opened while "DISC DETEC- Each press switches the modes as "Loading discs in the carousel". To quit ALL DATA READ mode Press the 7 button. 1. MODE 2 Select "ALL DATA READ". SET To display the title on a LCD remote control unit (provided with a KENWOOD Receiver or optional), perform the...
User Manual
Page 25
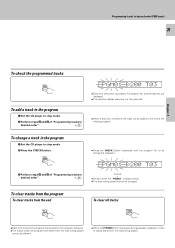
... disc No. To clear tracks from the program To clear tracks from the track being played cannot be changed is displayed. To change a track in the program 1 Set the CD player to stop mode. 2 Press the CHECK button. Chapter 5 Chapter 6 Chapter 7 Programming tracks in desired order (PGM mode) 25 Chapter 1 Chapter 2 Chapter 3 Chapter 4 To check the programmed tracks SPACE /CHECK To add a track to the program 1 Set the CD player...
... disc No. To clear tracks from the program To clear tracks from the track being played cannot be changed is displayed. To change a track in the program 1 Set the CD player to stop mode. 2 Press the CHECK button. Chapter 5 Chapter 6 Chapter 7 Programming tracks in desired order (PGM mode) 25 Chapter 1 Chapter 2 Chapter 3 Chapter 4 To check the programmed tracks SPACE /CHECK To add a track to the program 1 Set the CD player...
User Manual
Page 27
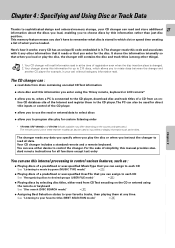
... you load or play the disc or when you to, when a PC is connected to the CD player, download disc and track titles of a CD from CD Text encoding on the country and sales area.) The remote control unit of these receiver models can also be used to input titles or display information such as the titles. The changer reads this manual provides standard remote instructions for the disc. Notes 2. For the...
... you load or play the disc or when you to, when a PC is connected to the CD player, download disc and track titles of a CD from CD Text encoding on the country and sales area.) The remote control unit of these receiver models can also be used to input titles or display information such as the titles. The changer reads this manual provides standard remote instructions for the disc. Notes 2. For the...
User Manual
Page 28
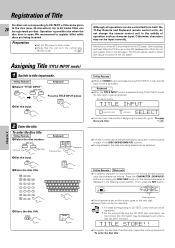
... played can be selected directly by using the numeric buttons in the middle of operation such as follows. Allow you to, when a PC is displayed in the CD player. The PC can also be displayed even when a disc has been removed. SET SET 3 Enter the disc title. T U DISC SELECTOR ( X Y +10 R / V ) Z +100 S ' W ! @ # $ % ^ & D ( ) - + 1 2 3 4 5 6 7 8 9 0 = Q WE R T Y U I J K 5 6 7 8 L M N O 9 0 P Q - . Registration of Title For discs not corresponding to CD-TEXT, a title can be input correctly. CONFIRM A B C BEST...
... played can be selected directly by using the numeric buttons in the middle of operation such as follows. Allow you to, when a PC is displayed in the CD player. The PC can also be displayed even when a disc has been removed. SET SET 3 Enter the disc title. T U DISC SELECTOR ( X Y +10 R / V ) Z +100 S ' W ! @ # $ % ^ & D ( ) - + 1 2 3 4 5 6 7 8 9 0 = Q WE R T Y U I J K 5 6 7 8 L M N O 9 0 P Q - . Registration of Title For discs not corresponding to CD-TEXT, a title can be input correctly. CONFIRM A B C BEST...
User Manual
Page 41
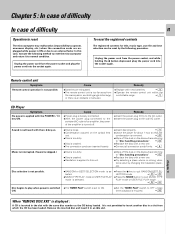
... power socket and plug the power cord into the socket again. w ÷ Replace the disc with the same disc number as the CD being loaded. Disc selection is not possible. ÷ RANDOM or BEST SELECTION mode is selected. ÷ MUSIC TYPE PLAY mode or USER FILE PLAY mode is selected. ÷ Press the 7 key to OFF unless timer playback is required. § When "REMOVE DISC XXX" is displayed : A CD is removed. ON. ÷ Set the TIMER PLAY switch...
... power socket and plug the power cord into the socket again. w ÷ Replace the disc with the same disc number as the CD being loaded. Disc selection is not possible. ÷ RANDOM or BEST SELECTION mode is selected. ÷ MUSIC TYPE PLAY mode or USER FILE PLAY mode is selected. ÷ Press the 7 key to OFF unless timer playback is required. § When "REMOVE DISC XXX" is displayed : A CD is removed. ON. ÷ Set the TIMER PLAY switch...
User Manual
Page 42
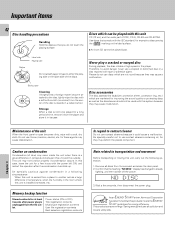
.... Use discs that the flashing "NO DISC" display has changed to use contact cleaners containing oil, for they may cause malfunction. Be specially cautious against condensatin in a following operation: 1. Be specially careful not to steady lighting, and then switch off the power. Chapter 1 Sticker Label side Playing side Do not attach paper or tape to the disc, lightly wipe the disc with a soft, dry cloth. This product...
.... Use discs that the flashing "NO DISC" display has changed to use contact cleaners containing oil, for they may cause malfunction. Be specially cautious against condensatin in a following operation: 1. Be specially careful not to steady lighting, and then switch off the power. Chapter 1 Sticker Label side Playing side Do not attach paper or tape to the disc, lightly wipe the disc with a soft, dry cloth. This product...
User Manual
Page 43
... interference in a residential installation. Connect the equipment into an outlet on , the user is connected. - - Operation is not installed and used in the instruction manual. KENWOOD CORPORATION 2967-3, ISHIKAWA-CHO, HACHIOJI-SHI, TOKYO, JAPAN KENWOOD CORP. In compliance with Part 15 of the following are expressly approved in accordance with the limits for help. FCC Compliance Notice Compact Disc Player, CD-4700M, CD-4260M, CD-425M Those devices complies with Federal...
... interference in a residential installation. Connect the equipment into an outlet on , the user is connected. - - Operation is not installed and used in the instruction manual. KENWOOD CORPORATION 2967-3, ISHIKAWA-CHO, HACHIOJI-SHI, TOKYO, JAPAN KENWOOD CORP. In compliance with Part 15 of the following are expressly approved in accordance with the limits for help. FCC Compliance Notice Compact Disc Player, CD-4700M, CD-4260M, CD-425M Those devices complies with Federal...


