Use and Care Guide
Page 2
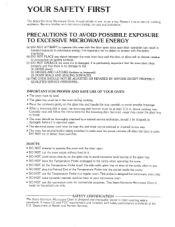
... ATTEMPT to operate this oven with the door open since open . • DO NOT run the oven empty without food in harmful exposure to meet exacting safety performance standards of Heuhh and Human Services. above cooking tray. Carefully read and follow the instructions for household use , is no ', a toy. to microwave energy. YOUR SAFETY FIRST The Sears Kenmore Microwave Oven. DO NOT try to operate this oven with the door open -door operation can...
... ATTEMPT to operate this oven with the door open since open . • DO NOT run the oven empty without food in harmful exposure to meet exacting safety performance standards of Heuhh and Human Services. above cooking tray. Carefully read and follow the instructions for household use , is no ', a toy. to microwave energy. YOUR SAFETY FIRST The Sears Kenmore Microwave Oven. DO NOT try to operate this oven with the door open -door operation can...
Use and Care Guide
Page 3
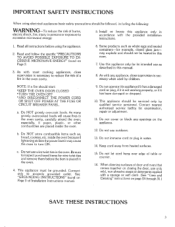
... heated in water. 14. When cleaning surfaces of door and oven that comes together on Page 3 of Installation Instructions manual. . Read all instructions before the item is necessary to properly grounded outlet. This appliance should start: *KEEP THE OVEN DOOR CLOSED *TURN THE OVEN OFF *AND DISCONNECT THE POWER CORD OR SHUT OFF POWER AT THE FUSE OR CIRCUIT BREAKER PANEL. IMPORTANT SAFETY INSTRUCTIONS When using the appliance. . Do not immerse cord...
... heated in water. 14. When cleaning surfaces of door and oven that comes together on Page 3 of Installation Instructions manual. . Read all instructions before the item is necessary to properly grounded outlet. This appliance should start: *KEEP THE OVEN DOOR CLOSED *TURN THE OVEN OFF *AND DISCONNECT THE POWER CORD OR SHUT OFF POWER AT THE FUSE OR CIRCUIT BREAKER PANEL. IMPORTANT SAFETY INSTRUCTIONS When using the appliance. . Do not immerse cord...
Use and Care Guide
Page 4
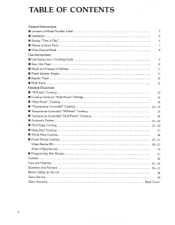
...CONTENTS General Instructions • Location of Model Number Label Installation Setting "Time of Day Names of Oven Parts Oven Control Panel Use Instructions • Use Instructions--Cooking Guide Easy Use Chart Recall and Change of Settings Pause between Stages Regular Timer Hold Warm Detailed Directions • "HI-Power" Cooking Cooking Guide for "Multi-Power" Settings Multi-Power" Cooking Temperature Controlled" Cooking Temperature Controlled "Hl-Power" Cooking Temperature Controlled "Multi-Power" Cooking Automatic Defrost Multi-Stage Cooking Delay-Start Cooking Whole...
...CONTENTS General Instructions • Location of Model Number Label Installation Setting "Time of Day Names of Oven Parts Oven Control Panel Use Instructions • Use Instructions--Cooking Guide Easy Use Chart Recall and Change of Settings Pause between Stages Regular Timer Hold Warm Detailed Directions • "HI-Power" Cooking Cooking Guide for "Multi-Power" Settings Multi-Power" Cooking Temperature Controlled" Cooking Temperature Controlled "Hl-Power" Cooking Temperature Controlled "Multi-Power" Cooking Automatic Defrost Multi-Stage Cooking Delay-Start Cooking Whole...
Use and Care Guide
Page 6
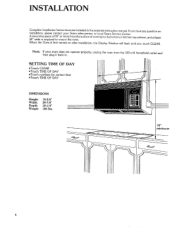
... on after installation, the Display Window will flash until you touch CLEAR. When the Oven is required to mount the oven. Note: If your Sears sales person or local Sears Service Center. A mounting space of kitchen top cabinet, and at least 30" wide is first turned on installation, please contact your oven does not operate then plug it back in the separate instruction manual. INSTALLATION Complete Installation Instructions are...
... on after installation, the Display Window will flash until you touch CLEAR. When the Oven is required to mount the oven. Note: If your Sears sales person or local Sears Service Center. A mounting space of kitchen top cabinet, and at least 30" wide is first turned on installation, please contact your oven does not operate then plug it back in the separate instruction manual. INSTALLATION Complete Installation Instructions are...
Use and Care Guide
Page 7
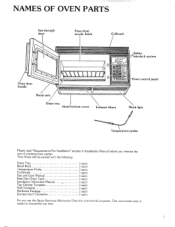
... following: Glass Tray Metal Rack Temperature Probe Cookbook Use and Care Manual Easy Use Chart Card Installation Instruction Manual Top Cabinet Template Wall Template Hardware Package Damper/duct Connector I each I each I each I each I each I each I each I each I each I each I each Do not use this Sears Kenmore Microwave Oven [or commercial made for household use only. NAMES OF OVEN PARTS See-through door Easy-clean acrylic finish Grillwork system Oven door handle Metal rack Glass tray Hood bottom cover Exhaust filters "Oven control panel Work light Temperature probe...
... following: Glass Tray Metal Rack Temperature Probe Cookbook Use and Care Manual Easy Use Chart Card Installation Instruction Manual Top Cabinet Template Wall Template Hardware Package Damper/duct Connector I each I each I each I each I each I each I each I each I each I each I each Do not use this Sears Kenmore Microwave Oven [or commercial made for household use only. NAMES OF OVEN PARTS See-through door Easy-clean acrylic finish Grillwork system Oven door handle Metal rack Glass tray Hood bottom cover Exhaust filters "Oven control panel Work light Temperature probe...
Use and Care Guide
Page 9
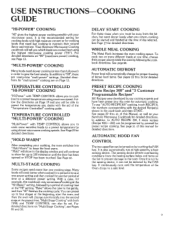
... cooked for a period of this Manual, as well as your microwave oven. Detailed directions for detailed directions. It continuously runs until the door has been opened or STOP has been touched. To cook two or more than full power) in order to a preset temperature using the highest microwave cooking power ("HI"). Once it can preset up to a safe level. To use "AUTO RECIPE 300" cooking, touch RECIPE #, the numbers corresponding with your Kenmore Microwave...
... cooked for a period of this Manual, as well as your microwave oven. Detailed directions for detailed directions. It continuously runs until the door has been opened or STOP has been touched. To cook two or more than full power) in order to a preset temperature using the highest microwave cooking power ("HI"). Once it can preset up to a safe level. To use "AUTO RECIPE 300" cooking, touch RECIPE #, the numbers corresponding with your Kenmore Microwave...

Use and Care Guide
Page 10
... detailed instructions.) TEMPERATURE CONTROLLED "HI-POWER" COOKING To set : 1. Program Recipe following the instructions in Auto Defrost Charts of Use and Care Manual. 6, After turning over -heating of the Oven occurs, the fan will run by itself until the temperature of the Oven drops to a safe level, "HI-POWER" COOKING To set 2nd cooking stage. 7. Touch numbers for desired cooking time. 4. Touch numbers for desired food temperature. 5. Touch numbers for cooking power level. 8. Touch MEMORY!RECALL or PAUSE and repeat 4th cooking stage. 9. Touch TEMP CONTROL. 4. Touch...
... detailed instructions.) TEMPERATURE CONTROLLED "HI-POWER" COOKING To set : 1. Program Recipe following the instructions in Auto Defrost Charts of Use and Care Manual. 6, After turning over -heating of the Oven occurs, the fan will run by itself until the temperature of the Oven drops to a safe level, "HI-POWER" COOKING To set 2nd cooking stage. 7. Touch numbers for desired cooking time. 4. Touch numbers for desired food temperature. 5. Touch numbers for cooking power level. 8. Touch MEMORY!RECALL or PAUSE and repeat 4th cooking stage. 9. Touch TEMP CONTROL. 4. Touch...
Use and Care Guide
Page 11
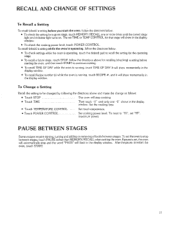
... the display window, Set the cooking time. • Touch TEMPERATURE CONTROL .... Set food temperature. • Touch POWER CONTROL Set cooking power level. To reset to restart the oven, touch START. 11 To recall (check) a setting while the oven is operating, follow the directions above and make the change as follows: • Touch STOP The oven will stop cooking. • Touch TIME Then touch "'0"" until the correct stage light and indicator light turns on. After the pause, to "HI". RECALL AND CHANGE OF SETTINGS To Recall a Setting To recall (check) a setting before...
... the display window, Set the cooking time. • Touch TEMPERATURE CONTROL .... Set food temperature. • Touch POWER CONTROL Set cooking power level. To reset to restart the oven, touch START. 11 To recall (check) a setting while the oven is operating, follow the directions above and make the change as follows: • Touch STOP The oven will stop cooking. • Touch TIME Then touch "'0"" until the correct stage light and indicator light turns on. After the pause, to "HI". RECALL AND CHANGE OF SETTINGS To Recall a Setting To recall (check) a setting before...
Use and Care Guide
Page 12
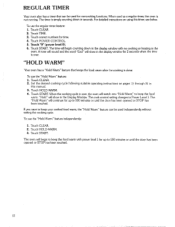
... cooked food warm, the "Hold Warm" feature can be used independently without setting the cooking cycle. The timer is over , the oven will show in the display window for time. 4. When the cooking cycle is over . Touch POWER CONTROL. 5. "Hold" will switch into "Hold Warm" to 100 minutes or until the door has been opened or STOP has been touched. If you want to Power Level 1. Touch HOLD WARM. operating instructions on using this manual...
... cooked food warm, the "Hold Warm" feature can be used independently without setting the cooking cycle. The timer is over , the oven will show in the display window for time. 4. When the cooking cycle is over . Touch POWER CONTROL. 5. "Hold" will switch into "Hold Warm" to 100 minutes or until the door has been opened or STOP has been touched. If you want to Power Level 1. Touch HOLD WARM. operating instructions on using this manual...
Use and Care Guide
Page 13
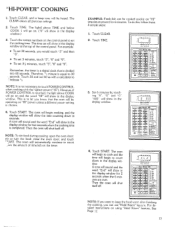
..." power unless a different power setting is divided into 60 seconds. Touch the correct numbers on the timer. However, if POWER CONTROL is touched, the light above TIME and below COOK 1 will go on and the word "HI" will begin to count _,wn the amount of the control panel. The oven will show in the display window. NOTE: To stir food during cooking: open the oven door: stir or turn the food: close the oven door...
..." power unless a different power setting is divided into 60 seconds. Touch the correct numbers on the timer. However, if POWER CONTROL is touched, the light above TIME and below COOK 1 will go on and the word "HI" will begin to count _,wn the amount of the control panel. The oven will show in the display window. NOTE: To stir food during cooking: open the oven door: stir or turn the food: close the oven door...
Use and Care Guide
Page 17
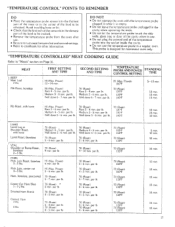
... CONTROLLED" MEAT COOKING GUIDE Refer to be cooked. • Remove the temperature probe from the oven after use the ternperature probe in the center of the food to be reheated. FIRST SETTING AND TIME i HI (Max. Power)...operating the oven. • Do not let the temperature probe touch the side walls, glass tray or door of the cavity when in use. • Do nol plug the pointed end of the temperature probe into the socket inside the cavity. • Do not use , • Be sure to turn meat between first and second settings. • Refer to cookbook for microwave oven...
... CONTROLLED" MEAT COOKING GUIDE Refer to be cooked. • Remove the temperature probe from the oven after use the ternperature probe in the center of the food to be reheated. FIRST SETTING AND TIME i HI (Max. Power)...operating the oven. • Do not let the temperature probe touch the side walls, glass tray or door of the cavity when in use. • Do nol plug the pointed end of the temperature probe into the socket inside the cavity. • Do not use , • Be sure to turn meat between first and second settings. • Refer to cookbook for microwave oven...

Use and Care Guide
Page 18
... of the oven wall. • Cover the food if desired. ,) Set the temperature ol the desired doneness. (See chart below. } • Select "multi-power" setting as shown below. • The microwave oven will stop cooking when the set . • Remove the temperature probe from the oven after use. Place the temperature probe sensor into the center of the beverage glass. The sensitive area of the sensor should rest...
... of the oven wall. • Cover the food if desired. ,) Set the temperature ol the desired doneness. (See chart below. } • Select "multi-power" setting as shown below. • The microwave oven will stop cooking when the set . • Remove the temperature probe from the oven after use. Place the temperature probe sensor into the center of the beverage glass. The sensitive area of the sensor should rest...
Use and Care Guide
Page 21
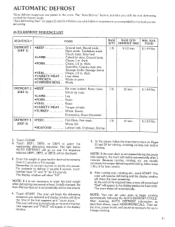
... to select the appropriate defrosting sequence. The display window will show the time of a pound. Touch START. NOTE: If the oven door is recommended for lhe food you are usually necessary for proper defrosting and cooking, follow the chart instructions on and the sequence selected (dEF1, dEF2, or dEF3) will be displayed. , Enter the weight of the required time, a tone will sound and "End" will...
... to select the appropriate defrosting sequence. The display window will show the time of a pound. Touch START. NOTE: If the oven door is recommended for lhe food you are usually necessary for proper defrosting and cooking, follow the chart instructions on and the sequence selected (dEF1, dEF2, or dEF3) will be displayed. , Enter the weight of the required time, a tone will sound and "End" will...

Use and Care Guide
Page 25
... display window will remember the next stage and continue working. Touch START. Touch CLEAR. 2. Touch POWER CONTROL. MULTI-STAGE COOKING WITH AUTO DEFROST If you touch MEMORY/RECALL instead of PAUSE, the oven will not stop between stages To set the oven to set the third cooking stage at power level 70), The first stage has been set the Auto Defrost and touch MEMORY/RECALL, then follow automatically wh¢,n oven is started. I -.-- ,i 4. NOTE: If you want to operate...
... display window will remember the next stage and continue working. Touch START. Touch CLEAR. 2. Touch POWER CONTROL. MULTI-STAGE COOKING WITH AUTO DEFROST If you touch MEMORY/RECALL instead of PAUSE, the oven will not stop between stages To set the oven to set the third cooking stage at power level 70), The first stage has been set the Auto Defrost and touch MEMORY/RECALL, then follow automatically wh¢,n oven is started. I -.-- ,i 4. NOTE: If you want to operate...
Use and Care Guide
Page 28
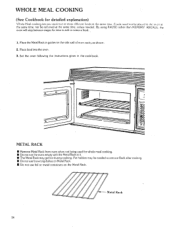
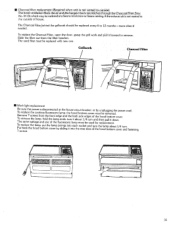
... Metal Rack may be removed at lh_.' Metal Rack 28 same tim,.' the oven will stop between stages for time Io add or remo,:'e food. Pot holders may get hot during cooking. unless needed to remove [] Do not use browning dishes on Metal Rack. [] Do not use foil or metal containers on the side wall of oven cavity as shown. 2. Set the oven following the instructions given in guides on...
... Metal Rack may be removed at lh_.' Metal Rack 28 same tim,.' the oven will stop between stages for time Io add or remo,:'e food. Pot holders may get hot during cooking. unless needed to remove [] Do not use browning dishes on Metal Rack. [] Do not use foil or metal containers on the side wall of oven cavity as shown. 2. Set the oven following the instructions given in guides on...
Use and Care Guide
Page 35
The same wattage and size of the hood bottom cover. put the lamp prongs into the rear slots of house. more often if needed. hold the lamp ends, turn it about 1/4 turn and then pull it forward to remove. P7 ustcrbewacs.k the hood bottom cover by unplugging the power cord. To replace the Charcoal Filter, open the door, grasp the grill work and !Sull it down. To replace the cooktop fluorescent lamp. the hood bottom cover must be...
The same wattage and size of the hood bottom cover. put the lamp prongs into the rear slots of house. more often if needed. hold the lamp ends, turn it about 1/4 turn and then pull it forward to remove. P7 ustcrbewacs.k the hood bottom cover by unplugging the power cord. To replace the Charcoal Filter, open the door, grasp the grill work and !Sull it down. To replace the cooktop fluorescent lamp. the hood bottom cover must be...
Use and Care Guide
Page 36
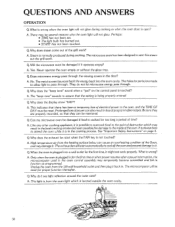
...; TIME has not been set. • The light bulb has burned out. • START has not been touched. Q.Why does steam come out of power can also result in the cooking process. The microwave oven has been designed to pass through. A. No. A. The "beep tone" sounds to assure that they are made to allow light to vent this steam out the grill work ? Q.Why does the display...
...; TIME has not been set. • The light bulb has burned out. • START has not been touched. Q.Why does steam come out of power can also result in the cooking process. The microwave oven has been designed to pass through. A. No. A. The "beep tone" sounds to assure that they are made to allow light to vent this steam out the grill work ? Q.Why does the display...

Use and Care Guide
Page 37
... yolk may pop due to break. A. While safe to use, they are boil-overs avoided? Also, for more popped corn. A. If you open the oven door or touch STOP, the food will stop boiling. (Remember to touch START again after closing the door to restart the cooking cycle.) Q.Why is needed to cook the food just taken out of utensils vary, thereby making it necessary...
... yolk may pop due to break. A. While safe to use, they are boil-overs avoided? Also, for more popped corn. A. If you open the oven door or touch STOP, the food will stop boiling. (Remember to touch START again after closing the door to restart the cooking cycle.) Q.Why is needed to cook the food just taken out of utensils vary, thereby making it necessary...
Use and Care Guide
Page 38
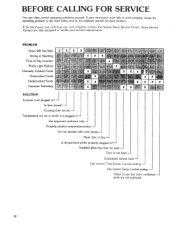
... defrost food.Use correct Time/Power Control setting.Use correct Temp Control setting. Check to see that oven ventilation -ports are fully equipped to handle your microwave oven fails to work properly, contact the nearest Sears Service Center. If the microwave oven still does not work properly, locate the operating problem in ? Sears Service Centers are not restricted. 38 Temperature not set . Is door closed? Do not operate with oven empty.Reset time of Day Incorrect Probe Light Flashes Unevenly Cooked Foods...
... defrost food.Use correct Time/Power Control setting.Use correct Temp Control setting. Check to see that oven ventilation -ports are fully equipped to handle your microwave oven fails to work properly, contact the nearest Sears Service Center. If the microwave oven still does not work properly, locate the operating problem in ? Sears Service Centers are not restricted. 38 Temperature not set . Is door closed? Do not operate with oven empty.Reset time of Day Incorrect Probe Light Flashes Unevenly Cooked Foods...
Use and Care Guide
Page 39
... Maintenance Agreement is nationwide. Your Sears Kenmore Microwave Oven has added value when you consider that we meet our pledge to time. Replacement of the Warranty. OVEN, Sears Kenmore Microwave Ovens are designed, manufactured, and tested for years of maximum efficiency from time to you , staffed by Sears Trained Technicians--professional technicians specifically trained on Sears for service because Sears Service is more than magnetron 2.
... Maintenance Agreement is nationwide. Your Sears Kenmore Microwave Oven has added value when you consider that we meet our pledge to time. Replacement of the Warranty. OVEN, Sears Kenmore Microwave Ovens are designed, manufactured, and tested for years of maximum efficiency from time to you , staffed by Sears Trained Technicians--professional technicians specifically trained on Sears for service because Sears Service is more than magnetron 2.


