Operation Manual
Page 1
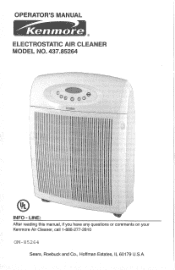
OPERATOR'S MANUAL -i ® INFO - LINE: After reading this manual, if you have any questions or comments on your Kenmore Air Cleaner, call 1-888-277-2810 0M-85264 Sears, Roebuck and Co., Hoffman Estates, IL 60179 U.S.A.
OPERATOR'S MANUAL -i ® INFO - LINE: After reading this manual, if you have any questions or comments on your Kenmore Air Cleaner, call 1-888-277-2810 0M-85264 Sears, Roebuck and Co., Hoffman Estates, IL 60179 U.S.A.
Operation Manual
Page 2
... assembled. Arrange cord so it will only fit into a properly grounded 3-prong electrical outlet. Removing the grounding plug may cause overheating and distortion of electric shock, this product. IMPORTANT SAFETY INSTRUCTIONS Please read all instructions before using electrical appliances, basic precautions should be tripped over by persons in electric shock or create unsafe condition. o Read all instructions before operating the air cleaner. o DO NOT use air cleaner outdoors. o Keep...
... assembled. Arrange cord so it will only fit into a properly grounded 3-prong electrical outlet. Removing the grounding plug may cause overheating and distortion of electric shock, this product. IMPORTANT SAFETY INSTRUCTIONS Please read all instructions before using electrical appliances, basic precautions should be tripped over by persons in electric shock or create unsafe condition. o Read all instructions before operating the air cleaner. o DO NOT use air cleaner outdoors. o Keep...
Operation Manual
Page 3
... product is used for outstanding owner convenience, the air cleaner features a washable pre-filter and collecting cell, so there are easily set and adjusted on your special needs. Designed for commercial or rental purposes. For maximum performance, we highly recommend that you operate the Electrostatic Air Cleaner in material or workmanship, RETURN ITTO ANY SEARS STORE OR OTHER KENiVIORE OUTLET mNTHE UNITED STATES FOR FREE REPLACEMENT. DO NOT use this product...
... product is used for outstanding owner convenience, the air cleaner features a washable pre-filter and collecting cell, so there are easily set and adjusted on your special needs. Designed for commercial or rental purposes. For maximum performance, we highly recommend that you operate the Electrostatic Air Cleaner in material or workmanship, RETURN ITTO ANY SEARS STORE OR OTHER KENiVIORE OUTLET mNTHE UNITED STATES FOR FREE REPLACEMENT. DO NOT use this product...
Operation Manual
Page 4
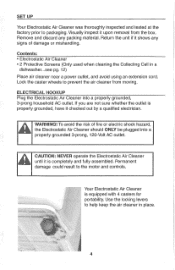
.... Visually inspect it shows any packing material. CAUTION: NEVER operate the Electrostatic Air Cleaner until it checked out by a qualified electrician. SETUP Your Electrostatic Air Cleaner was thoroughly inspected and tested at the factory prior to help keep the air cleaner in a dishwasher...see pg. 12) Place air cleaner near a power outlet, and avoid using an extension cord. Contents: o Electrostatic Air Cleaner o 2 Protective Screens (Only used when cleaning the Collecting Cell in place. 4
.... Visually inspect it shows any packing material. CAUTION: NEVER operate the Electrostatic Air Cleaner until it checked out by a qualified electrician. SETUP Your Electrostatic Air Cleaner was thoroughly inspected and tested at the factory prior to help keep the air cleaner in a dishwasher...see pg. 12) Place air cleaner near a power outlet, and avoid using an extension cord. Contents: o Electrostatic Air Cleaner o 2 Protective Screens (Only used when cleaning the Collecting Cell in place. 4
Operation Manual
Page 5
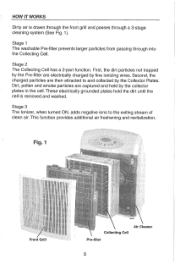
... a 2-part function. These electrically grounded plates hold the dirt until the cell is drawn through the front grill and passes through into the Collecting Cell. Fig. 1 Front Grill Collecting Cell Pre-filter Air Cleaner Dirt, pollen and smoke particles are then attracted to the exiting stream of clean air. Stage 3 The Ionizer, when turned ON, adds negative ions to and collected by the Collector Plates. HOW IT WORKS...
... a 2-part function. These electrically grounded plates hold the dirt until the cell is drawn through the front grill and passes through into the Collecting Cell. Fig. 1 Front Grill Collecting Cell Pre-filter Air Cleaner Dirt, pollen and smoke particles are then attracted to the exiting stream of clean air. Stage 3 The Ionizer, when turned ON, adds negative ions to and collected by the Collector Plates. HOW IT WORKS...
Operation Manual
Page 6
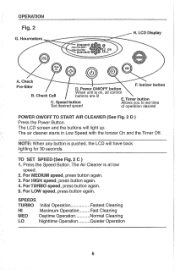
... operation desired POWER ON/OFF TO START AIR CLEANER (See Fig. 2 D ) Press the Power Button. Quieter Operation 6 The LCD screen and the buttons will have back lighting for 30 seconds. Press the Speed Button. For HIGH speed, press button again. 4. SPEEDS TURBO Hi MED LO Initial Operation Fastest Cleaning Maximum Operation ......... Ionizer button B. TO SET SPEED (See Fig. 2 C ) 1. The Air Cleaner is on, all control buttons are lit E. Timer button C. LCD Display A. Check Cell When unit...
... operation desired POWER ON/OFF TO START AIR CLEANER (See Fig. 2 D ) Press the Power Button. Quieter Operation 6 The LCD screen and the buttons will have back lighting for 30 seconds. Press the Speed Button. For HIGH speed, press button again. 4. SPEEDS TURBO Hi MED LO Initial Operation Fastest Cleaning Maximum Operation ......... Ionizer button B. TO SET SPEED (See Fig. 2 C ) 1. The Air Cleaner is on, all control buttons are lit E. Timer button C. LCD Display A. Check Cell When unit...
Operation Manual
Page 7
.... This function provides additional air freshening and revitalization. Each time you want it is normal to run and then shut off. If snapping sounds do not eventually stop, TURN UNIT OFF and follow instructions for fast initial cleaning. The ION icon on control board will run it to 8 pushes = 8 hours. Each time you start your Air Cleaner, we recommend that are...
.... This function provides additional air freshening and revitalization. Each time you want it is normal to run and then shut off. If snapping sounds do not eventually stop, TURN UNIT OFF and follow instructions for fast initial cleaning. The ION icon on control board will run it to 8 pushes = 8 hours. Each time you start your Air Cleaner, we recommend that are...
Operation Manual
Page 8
.... The unit may need to be cleaned earlier depending on the environment. o To manually reset the Pre-Filter and/or Cell Hourmeter, press and hold the Check Cell button for a minimum of use. o A bar will alert the user to the need to be cleaned sooner than the hourmeter indicates. To avoid serious injury from electric shock ALWAYS turn the air cleaner OFF and disconnect the plug from electrical outlet, and clean Cell before turning unit back...
.... The unit may need to be cleaned earlier depending on the environment. o To manually reset the Pre-Filter and/or Cell Hourmeter, press and hold the Check Cell button for a minimum of use. o A bar will alert the user to the need to be cleaned sooner than the hourmeter indicates. To avoid serious injury from electric shock ALWAYS turn the air cleaner OFF and disconnect the plug from electrical outlet, and clean Cell before turning unit back...
Operation Manual
Page 9
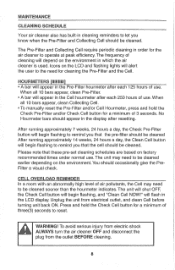
Turn off the air cleaner by gently vacuuming it, using warm, soapy water. There are 2 built-in place. 9 Push the top of cell cavity. 3. Lift up the pre-filter to speed dry Pre-Filter after turning OFF and [_ unApUluTgIgOinNg:. Use a mild dish washing liquid detergent that may be cleaned by pressing the Power Switch. Push the pre-filter forward until the magnetic latches catch and hold the grill in retention...
Turn off the air cleaner by gently vacuuming it, using warm, soapy water. There are 2 built-in place. 9 Push the top of cell cavity. 3. Lift up the pre-filter to speed dry Pre-Filter after turning OFF and [_ unApUluTgIgOinNg:. Use a mild dish washing liquid detergent that may be cleaned by pressing the Power Switch. Push the pre-filter forward until the magnetic latches catch and hold the grill in retention...

Operation Manual
Page 10
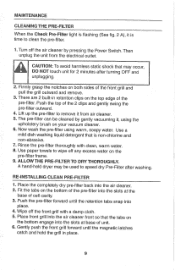
... the cell. 4. Press the power On button. 9. Turn Off the air cleaner by pressing the Power Button. Plug the air cleaner back into a properly grounded 3-prong outlet. 8. Then unplug the unit from the electrical outlet. Filter on page 9 ) NOTE: When you clean the cell, it . Swing out the two handles on the cell. CLEANING THE CELL (See Fig. 3) When the Check Cell light is flashing, it with extreme care. 10 Remove the pre-filter ( See Cleaning the Pre- IMPORTANT...
... the cell. 4. Press the power On button. 9. Turn Off the air cleaner by pressing the Power Button. Plug the air cleaner back into a properly grounded 3-prong outlet. 8. Then unplug the unit from the electrical outlet. Filter on page 9 ) NOTE: When you clean the cell, it . Swing out the two handles on the cell. CLEANING THE CELL (See Fig. 3) When the Check Cell light is flashing, it with extreme care. 10 Remove the pre-filter ( See Cleaning the Pre- IMPORTANT...

Operation Manual
Page 11
... by placing the cell in a tub of Hot Water; Carefully place cell back into a properly grounded 3-prong outlet. 10. Fig. 3 11 Use a mild dishwashing liquid that is non-chlorine and non-abrasive. Hold the bale handles on the cell and let it . Plug the Air Cleaner into the air cleaner and swing handles inward. 8. MAINTENANCE Washing Cell in a Tub of clean hot water. 5. Recommended Method (See...
... by placing the cell in a tub of Hot Water; Carefully place cell back into a properly grounded 3-prong outlet. 10. Fig. 3 11 Use a mild dishwashing liquid that is non-chlorine and non-abrasive. Hold the bale handles on the cell and let it . Plug the Air Cleaner into the air cleaner and swing handles inward. 8. MAINTENANCE Washing Cell in a Tub of clean hot water. 5. Recommended Method (See...
Operation Manual
Page 12
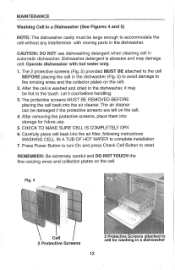
.... Operate dishwasher with moving parts in a dishwasher 12 Let it may damage cell. After removing the protective screens, place them into storage for washing in the dishwasher. Carefully place cell back into the air cleaner. Press Power Button to turn On and press Check Cell Button to reset. The protective screens MUST BE REMOVED BEFORE placing the cell back into the air filter, following instructions WASHING CELL IN A TUB OF HOT WATER to complete installation 7. CHECK...
.... Operate dishwasher with moving parts in a dishwasher 12 Let it may damage cell. After removing the protective screens, place them into storage for washing in the dishwasher. Carefully place cell back into the air cleaner. Press Power Button to turn On and press Check Cell Button to reset. The protective screens MUST BE REMOVED BEFORE placing the cell back into the air filter, following instructions WASHING CELL IN A TUB OF HOT WATER to complete installation 7. CHECK...

Operation Manual
Page 13
... the air cleaner and store in the previous two sections. Turn Off the air cleaner by pressing the Power Button. Clean cabinet and grills. STORAGE 1. If the snapping sounds continue, turn off the unit and wash the cell as described in a suitable clean, dry environment. 13 Turn Off the air cleaner by pressing the Power Switch. MAINTENANCE Extra Cleaning of Cell Occasionally, a few particles of the Air Cleaner Cabinet 1. The cell will begin making snapping sounds. Use a soft...
... the air cleaner and store in the previous two sections. Turn Off the air cleaner by pressing the Power Button. Clean cabinet and grills. STORAGE 1. If the snapping sounds continue, turn off the unit and wash the cell as described in a suitable clean, dry environment. 13 Turn Off the air cleaner by pressing the Power Switch. MAINTENANCE Extra Cleaning of Cell Occasionally, a few particles of the Air Cleaner Cabinet 1. The cell will begin making snapping sounds. Use a soft...

Operation Manual
Page 14
..., 60 Hz REPLACEMENT PARTS Protective Screens 85160 Pre-Filter 85161 Collecting Cell 85162 Rev. Unplug the unit. A 14 Remove and reassemble the front grill to be sure that the power cord is properly fitted. TECHNICAL SPECiFiCATIONS Width Height Depth Weight Input Voltage 20- 7/8 in.(53cm) 27-7/8 in.(70.9cm) 14 -1/8 in a working appliance or test light. 3. Check to make sure it is plugged into...
..., 60 Hz REPLACEMENT PARTS Protective Screens 85160 Pre-Filter 85161 Collecting Cell 85162 Rev. Unplug the unit. A 14 Remove and reassemble the front grill to be sure that the power cord is properly fitted. TECHNICAL SPECiFiCATIONS Width Height Depth Weight Input Voltage 20- 7/8 in.(53cm) 27-7/8 in.(70.9cm) 14 -1/8 in a working appliance or test light. 3. Check to make sure it is plugged into...
Operation Manual
Page 15
For Sears professional installation of home appliances and items like vacuums, lawn equipment, and electronics, call or go on a product serviced by Sears: 1o800o827o6655 (U.S.A.) 1o800o36t =6665 (Canada) Para pedir servicio de reparaci6n a domicilio, y para ordenar piezas: ..... lo888-SU-HOGARsM (1-888-784-6427) Au Canada pour service en fran(;ais: 1-8O0-LE-FOYERMc (1-800-533-6937) www.sears,ca ® Reg{stered Trademark...
For Sears professional installation of home appliances and items like vacuums, lawn equipment, and electronics, call or go on a product serviced by Sears: 1o800o827o6655 (U.S.A.) 1o800o36t =6665 (Canada) Para pedir servicio de reparaci6n a domicilio, y para ordenar piezas: ..... lo888-SU-HOGARsM (1-888-784-6427) Au Canada pour service en fran(;ais: 1-8O0-LE-FOYERMc (1-800-533-6937) www.sears,ca ® Reg{stered Trademark...


