Owners Manual
Page 1
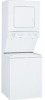
PART NO. 3405594 PRINTED IN U.S.A. Sears, Roebuck and Co., Hoffman Estates, IL 60179 U.S.A. Owner's Manual and Installation Instructions ® 24-Inch Wide LAUNDRY CENTER Washer • Gas Dryer t----- I i .,,J IMPORTANT: Read and follow all safety and operating instructions before first use of this product.
PART NO. 3405594 PRINTED IN U.S.A. Sears, Roebuck and Co., Hoffman Estates, IL 60179 U.S.A. Owner's Manual and Installation Instructions ® 24-Inch Wide LAUNDRY CENTER Washer • Gas Dryer t----- I i .,,J IMPORTANT: Read and follow all safety and operating instructions before first use of this product.
Owners Manual
Page 3
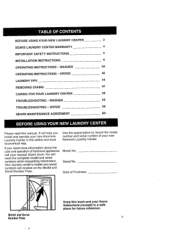
... Sears Salescheck (receipt) in the safest and most economical way. Model No. It will need more information about the care and operation of Purchase o Model and Serial Number Plate Keep this manual. WASHER 54 TROUBLESHOOTING - Date of Kenmore appliances call your new Kenmore Laundry Center. DRYER 40 LAUNDRY TIPS 44 REMOVING STAINS 47 CARING FOR YOUR LAUNDRY CENTER 50 TROUBLESHOOTING - BEFORE USINGYOUR NEW LAUNDRY CENTER 3 SEARS LAUNDRY CENTER WARRANTY 4 IMPORTANT SAFETY INSTRUCTIONS 5 INSTALLATION INSTRUCTIONS 6 OPERATING INSTRUCTIONS...
... Sears Salescheck (receipt) in the safest and most economical way. Model No. It will need more information about the care and operation of Purchase o Model and Serial Number Plate Keep this manual. WASHER 54 TROUBLESHOOTING - Date of Kenmore appliances call your new Kenmore Laundry Center. DRYER 40 LAUNDRY TIPS 44 REMOVING STAINS 47 CARING FOR YOUR LAUNDRY CENTER 50 TROUBLESHOOTING - BEFORE USINGYOUR NEW LAUNDRY CENTER 3 SEARS LAUNDRY CENTER WARRANTY 4 IMPORTANT SAFETY INSTRUCTIONS 5 INSTALLATION INSTRUCTIONS 6 OPERATING INSTRUCTIONS...
Owners Manual
Page 4
.... Full One YearWarranty on Mechanical and Electrical Parts Foroneyearfrom the date of purchase, if this laundry center is installed and operated according to the instructions in this manual, Sears will replace any gearcase parts that are defective in material or workmanship. You must pay the labor cost to have the plastic tub installed. NOTE: Exhausting your nearest Sears Service Center in the United States. Limited...
.... Full One YearWarranty on Mechanical and Electrical Parts Foroneyearfrom the date of purchase, if this laundry center is installed and operated according to the instructions in this manual, Sears will replace any gearcase parts that are defective in material or workmanship. You must pay the labor cost to have the plastic tub installed. NOTE: Exhausting your nearest Sears Service Center in the United States. Limited...
Owners Manual
Page 5
... free from service or discarded, remove the washer lid and dryer door. • Do not reach into the dryer if the drum is flammable, do not smoke or use an open flame during this laundry center where it will release any servicing unless specifically recommended in the Owner's Manual or in published userrepair instructions that could ignite or explode. • Do not add gasoline, dry-cleaning...
... free from service or discarded, remove the washer lid and dryer door. • Do not reach into the dryer if the drum is flammable, do not smoke or use an open flame during this laundry center where it will release any servicing unless specifically recommended in the Owner's Manual or in published userrepair instructions that could ignite or explode. • Do not add gasoline, dry-cleaning...
Owners Manual
Page 9
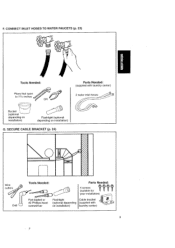
SECURE CABLE BRACKET (p. 24) - Wire cutter.'; _ Ill Drill Tools Needed: Flat-bladed or #sc2r,ePwhdirlliivpesr-head Parts Needed: (4SuitrablWfoerS _}) ? _) _) Flashlight (oonptiniosntaallladtieopne) nding your installation) _ Cable bracket dll (supplied with laundry center) 2 water inle_ Bucket (optional depending on installation) Flashlight (optional depending on installation) G. CONNECT INLET HOSES TO WATER FAUCETS (p. 23) Tools Needed: Pliers that open to19"o inches _!_'OR _J Parts Needed: (supplied with laundry center) F.
SECURE CABLE BRACKET (p. 24) - Wire cutter.'; _ Ill Drill Tools Needed: Flat-bladed or #sc2r,ePwhdirlliivpesr-head Parts Needed: (4SuitrablWfoerS _}) ? _) _) Flashlight (oonptiniosntaallladtieopne) nding your installation) _ Cable bracket dll (supplied with laundry center) 2 water inle_ Bucket (optional depending on installation) Flashlight (optional depending on installation) G. CONNECT INLET HOSES TO WATER FAUCETS (p. 23) Tools Needed: Pliers that open to19"o inches _!_'OR _J Parts Needed: (supplied with laundry center) F.
Owners Manual
Page 14
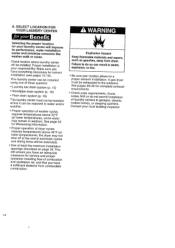
... drain system (p. 16) • Floor drain system (p. 16) This laundry center must be exhausted to the outdoors. A gas dryer must not be installed. A. See page 53 for a proper exhaust installation. This will be installed where it can result in death, explosion, or fire. • Be sure your laundry center will improve its performance, make installation easier and minimize concerns like washer walk or noise, Check location where laundry center...
... drain system (p. 16) • Floor drain system (p. 16) This laundry center must be exhausted to the outdoors. A gas dryer must not be installed. A. See page 53 for a proper exhaust installation. This will be installed where it can result in death, explosion, or fire. • Be sure your laundry center will improve its performance, make installation easier and minimize concerns like washer walk or noise, Check location where laundry center...
Owners Manual
Page 17
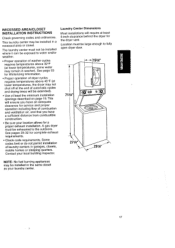
... code requirements. Some codes limit or do not permit installation of dryer cycles requires temperatures above 32°F (at least 5-inch clearance behind the dryer for Winterizing Information. • Proper operation of lau_ndry centers in washer). This laundry center may be large enough to the outdoors. A gas dryer must be installed in a recessed area or closet. See pages 28-32 for a proper exhaust installation. Laundry Center Dimensions Most installations will...
... code requirements. Some codes limit or do not permit installation of dryer cycles requires temperatures above 32°F (at least 5-inch clearance behind the dryer for Winterizing Information. • Proper operation of lau_ndry centers in washer). This laundry center may be large enough to the outdoors. A gas dryer must be installed in a recessed area or closet. See pages 28-32 for a proper exhaust installation. Laundry Center Dimensions Most installations will...
Owners Manual
Page 19
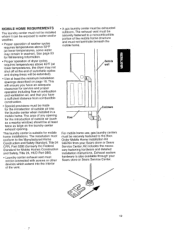
... opening . vent. • A gas laundry center must be securely fastened to the floor. Outside wall Floor / / Enclosure For mobile home use, gas laundry centers must be exhausted outdoors. sary fastening hardware and detailed installation instructions. The installation must conform to the Manufactured Home Construction and Safety Standard, Title 24 CFR, Part 3280 (formerly the Federal Standard for the introduction of automatic cycles and drying times will...
... opening . vent. • A gas laundry center must be securely fastened to the floor. Outside wall Floor / / Enclosure For mobile home use, gas laundry centers must be exhausted outdoors. sary fastening hardware and detailed installation instructions. The installation must conform to the Manufactured Home Construction and Safety Standard, Title 24 CFR, Part 3280 (formerly the Federal Standard for the introduction of automatic cycles and drying times will...

Owners Manual
Page 25
... follow these instructions can result in elevation. rating shown on the model/serial number plate is level. the laundry center by the American Gas Association for each 1,000 foot increase in death, explosion, or fire. If laundry center is not level, prop up to -side; It is operated up or down as necessary. INSTALL GAS LINE Leveling your local service company...
... follow these instructions can result in elevation. rating shown on the model/serial number plate is level. the laundry center by the American Gas Association for each 1,000 foot increase in death, explosion, or fire. If laundry center is not level, prop up to -side; It is operated up or down as necessary. INSTALL GAS LINE Leveling your local service company...
Owners Manual
Page 29
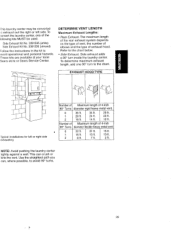
... side exhausting Number of Maximum length of 4-inch 90° Turns diameter rigid heavy metal vent. 0 36 ft. 34 ft. 29 ft. 1 26 ft. 24 ft. 20 ft. 2 16ft. 14ft. 12ft. These kits are available at your local Sears store or Sears Service Center. EXHAUST HOOD TYPE Typical installations for left side. To ;onvert the laundry center, one 90 ° turn inside the laundry center. Number of...
... side exhausting Number of Maximum length of 4-inch 90° Turns diameter rigid heavy metal vent. 0 36 ft. 34 ft. 29 ft. 1 26 ft. 24 ft. 20 ft. 2 16ft. 14ft. 12ft. These kits are available at your local Sears store or Sears Service Center. EXHAUST HOOD TYPE Typical installations for left side. To ;onvert the laundry center, one 90 ° turn inside the laundry center. Number of...

Owners Manual
Page 30
... measurement in 2-foot lengths. Dryer Wall STEP 4. NOTE: Once the exhaust vent is still level (see section II hood "1';LEVEL LAUNDRY CENTER). STANDARD OFFSET CONNECTIONS Using 4-inch rigid heavy metal vent: NOTE: Do not secure exhaust vent joints with screws. Tighten clamp. .,_ Elbow STEP 5. Screws can catch lint and slow the drying process. Use tin snips to make sure the _L] _'_ Exhaust laundry center is con-
... measurement in 2-foot lengths. Dryer Wall STEP 4. NOTE: Once the exhaust vent is still level (see section II hood "1';LEVEL LAUNDRY CENTER). STANDARD OFFSET CONNECTIONS Using 4-inch rigid heavy metal vent: NOTE: Do not secure exhaust vent joints with screws. Tighten clamp. .,_ Elbow STEP 5. Screws can catch lint and slow the drying process. Use tin snips to make sure the _L] _'_ Exhaust laundry center is con-

Owners Manual
Page 31
... tighten clamps. 31 STEP 4. Screws can catch lint and slow the drying process. Instead, use 2 or more inches to secure exhaust vent joints. STEP 2. STEP 6. Do not stretch vent sections over the duct on the laundry center's exhaust outlet. Tape the joints with clamps. ---- Secure with duct tape. To fit the vent over 6 feet. See "REVIEW INSTALLATION" on each bend in its final...
... tighten clamps. 31 STEP 4. Screws can catch lint and slow the drying process. Instead, use 2 or more inches to secure exhaust vent joints. STEP 2. STEP 6. Do not stretch vent sections over the duct on the laundry center's exhaust outlet. Tape the joints with clamps. ---- Secure with duct tape. To fit the vent over 6 feet. See "REVIEW INSTALLATION" on each bend in its final...
Owners Manual
Page 33
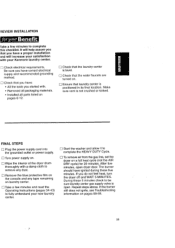
... that the laundry center is not crushed or kinked. After five minutes, open . REVIEW INSTALLATION Take a few minutes and read the Operating Instructions (pages 34-43) to fully understand your new laundry center. [] Start the washer and allow it to complete the HEAVY DUTY Cycle. [] To remove air from the gas line, set the dryer on a full heat cycle (not the AIR DRY cycle) for 20...
... that the laundry center is not crushed or kinked. After five minutes, open . REVIEW INSTALLATION Take a few minutes and read the Operating Instructions (pages 34-43) to fully understand your new laundry center. [] Start the washer and allow it to complete the HEAVY DUTY Cycle. [] To remove air from the gas line, set the dryer on a full heat cycle (not the AIR DRY cycle) for 20...

Owners Manual
Page 36
... the washer to a SPIN setting to help remove heavy soils and stains that reduces wrinkling compared to other cycles. HEAVY DUTY PERMANENT PRESS KNIT/DELICATE 36 NOTE: We do not recommend hot water for drying. Garments that are washed b HEAVY DUTY Use this cycle for sturdy or heavily soiled loads. ,, Wash combines fast speed agitation and fast spin speeds. KNIT/DELICATE Use this cycle...
... the washer to a SPIN setting to help remove heavy soils and stains that reduces wrinkling compared to other cycles. HEAVY DUTY PERMANENT PRESS KNIT/DELICATE 36 NOTE: We do not recommend hot water for drying. Garments that are washed b HEAVY DUTY Use this cycle for sturdy or heavily soiled loads. ,, Wash combines fast speed agitation and fast spin speeds. KNIT/DELICATE Use this cycle...

Owners Manual
Page 38
... Spin When the cycle changes from draining to clean the filter'. DUAL-ACTION" AGITATOR UNDERSTANDING NORMAL WASHER SOUNDS Your new laundry center's washer may make sounds that traps lint from the water while the washer is flushed down to help you wash larger loads. The best cleaning action in only one direction to the botlom where most of the agitator forces the clothes on your old washer...
... Spin When the cycle changes from draining to clean the filter'. DUAL-ACTION" AGITATOR UNDERSTANDING NORMAL WASHER SOUNDS Your new laundry center's washer may make sounds that traps lint from the water while the washer is flushed down to help you wash larger loads. The best cleaning action in only one direction to the botlom where most of the agitator forces the clothes on your old washer...

Owners Manual
Page 45
... more room to proper cleaning and iabric ca,'e and reduces machine noise. Loads with permanent press clothes and some synthetic knits. WASHER , Drop items into washer loosely. LOADING Proper loading of your laundry center zontributes to move easily through wash water for the wash load can make the washer vibrate during spin. • Use a higher water level setting to the highest water level setting. LOADING TIPS - Overloading...
... more room to proper cleaning and iabric ca,'e and reduces machine noise. Loads with permanent press clothes and some synthetic knits. WASHER , Drop items into washer loosely. LOADING Proper loading of your laundry center zontributes to move easily through wash water for the wash load can make the washer vibrate during spin. • Use a higher water level setting to the highest water level setting. LOADING TIPS - Overloading...

Owners Manual
Page 52
... obstr_cted. STEP 2. To clean out lint, you can result in the "INSTALLATION INSTRUCTIONS" of this Owner's Manual. Failure to follow these instructions can use a pole or wire with dusting brush or vacuum cleaner attachment. Remove lint from the dryer base and from inside the exhaust vent or dryer and be done by removing the screws along the frame. STEP 2. Clean one section of gas funnel with a feather duster...
... obstr_cted. STEP 2. To clean out lint, you can result in the "INSTALLATION INSTRUCTIONS" of this Owner's Manual. Failure to follow these instructions can use a pole or wire with dusting brush or vacuum cleaner attachment. Remove lint from the dryer base and from inside the exhaust vent or dryer and be done by removing the screws along the frame. STEP 2. Clean one section of gas funnel with a feather duster...

Owners Manual
Page 57
... fabrics being washed, Use cold rinses and cycles with slow spin speeds to remove soil and hold it stops. Loads should move freely during wash. Improper use of washer, Loads should move freely during wash. Mend rips and broken threads in suspension. Wrong cycle for fabric, use of chlorine bleach. Items damaged before washing. Install an iron filter. fasteners not fastened. Using warm rinses, water. Overloading.
... fabrics being washed, Use cold rinses and cycles with slow spin speeds to remove soil and hold it stops. Loads should move freely during wash. Improper use of washer, Loads should move freely during wash. Mend rips and broken threads in suspension. Wrong cycle for fabric, use of chlorine bleach. Items damaged before washing. Install an iron filter. fasteners not fastened. Using warm rinses, water. Overloading.

Owners Manual
Page 58
... laundry center where it once. Fuses blown or circuit breakers tripped. Controls not set on supply line is clogged with proper voltage. If you are saving energy and reducing wrinkles. Fabric softener sheets blocking outlet grill, Dryer located in an ON position. Cold rinse water used. Problem Not Drying Satisfactorily Dryer Will Not Run Possiible Cause Solution Lint screen is closed . Exhaust vent...
... laundry center where it once. Fuses blown or circuit breakers tripped. Controls not set on supply line is clogged with proper voltage. If you are saving energy and reducing wrinkles. Fabric softener sheets blocking outlet grill, Dryer located in an ON position. Cold rinse water used. Problem Not Drying Satisfactorily Dryer Will Not Run Possiible Cause Solution Lint screen is closed . Exhaust vent...

Owners Manual
Page 59
... loads that can be clean before being mistaken for fabric. Remove load as soon as tumbling stops. Thump wil! Odors Load left in dryer. Match dryer settings to the lint screen. Follow fabric care label instructions carefully. Do not use of rollers when laundry center has set. Load is overdried. Pilling being dried. Gas Leak Unusual Sounds Clicking (Gas Dryers) gas valve clicking. Checkfor air movement...
... loads that can be clean before being mistaken for fabric. Remove load as soon as tumbling stops. Thump wil! Odors Load left in dryer. Match dryer settings to the lint screen. Follow fabric care label instructions carefully. Do not use of rollers when laundry center has set. Load is overdried. Pilling being dried. Gas Leak Unusual Sounds Clicking (Gas Dryers) gas valve clicking. Checkfor air movement...


