Kenmore 9875 Support Question
Kenmore 9875 Support Question
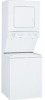
Find answers below for this question about Kenmore 9875 - 24 in. Laundry Center.Need a Kenmore 9875 manual? We have 1 online manual for this item!
Question posted by michaeldbryant on November 13th, 2011
Bulb Replaced
How do I change the bulb in the dryer section of a Kenmore 9875 Laundry Center?
Current Answers
Answer #1: Posted by techie12330 on November 13th, 2011 9:43 PM
techie12330

Member since:
November 8th, 2011 Points: 286,200

Member since:
November 8th, 2011 Points: 286,200
Take a good look at and determine if there is a screw or slides or pry it out. If you not look at your owner's manual, if doesn't have one take at look at this site. You will be able to look one online. www.retrevo.com
Related Kenmore 9875 Manual Pages
Owners Manual - Page 1
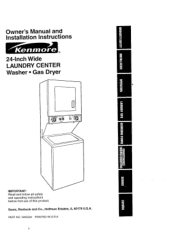
PART NO. 3405594 PRINTED IN U.S.A. Owner's Manual and Installation Instructions
®
24-Inch Wide LAUNDRY CENTER Washer • Gas Dryer
t-----
Sears, Roebuck and Co., Hoffman Estates, IL 60179 U.S.A. I
i .,,J
IMPORTANT: Read and follow all safety and operating instructions before first use of this product.
Owners Manual - Page 3
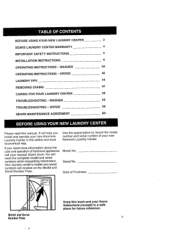
... Number Plate. Use the space below to record the model number and serial number of your new Kenmore Laundry Center in a safe place for future reference. Serial No. DRYER
40
LAUNDRY TIPS
44
REMOVING STAINS
47
CARING FOR YOUR LAUNDRY CENTER
50
TROUBLESHOOTING -
It will need more information about the care and operation of Purchase
o
Model and...
Owners Manual - Page 4
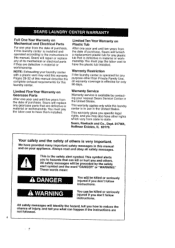
... messages will furnish a replacement plastic tub for only 90 days.
We have other than Private Family Use, all safety messages. You must pay the labor cost to state. NOTE: Exhausting your appliance. This warranty gives you specific legal rights, and you may void this manual and on your laundry center with a plastic vent...
Owners Manual - Page 5
... the weather.
• Do not tamper with controls.
• Do not repair or replace any part of the laundry center or attempt any accumulated hydrogen gas. If the hot water system has not been used for...before using the washing machine. Because the gas is moving . • Do not reach into the dryer if the drum
is flammable, do not smoke or use heat to dry articles containing foam rubber or...
Owners Manual - Page 6
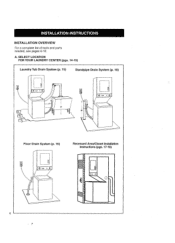
INSTALLATION OVERVIEW
For a complete list of tools and parts needed, see pages 6-12. A. SELECT LOCATION FOR YOUR LAUNDRY CENTER (pgs. 14-19)
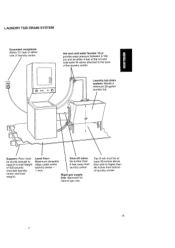
Laundry Tub Drain System (p. 15)
Standpipe Drain System (p. 16)
Floor Drain System (p. 16)
Recessed Area/Closet Installation Instructions (pgs. 17-18)
Owners Manual - Page 7
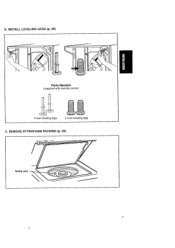
REMOVE STYROFOAM PACKING (p. 20)
Yellow card B. INSTALL LEVELING LEGS (p. 20)
[
o
E
Parts Needed: (supplied with laundry center)
2 rear leveling legs
2 front leveling legs
C.
Owners Manual - Page 8
...(pgs. 22-23)
Tools Needed:
Parts Needed: (supplied with laundry center)
Pliers that open _"_'- _-_
to lg/16 inches
_..._- \ \k_
Flashlight (optional depending on installation)
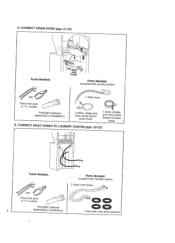
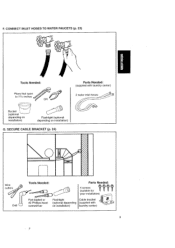
1 yellow, single-wire ... water inlet hose washers D. CONNECT DRAIN HOSE (pgs. 21-22)
Tools Needed:
PUSH
Parts Needed: (supplied with laundry center)
2 water inlet hoses
Pliers that open to 19/1_inches
!
Owners Manual - Page 9
...Tools Needed:
Flat-bladed or #sc2r,ePwhdirlliivpesr-head
Parts Needed:
(4SuitrablWfoerS _}) ? _) _)
Flashlight (oonptiniosntaallladtieopne) nding
your installation) _
Cable bracket dll
(supplied with laundry center)
2 water inle_
Bucket
(optional depending on installation)
Flashlight (optional depending on installation)
G.
F. CONNECT INLET HOSES TO WATER FAUCETS (p. 23)
Tools Needed...
Owners Manual - Page 10
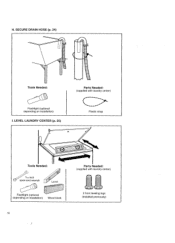
LEVEL LAUNDRY CENTER (p. 25)
Plastic strap
Tools Needed:
(_ open-%ened-incwhrench
_Level
Flashlight (optional depending on installation)
I. 14.SECURE DRAIN HOSE (p. 24)
Tools Needed:
Parts Needed: (suppliedwith laundry center)
Flashlight (optional depending on installation)
Wood block
10
Parts Needed: (supplied with laundry center)
2 front leveling legs (installed previously)
Owners Manual - Page 14
Failure to do not permit installation of combustion and ventilation air, and that you have a sufficient distance from dryer. Some codes limit or do so can be installed.
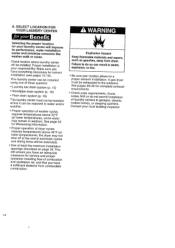
SELECT LOCATION FOR YOUR LAUNDRY CENTER
Selecting the proper location for your location allows for complete exhaust requirements.
• Check code requirements. See page 53 for...
Owners Manual - Page 15
... for natural gas use.
Shut-off valve: No further than 96 inches from laundry center. Top of tub must be sturdy enough to the back of laundry center. LAUNDRY TUB DRAIN SYSTEM
Grounded receptacle: Within 31/2feet of either side of the laundry center.
I !
Hot and cold water faucets: Must provide water pressure between 5-100 psi and...
Owners Manual - Page 19
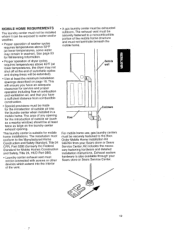
...dryer may not shut off at the end of the mobile home structure and must not terminate beneath the mobile home. This laundry center is also available through your Sears store or Sears Service Center...Construction
and Safety, Title 24, HUD Part 280).
• Laundry center exhaust vent must not be connected with screws or other devices which extend into
the laundry center when installed in washer...
Owners Manual - Page 22

...will allow hot and cold water to do so can result in couplings.
When replacing your laundry center properly. Open yellow, single-wire clamp with a permanent marker
STEP 1. Drain ...drain hose and force excess drain hose into laundry tub or standpipe. NOTE: Replace inlet hoses after five years of use to secure the rubber and corrugated sections together. Insert one new, flat washer ...
Owners Manual - Page 24

... or standpipe. Select the
correct type of drain
hose in standpipe. STEP 1.
Prepare mounting holes suitable for your floors from the bracket.
or stems). l
i,:j
24
Move laundry center to the power supply cord. Secure plastic strap.
Discard plastic strap.
Cut the plastic strap securing the cable wire bracket to its final location. STEP...
Owners Manual - Page 29
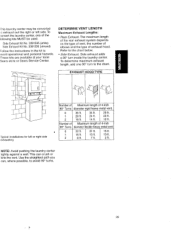
....
24 ft.
20 ft.
2
16ft.
14ft.
12ft. EXHAUST HOOD TYPE
Typical installations for left side.
Side Exhaust Kit No. 3391335 (white) Side Exhaust Kit No. 3391336 (almond)
Follow the instructions in the kit to avoid 90 ° turns.
29
Use the straightest path you can crush or kink the vent.
1-his laundry center...
Owners Manual - Page 50

... occur. Proper care of your inlet hoses, mark the date of replacement on or in your dryer. Repeat process if necessary.
Garments that contain unstable dyes, such as washer safe. or STEP la. STEP 2.
-I'his section explains flow to care for your laundry center after five years of use to reduce the risk of hose...
Owners Manual - Page 52

.... Check to 3 years, or more often, dependir_g on laundry center rear panel. STEP 1. int
STEP 4.
STEP 2. Clean one section of gas funnel with a feather duster or rag attached. Replace all panels before cleaning. Reconnect vent as described in death or electrical shock. Remove lint from the dryer base and from inside the exhaust vent or...
Owners Manual - Page 56

... pockets.
Use wash water warmer than 70°F.
56 Timer is normal.
Replace fuse or reset circuit breaker. Set and pull out knob.
Ensure leveling legs are installed. Clean out pockets before starting washer. Ensure tub is centered before washing. Level laundry center (see "OPERATION").
Paper or tissue in load if overloaded.Wash smaller...
Owners Manual - Page 58

...
Dryer Will Not Run
Possiible Cause
Solution
Lint screen is crushed or kinked,
Replace with rigid or flexible heavy metal vent (see "INSTALLATION','Section K).
If you are saving energy and reducing wrinkles. Exhaust vent is clogged with a time-delay fuse.
Timer or the temperature control is set in an ON position.
58
Move laundry center...
Owners Manual - Page 60
... has service units nationwide, staffed with a Sears Maintenance Agreement. For more information, call 1-800-827-6655.
6O dependable operation. LAUNDRY CENTERS
"We Service What We Sell" is our assurance that you consider that "We Service What We SelE
Sears Maintenance Agreement Maintain the value of your laundry center in proper running condition.
Your Kenmore
Laundry Center has added...
Similar Questions

98752 Model I Yurn On Dryer, It Spins But Develops No Heat Whatsoever
(Posted by botmzup 9 years ago)

The Rear Levelling Legs On Our 27 Inch Kenmore Laundry Center Will Not Come Down
The rear levelling legs on our 27 inch Kenmore laundry center will not come down. How do I free them...
The rear levelling legs on our 27 inch Kenmore laundry center will not come down. How do I free them...
(Posted by jochamberlin 10 years ago)

Kenmore Laundry Center Dryer Making Noise
My Kenmore 24" gas Laundry Center makes a rhythmic clicking noise when in the dryer cycle. What can ...
My Kenmore 24" gas Laundry Center makes a rhythmic clicking noise when in the dryer cycle. What can ...
(Posted by mbrunker 12 years ago)

1995 Kenmore Laundry Center Stackable Unit.need Correct Wiring Diagram For Washe
(Posted by saleging5050 12 years ago)

97812 Laundry Center
The center aerator does not move in wash cycle. Can the front panel be removed to repair or replace ...
The center aerator does not move in wash cycle. Can the front panel be removed to repair or replace ...
(Posted by stoupal55 12 years ago)