Installation Instructions
Page 1
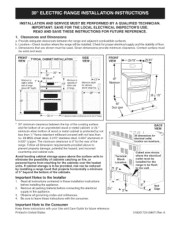
.... Be sure to leave these instructions with your Use and Care Guide for proper electrical supply and the stability of cabinets catching on either - Dimensions that projects horizontally a minimum of 5" beyond the bottom of range. * 30" minimum clearance between the range and adjacent combustible surfaces. I t Minimumto 18" ceaitbhienrestisdeon s"#vff 1_13"÷ fMoracxaimbiunmetdsepth f/ FRONT VIEW...
.... Be sure to leave these instructions with your Use and Care Guide for proper electrical supply and the stability of cabinets catching on either - Dimensions that projects horizontally a minimum of 5" beyond the bottom of range. * 30" minimum clearance between the range and adjacent combustible surfaces. I t Minimumto 18" ceaitbhienrestisdeon s"#vff 1_13"÷ fMoracxaimbiunmetdsepth f/ FRONT VIEW...
Installation Instructions
Page 2
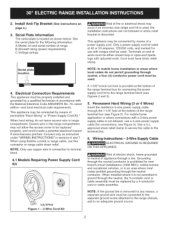
... with upturned ends. Use a U.L. B.Kilowatt rating (power requirements). When using flexible conduit or range cable, use with the National Electrical Code ANSI/NFPA No. 70--latest edition--and local electrical code requirements. Only a power supply cord kit rated at 40 or 50 amperes, 125/250 volts...serial number of appliance through the neutral conductor is not allowed, use copper wire in accordance with ranges shall be properly installed and grounded by means of fire or electrical shock may not allow the access cover to the terminal box. 6. See the serial plate for ...
... with upturned ends. Use a U.L. B.Kilowatt rating (power requirements). When using flexible conduit or range cable, use with the National Electrical Code ANSI/NFPA No. 70--latest edition--and local electrical code requirements. Only a power supply cord kit rated at 40 or 50 amperes, 125/250 volts...serial number of appliance through the neutral conductor is not allowed, use copper wire in accordance with ranges shall be properly installed and grounded by means of fire or electrical shock may not allow the access cover to the terminal box. 6. See the serial plate for ...
Installation Instructions
Page 3
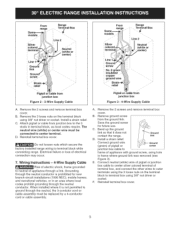
... block using the 3 loose nuts on the terminal block to center silver colored terminal of electrical connection may occur. 7. When installed where it does not contact the range, link D, Install a strain relief. Remove ground screw from junction box to screw frame ... Cable A. B. Install a strain relief. C. Reinstall terminal box cover, Do not loosen nuts which secure the factory installed range wiring to ground through a link. Electrical failure or loss of terminal box, and connect the other wires to outer terminals using 3/8" nut driver or socket. mobile homes...
... block using the 3 loose nuts on the terminal block to center silver colored terminal of electrical connection may occur. 7. When installed where it does not contact the range, link D, Install a strain relief. Remove ground screw from junction box to screw frame ... Cable A. B. Install a strain relief. C. Reinstall terminal box cover, Do not loosen nuts which secure the factory installed range wiring to ground through a link. Electrical failure or loss of terminal box, and connect the other wires to outer terminals using 3/8" nut driver or socket. mobile homes...
Installation Instructions
Page 4
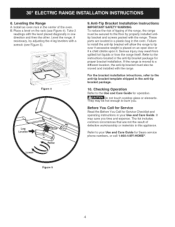
... appliance. They may be secured to the anti-tip bracket template shipped in one direction and then the other. Figure 5 4 Level the range, if necessary, by properly installed antitip bracket and screws packed with a wrench (see Figure 4). For the bracket installation intructions, refer to...oven. Checking Operation Refer to burn you time and expense. It may result from spilled hot liquids or from the range itself. B. Take 2 readings with the range. The list includes common occurrences that are located in a plastic bag in your Use and Care Guide for proper ...
... appliance. They may be secured to the anti-tip bracket template shipped in one direction and then the other. Figure 5 4 Level the range, if necessary, by properly installed antitip bracket and screws packed with a wrench (see Figure 4). For the bracket installation intructions, refer to...oven. Checking Operation Refer to burn you time and expense. It may result from spilled hot liquids or from the range itself. B. Take 2 readings with the range. The list includes common occurrences that are located in a plastic bag in your Use and Care Guide for proper ...
Use and Care Guide
Page 2
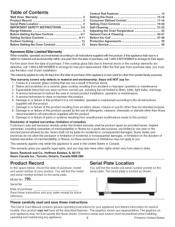
... may not apply to you. Table of Contents Wall Oven Warranty 2 Product Record 2 Serial Plate Location 2 IMPORTANT SAFETY INSTRUCTIONS 3-4 Range Features 5 Before Setting Surface Controls 6=7 Setting Surface Controls 8-11 Surface Cooking 12 Before Setting the Oven Controls 13 Control Pad Features 14... Defined Control 17-18 Setting Oven Controls 19=30 Self-Cleaning 31-33 Adjusting the Oven Temperature 33 General Care & Cleaning 34-37 Before You Call 37-38 Protection Agreements 39 Sears Service 40 Kenmore Elite Limited Warranty When installed, operated and maintained according...
... may not apply to you. Table of Contents Wall Oven Warranty 2 Product Record 2 Serial Plate Location 2 IMPORTANT SAFETY INSTRUCTIONS 3-4 Range Features 5 Before Setting Surface Controls 6=7 Setting Surface Controls 8-11 Surface Cooking 12 Before Setting the Oven Controls 13 Control Pad Features 14... Defined Control 17-18 Setting Oven Controls 19=30 Self-Cleaning 31-33 Adjusting the Oven Temperature 33 General Care & Cleaning 34-37 Before You Call 37-38 Protection Agreements 39 Sears Service 40 Kenmore Elite Limited Warranty When installed, operated and maintained according...
Use and Care Guide
Page 5
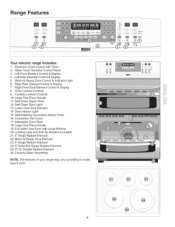
... Oven Door with Timer 2. Right Front Dual Element Control & Display 8. Ceramic Glass Smoothtop NOTE: The features of your range may vary according to model type & color, @ Oven Lockout Controls 9. Self-Clean Door Latch 13. Warm & Ready Zone Control & Indicator...TA_ ® _Lo A FA H4 A e_Out_, Warmer 8 zone R_ght _e_r Right VL) Fro_t ©@© ©©_ ©©© Your electric range includes: 1. Glass Touch Sensitive Control Panel 3. Left Rear Element Control & Display 5. Large One Piece Handle 11. Lower Oven Broil Element 14. Oven Interior ...
... Oven Door with Timer 2. Right Front Dual Element Control & Display 8. Ceramic Glass Smoothtop NOTE: The features of your range may vary according to model type & color, @ Oven Lockout Controls 9. Self-Clean Door Latch 13. Warm & Ready Zone Control & Indicator...TA_ ® _Lo A FA H4 A e_Out_, Warmer 8 zone R_ght _e_r Right VL) Fro_t ©@© ©©_ ©©© Your electric range includes: 1. Glass Touch Sensitive Control Panel 3. Left Rear Element Control & Display 5. Large One Piece Handle 11. Lower Oven Broil Element 14. Oven Interior ...
Use and Care Guide
Page 6
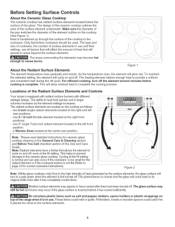
... heat generated by the surface elements, the glass surface will turn off . Make sure the diameter of the pan matches the diameter of the range when it is not flat (Refer to cycle on and off cycle. Figure 1 About the Radiant Surface Elements The element temperature rises gradually and...to heat food quicker and in the General Care & Cleaning section and Before You Call checklist section of the Radiant Surface Elements and Controls Your range is first turned off , even at the center rear position. Do not place plastic items such as the element wattage increases. These items could...
... heat generated by the surface elements, the glass surface will turn off . Make sure the diameter of the pan matches the diameter of the range when it is not flat (Refer to cycle on and off cycle. Figure 1 About the Radiant Surface Elements The element temperature rises gradually and...to heat food quicker and in the General Care & Cleaning section and Before You Call checklist section of the Radiant Surface Elements and Controls Your range is first turned off , even at the center rear position. Do not place plastic items such as the element wattage increases. These items could...
Use and Care Guide
Page 8
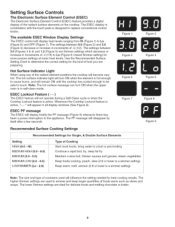
... delicate foods and melting chocolate or butter. Note: The hot surface message can turn ON when the element is a simmer setting). " will display heat levels ranging from Hi (Figure 1) to cause burns, and will turn ON when the upper oven is in all display windows (See Figure 8). lowest Simmer setting) for...
... delicate foods and melting chocolate or butter. Note: The hot surface message can turn ON when the element is a simmer setting). " will display heat levels ranging from Hi (Figure 1) to cause burns, and will turn ON when the upper oven is in all display windows (See Figure 8). lowest Simmer setting) for...
Use and Care Guide
Page 9
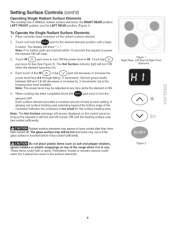
... long as salt and pepper shakers, spoon holders or plastic wrappings on the radiant surface element. . V Figure 2 Each surface element provides a constant amount of the range when it has cooled sufficiently. To Operate the Single Radiant Surface Elements: 1. Touch and hold the pad for Lo (See Figure 3). Lo is heard. Radiant...
... long as salt and pepper shakers, spoon holders or plastic wrappings on the radiant surface element. . V Figure 2 Each surface element provides a constant amount of the range when it has cooled sufficiently. To Operate the Single Radiant Surface Elements: 1. Touch and hold the pad for Lo (See Figure 3). Lo is heard. Radiant...
Use and Care Guide
Page 10
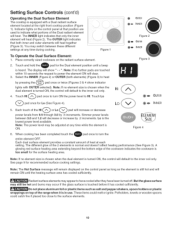
... the INNER (Figure 2) or OUTER (both inner and outer elements will clear. 3. Note: If no further pads are used to indicate what portions of the range when it has cooled sufficiently. These items could catch fire if placed too close to heat ELEE_M""_T by .2 increments. Figure 1 @ OUTER @÷ INNER Figure...
... the INNER (Figure 2) or OUTER (both inner and outer elements will clear. 3. Note: If no further pads are used to indicate what portions of the range when it has cooled sufficiently. These items could catch fire if placed too close to heat ELEE_M""_T by .2 increments. Figure 1 @ OUTER @÷ INNER Figure...
Use and Care Guide
Page 11
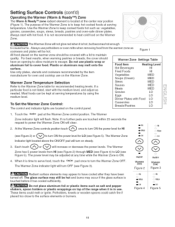
... is hot, but becomes hot enough to power the Warmer Zone ON will not glow red when it has cooled sufficiently. The purpose of the range when it is in use on the Warmer Zone. Setting Surface Controls (cont'd) Operating the Warmer (Warm & Ready TM) Zone The Warm & Ready TM zone...
... is hot, but becomes hot enough to power the Warmer Zone ON will not glow red when it has cooled sufficiently. The purpose of the range when it is in use on the Warmer Zone. Setting Surface Controls (cont'd) Operating the Warmer (Warm & Ready TM) Zone The Warm & Ready TM zone...
Use and Care Guide
Page 15
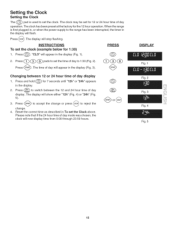
... Clock Setting the Clock The _ pad is first plugged in, or when the power supply to the range has been interrupted, the timer in the display will appear in the display (Fig. 1). (_ , Press pads to 1:30 (Fig. 2). Press _. for the 12 hour operation. The display will show either "12h" (Fig. 4) or "... (Fig. 3). The clock has been preset at the factory for 7 seconds until "12h" or "24h" appears 2. When the range is used to set the Clock above. The time of day to set for 1:30) PR ESS 1. Changing between the 12 and 24 hour time of day mode was chosen, the clock will...
... Clock Setting the Clock The _ pad is first plugged in, or when the power supply to the range has been interrupted, the timer in the display will appear in the display (Fig. 1). (_ , Press pads to 1:30 (Fig. 2). Press _. for the 12 hour operation. The display will show either "12h" (Fig. 4) or "... (Fig. 3). The clock has been preset at the factory for 7 seconds until "12h" or "24h" appears 2. When the range is used to set the Clock above. The time of day to set for 1:30) PR ESS 1. Changing between the 12 and 24 hour time of day mode was chosen, the clock will...
Use and Care Guide
Page 20
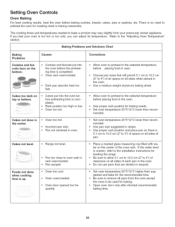
... needs. • Set oven temperature 25°F/12°C lower than recom- The cooking times and temperatures needed to preheat the oven for leveling the range. • Be sure to allow 5.1 cm to l0.2 cm (2" to 4") of clearance on the center of air space on all pans from your oven... too hot or too cold, you can adjust its temperature. Oven rack overcrowded. • Dark pan absorbs heat too fast. Cakes not level. • Range not level. Baking Problems and Solutions Chart Baking Problems Cookies and biscuits burn on top or bottom. • Cakes put into the oven before the...
... needs. • Set oven temperature 25°F/12°C lower than recom- The cooking times and temperatures needed to preheat the oven for leveling the range. • Be sure to allow 5.1 cm to l0.2 cm (2" to 4") of clearance on the center of air space on all pans from your oven... too hot or too cold, you can adjust its temperature. Oven rack overcrowded. • Dark pan absorbs heat too fast. Cakes not level. • Range not level. Baking Problems and Solutions Chart Baking Problems Cookies and biscuits burn on top or bottom. • Cakes put into the oven before the...
Use and Care Guide
Page 23
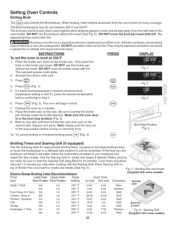
... side Doneness Steak 1"thick 3rd 1st 550° F 6:00 4:00 Rare Grill 3rd 1st 550 ° F 7:00 5:00 Medium Searing Pork Chops 3/4" thick 3rd Chicken - Electric Range Broiling Table Recommendations Fig. 5 - Setting Oven Controls Setting Broil The _ pad controls the Broil feature. If the fire continues, throw baking soda on the rack...
... side Doneness Steak 1"thick 3rd 1st 550° F 6:00 4:00 Rare Grill 3rd 1st 550 ° F 7:00 5:00 Medium Searing Pork Chops 3/4" thick 3rd Chicken - Electric Range Broiling Table Recommendations Fig. 5 - Setting Oven Controls Setting Broil The _ pad controls the Broil feature. If the fire continues, throw baking soda on the rack...
Use and Care Guide
Page 34
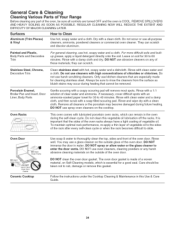
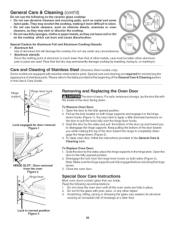
...and a dishcloth. Painted and Plastic, Body Parts and Decorative Trim For general cleaning, use abrasive cleaners on any of these materials; Leave on soil for 30 to thoroughly clean the top, sides and front of the oven door. DO NOT use hot, soapy water and a cloth. Stainless Steel, Chrome, ...cleaners on the cooktop. Do not use a glass cleaner on the outside of the oven door. General Care & Cleaning Cleaning Various Parts of Your Range Before cleaning any part of the oven, be sure all controls are especially made of a woven material, on Self-Cleaning models, which can remain ...
...and a dishcloth. Painted and Plastic, Body Parts and Decorative Trim For general cleaning, use abrasive cleaners on any of these materials; Leave on soil for 30 to thoroughly clean the top, sides and front of the oven door. DO NOT use hot, soapy water and a cloth. Stainless Steel, Chrome, ...cleaners on the cooktop. Do not use a glass cleaner on the outside of the oven door. General Care & Cleaning Cleaning Various Parts of Your Range Before cleaning any part of the oven, be sure all controls are especially made of a woven material, on Self-Cleaning models, which can remain ...
Use and Care Guide
Page 36
... foil will damage the cooktop. Pans that of the door toward you to the fully opened position. 2. Care and Cleaning of the door toward the range to pull the locks fully over the hinge lever hooks. 3. Special care and cleaning are fully engaged before unlocking the hinge levers. 3. Door removed from...
... foil will damage the cooktop. Pans that of the door toward you to the fully opened position. 2. Care and Cleaning of the door toward the range to pull the locks fully over the hinge lever hooks. 3. Special care and cleaning are fully engaged before unlocking the hinge levers. 3. Door removed from...
Use and Care Guide
Page 37
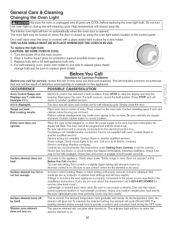
...will turn on . 37 THIS GLASS SHIELD MUST BE IN PLACE WHENEVER THE OVEN IS IN USE. d=O is securely connected into the electrical junction box. Be sure cabinets are not level. Replace cord/plug. Be sure appliance is opened. The element temperature rises gradually and ...CAUSE/SOLUTION Oven Control Beeps and Displays any F code error (example F11). ii.i.l _;ii:/:ii_ ...i.i....... Be sure electrical cord is displayed. See instructions under "Entire range or oven does not operate" in the installation instructions. Too low heat setting. To replace the light bulb: CAUTION...
...will turn on . 37 THIS GLASS SHIELD MUST BE IN PLACE WHENEVER THE OVEN IS IN USE. d=O is securely connected into the electrical junction box. Be sure cabinets are not level. Replace cord/plug. Be sure appliance is opened. The element temperature rises gradually and ...CAUSE/SOLUTION Oven Control Beeps and Displays any F code error (example F11). ii.i.l _;ii:/:ii_ ...i.i....... Be sure electrical cord is displayed. See instructions under "Entire range or oven does not operate" in the installation instructions. Too low heat setting. To replace the light bulb: CAUTION...


