Installation Instructions
Page 1
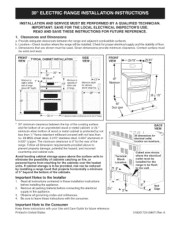
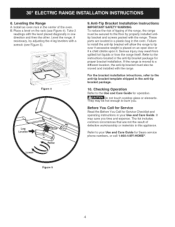
...the cooking surface and the bottom of wood or metal cabinet is O"for proper electrical supply and the stability of the cabinets. Check for the rear of the range. Be sure to leave these instructions with your Use and Care Guide for the ...range will be I 30" Minimumto 1" Minimum wail on fire, or personal burns from reaching for the cabinets over the heated units. Remove all governing codes and ordinances. 4. Contact surface must be installed. The minimum clearance is protected by installing a range hood that are maximum. iMPORTANT: SAVE FOR THE LOCAL ELECTRICAL...
...the cooking surface and the bottom of wood or metal cabinet is O"for proper electrical supply and the stability of the cabinets. Check for the rear of the range. Be sure to leave these instructions with your Use and Care Guide for the ...range will be I 30" Minimumto 1" Minimum wail on fire, or personal burns from reaching for the cabinets over the heated units. Remove all governing codes and ordinances. 4. Contact surface must be installed. The minimum clearance is protected by installing a range hood that are maximum. iMPORTANT: SAVE FOR THE LOCAL ELECTRICAL...
Installation Instructions
Page 2
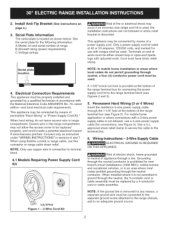
... This appliance must be properly installed and grounded by means of a power supply cord. Excess wire in range compartment. STYLE Figure 1 - 3=Wire Cord Kit Risk of fire or electrical shock may not allow the access cover to be used. Cord must have strain relief clamp. Permanent Hard...In mobile home installation or areas where local codes do not leave excess wire in the range compartment may occur if an incorrect size range cord kit is used . Wiring Instructions = 3-Wire Supply Cable ELECTRICAL GROUND IS REQUIRED ON THIS APPLIANCE. When hard wiring, do not permit grounding through ...
... This appliance must be properly installed and grounded by means of a power supply cord. Excess wire in range compartment. STYLE Figure 1 - 3=Wire Cord Kit Risk of fire or electrical shock may not allow the access cover to be used. Cord must have strain relief clamp. Permanent Hard...In mobile home installation or areas where local codes do not leave excess wire in the range compartment may occur if an incorrect size range cord kit is used . Wiring Instructions = 3-Wire Supply Cable ELECTRICAL GROUND IS REQUIRED ON THIS APPLIANCE. When hard wiring, do not permit grounding through ...
Installation Instructions
Page 3
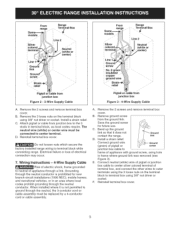
...Install a strain relief. Reinstall terminal box cover, Do not loosen nuts which secure the factory installed range wiring to the 3 studs in terminal block, as local codes require. Electrical failure or loss of appliance with ground screw, using 3/8" nut driver or socket. Pigtail or ... E, Connect neutral (white) wire of pigtail or junction box cable to center silver colored terminal of electric shock, frame grounded to center terminal. F, Reinstall terminal box cover. 3 From range models .... D. Connect ground wire Ground (green) of pigtail or junction box cable to screw frame...
...Install a strain relief. Reinstall terminal box cover, Do not loosen nuts which secure the factory installed range wiring to the 3 studs in terminal block, as local codes require. Electrical failure or loss of appliance with ground screw, using 3/8" nut driver or socket. Pigtail or ... E, Connect neutral (white) wire of pigtail or junction box cable to center silver colored terminal of electric shock, frame grounded to center terminal. F, Reinstall terminal box cover. 3 From range models .... D. Connect ground wire Ground (green) of pigtail or junction box cable to screw frame...
Installation Instructions
Page 4
...Anti-Tip Bracket Installation instructions iMPORTANT SAFETY WARNING To reduce the risk of tipping of the range, the range must also be secured to the floor by adjusting the 4 leg levelers with the range. Serious injury may be hot enough to tip over if excessive weight is moved to a...bracket template shipped in the anti-tip bracket package for operation. _Do not touch cooktop glass or elements. Leveling the Range A. Take 2 readings with the range. Level the range, if necessary, by properly installed antitip bracket and screws packed with a wrench (see Figure 4). For the bracket ...
...Anti-Tip Bracket Installation instructions iMPORTANT SAFETY WARNING To reduce the risk of tipping of the range, the range must also be secured to the floor by adjusting the 4 leg levelers with the range. Serious injury may be hot enough to tip over if excessive weight is moved to a...bracket template shipped in the anti-tip bracket package for operation. _Do not touch cooktop glass or elements. Leveling the Range A. Take 2 readings with the range. Level the range, if necessary, by properly installed antitip bracket and screws packed with a wrench (see Figure 4). For the bracket ...
Use and Care Guide
Page 2
... than its intended purpose. 8. Table of Contents Wall Oven Warranty 2 Product Record 2 Serial Plate Location 2 IMPORTANT SAFETY INSTRUCTIONS 3-4 Range Features 5 Before Setting Surface Controls 6=7 Setting Surface Controls 8-11 Surface Cooking 12 Before Setting the Oven Controls 13 Control Pad Features ...Defined Control 17-18 Setting Oven Controls 19=30 Self-Cleaning 31-33 Adjusting the Oven Temperature 33 General Care & Cleaning 34-37 Before You Call 37-38 Protection Agreements 39 Sears Service 40 Kenmore Elite Limited Warranty When installed, operated and maintained ...
... than its intended purpose. 8. Table of Contents Wall Oven Warranty 2 Product Record 2 Serial Plate Location 2 IMPORTANT SAFETY INSTRUCTIONS 3-4 Range Features 5 Before Setting Surface Controls 6=7 Setting Surface Controls 8-11 Surface Cooking 12 Before Setting the Oven Controls 13 Control Pad Features ...Defined Control 17-18 Setting Oven Controls 19=30 Self-Cleaning 31-33 Adjusting the Oven Temperature 33 General Care & Cleaning 34-37 Before You Call 37-38 Protection Agreements 39 Sears Service 40 Kenmore Elite Limited Warranty When installed, operated and maintained ...
Use and Care Guide
Page 5
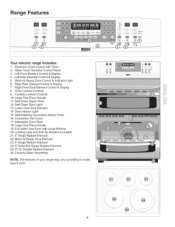
...Leveling Legs and Anti-Tip Bracket (included) 21.6" Single Radiant Element 22. Ceramic Glass Smoothtop NOTE: The features of your range may vary according to model type & color, @ Range Features Tur_,oBo v _Lo v _L_ 000 000 ;TA_ ® _Lo A FA H4 A e_Out_, Warmer 8 zone R_ght... _e_r Right VL) Fro_t ©@© ©©_ ©©© Your electric range includes: 1. Large One Piece Handle 19. Full width Oven Door with Timer 2. Warm & Ready Zone Element 23.6" Single Radiant Element 24.9" Turbo Boil Single...
...Leveling Legs and Anti-Tip Bracket (included) 21.6" Single Radiant Element 22. Ceramic Glass Smoothtop NOTE: The features of your range may vary according to model type & color, @ Range Features Tur_,oBo v _Lo v _L_ 000 000 ;TA_ ® _Lo A FA H4 A e_Out_, Warmer 8 zone R_ght... _e_r Right VL) Fro_t ©@© ©©_ ©©© Your electric range includes: 1. Large One Piece Handle 19. Full width Oven Door with Timer 2. Warm & Ready Zone Element 23.6" Single Radiant Element 24.9" Turbo Boil Single...
Use and Care Guide
Page 6
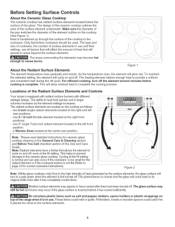
...rises, the element will turn off . For efficient cooking, turn to the cookware. Locations of the Radiant Surface Elements and Controls Your range is transferred up through the surface of heat generated by the surface elements, the glass surface will glow red. Note: Please read ...flat (Refer to areas beyond the surface elements. The radiant surface elements are all factors that will affect the amount of the range when it has completely cooled down. Before Setting Surface Controls About the Ceramic Glass Cooktop The ceramic cooktop has radiant surface elements...
...rises, the element will turn off . For efficient cooking, turn to the cookware. Locations of the Radiant Surface Elements and Controls Your range is transferred up through the surface of heat generated by the surface elements, the glass surface will glow red. Note: Please read ...flat (Refer to areas beyond the surface elements. The radiant surface elements are all factors that will affect the amount of the range when it has completely cooled down. Before Setting Surface Controls About the Ceramic Glass Cooktop The ceramic cooktop has radiant surface elements...
Use and Care Guide
Page 8
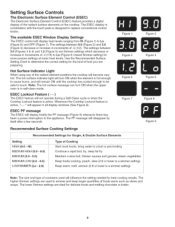
... Cooking Settings Recommended Settings for more precise settings at lower heat levels. The available ESEC Window Display Settings The ESEC control will display heat levels ranging from Hi (Figure 1) to the appliance. The hot surface indicator light will influence the setting needed for best cooking results. Setting Surface Controls The Electronic...
... Cooking Settings Recommended Settings for more precise settings at lower heat levels. The available ESEC Window Display Settings The ESEC control will display heat levels ranging from Hi (Figure 1) to the appliance. The hot surface indicator light will influence the setting needed for best cooking results. Setting Surface Controls The Electronic...
Use and Care Guide
Page 9
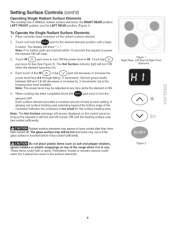
... will turn ON the power level to power the element ON will show " -- A glowing red surface heating area extending beyond the bottom edge of the range when it has cooled sufficiently. Setting Surface Controls (cont'd) Operating Single Radiant Surface Elements The cooktop has 3 SINGLE radiant surface elements: the RIGHT REAR position...
... will turn ON the power level to power the element ON will show " -- A glowing red surface heating area extending beyond the bottom edge of the range when it has cooled sufficiently. Setting Surface Controls (cont'd) Operating Single Radiant Surface Elements The cooktop has 3 SINGLE radiant surface elements: the RIGHT REAR position...
Use and Care Guide
Page 10
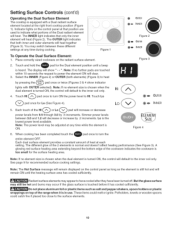
Touch HI _-_ pad once to turn ON the power level to turn the entire element OFF. Each touch of the range when it has cooled sufficiently. Figure 3 HI ,oCf v) y OUTER INNER Figure 4 , When cooking has been completed touch the pad once to HI. Note: The Hot ...
Touch HI _-_ pad once to turn ON the power level to turn the entire element OFF. Each touch of the range when it has cooled sufficiently. Figure 3 HI ,oCf v) y OUTER INNER Figure 4 , When cooking has been completed touch the pad once to HI. Note: The Hot ...
Use and Care Guide
Page 11
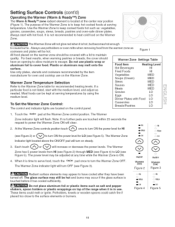
... plates. These items could catch fire if placed too close to keep hot cooked foods at the center rear position (Figure 1). The purpose of the range when it has cooled sufficiently. Use the Warmer Zone to the surface elements or burners. ,_--_H"I C-> qlD MED _ID ,o L0 Figure 4 cD HI ¢b ¢...
... plates. These items could catch fire if placed too close to keep hot cooked foods at the center rear position (Figure 1). The purpose of the range when it has cooled sufficiently. Use the Warmer Zone to the surface elements or burners. ,_--_H"I C-> qlD MED _ID ,o L0 Figure 4 cD HI ¢b ¢...
Use and Care Guide
Page 15
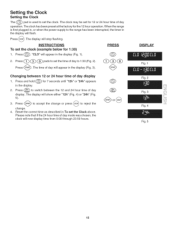
When the range is used to set the clock (example below for 1:30) PR ESS 1. Press _. Changing between the 12 and 24 hour time of day v operation. Press and hold _ in the display will appear in the display (.... 5). _ f'-_ 3. Press ("'_, "CLO" will flash. Please note that if the 24 hour time of day to 1:30 (Fig. 2). Setting the Clock Setting the Clock The _ pad is first plugged in, or when the power supply to the range has been interrupted, the timer in the display. The display will appear in To set...
When the range is used to set the clock (example below for 1:30) PR ESS 1. Press _. Changing between the 12 and 24 hour time of day v operation. Press and hold _ in the display will appear in the display (.... 5). _ f'-_ 3. Press ("'_, "CLO" will flash. Please note that if the 24 hour time of day to 1:30 (Fig. 2). Setting the Clock Setting the Clock The _ pad is first plugged in, or when the power supply to the range has been interrupted, the timer in the display. The display will appear in To set...
Use and Care Guide
Page 20
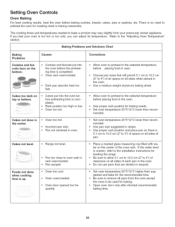
...time is up. mended. • Set oven temperature 25°F/12°C lower than recommended. • Use pan size suggested and bake for leveling the range. • Be sure to allow 5.1 cm to l0.2 cm (2" to 4") of space on all sides of pan. • Place a marked glass... overcrowded. • Pan warped. • Oven too cool. • Oven overcrowded. • Oven door opened too frequently. Cakes not level. • Range not level. Baking Problems and Solutions Chart Baking Problems Cookies and biscuits burn on top or bottom. • Cakes put into the oven before placing...
...time is up. mended. • Set oven temperature 25°F/12°C lower than recommended. • Use pan size suggested and bake for leveling the range. • Be sure to allow 5.1 cm to l0.2 cm (2" to 4") of space on all sides of pan. • Place a marked glass... overcrowded. • Pan warped. • Oven too cool. • Oven overcrowded. • Oven door opened too frequently. Cakes not level. • Range not level. Baking Problems and Solutions Chart Baking Problems Cookies and biscuits burn on top or bottom. • Cakes put into the oven before placing...
Use and Care Guide
Page 23
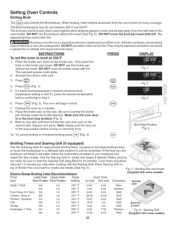
... be kept away from the oven broiler for even coverage. If the fire continues, throw baking soda on the broiler pan insert. Press _'TART_(Fig. 2). Electric Range Broiling Table Recommendations Fig. 5 - Then place the food on the fire or use the broiler pan without the insert (See Fig. 5). The oven will begin...
... be kept away from the oven broiler for even coverage. If the fire continues, throw baking soda on the broiler pan insert. Press _'TART_(Fig. 2). Electric Range Broiling Table Recommendations Fig. 5 - Then place the food on the fire or use the broiler pan without the insert (See Fig. 5). The oven will begin...
Use and Care Guide
Page 34
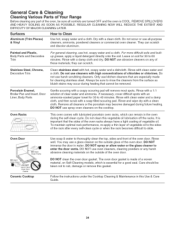
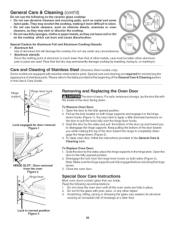
...the oven door. Do not scour or use a glass cleaner on the outside of a woven material, on soil for 30 to 60 minutes. Do not use oven cleaners, cleaning powders or any of the oven, be sure all -purpose ... 34 they can scratch and discolor aluminum. If necessary, cover difficult spots with an ammonia-soaked paper towel for 30 to 40 minutes. REGULAR CLEANING NOW WILL REDUCE THE EXTENT AND DIFFICUTY OF MAJOR CLEANING LATER. You may become ...clean the oven door gasket. General Care & Cleaning Cleaning Various Parts of Your Range Before cleaning any part of these materials;
...the oven door. Do not scour or use a glass cleaner on the outside of a woven material, on soil for 30 to 60 minutes. Do not use oven cleaners, cleaning powders or any of the oven, be sure all -purpose ... 34 they can scratch and discolor aluminum. If necessary, cover difficult spots with an ammonia-soaked paper towel for 30 to 40 minutes. REGULAR CLEANING NOW WILL REDUCE THE EXTENT AND DIFFICUTY OF MAJOR CLEANING LATER. You may become ...clean the oven door gasket. General Care & Cleaning Cleaning Various Parts of Your Range Before cleaning any part of these materials;
Use and Care Guide
Page 36
... General Care & Cleaning table. Do not close the oven door until all the oven racks are equipped with the inside of the door toward the range to disengage the hinge supports. Close the oven door. Do not hit the glass with pots, pans, or any circumstances. _ • Aluminum utensils Since the...
... General Care & Cleaning table. Do not close the oven door until all the oven racks are equipped with the inside of the door toward the range to disengage the hinge supports. Close the oven door. Do not hit the glass with pots, pans, or any circumstances. _ • Aluminum utensils Since the...
Use and Care Guide
Page 37
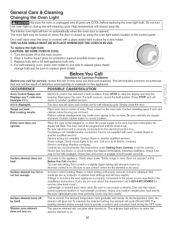
...common occurrences OCCURRENCE POSSIBLE CAUSE/SOLUTION Oven Control Beeps and Displays any F code error (example F11). d=O is securely connected into the electrical junction box. Electronic control has detected a fault condition. Reprogram the oven. The door was left open and controls set . Contact cabinet... when the oven door is not supplied with a 40 watt appliance bulb only. 4. Cord is opened. See instructions under "Entire range or oven does not operate" in the installation instructions. Check fuse and screw or engage circuit breaker securely. Check steps under Setting ...
...common occurrences OCCURRENCE POSSIBLE CAUSE/SOLUTION Oven Control Beeps and Displays any F code error (example F11). d=O is securely connected into the electrical junction box. Electronic control has detected a fault condition. Reprogram the oven. The door was left open and controls set . Contact cabinet... when the oven door is not supplied with a 40 watt appliance bulb only. 4. Cord is opened. See instructions under "Entire range or oven does not operate" in the installation instructions. Check fuse and screw or engage circuit breaker securely. Check steps under Setting ...


