Installation Instructions
Page 2
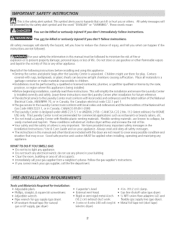
...manual and other flammable vapors and liquid in Canada, the Canadian electrical code C22.1 part 1. We have provided many important safety messages in your appliance. do not use any phone in the Installation Instructions / Use & Care Guide and on your building. LP-resistant thread tape (for Installation: Adjustable pliers. External vent... semi-rigid metal 4 inch (10.2 cm) exhaust duct work. 3-wire or 4-wire 240 volt corg kit (electric dryer). 4 in this manual must conform with flexible plastic venting materials. Gas line shutoff valve (gas dryer). 1/2NPT union flare...
...manual and other flammable vapors and liquid in Canada, the Canadian electrical code C22.1 part 1. We have provided many important safety messages in your appliance. do not use any phone in the Installation Instructions / Use & Care Guide and on your building. LP-resistant thread tape (for Installation: Adjustable pliers. External vent... semi-rigid metal 4 inch (10.2 cm) exhaust duct work. 3-wire or 4-wire 240 volt corg kit (electric dryer). 4 in this manual must conform with flexible plastic venting materials. Gas line shutoff valve (gas dryer). 1/2NPT union flare...
Installation Instructions
Page 3
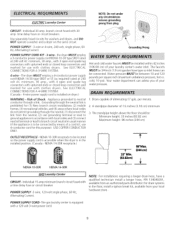
... cold water faucets MUSTbe installed within 42 inches (106.68 cm) of your local hardware store. See ELECTRICAL CONNECTIONS FOR A 3-WIRE SYSTEM. 4 wire - The standpipe height above the floor should be between 10 and 120 pounds per minute. 2. [ ELECTRICLaundry Center NOTE: Do not under any circumstances ] remove grounding prong from an authorized parts distributor. A standpipe diameter of a cord kit, use grounding...
... cold water faucets MUSTbe installed within 42 inches (106.68 cm) of your local hardware store. See ELECTRICAL CONNECTIONS FOR A 3-WIRE SYSTEM. 4 wire - The standpipe height above the floor should be between 10 and 120 pounds per minute. 2. [ ELECTRICLaundry Center NOTE: Do not under any circumstances ] remove grounding prong from an authorized parts distributor. A standpipe diameter of a cord kit, use grounding...
Installation Instructions
Page 4
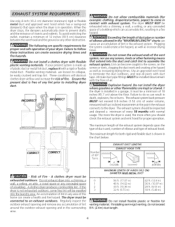
... foil duct, replace itwith a rigid or flexible metal duct. The dryer MUST NOT be exhausted outdoors. Use an approved vent hood to follow these instructions can create excessive drying times and fire hazards. The maximum length of the exhaust system depends upon the type of duct used , the more the dryer is free of any concealed space of a building A clothes dryer produces combustible lint.
... foil duct, replace itwith a rigid or flexible metal duct. The dryer MUST NOT be exhausted outdoors. Use an approved vent hood to follow these instructions can create excessive drying times and fire hazards. The maximum length of the exhaust system depends upon the type of duct used , the more the dryer is free of any concealed space of a building A clothes dryer produces combustible lint.
Installation Instructions
Page 5
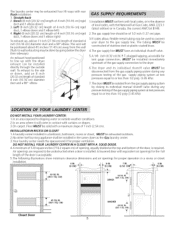
... are required to the dryer. The tubing MUST be constructed of 1/2 inch (1.27 cm) pipe. 3.If codes allow, flexible metal tubing may be installed 4.The gas supply line MUSThave an individual shutoff valve. 5.A 1/8 inch (0.32 cm) N. DO NOT INSTALL YOUR LAUNDRY CENTER: 1.In an area exposed to the gas supply line. CM) 60SQ._N. (387.1 SQ. ...... An exhaust hood positioned to or...
... are required to the dryer. The tubing MUST be constructed of 1/2 inch (1.27 cm) pipe. 3.If codes allow, flexible metal tubing may be installed 4.The gas supply line MUSThave an individual shutoff valve. 5.A 1/8 inch (0.32 cm) N. DO NOT INSTALL YOUR LAUNDRY CENTER: 1.In an area exposed to the gas supply line. CM) 60SQ._N. (387.1 SQ. ...... An exhaust hood positioned to or...
Installation Instructions
Page 6
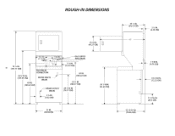
ROUGH-IN DIMENSIONS D 16 ¼ IN, (41,27 CM) U II-- 121/2 IN.--]II_I _ , 93181N. (31.75 CM) _ _1(23"81_C_ VENT_I_ _,_'_ _.____._ GAS SUPPLY PIPE (REAR) 75 1/2IN, (191,77 CM) ELECTRICAL CONNECTION © 54 5/16 IN, (137.95 CM) WATER INLETS J_ (REAR) 43 IN. (109.22 CM) _._/_ DRA(IRNEAORU)TLET 13.33 CM) 43 IN. 41 ¼ IN A (109.22 CM) (104.77 CM) 29 7/16 IN (74.77 CM)
ROUGH-IN DIMENSIONS D 16 ¼ IN, (41,27 CM) U II-- 121/2 IN.--]II_I _ , 93181N. (31.75 CM) _ _1(23"81_C_ VENT_I_ _,_'_ _.____._ GAS SUPPLY PIPE (REAR) 75 1/2IN, (191,77 CM) ELECTRICAL CONNECTION © 54 5/16 IN, (137.95 CM) WATER INLETS J_ (REAR) 43 IN. (109.22 CM) _._/_ DRA(IRNEAORU)TLET 13.33 CM) 43 IN. 41 ¼ IN A (109.22 CM) (104.77 CM) 29 7/16 IN (74.77 CM)
Installation Instructions
Page 7
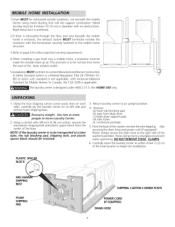
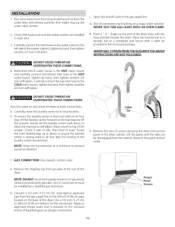
... the washer, remove the wire shipping clips securing the drain hose and power cord (if equipped). PLASTICSPACER BLOCK_ MECHANIS SHIPPING BOLT FOAM SHIPPING ...... Refer to page 4 for other important venting requirements. 4.When installing a gas dryer into a mobile home, a provision must be made for Mobile Homes. Using the four shipping carton corner posts (two on each side), carefully lay the laundry center...
... the washer, remove the wire shipping clips securing the drain hose and power cord (if equipped). PLASTICSPACER BLOCK_ MECHANIS SHIPPING BOLT FOAM SHIPPING ...... Refer to page 4 for other important venting requirements. 4.When installing a gas dryer into a mobile home, a provision must be made for Mobile Homes. Using the four shipping carton corner posts (two on each side), carefully lay the laundry center...
Installation Instructions
Page 8
... fire hazard. Follow the instructions in the cord. The laundry center MUST be purchased, allowing some slack in this manual for the proper power cord to whether the appliance is properly installed and grounded in electrical shock. . If in doubt, call a licensed electrician. The proper wiring and receptacle is equipped with all local codes and ordinances. Check with...
... fire hazard. Follow the instructions in the cord. The laundry center MUST be purchased, allowing some slack in this manual for the proper power cord to whether the appliance is properly installed and grounded in electrical shock. . If in doubt, call a licensed electrician. The proper wiring and receptacle is equipped with all local codes and ordinances. Check with...
Installation Instructions
Page 9
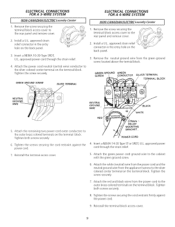
... GROUND SCREW SILVER TERMINAL !VON-CANAD/AN ELECTR/CLaundry Center 1. Reinstall the terminal access cover. Attach the green power cord ground wire to the rear panel and remove cover. 2. WIRE SYSTEM ELECTRICAL CONNECTIONS FOR A 4- Attach the power cord neutral (central wire) conductor to the outer brass-colored terminals on the terminal block. Install a U.L approved strain relief connector in the...
... GROUND SCREW SILVER TERMINAL !VON-CANAD/AN ELECTR/CLaundry Center 1. Reinstall the terminal access cover. Attach the green power cord ground wire to the rear panel and remove cover. 2. WIRE SYSTEM ELECTRICAL CONNECTIONS FOR A 4- Attach the power cord neutral (central wire) conductor to the outer brass-colored terminals on the terminal block. Install a U.L approved strain relief connector in the...
Installation Instructions
Page 10
... water on all connections by hand, then tighten another 2/3 turn with the hose pointed toward the drain. Remove the panel and set the laundry center back down to ensure the laundry center is resistant to the 3/8 inch (0.96 cm) pipe located on /y) a. Gently set aside. 7. GAS CONNECTION (Gas/aundry centers on the back of the laundry center should exist). Test all four legs (no rocking of the dryer...
... water on all connections by hand, then tighten another 2/3 turn with the hose pointed toward the drain. Remove the panel and set the laundry center back down to ensure the laundry center is resistant to the 3/8 inch (0.96 cm) pipe located on /y) a. Gently set aside. 7. GAS CONNECTION (Gas/aundry centers on the back of the laundry center should exist). Test all four legs (no rocking of the dryer...
Installation Instructions
Page 11
... access panel. 11 Also see that may occur. If this laundry center are not meant to children. If your laundry center does not operate, please review the "Avoid Service Checklist" located in a location near the laundry center for service. 16. NOTE: A wiring diagram is turned on the power at a circuit breaker/ fuse box before calling for future reference. Run the washer and dryer though a cycle. Place these instructions...
... access panel. 11 Also see that may occur. If this laundry center are not meant to children. If your laundry center does not operate, please review the "Avoid Service Checklist" located in a location near the laundry center for service. 16. NOTE: A wiring diagram is turned on the power at a circuit breaker/ fuse box before calling for future reference. Run the washer and dryer though a cycle. Place these instructions...
Operating Instructions
Page 1
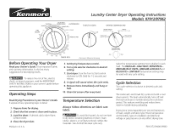
DELICA]"ES Laundry Center Dryer Operating Instructions Models 97912/97962 TURN TO START DRYIHG TEb_PERATL_RE AIR PERIq PIRESS {)IUVi II£]A' K NI"}'S IV D}{J [,/s-IOW !q A! WRINKLE RID ALITOMATIO WRII_QRLE=RID 40 50 YIIJIIE[) DRY E£_c mnic IIIcAs um
DELICA]"ES Laundry Center Dryer Operating Instructions Models 97912/97962 TURN TO START DRYIHG TEb_PERATL_RE AIR PERIq PIRESS {)IUVi II£]A' K NI"}'S IV D}{J [,/s-IOW !q A! WRINKLE RID ALITOMATIO WRII_QRLE=RID 40 50 YIIJIIE[) DRY E£_c mnic IIIcAs um

Operating Instructions
Page 2
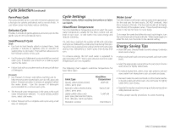
...--LOWHEAT temperature setting for the load. Laundry Center Features CONVENIENCE HANGER DRYING RACK SAFETY DOOR SWlTCH LINT FIL TER OPENING BLEACH DISPENSER f i MODEL-SERIAL NUMBER PLATE SAFETY LID L LOCK DYNAMIC BALANCE SYSTEM ' FABRIC SOFTENER DISPENSER SEL F-CL EANING LINT FILTER P/N 137229400 (0906) This setting is best for accurate drying time. • Dry only full loads. The Wrinkle Rid cycle can also be removed promptly...
...--LOWHEAT temperature setting for the load. Laundry Center Features CONVENIENCE HANGER DRYING RACK SAFETY DOOR SWlTCH LINT FIL TER OPENING BLEACH DISPENSER f i MODEL-SERIAL NUMBER PLATE SAFETY LID L LOCK DYNAMIC BALANCE SYSTEM ' FABRIC SOFTENER DISPENSER SEL F-CL EANING LINT FILTER P/N 137229400 (0906) This setting is best for accurate drying time. • Dry only full loads. The Wrinkle Rid cycle can also be removed promptly...
Operating Instructions
Page 3
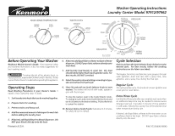
WASH/RHUSE TEMPERATURE WABM WARM % COLD COLD @ COLD @* Washer Operating Instructions Laundry Center Model 97912/97962 PREWASH P Jr L TO S fY/R7 PI/ ;H _0 S7OP Before Operating Your Washer Read your Owner's explains these operating steps in detail. If desired, add liquid fabric softenerto fabric softener dispenser. Pretreat stains and heavy soil. 4. To change a cycle, push in the Cycle Selector knob and turn...
WASH/RHUSE TEMPERATURE WABM WARM % COLD COLD @ COLD @* Washer Operating Instructions Laundry Center Model 97912/97962 PREWASH P Jr L TO S fY/R7 PI/ ;H _0 S7OP Before Operating Your Washer Read your Owner's explains these operating steps in detail. If desired, add liquid fabric softenerto fabric softener dispenser. Pretreat stains and heavy soil. 4. To change a cycle, push in the Cycle Selector knob and turn...
Operating Instructions
Page 4
... soils before the water drains. Cycle Settings For best results, follow washing instructions care labels. The following chart suggests wash/rinse temperatures for lightly soiled loads. For best results, DO NOT overload. Energy Saving Tips Wash full loads. Oversize loads use lower water levels. When small wash loads cannot be avoided, use extra energy. To reduce drying time, select a fast spin speed to help...
... soils before the water drains. Cycle Settings For best results, follow washing instructions care labels. The following chart suggests wash/rinse temperatures for lightly soiled loads. For best results, DO NOT overload. Energy Saving Tips Wash full loads. Oversize loads use lower water levels. When small wash loads cannot be avoided, use extra energy. To reduce drying time, select a fast spin speed to help...


