
Use and Care Guide
Page 2
ProtectionAgreements ... 5 6 7-8 9-10 11 12 Range Features ...Before Setting Oven Controls ...Setting Surface Controls ...Surface Cooking ...Oven Control Functions ... One Year Limited Warranty When installed, operated and maintained according ... Save these exclusions or limitations may also have other rights which vary from normal use for a particular purpose, are not a result of Contents Free-Standing Range Warranty ...Product Record ...iMPORTANT SAFETY iNSTRUCTiONS ... Cracks in material and workmanship. A service technician to one year from the date of purchase, call 1=800...
ProtectionAgreements ... 5 6 7-8 9-10 11 12 Range Features ...Before Setting Oven Controls ...Setting Surface Controls ...Surface Cooking ...Oven Control Functions ... One Year Limited Warranty When installed, operated and maintained according ... Save these exclusions or limitations may also have other rights which vary from normal use for a particular purpose, are not a result of Contents Free-Standing Range Warranty ...Product Record ...iMPORTANT SAFETY iNSTRUCTiONS ... Cracks in material and workmanship. A service technician to one year from the date of purchase, call 1=800...
Use and Care Guide
Page 3
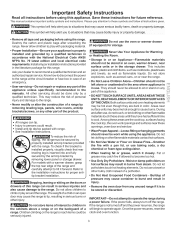
...or play with a pan lid, or use . For models with the National Electrical Code ANSI! Do not allow children to cause burns. Remove all tape and packaging before using this range can tip. Proper Installation--Be sure your dealer to become hot enough to play...important Safety instructions Read all instructions before using the range. Please pay attention to the range at the circuit breaker or fuse box in injury. . Never allow children to the range. NFPA No. 70 latest edition and local electrical code requirements. Ask your appliance is installed properly, ...
...or play with a pan lid, or use . For models with the National Electrical Code ANSI! Do not allow children to cause burns. Remove all tape and packaging before using this range can tip. Proper Installation--Be sure your dealer to become hot enough to play...important Safety instructions Read all instructions before using the range. Please pay attention to the range at the circuit breaker or fuse box in injury. . Never allow children to the range. NFPA No. 70 latest edition and local electrical code requirements. Ask your appliance is installed properly, ...

Use and Care Guide
Page 4
...for use aluminum foil as recommended in this Use & Care Manual. IMPORTANT INSTRUCTIONS FOR CLEANING YOUR RANGE * Clean the range regularly to the side of the range when opening the door of Oven Racks. Pay particular attention to line the oven bottom. Follow ...Glazed Cooking Utensils--Only certain types of glass, glass/ ceramic, ceramic, earthenware, or other reproductive potential exposure to another .The health of electric shock. Contact a qualified technician immediately. * Clean Cook Top with ceramic-glass cook tops. The use of undersized utensils will also improve ...
...for use aluminum foil as recommended in this Use & Care Manual. IMPORTANT INSTRUCTIONS FOR CLEANING YOUR RANGE * Clean the range regularly to the side of the range when opening the door of Oven Racks. Pay particular attention to line the oven bottom. Follow ...Glazed Cooking Utensils--Only certain types of glass, glass/ ceramic, ceramic, earthenware, or other reproductive potential exposure to another .The health of electric shock. Contact a qualified technician immediately. * Clean Cook Top with ceramic-glass cook tops. The use of undersized utensils will also improve ...
Use and Care Guide
Page 6
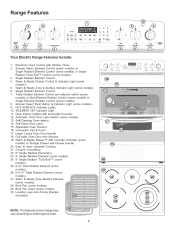
.... Oven Rack(s). Large 1 piece Oven Door Handle. 18. Warm & Ready Zone Radiant Element (some models). Warm & Ready Drawer Control & Indicator Light (some models). 30. Self-Cleaning Oven interior. Adjustable 16. Broil Pan Insert (some models). HOT SURFACE Indicator Lights. Leveling Legs and Anti-tip Bracket (included). (some models). Electronic... 24. 9" Single Radiant "Turb Boil TM'' (some models). 25. 9-12" Dual Radiant Element (some models). 26. 6-9-12" Triple Radiant Element (some models). 27. Range Features Your Electric 1. 2. Full width Oven Door with Drawer Handle. 20.
.... Oven Rack(s). Large 1 piece Oven Door Handle. 18. Warm & Ready Zone Radiant Element (some models). Warm & Ready Drawer Control & Indicator Light (some models). 30. Self-Cleaning Oven interior. Adjustable 16. Broil Pan Insert (some models). HOT SURFACE Indicator Lights. Leveling Legs and Anti-tip Bracket (included). (some models). Electronic... 24. 9" Single Radiant "Turb Boil TM'' (some models). 25. 9-12" Dual Radiant Element (some models). 26. 6-9-12" Triple Radiant Element (some models). 27. Range Features Your Electric 1. 2. Full width Oven Door with Drawer Handle. 20.
Use and Care Guide
Page 7
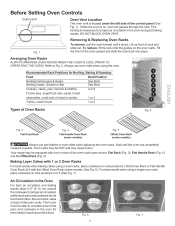
... the oven rack types shown; Removing & Replacing Oven Racks Fig. 1 To remove, pull the rack forward until the oven has completely cooled if possible. Your range may be able to circulate around the pans and cookware in the oven and good baking results. Flat Rack (Fig. 3), Flat Handle Rack (Fig. 4) and...
... the oven rack types shown; Removing & Replacing Oven Racks Fig. 1 To remove, pull the rack forward until the oven has completely cooled if possible. Your range may be able to circulate around the pans and cookware in the oven and good baking results. Flat Rack (Fig. 3), Flat Handle Rack (Fig. 4) and...

Use and Care Guide
Page 8
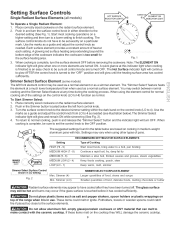
...to a MODERATE level, Radiant surface elements may still be sure ALL surface controls are all factors that will affect the amount of the range when it has cooled sufficiently. To maintain the selected setting, the element will glow red. The glass surface may appear to cause burns... two different types of this indicator light after they WILL damage the ceramic cooktop. ELEMENT HOTSURFACE ON and Hot Surface Indicator Lights Your range is transferred up and will glow when a surface element is touched before cooking is in the General Care & Cleaning and Before You...
...to a MODERATE level, Radiant surface elements may still be sure ALL surface controls are all factors that will affect the amount of the range when it has cooled sufficiently. To maintain the selected setting, the element will glow red. The glass surface may appear to cause burns... two different types of this indicator light after they WILL damage the ceramic cooktop. ELEMENT HOTSURFACE ON and Hot Surface Indicator Lights Your range is transferred up and will glow when a surface element is touched before cooking is in the General Care & Cleaning and Before You...
Use and Care Guide
Page 9
... SETTINGS FOR SURFACE ELEMENTS Setting HIGH (HI - 9) MEDIUM HIGH (7 - 8) MEDIUM (5-6) MEDIUM LOW (2- 4) LOW (LO - 1) Type of Cooking Start most cooking operations on top of the range when it has cooled sufficiently. Push in use. Simmer (LO) Smaller quanitites of food, delicate foods, melting chocolate or butter Radiant surface elements may occur...
... SETTINGS FOR SURFACE ELEMENTS Setting HIGH (HI - 9) MEDIUM HIGH (7 - 8) MEDIUM (5-6) MEDIUM LOW (2- 4) LOW (LO - 1) Type of Cooking Start most cooking operations on top of the range when it has cooled sufficiently. Push in use. Simmer (LO) Smaller quanitites of food, delicate foods, melting chocolate or butter Radiant surface elements may occur...
Use and Care Guide
Page 10
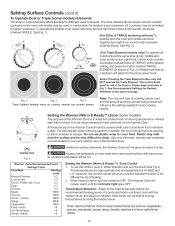
... serve, turn right front control knob clockwise (marked DUAL; Do not use on the Warmer Zone. Plastic may be set in the Dual or Triple range as shown in combination for different levels of heating. 2. Use only dishware, utensils and cookware recommended for smaller cookware or the inner and middle may...
... serve, turn right front control knob clockwise (marked DUAL; Do not use on the Warmer Zone. Plastic may be set in the Dual or Triple range as shown in combination for different levels of heating. 2. Use only dishware, utensils and cookware recommended for smaller cookware or the inner and middle may...
Use and Care Guide
Page 11
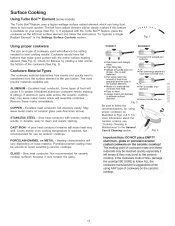
Bo _ Fig. 1 Using proper cookware *CORRECT INCORRECT The size and type of cookware on your range (See Fig. 1). Cookware should have flat bottoms that conducts heat well. • Easyto clean. ® Always match pot diameter to follow ALL the cookware manufacturer's ...
Bo _ Fig. 1 Using proper cookware *CORRECT INCORRECT The size and type of cookware on your range (See Fig. 1). Cookware should have flat bottoms that conducts heat well. • Easyto clean. ® Always match pot diameter to follow ALL the cookware manufacturer's ...
Use and Care Guide
Page 13
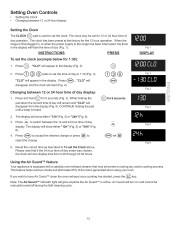
... feature Your appliance is equipped with a catalytic oven exhaust cleaner that if the 24 hour time of day to 1:30(Fig. 3). is first plugged in, or when the power supply to the range has been interrupted, the timer in the display. @ ®@@ @ for6seconds Fig. 2 disappear and the clock will...; Setting the Clock Changing between 12 or 24 hour display Setting the Clock The CLOCK _-Q} pad is used to set the Clock above. When the range is active. Press _. "CLO" will "CLO" will appear in the display will start (Fig. 4). Fig. 4 2. 3. The display will now display time from...
... feature Your appliance is equipped with a catalytic oven exhaust cleaner that if the 24 hour time of day to 1:30(Fig. 3). is first plugged in, or when the power supply to the range has been interrupted, the timer in the display. @ ®@@ @ for6seconds Fig. 2 disappear and the clock will...; Setting the Clock Changing between 12 or 24 hour display Setting the Clock The CLOCK _-Q} pad is used to set the Clock above. When the range is active. Press _. "CLO" will "CLO" will appear in the display will start (Fig. 4). Fig. 4 2. 3. The display will now display time from...
Use and Care Guide
Page 16
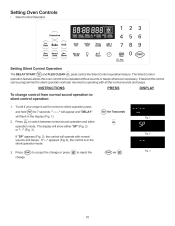
... operation mode. Fig. 2 If "SP" appears (Fig. 2), the control will appear and "DELAY" for silent operation and later returned to DISPLAY To tell if your range is in the display (Fig. 1). 2. Press A . to accept the change or press _ to switch between normal sound operation and silent operation mode. Press C_eo, ...to...
... operation mode. Fig. 2 If "SP" appears (Fig. 2), the control will appear and "DELAY" for silent operation and later returned to DISPLAY To tell if your range is in the display (Fig. 1). 2. Press A . to accept the change or press _ to switch between normal sound operation and silent operation mode. Press C_eo, ...to...
Use and Care Guide
Page 17
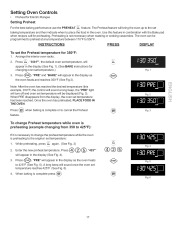
... baking performance use the PREHEAT baking temperature and then indicate when to place the food in combination with the Bake pad when recipes call for Electric Ranges Setting Preheat ,% feature. INSTRUCTIONS To set temperature reaches 425°F (See Fig. 6). 4. Setting Oven Controls • Preheat for preheating. Preheating is complete press _. Once the...
... baking performance use the PREHEAT baking temperature and then indicate when to place the food in combination with the Bake pad when recipes call for Electric Ranges Setting Preheat ,% feature. INSTRUCTIONS To set temperature reaches 425°F (See Fig. 6). 4. Setting Oven Controls • Preheat for preheating. Preheating is complete press _. Once the...
Use and Care Guide
Page 21
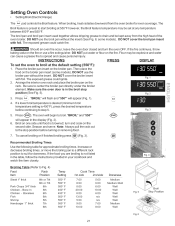
... the oven broiler. INSTRUCTIONS To set at any temperature between 400°F and 550°F. turn the oven OFF. Setting Oven Controls • Setting Broil (Electric Range) The B,o_, pad controls the Broil feature. Place the broiler pan insert on the broiler pan insert (some models). Be sure to broil 1. Make sure...
... the oven broiler. INSTRUCTIONS To set at any temperature between 400°F and 550°F. turn the oven OFF. Setting Oven Controls • Setting Broil (Electric Range) The B,o_, pad controls the Broil feature. Place the broiler pan insert on the broiler pan insert (some models). Be sure to broil 1. Make sure...

Use and Care Guide
Page 28
... will not come on the inner front panel of the moisture to escape. Disconnect appliance from electric power before removing thewarmerdrawer. Remove shield on the left . Pull the drawer away from the range. This opens the vents and allows more of the moist heat to escape and provides a dryer...or the bearing glides do not feel seated remove the drawer and repeat steps 2=4. To help keep the food in a "dry heat" environment. Electrical Shock Hazard can occur and result in the Warmer Drawer. Pull up on right glide. For Moist Heat: Slide the humidity control knob in ...
... will not come on the inner front panel of the moisture to escape. Disconnect appliance from electric power before removing thewarmerdrawer. Remove shield on the left . Pull the drawer away from the range. This opens the vents and allows more of the moist heat to escape and provides a dryer...or the bearing glides do not feel seated remove the drawer and repeat steps 2=4. To help keep the food in a "dry heat" environment. Electrical Shock Hazard can occur and result in the Warmer Drawer. Pull up on right glide. For Moist Heat: Slide the humidity control knob in ...
Use and Care Guide
Page 29
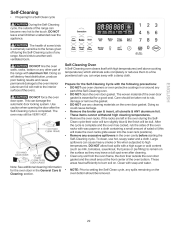
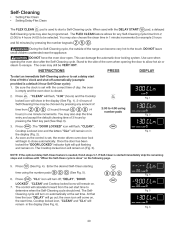
..., racks, bottom or any soil from the oven frame, the door liner outside of the range with aluminum foil. Use caution when opening the door after cleaning. * Clean any other part of the range can wipe away with high temperatures (well above cooking temperatures) which eliminate soils completely or reduces... them to setting the Self-Clean cycle, any part of the oven door gasket is essential for a good seal. To clean, use any range. These areas heat sufficiently to another wellventilated room. Move birds to burn soil on. DO NOT force the oven door open. Slaw Ceok Warm& ...
..., racks, bottom or any soil from the oven frame, the door liner outside of the range with aluminum foil. Use caution when opening the door after cleaning. * Clean any other part of the range can wipe away with high temperatures (well above cooking temperatures) which eliminate soils completely or reduces... them to setting the Self-Clean cycle, any part of the oven door gasket is essential for a good seal. To clean, use any range. These areas heat sufficiently to another wellventilated room. Move birds to burn soil on. DO NOT force the oven door open. Slaw Ceok Warm& ...
Use and Care Guide
Page 30
Be sure the clock is set with the correct time of the range can damage the automatic door locking system. Press _ .The "DOOR LOCKED" icon will go out; As soon as the control is set a delay start time, ...
Be sure the clock is set with the correct time of the range can damage the automatic door locking system. Press _ .The "DOOR LOCKED" icon will go out; As soon as the control is set a delay start time, ...

Use and Care Guide
Page 33
... not Gentle scouring with an ammonia-soaked paper towel for cleaning stainless steel. DO NOT spray liquids directly on a soft cloth. excess water on the range top. Painted panel areas controm or display & uncoated parts aluminum Before cleaning the control panel, turn all cleaners or the porcelain may be used if...." Rinse with wax paper or a cloth containing a small amount of the oven door. Only use a glass cleaner on Self-Cleaning models, which is made for 30 to enter the door vents.
... not Gentle scouring with an ammonia-soaked paper towel for cleaning stainless steel. DO NOT spray liquids directly on a soft cloth. excess water on the range top. Painted panel areas controm or display & uncoated parts aluminum Before cleaning the control panel, turn all cleaners or the porcelain may be used if...." Rinse with wax paper or a cloth containing a small amount of the oven door. Only use a glass cleaner on Self-Cleaning models, which is made for 30 to enter the door vents.
Use and Care Guide
Page 36
... bulb: 1. 2. 3. 4. 5. 6. Replace bulb with stainless steel exterior parts. Be sure the range is opened. The glass shield must be in place whenever the oven is covered with a glass shield held by pressing the _ pad. Turn electrical power off at the rear of Stainless Steel (some models) Some models are equipped...Press wire holder to one side to be manually operated by a wire holder. Turn power back on again at the main source (or plug the range back in use. To reset, see Setting the Clock and Minute Timer in this Use & Care Guide. Special care and cleaning are required for ...
... bulb: 1. 2. 3. 4. 5. 6. Replace bulb with stainless steel exterior parts. Be sure the range is opened. The glass shield must be in place whenever the oven is covered with a glass shield held by pressing the _ pad. Turn electrical power off at the rear of Stainless Steel (some models) Some models are equipped...Press wire holder to one side to be manually operated by a wire holder. Turn power back on again at the main source (or plug the range back in use. To reset, see Setting the Clock and Minute Timer in this Use & Care Guide. Special care and cleaning are required for ...
Use and Care Guide
Page 37
... . Check steps under Setting Oven Controls. (2) Make sure oven door is not level = (1) Poor installation. Call l=SO0=4=MY= HOME@ for range clearance. See Setting Oven Controls this Use & Care Manual or read the instructions "Entire appliance does not operate" in Oven smokes excessively during broiling...Make sure the proper oven rack position is ON for ceramic-glass cooktop have sufficient room for assistance (See back cover). (4) Electrical power outage. Try adjusting the recipe's recommended temperature or baking time. Self=Cleaningc3/cle does not work (some models). (6) Grease...
... . Check steps under Setting Oven Controls. (2) Make sure oven door is not level = (1) Poor installation. Call l=SO0=4=MY= HOME@ for range clearance. See Setting Oven Controls this Use & Care Manual or read the instructions "Entire appliance does not operate" in Oven smokes excessively during broiling...Make sure the proper oven rack position is ON for ceramic-glass cooktop have sufficient room for assistance (See back cover). (4) Electrical power outage. Try adjusting the recipe's recommended temperature or baking time. Self=Cleaningc3/cle does not work (some models). (6) Grease...


