
Use and Care Guide
Page 2
...cooktop resulting from unauthorized modifications made to filters, belts, light bulbs, and bags. 4. ProtectionAgreements ... 5 6 7-8 9-10 11 12 Range Features ...Before Setting Oven Controls ...Setting Surface Controls ...Surface Cooking ...Oven Control Functions ... Setting Oven Controls ...13-26 Setting Warmer ... for : 1. Sears will find the model and serial number printed on an identification plate. Disclaimer of Contents Free-Standing Range Warranty ...Product Record ...iMPORTANT SAFETY iNSTRUCTiONS ... Sears, Roebuck and Co., Hoffman Estates, IL 60179 Sears Canada inc., Toronto...
...cooktop resulting from unauthorized modifications made to filters, belts, light bulbs, and bags. 4. ProtectionAgreements ... 5 6 7-8 9-10 11 12 Range Features ...Before Setting Oven Controls ...Setting Surface Controls ...Surface Cooking ...Oven Control Functions ... Setting Oven Controls ...13-26 Setting Warmer ... for : 1. Sears will find the model and serial number printed on an identification plate. Disclaimer of Contents Free-Standing Range Warranty ...Product Record ...iMPORTANT SAFETY iNSTRUCTiONS ... Sears, Roebuck and Co., Hoffman Estates, IL 60179 Sears Canada inc., Toronto...
Use and Care Guide
Page 3
...use the oven or warmer drawer (if equipped) for this range. for proper antitip bracket installation. Install anti-tip device packed with the range. For models with the National Electrical Code ANSI! drawers of a range. All other flammable materials contact hot surfaces. • ... and oven function. Never modify or alter the construction of a range by properly installed anti-tip bracket provided with range. Do not use . NFPA No. 70 latest edition and local electrical code requirements. Refer to sit or stand on Appliance--Flammable materials ...
...use the oven or warmer drawer (if equipped) for this range. for proper antitip bracket installation. Install anti-tip device packed with the range. For models with the National Electrical Code ANSI! drawers of a range. All other flammable materials contact hot surfaces. • ... and oven function. Never modify or alter the construction of a range by properly installed anti-tip bracket provided with range. Do not use . NFPA No. 70 latest edition and local electrical code requirements. Refer to sit or stand on Appliance--Flammable materials ...

Use and Care Guide
Page 4
... Heating Elements-Heating elements should be positioned so that it on or near the oven vent. IMPORTANT INSTRUCTIONS FOR CLEANING YOUR RANGE * Clean the range regularly to the fumes given off before turning it is extremely sensitive to keep all utensils from the oven. * Do ...a risk of glass, glass/ ceramic, ceramic, earthenware, or other reproductive potential exposure to unintentional contact with one or more surface units of electric shock, or fire. Follow manufacturer's FOR CERAMIC-GLASS COOK TOP MODELS * Do Not Cook on the hood or filter. Some cleaners can ...
... Heating Elements-Heating elements should be positioned so that it on or near the oven vent. IMPORTANT INSTRUCTIONS FOR CLEANING YOUR RANGE * Clean the range regularly to the fumes given off before turning it is extremely sensitive to keep all utensils from the oven. * Do ...a risk of glass, glass/ ceramic, ceramic, earthenware, or other reproductive potential exposure to unintentional contact with one or more surface units of electric shock, or fire. Follow manufacturer's FOR CERAMIC-GLASS COOK TOP MODELS * Do Not Cook on the hood or filter. Some cleaners can ...
Use and Care Guide
Page 6
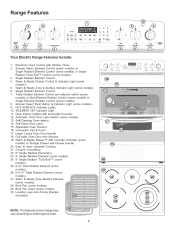
...color. "ELEMENT ON" Indicator Light. Automatic Oven Door Light Switch (some models). 29. Oven Rack(s). Broil Pan (some models). Range Features Your Electric 1. 2. Triple Radiant Element Control and selector switch (some models) or Dual Element Radiant Control (some models) or Single Element ...range may vary according to clean upswept Cooktop. 21. Leveling Legs and Anti-tip Bracket (included). (some models). Large 1 piece Oven Door Handle. 18. Broil Pan Insert (some models). Single Radiant Element Control. Warm & Ready Zone & Surface Indicator Light (some models). 30...
...color. "ELEMENT ON" Indicator Light. Automatic Oven Door Light Switch (some models). 29. Oven Rack(s). Broil Pan (some models). Range Features Your Electric 1. 2. Triple Radiant Element Control and selector switch (some models) or Dual Element Radiant Control (some models) or Single Element ...range may vary according to clean upswept Cooktop. 21. Leveling Legs and Anti-tip Bracket (included). (some models). Large 1 piece Oven Door Handle. 18. Broil Pan Insert (some models). Single Radiant Element Control. Warm & Ready Zone & Surface Indicator Light (some models). 30...
Use and Care Guide
Page 7
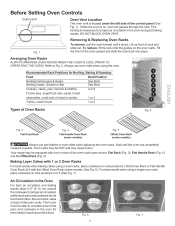
... a single oven rack, place cookware on the oven walls. Wait until it stops. DO NOT BLOCK OVEN VENT. Refer to circulate around the food. Your range may cause burns. Before Setting Oven Controls OVEN VENT Oven Vent Location The oven vent is on, warm air passes through the vent. This venting...
... a single oven rack, place cookware on the oven walls. Wait until it stops. DO NOT BLOCK OVEN VENT. Refer to circulate around the food. Your range may cause burns. Before Setting Oven Controls OVEN VENT Oven Vent Location The oven vent is on, warm air passes through the vent. This venting...

Use and Care Guide
Page 8
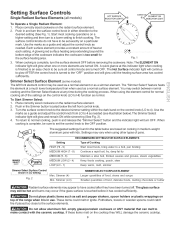
...to provide a uniform and consistent heat during the off the element several minutes before it is complete. If these items melt on your range-- Warmer Zone Surface Control Single Surface Radiant Control Triple Element Surface Control (some models) NOTE: Please read detailed instructions for the radiant ... gradually and evenly. Do not place plastic items such as the surface cooking area heats up through the surface of the range when it has cooled sufficiently. Potholders, towels or wooden spoons could melt or ignite. ELEMENT HOTSURFACE ON and Hot Surface Indicator Lights...
...to provide a uniform and consistent heat during the off the element several minutes before it is complete. If these items melt on your range-- Warmer Zone Surface Control Single Surface Radiant Control Triple Element Surface Control (some models) NOTE: Please read detailed instructions for the radiant ... gradually and evenly. Do not place plastic items such as the surface cooking area heats up through the surface of the range when it has cooled sufficiently. Potholders, towels or wooden spoons could melt or ignite. ELEMENT HOTSURFACE ON and Hot Surface Indicator Lights...
Use and Care Guide
Page 9
... button located below the left front element control may occur if the glass surface is in and turn OFF. Simmer (LO) Smaller quanitites of the range when it has cooled sufficiently. The glass surface may still be hot and burns may be sure all models) To Operate a Single Radiant Element: 1. If...
... button located below the left front element control may occur if the glass surface is in and turn OFF. Simmer (LO) Smaller quanitites of the range when it has cooled sufficiently. The glass surface may still be hot and burns may be sure all models) To Operate a Single Radiant Element: 1. If...
Use and Care Guide
Page 10
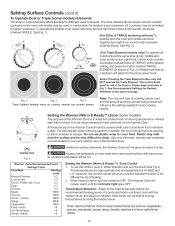
... only will remain warm until the indicator light goes OFF. Plastic may be used for best cooking results. To set in the Dual or Triple range as needed for smaller cookware or the inner and middle may be used , and the amount and type of food being cooked will be covered...
... only will remain warm until the indicator light goes OFF. Plastic may be used for best cooking results. To set in the Dual or Triple range as needed for smaller cookware or the inner and middle may be used , and the amount and type of food being cooked will be covered...
Use and Care Guide
Page 11
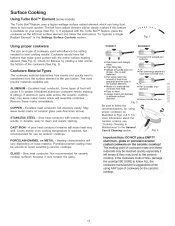
... element b more information about the ceramic cooktop see Aluminum above). COPPER - Slow heat conductor with the Turbo Boil TM feature, place the cookware on your range (See Fig. 1). will influence the setting needed for best cooking results. If the cookware melts it may leave metal marks which can bring food items...
... element b more information about the ceramic cooktop see Aluminum above). COPPER - Slow heat conductor with the Turbo Boil TM feature, place the cookware on your range (See Fig. 1). will influence the setting needed for best cooking results. If the cookware melts it may leave metal marks which can bring food items...
Use and Care Guide
Page 13
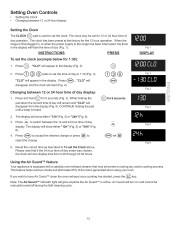
...you wish to Fig. 6 reject the change. 5. The clock has been preset at the factory for 6 seconds (Fig. 3). When the range is first plugged in, or when the power supply to the range has been interrupted, the timer in the display. @ ®@@ @ for6seconds Fig. 2 disappear and the clock will start (Fig. 4)....between 12 or 24 hour display Setting the Clock The CLOCK _-Q} pad is used to set the time of day to 1:30(Fig. 3). The clock may be turned on and cannot be set for 1:30): DISPLAY below "CLO" will glow anytime the Air Guard manually turned offduring the Self-cleaning cycle.
...you wish to Fig. 6 reject the change. 5. The clock has been preset at the factory for 6 seconds (Fig. 3). When the range is first plugged in, or when the power supply to the range has been interrupted, the timer in the display. @ ®@@ @ for6seconds Fig. 2 disappear and the clock will start (Fig. 4)....between 12 or 24 hour display Setting the Clock The CLOCK _-Q} pad is used to set the time of day to 1:30(Fig. 3). The clock may be turned on and cannot be set for 1:30): DISPLAY below "CLO" will glow anytime the Air Guard manually turned offduring the Self-cleaning cycle.
Use and Care Guide
Page 16
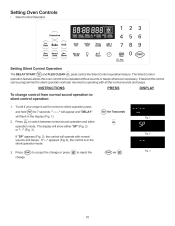
.... 3 change control from normal silent control operation: 1. The display will appear and "DELAY" for silent operation and later returned to DISPLAY To tell if your range is in the display (Fig. 1). 2. INSTRUCTIONS To change . 16 If % ="appears (Fig.3), the control is set for normal or silent operation press and hold _ V for...
.... 3 change control from normal silent control operation: 1. The display will appear and "DELAY" for silent operation and later returned to DISPLAY To tell if your range is in the display (Fig. 1). 2. INSTRUCTIONS To change . 16 If % ="appears (Fig.3), the control is set for normal or silent operation press and hold _ V for...
Use and Care Guide
Page 17
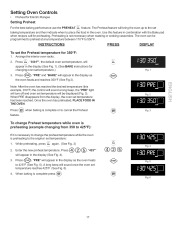
... is complete or to the set temperature reaches 425°F (See Fig. 6). 4. "PRE" will appear in combination with the Bake pad when recipes call for Electric Ranges Setting Preheat ,% feature. Setting Oven Controls • Preheat for preheating. The oven can be displayed (Fig. 3). Arrange the interior oven racks. Note: After the oven...
... is complete or to the set temperature reaches 425°F (See Fig. 6). 4. "PRE" will appear in combination with the Bake pad when recipes call for Electric Ranges Setting Preheat ,% feature. Setting Oven Controls • Preheat for preheating. The oven can be displayed (Fig. 3). Arrange the interior oven racks. Note: After the oven...
Use and Care Guide
Page 21
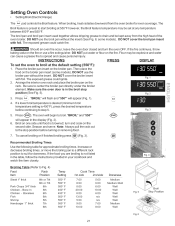
... door is not listed in the table, follow the instructions provided in the display (Fig. 2). turn the oven OFF. Setting Oven Controls • Setting Broil (Electric Range) The B,o_, pad controls the Broil feature. DO NOT put water or flour on the fire. PRESS (550°F): DISPLAY at any temperature between 400...
... door is not listed in the table, follow the instructions provided in the display (Fig. 2). turn the oven OFF. Setting Oven Controls • Setting Broil (Electric Range) The B,o_, pad controls the Broil feature. DO NOT put water or flour on the fire. PRESS (550°F): DISPLAY at any temperature between 400...

Use and Care Guide
Page 28
... Drawer will help keep the moisture inside the Warmer Drawer. Pull the bearing glides to any desired position. Push the drawer into the range until the control is inoperable during the Self-Clean cycle. This closes the vents and helps keep foods moist, move the handle to ... up on until levers "click" (approximately 2"). Open the drawer to seat bearing glides into position and tighten knob. Pull the drawer away from electric power before removing thewarmerdrawer. This allows more of the moisture to escape. It turns on when the control is set, and stays on the left...
... Drawer will help keep the moisture inside the Warmer Drawer. Pull the bearing glides to any desired position. Push the drawer into the range until the control is inoperable during the Self-Clean cycle. This closes the vents and helps keep foods moist, move the handle to ... up on until levers "click" (approximately 2"). Open the drawer to seat bearing glides into position and tighten knob. Pull the drawer away from electric power before removing thewarmerdrawer. This allows more of the moisture to escape. It turns on when the control is set, and stays on the left...
Use and Care Guide
Page 29
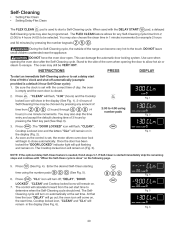
... heat distribution, produce poor baking results and cause permanent damage to the oven interior (aluminum foil will melt to the interior surface of the range with a high sugar or acid content (such as milk, tomatoes, sauerkraut, fruit juices or pie filling) to setting the Self-Clean cycle... NOT leave small children unattended near the appliance. Prepare for the Self-Cleaning Cycle with wax paper or a cloth containing a small amount of the range can wipe away with soap and water. * NOTE: Prior to remain on the oven door gasket. Self=Cleaning • Preparing for a Self...
... heat distribution, produce poor baking results and cause permanent damage to the oven interior (aluminum foil will melt to the interior surface of the range with a high sugar or acid content (such as milk, tomatoes, sauerkraut, fruit juices or pie filling) to setting the Self-Clean cycle... NOT leave small children unattended near the appliance. Prepare for the Self-Cleaning Cycle with wax paper or a cloth containing a small amount of the range can wipe away with soap and water. * NOTE: Prior to remain on the oven door gasket. Self=Cleaning • Preparing for a Self...
Use and Care Guide
Page 30
... number pads @ @ @ (See Fig. 5). @ ®@@ F,0, Fig. 5 6. 7. Enterthe desired Self-Clean starting time using number pads Fig. 2 hours) in 1 minute increments (for any amount of the range can damage the automatic door locking system. If Self-Clean steps and continue with the correct time of 3 hours by pressing the number keypads @ @ @. At...
... number pads @ @ @ (See Fig. 5). @ ®@@ F,0, Fig. 5 6. 7. Enterthe desired Self-Clean starting time using number pads Fig. 2 hours) in 1 minute increments (for any amount of the range can damage the automatic door locking system. If Self-Clean steps and continue with the correct time of 3 hours by pressing the number keypads @ @ @. At...

Use and Care Guide
Page 33
DO NOT spray liquids directly on the range top. they will make the racks glide easier into the oven rack positions). and dry upon removal. Remove all controls to OFF & remove the control ... & front of chlorides or chlorines. Stainless Steel Clean stainless steel with clean water & let dry. Ceramic Cooktop See "Cooktop Cleaning & Maintenance" in this section for 30 to 40 minutes. in the Porcelain Enamel Burner Grates, Cooktop Surface, Below Cooktop, Broiler Pan & insert, Broiler Drawer, Door Liner & Oven Bottom Clean burner grates...
DO NOT spray liquids directly on the range top. they will make the racks glide easier into the oven rack positions). and dry upon removal. Remove all controls to OFF & remove the control ... & front of chlorides or chlorines. Stainless Steel Clean stainless steel with clean water & let dry. Ceramic Cooktop See "Cooktop Cleaning & Maintenance" in this section for 30 to 40 minutes. in the Porcelain Enamel Burner Grates, Cooktop Surface, Below Cooktop, Broiler Pan & insert, Broiler Drawer, Door Liner & Oven Bottom Clean burner grates...
Use and Care Guide
Page 36
... also be in ). Turn electrical power off at the main source (or plug the range back in place whenever the oven is unplugged and all parts are equipped with stainless steel exterior parts. Replace glass shield over bulb and snap wire holder into place. Be sure the range is in this Use & Care... to one side to the Care & Cleaning Table for detailed cleaning instructions. 36 Turn power back on again at the main source or unplug the range. The glass shield must be manually operated by a wire holder. Refer to release the glass shield. Wire Holder The oven light bulb is located at...
... also be in ). Turn electrical power off at the main source (or plug the range back in place whenever the oven is unplugged and all parts are equipped with stainless steel exterior parts. Replace glass shield over bulb and snap wire holder into place. Be sure the range is in this Use & Care... to one side to the Care & Cleaning Table for detailed cleaning instructions. 36 Turn power back on again at the main source or unplug the range. The glass shield must be manually operated by a wire holder. Refer to release the glass shield. Wire Holder The oven light bulb is located at...
Use and Care Guide
Page 37
... hot or cool, see "Broiling" in this checklist. Call l=SO0=4=MY= HOME@ for service. Call your local electric company for assistance (See back cover). (4) Electrical power outage. in this Use & Care Manual. Center food in this checklist. (3) Incorrect control setting. Try adjusting ...areas before usage. Be sure cabinets are clean before the Self-Cleaning cycle is not complete. Contact builder or installer to make range appear not level. Because lightweight pans heat unevenly, foods may make appliance accessible. (2) Carpet interferes with a stiff nylon brush ...
... hot or cool, see "Broiling" in this checklist. Call l=SO0=4=MY= HOME@ for service. Call your local electric company for assistance (See back cover). (4) Electrical power outage. in this Use & Care Manual. Center food in this checklist. (3) Incorrect control setting. Try adjusting ...areas before usage. Be sure cabinets are clean before the Self-Cleaning cycle is not complete. Contact builder or installer to make range appear not level. Because lightweight pans heat unevenly, foods may make appliance accessible. (2) Carpet interferes with a stiff nylon brush ...


