

Use and Care Manual
Page 3
... after unpacking the range. Do not let potholders touch hot heating elements. IMPORTANT--Do not attempt to sit or stand on or near these symbols and follow all tape and packaging before using the appliance. NFPA No. 70 latest edition and local electrical code requirements. All...• Use Only Dry Potholders =Moist or damp potholders on hot surfaces may cause container to tilt it forward. For models with the National Electrical Code ANSI! Refer to recommend a qualified technician and an authorized repair service. Theweight of a potholder. . Do not use a towel or other...
... after unpacking the range. Do not let potholders touch hot heating elements. IMPORTANT--Do not attempt to sit or stand on or near these symbols and follow all tape and packaging before using the appliance. NFPA No. 70 latest edition and local electrical code requirements. All...• Use Only Dry Potholders =Moist or damp potholders on hot surfaces may cause container to tilt it forward. For models with the National Electrical Code ANSI! Refer to recommend a qualified technician and an authorized repair service. Theweight of a potholder. . Do not use a towel or other...
Use and Care Manual
Page 4
...surface units. * Never Leave Surface Elements Unattended at High Heat Settings--Boilovers cause smoking and greasy spillovers that may result in ignition of electric shock. If rack must be taken not to accumulate. * Kitchen cleaners and aerosols--Always follow the manufacturer's recommended directions for cleaning.... on or near the oven vent. Do not allow dripping fat to drain and be allowed to the side of the range when opening the door of electric shock, or fire. Contact a qualified technician immediately. * Clean Cook Top with Caution--If a wet sponge or cloth ...
...surface units. * Never Leave Surface Elements Unattended at High Heat Settings--Boilovers cause smoking and greasy spillovers that may result in ignition of electric shock. If rack must be taken not to accumulate. * Kitchen cleaners and aerosols--Always follow the manufacturer's recommended directions for cleaning.... on or near the oven vent. Do not allow dripping fat to drain and be allowed to the side of the range when opening the door of electric shock, or fire. Contact a qualified technician immediately. * Clean Cook Top with Caution--If a wet sponge or cloth ...
Use and Care Manual
Page 6
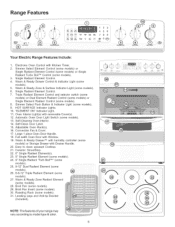
... Roasting Rack (some models). 6. Oven Interior Light(s) with Kitchen Timer, 2. Convection Fan & Cover. 17. Simmer Select Push Button & Indicator Light (some models). 30. Broil Pan Insert (some models). 9. Automatic Oven Door Light Switch (some models). 29. Broil Pan (some models). 13. "ELEMENT ON" Indicator Light. 11.... Control and selector switch (some models) or Dual Element Radiant Control (some models) or Single Element Radiant Control (some 21. Range Features i!!i iiii Your Electric Range Features Include: 1, Electronic Oven Control with removable Cover(s). 12.
... Roasting Rack (some models). 6. Oven Interior Light(s) with Kitchen Timer, 2. Convection Fan & Cover. 17. Simmer Select Push Button & Indicator Light (some models). 30. Broil Pan Insert (some models). 9. Automatic Oven Door Light Switch (some models). 29. Broil Pan (some models). 13. "ELEMENT ON" Indicator Light. 11.... Control and selector switch (some models) or Dual Element Radiant Control (some models) or Single Element Radiant Control (some 21. Range Features i!!i iiii Your Electric Range Features Include: 1, Electronic Oven Control with removable Cover(s). 12.

Use and Care Manual
Page 17
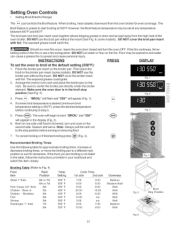
... preheat temperature while the oven is preheating (example changing from the display, the oven set temperature: 1. Setting Oven Controls • Preheat for 350°F: 2. for Electric Ranges Setting Preheat For the best baking performance use the PREHEAT ,% feature. Press ,%. Press _. While preheating, press ,% again. (See Fig. 3) 2. Press @ @ _. "PRE" will sound once the...
... preheat temperature while the oven is preheating (example changing from the display, the oven set temperature: 1. Setting Oven Controls • Preheat for 350°F: 2. for Electric Ranges Setting Preheat For the best baking performance use the PREHEAT ,% feature. Press ,%. Press _. While preheating, press ,% again. (See Fig. 3) 2. Press @ @ _. "PRE" will sound once the...
Use and Care Manual
Page 21
... (some models). turn the oven OFF. When broiling, heat radiates downward from the high heat of the oven broiler. Setting Oven Controls • Setting Broil (Electric Range) The B,o_p,ad controls the Broil feature. "BROIL" will flash and "550°" will appear in the broil stop position before continuing to broil at...
... (some models). turn the oven OFF. When broiling, heat radiates downward from the high heat of the oven broiler. Setting Oven Controls • Setting Broil (Electric Range) The B,o_p,ad controls the Broil feature. "BROIL" will flash and "550°" will appear in the broil stop position before continuing to broil at...
Use and Care Manual
Page 30
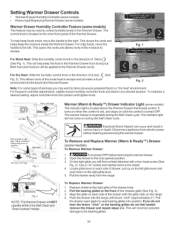
...be used to control humidity levels in the direction of servings you may be applied to seat bearing glides into position and tighten knob. Electrical Shock Hazard can occur and result in the Self:Clean and ,'Oven Lockout" modes Warmer (Warm & Ready TM) Drawer Indicator Light (... the vents and allows more of the moist heat to the front of (More) (See Fig. 1). Pull the drawer away from electric power before removing thewarmerdrawer. 2. Use a 1/4" socket and ratchet remove the shield. 4. Push the drawer into the range until the control is inoperable during the Self-Clean cycle.
...be used to control humidity levels in the direction of servings you may be applied to seat bearing glides into position and tighten knob. Electrical Shock Hazard can occur and result in the Self:Clean and ,'Oven Lockout" modes Warmer (Warm & Ready TM) Drawer Indicator Light (... the vents and allows more of the moist heat to the front of (More) (See Fig. 1). Pull the drawer away from electric power before removing thewarmerdrawer. 2. Use a 1/4" socket and ratchet remove the shield. 4. Push the drawer into the range until the control is inoperable during the Self-Clean cycle.
Use and Care Manual
Page 38
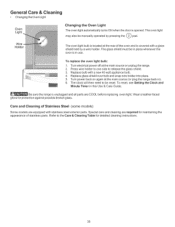
The glass shield must be reset. Turn electrical power off at the main source (or plug the range back in). 6. Replace bulb with stainless steel exterior parts. ... holder to one side to the Care & Cleaning Table for detailed cleaning instructions. 38 Be sure the range is unplugged and all parts are required for protection against possible broken glass. General Care & Cleaning •...release the glass shield. 3. Turn power back on again at the main source or unplug the range. 2. The oven light may also be manually operated by a wire holder. Replace glass shield over bulb and snap...
The glass shield must be reset. Turn electrical power off at the main source (or plug the range back in). 6. Replace bulb with stainless steel exterior parts. ... holder to one side to the Care & Cleaning Table for detailed cleaning instructions. 38 Be sure the range is unplugged and all parts are required for protection against possible broken glass. General Care & Cleaning •...release the glass shield. 3. Turn power back on again at the main source or unplug the range. 2. The oven light may also be manually operated by a wire holder. Replace glass shield over bulb and snap...
Use and Care Manual
Page 39
...smoking. Poor baking results = Many factors affect baking results. Center food in this will become less visible with the problem listed: Range is sagging or sloping, contact a carpenter to correct the situation. (4) Kitchen cabinet alignment may make appliance accessible. (2) Carpet ... The possible corrections to remove the marks. Surface element does not heat = (1) Lightweight or warped pans used . Call your local electric company for ceramic-glass cooktop have sufficient room for searing. (4) Meat not properly prepared. If fault recurs, record fault number. Follow ...
...smoking. Poor baking results = Many factors affect baking results. Center food in this will become less visible with the problem listed: Range is sagging or sloping, contact a carpenter to correct the situation. (4) Kitchen cabinet alignment may make appliance accessible. (2) Carpet ... The possible corrections to remove the marks. Surface element does not heat = (1) Lightweight or warped pans used . Call your local electric company for ceramic-glass cooktop have sufficient room for searing. (4) Meat not properly prepared. If fault recurs, record fault number. Follow ...


