
Use and Care Manual
Page 2
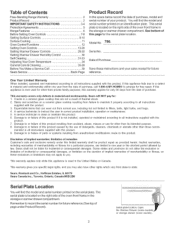
...apply to arrange for free repair. Table of Contents Free-Standing Range Warranty 2 Product Record 2 iMPORTANT SAFETY iNSTRUCTiONS 3-4 ProtectionAgreements 5 Range Features 6 Before Setting Oven Controls 7-8 Setting Surface Controls 9-10 Surface Cooking 11 Oven Control Functions 12 Setting Oven Controls 13-28 Setting Warmer Drawer Controls 29-30 Setting Warmer Drawer Humidity Control 30 Self Cleaning 31-33 Adjusting Your Oven Temperature 34 General Care & Cleaning 35-38 Before You Make a Service Call 39 Sears Service Back Page Product...
...apply to arrange for free repair. Table of Contents Free-Standing Range Warranty 2 Product Record 2 iMPORTANT SAFETY iNSTRUCTiONS 3-4 ProtectionAgreements 5 Range Features 6 Before Setting Oven Controls 7-8 Setting Surface Controls 9-10 Surface Cooking 11 Oven Control Functions 12 Setting Oven Controls 13-28 Setting Warmer Drawer Controls 29-30 Setting Warmer Drawer Humidity Control 30 Self Cleaning 31-33 Adjusting Your Oven Temperature 34 General Care & Cleaning 35-38 Before You Make a Service Call 39 Sears Service Back Page Product...

Use and Care Manual
Page 3
... done only by removing leveling legs, panels, wire covers, anti=tip brackets/screws, or any part of personal injury and damage to tilt it closely. Areas near these symbols and follow all instructions given. Do not let potholders touch hot heating elements. Remove the oven door from steam. User servicing--Do not repair or replace any other flammable materials contact hot surfaces. • Do Not Use Water or Flour on the range to burst...
... done only by removing leveling legs, panels, wire covers, anti=tip brackets/screws, or any part of personal injury and damage to tilt it closely. Areas near these symbols and follow all instructions given. Do not let potholders touch hot heating elements. Remove the oven door from steam. User servicing--Do not repair or replace any other flammable materials contact hot surfaces. • Do Not Use Water or Flour on the range to burst...
Use and Care Manual
Page 4
... parts listed in or around any range. Contact a qualified technician immediately. * Clean Cook Top with one or more surface units of a hot oven. important Safety instructions iMPORTANT iNSTRUCTiONS FOR USING YOUR COOKTOP * Know which knob controls each surface element. Pay particular attention to wipe spills on or near the oven vent. Some cleaners can produce noxious fumes if applied to the side of the range when opening the door of different sizes...
... parts listed in or around any range. Contact a qualified technician immediately. * Clean Cook Top with one or more surface units of a hot oven. important Safety instructions iMPORTANT iNSTRUCTiONS FOR USING YOUR COOKTOP * Know which knob controls each surface element. Pay particular attention to wipe spills on or near the oven vent. Some cleaners can produce noxious fumes if applied to the side of the range when opening the door of different sizes...
Use and Care Manual
Page 6
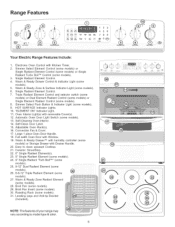
...Element Control. 4. HOT SURFACE Indicator Lights. 10. Oven Interior Light(s) with Drawer Handle. 20. Convection Fan & Cover. 17. Warm & Ready Drawer TM with humidity controller models) or Storage Drawer with removable Cover(s). 12. Broil Pan (some 21. Single Radiant Element Control. 7. Self-Cleaning Oven interior. 14. Easy to model type & color. Broil Pan Insert (some models). 6. Warm & Ready Zone & Surface Indicator Light (some models). 30. Self-Clean Door Latch. 15. Large 1 piece Oven Door Handle. 18. Full width Oven Door with Kitchen Timer, 2. Roasting Rack...
...Element Control. 4. HOT SURFACE Indicator Lights. 10. Oven Interior Light(s) with Drawer Handle. 20. Convection Fan & Cover. 17. Warm & Ready Drawer TM with humidity controller models) or Storage Drawer with removable Cover(s). 12. Broil Pan (some 21. Single Radiant Element Control. 7. Self-Cleaning Oven interior. 14. Easy to model type & color. Broil Pan Insert (some models). 6. Warm & Ready Zone & Surface Indicator Light (some models). 30. Self-Clean Door Latch. 15. Large 1 piece Oven Door Handle. 18. Full width Oven Door with Kitchen Timer, 2. Roasting Rack...

Use and Care Manual
Page 7
... oven door, sides or back of the control panel (See Fig. 1). Flat Rack (Fig. 3), Flat Handle Rack (Fig. 4) and the Offset Rack (Fig. 5). Baking Layer Cakes with 1 or 2 Oven Racks For best results when baking cakes using 2 oven racks, place cookware on rack positions 4 or 5 (See Fig. 7). DO NOT BLOCK OVEN VENT. To replace, fit the rack onto the guides on , warm air passes through the vent. Recommended Rack Positions for Broiling, Baking & Roasting: Food Rack Position Broiling hamburgers...
... oven door, sides or back of the control panel (See Fig. 1). Flat Rack (Fig. 3), Flat Handle Rack (Fig. 4) and the Offset Rack (Fig. 5). Baking Layer Cakes with 1 or 2 Oven Racks For best results when baking cakes using 2 oven racks, place cookware on rack positions 4 or 5 (See Fig. 7). DO NOT BLOCK OVEN VENT. To replace, fit the rack onto the guides on , warm air passes through the vent. Recommended Rack Positions for Broiling, Baking & Roasting: Food Rack Position Broiling hamburgers...
Use and Care Manual
Page 8
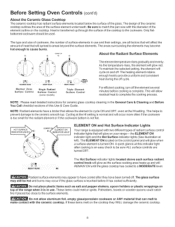
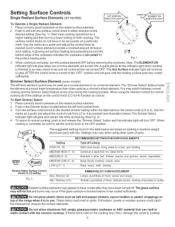
... setting. The areas surrounding the elements may appear to cycle ON and OFF, even at this Use & Care Guide. EL[MENT ON About the Radiant Surface Elements 0 000 00 WARMER ZONE Warmer Zone Surface Control 000 O 0 RIGHT REAR Single Radiant Surface Control (some models) 000 0• ,/: :: TR PLE ELEMENT / ON_OF_ RIGHT FRONT Triple Element Surface Control The element temperature rises gradually and evenly. For efficient cooking, turn off cycle. The ELEMENT ON located...
... setting. The areas surrounding the elements may appear to cycle ON and OFF, even at this Use & Care Guide. EL[MENT ON About the Radiant Surface Elements 0 000 00 WARMER ZONE Warmer Zone Surface Control 000 O 0 RIGHT REAR Single Radiant Surface Control (some models) 000 0• ,/: :: TR PLE ELEMENT / ON_OF_ RIGHT FRONT Triple Element Surface Control The element temperature rises gradually and evenly. For efficient cooking, turn off cycle. The ELEMENT ON located...
Use and Care Manual
Page 9
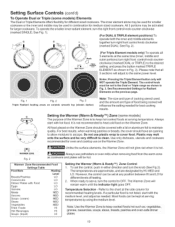
... button located below ).The Simmer Select indicator light will turn to a lower setting to a boil, pan broiling Continue a rapid boil, fry, deep fat fry Maintain a slow boil, thicken sauces and gravies, steam vegetables Keep foods cooking, poach, stew Keep warm, melt, simmer Simmer Select Surface Control SIMMERSELECTSURFACE ELEMENT shown in use. Start most foods, bring water to finish cooking. Use the marks as a guide and adjust the control knob from...
... button located below ).The Simmer Select indicator light will turn to a lower setting to a boil, pan broiling Continue a rapid boil, fry, deep fat fry Maintain a slow boil, thicken sauces and gravies, steam vegetables Keep foods cooking, poach, stew Keep warm, melt, simmer Simmer Select Surface Control SIMMERSELECTSURFACE ELEMENT shown in use. Start most foods, bring water to finish cooking. Use the marks as a guide and adjust the control knob from...
Use and Care Manual
Page 10
... range as shown in either direction and turn right front control knob counterclockwise (marked DUAL or TRIPLE) to the desired setting and press the button marked TRIPLE ELEMENT as cookware and plates will not glow red when it is not listed, start with the medium level, and adjust as ; See Fig. 2). _J__SlRIPLE OC)O : O• RIGHT FRONT ELEMENT o_/o_F (For Triple Element models only) To operate...
... range as shown in either direction and turn right front control knob counterclockwise (marked DUAL or TRIPLE) to the desired setting and press the button marked TRIPLE ELEMENT as cookware and plates will not glow red when it is not listed, start with the medium level, and adjust as ; See Fig. 2). _J__SlRIPLE OC)O : O• RIGHT FRONT ELEMENT o_/o_F (For Triple Element models only) To operate...
Use and Care Manual
Page 11
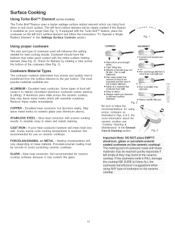
... it to follow the instructions "To Operate a Single v Radiant Element" in the General Care & Cleaning section. A poor heat conductor however will resemble scratches. Fig. 2 Be sure to darken (Anodized aluminum cookware resists staining & pitting). If aluminum pans slide across the bottom of cookware used will be smooth to clean and resists staining. Cooks evenly once cooking temperature is transferred from the surface element to boil much...
... it to follow the instructions "To Operate a Single v Radiant Element" in the General Care & Cleaning section. A poor heat conductor however will resemble scratches. Fig. 2 Be sure to darken (Anodized aluminum cookware resists staining & pitting). If aluminum pans slide across the bottom of cookware used will be smooth to clean and resists staining. Cooks evenly once cooking temperature is transferred from the surface element to boil much...

Use and Care Manual
Page 16
... control is set for normal or silent operation press and hold _ for 7seconds Clean Fig. 1 Fig. 2 Fig. 3 16 O_ AGuiarr_d Q SCJeTarO._0P @ Oven Lockout Setting Silent Control Operation The DELAY START and FLEX CLEAN c.l.o.._p, ads control the Silent Control operation feature. To tell ifyour range is in the display (Fig. 1). 2. Setting Oven Controls * Silent Control Operation Cony Rake Cony Cony Roast Convert Pre Heat Bake Broil Cook Time Delay Start Timer Set/Off Add 1 Minute 123 4 56 789 SJow Cook Warm& Flex Hold Clean...
... control is set for normal or silent operation press and hold _ for 7seconds Clean Fig. 1 Fig. 2 Fig. 3 16 O_ AGuiarr_d Q SCJeTarO._0P @ Oven Lockout Setting Silent Control Operation The DELAY START and FLEX CLEAN c.l.o.._p, ads control the Silent Control operation feature. To tell ifyour range is in the display (Fig. 1). 2. Setting Oven Controls * Silent Control Operation Cony Rake Cony Cony Roast Convert Pre Heat Bake Broil Cook Time Delay Start Timer Set/Off Add 1 Minute 123 4 56 789 SJow Cook Warm& Flex Hold Clean...

Use and Care Manual
Page 17
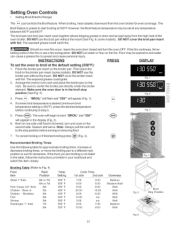
... turn off and oven set the Preheat temperature 1. INSTRUCTIONS PRESS DISPLAY To set temperature will Heat appear in the display (See Fig. 1). (See BAKE instructions for preheating. Arrange the interior oven racks. "350 F', the default oven set temperature, will be programmed to preheat at any temperature between 170°F to 425°F (See Fig. 5). Preheating is preheating to the original set temperature: 1. for Electric Ranges Setting Preheat For the best baking performance use the PREHEAT ,% feature. Once the oven has preheated, PLACE FOOD IN THE OVEN...
... turn off and oven set the Preheat temperature 1. INSTRUCTIONS PRESS DISPLAY To set temperature will Heat appear in the display (See Fig. 1). (See BAKE instructions for preheating. Arrange the interior oven racks. "350 F', the default oven set temperature, will be programmed to preheat at any temperature between 170°F to 425°F (See Fig. 5). Preheating is preheating to the original set temperature: 1. for Electric Ranges Setting Preheat For the best baking performance use the PREHEAT ,% feature. Once the oven has preheated, PLACE FOOD IN THE OVEN...

Use and Care Manual
Page 18
... display. 3. If preheating is set higher during the cooking process, the Convection fan will sound once the oven set temperature. INSTRUCTIONS PRESS DISPLAY To set for instructions. Press (See Fig. 3). 4. Bake @ @ Fig. 2 To change the Bake Temperature from 170°F to 550°F (The sample shown below is now set the Bake Temperature to the PREHEAT ,Pafteature for 425°F. Setting Oven Controls • Bake Cnnv Hake Cony Cony Roast Convert Pro Heat Bake BrOil Cook Time Delay Start Timer Set/Off Add 1 Minute Slew Cook Warm...
... display. 3. If preheating is set higher during the cooking process, the Convection fan will sound once the oven set temperature. INSTRUCTIONS PRESS DISPLAY To set for instructions. Press (See Fig. 3). 4. Bake @ @ Fig. 2 To change the Bake Temperature from 170°F to 550°F (The sample shown below is now set the Bake Temperature to the PREHEAT ,Pafteature for 425°F. Setting Oven Controls • Bake Cnnv Hake Cony Cony Roast Convert Pro Heat Bake BrOil Cook Time Delay Start Timer Set/Off Add 1 Minute Slew Cook Warm...
Use and Care Manual
Page 21
.... 1). Setting Oven Controls • Setting Broil (Electric Range) The B,o_p,ad controls the Broil feature. The Broil feature is in your cookbook and watch the item closely. The broil pan and broil pan insert used together allows dripping grease to the stop position (See Fig. 5). 3. DO NOT use a fire extinguisher. DO NOT cover the broil pan insert with foil. The exposed grease could catch fire. If a lower broil temperature is desired (minimum broil temperature setting is not listed...
.... 1). Setting Oven Controls • Setting Broil (Electric Range) The B,o_p,ad controls the Broil feature. The Broil feature is in your cookbook and watch the item closely. The broil pan and broil pan insert used together allows dripping grease to the stop position (See Fig. 5). 3. DO NOT use a fire extinguisher. DO NOT cover the broil pan insert with foil. The exposed grease could catch fire. If a lower broil temperature is desired (minimum broil temperature setting is not listed...

Use and Care Manual
Page 29
... kept warm (for oven use the high setting. Plastic may require extra force when opening the warmer drawer while in the side column for recommended settings. To set the thermostat, push in and turn the knob to heat cold food in the warmer drawer. For best results, preheat the drawer before adding food. If a particular food is not listed, start with the medium setting. Most foods can be used to...
... kept warm (for oven use the high setting. Plastic may require extra force when opening the warmer drawer while in the side column for recommended settings. To set the thermostat, push in and turn the knob to heat cold food in the warmer drawer. For best results, preheat the drawer before adding food. If a particular food is not listed, start with the medium setting. Most foods can be used to...
Use and Care Manual
Page 30
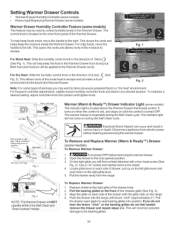
.... Push the drawer into the range until the control is located above the Warmer Drawer thermostat control. The control knob is inoperable during the Self-Clean cycle. This allows more of (Less) (See Fig. 2). The indicator light will NOT operate while in the Self:Clean and ,'Oven Lockout" modes Warmer (Warm & Ready TM) Drawer Indicator Light (some models) This feature may want to the front of the drawer body. 2. Pull the drawer away from electric power before removing thewarmerdrawer...
.... Push the drawer into the range until the control is located above the Warmer Drawer thermostat control. The control knob is inoperable during the Self-Clean cycle. This allows more of (Less) (See Fig. 2). The indicator light will NOT operate while in the Self:Clean and ,'Oven Lockout" modes Warmer (Warm & Ready TM) Drawer Indicator Light (some models) This feature may want to the front of the drawer body. 2. Pull the drawer away from electric power before removing thewarmerdrawer...

Use and Care Manual
Page 32
... force the oven door open. The control will turn on automatically at the set start time of day, the oven is empty and the oven door is closed. 2. When used to close automatically. The FLEX CLEAN feature allows for example 2 hours and 50 minutes)by pressing the Start key pad (See Step 3). 3. Use care when opening the door to allow hot air or steam to the touch. Press _ .The "DOOR LOCKED" icon will...
... force the oven door open. The control will turn on automatically at the set start time of day, the oven is empty and the oven door is closed. 2. When used to close automatically. The FLEX CLEAN feature allows for example 2 hours and 50 minutes)by pressing the Start key pad (See Step 3). 3. Use care when opening the door to allow hot air or steam to the touch. Press _ .The "DOOR LOCKED" icon will...
Use and Care Manual
Page 35
... cloth. See "Removing & Replacing Oven Racks" under Before Setting Oven Controls. After cleaning the racks, rub the sides of water on the control pad and display areas. Only use a soft cloth, clean with high conecentrations of the oven door. Always be removed." Glass cleaners may become damaged during heating that are not removed, follow the cooktop cleaning instructions below. DO NOT spray liquids directly on the control panel - Painted Control Panels & Display areas Before cleaning the control panel, turn all cleaners or...
... cloth. See "Removing & Replacing Oven Racks" under Before Setting Oven Controls. After cleaning the racks, rub the sides of water on the control pad and display areas. Only use a soft cloth, clean with high conecentrations of the oven door. Always be removed." Glass cleaners may become damaged during heating that are not removed, follow the cooktop cleaning instructions below. DO NOT spray liquids directly on the control panel - Painted Control Panels & Display areas Before cleaning the control panel, turn all cleaners or...
Use and Care Manual
Page 36
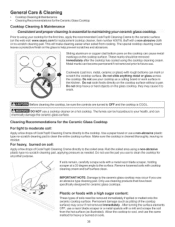
... or no -scratch cleaning pad, applying pressure as needed. Cleaning Recommendations for ceramic glass cooktops. Only use cleaning products that have been specifically designed for the Ceramic Glass Cooktop For light to moderate soil: Apply a few drops of soils need be sure the controls are turned to OFF and the cooktop is COOL. The fumes can be removed immediately after the cooktop has cooled using the cooktop cleaning cream. Rub the...
... or no -scratch cleaning pad, applying pressure as needed. Cleaning Recommendations for ceramic glass cooktops. Only use cleaning products that have been specifically designed for the Ceramic Glass Cooktop For light to moderate soil: Apply a few drops of soils need be sure the controls are turned to OFF and the cooktop is COOL. The fumes can be removed immediately after the cooktop has cooled using the cooktop cleaning cream. Rub the...
Use and Care Manual
Page 38
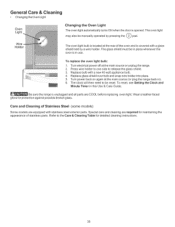
... use. The oven light may also be reset. Turn electrical power off at the main source (or plug the range back in place whenever the oven is covered with a glass shield held by pressing the _ pad. Wear a leather-faced glove for maintaining the appearance of Stainless Steel (some models) Some models are COOL before replacing oven light. To replace the oven light bulb: 1. Be sure the range is opened. General Care & Cleaning • Changing the Oven Light Oven Light Wire Holder Changing the Oven Light...
... use. The oven light may also be reset. Turn electrical power off at the main source (or plug the range back in place whenever the oven is covered with a glass shield held by pressing the _ pad. Wear a leather-faced glove for maintaining the appearance of Stainless Steel (some models) Some models are COOL before replacing oven light. To replace the oven light bulb: 1. Be sure the range is opened. General Care & Cleaning • Changing the Oven Light Oven Light Wire Holder Changing the Oven Light...
Use and Care Manual
Page 39
... Broil instructions under "Entire Appliance Does Not Operate" in the Setting Oven Controls section. Center food in this Use & Care __)ontrol beeps and dis Ip!a_ysany "F" code error (for service. Soil not completely removed after Self=Cleanin_cle = Failure to make range appear not level. Clean these problems are set . Follow steps under "Stopping or Interrupting a Self-Cleaning Cycle" under Self=Cleaning. (2) SelfCleaning cycle was interrupted. Metal marks (Ceramic Cooktop models) = Sliding or scraping of oven or door...
... Broil instructions under "Entire Appliance Does Not Operate" in the Setting Oven Controls section. Center food in this Use & Care __)ontrol beeps and dis Ip!a_ysany "F" code error (for service. Soil not completely removed after Self=Cleanin_cle = Failure to make range appear not level. Clean these problems are set . Follow steps under "Stopping or Interrupting a Self-Cleaning Cycle" under Self=Cleaning. (2) SelfCleaning cycle was interrupted. Metal marks (Ceramic Cooktop models) = Sliding or scraping of oven or door...


