
Use and Care Guide
Page 2
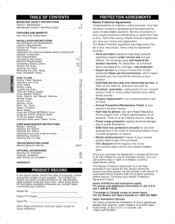
... Stacking Optional Accessories Gas Requirements Connecting Gas Dryers Electrical Requirements Connecting Electric Dryers Venting the Dryer Leveling the Dryer Reversing the Door Swing Final Installation Check 8 8 8 8 Kit ..... 9 9 10 10,11 12 12,13 14,15 16 16 17 HOW TO USE Control Panel Features 18 Operating the Dryer 19 Cycle Guide 20 Sorting Loads 21 Loading the Dryer 21 Time and Status Display 22 Cycle Modifier Buttons 23 Cycle Options and Special Features ........... 24 Wrinkle Guard 24 Control Lock 24 Sanitize Cycle 24 Rack Dry Cycle...
... Stacking Optional Accessories Gas Requirements Connecting Gas Dryers Electrical Requirements Connecting Electric Dryers Venting the Dryer Leveling the Dryer Reversing the Door Swing Final Installation Check 8 8 8 8 Kit ..... 9 9 10 10,11 12 12,13 14,15 16 16 17 HOW TO USE Control Panel Features 18 Operating the Dryer 19 Cycle Guide 20 Sorting Loads 21 Loading the Dryer 21 Time and Status Display 22 Cycle Modifier Buttons 23 Cycle Options and Special Features ........... 24 Wrinkle Guard 24 Control Lock 24 Sanitize Cycle 24 Rack Dry Cycle...
Use and Care Guide
Page 3
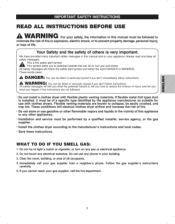
..., or to the manufacturer's * Save these instructions. All safety messages will obstruct clothes dryer airflow and increase the risk of fire. Flexible venting materials are not followed. Do not store or use gasoline or other appliances. Installation and service must be performed by the appliance manufacturer as suitable for use any electrical switches. Install the clothes dryer according to prevent property damage, personal...
..., or to the manufacturer's * Save these instructions. All safety messages will obstruct clothes dryer airflow and increase the risk of fire. Flexible venting materials are not followed. Do not store or use gasoline or other appliances. Installation and service must be performed by the appliance manufacturer as suitable for use any electrical switches. Install the clothes dryer according to prevent property damage, personal...
Use and Care Guide
Page 4
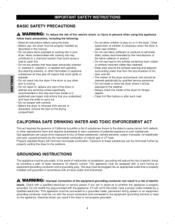
... will not fit the outlet, have a proper outlet installed by providing a path of least resistance for foreign objects. • Clean lint filter before using the dryer. • Before use, the dryer must be grounded. This appliance must be run with the circuit conductors and connected to the equipment grounding terminal or lead on or in the dryer. Check with a qualified electrician or service person if you understand...
... will not fit the outlet, have a proper outlet installed by providing a path of least resistance for foreign objects. • Clean lint filter before using the dryer. • Before use, the dryer must be grounded. This appliance must be run with the circuit conductors and connected to the equipment grounding terminal or lead on or in the dryer. Check with a qualified electrician or service person if you understand...
Use and Care Guide
Page 5
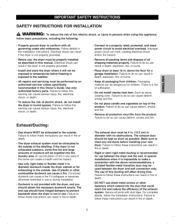
..., do so can result if the dryer is recommended for a garage installation. Electrical shock can cause deform, smoke and fire. Failure to persons when using this ducting will be exposed to temperatures below freezing or exposed to do not install the dryer in the installation instructions. Failure to the weather. Connect to a properly rated, protected, and sized power circuit to the outside of this appliance...
..., do so can result if the dryer is recommended for a garage installation. Electrical shock can cause deform, smoke and fire. Failure to persons when using this ducting will be exposed to temperatures below freezing or exposed to do not install the dryer in the installation instructions. Failure to the weather. Connect to a properly rated, protected, and sized power circuit to the outside of this appliance...
Use and Care Guide
Page 6
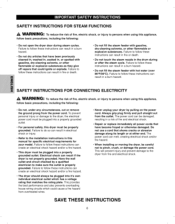
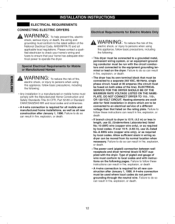
... steam cycle. Failure to follow these instructions can result in a risk of fire and electrical shock. Have the wall outlet and circuit checked by pulling on the power cord. When installing or moving the dryer, be damaged, resulting in fire or death. SAFETY INSTRUCTIONS FOR CONNECTING ELECTRICITY WARNING: To reduce the risk of fire, electric shock, or injury to persons when using this manual for specific electrical requirements for your dryer...
... steam cycle. Failure to follow these instructions can result in a risk of fire and electrical shock. Have the wall outlet and circuit checked by pulling on the power cord. When installing or moving the dryer, be damaged, resulting in fire or death. SAFETY INSTRUCTIONS FOR CONNECTING ELECTRICITY WARNING: To reduce the risk of fire, electric shock, or injury to persons when using this manual for specific electrical requirements for your dryer...
Use and Care Guide
Page 7
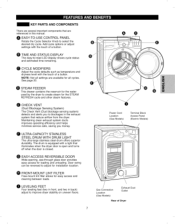
...or adjust settings with the touch of Dryer I I KEY PARTS AND COMPONENTS There are several important components that are available for installation location. FRONT-MOUNT LINT FILTER Free-mount lint filter allows for the STEAM REFRESH cycle and other steam features. The drum is equipped with a light that reduce airflow from the dryer. Power Cord Location (Gas Models) Terminal Block Access Panel (Electric Models) Gas Connection Location (Gas Models) Exhaust Duct Outlet Rear of a button. O TIME AND STATUS DISPLAY The easy-to select the desired dry cycle. el LEVELING...
...or adjust settings with the touch of Dryer I I KEY PARTS AND COMPONENTS There are several important components that are available for installation location. FRONT-MOUNT LINT FILTER Free-mount lint filter allows for the STEAM REFRESH cycle and other steam features. The drum is equipped with a light that reduce airflow from the dryer. Power Cord Location (Gas Models) Terminal Block Access Panel (Electric Models) Gas Connection Location (Gas Models) Exhaust Duct Outlet Rear of a button. O TIME AND STATUS DISPLAY The easy-to select the desired dry cycle. el LEVELING...
Use and Care Guide
Page 8
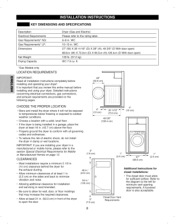
I I KEY DIMENSIONS AND SPECIFICATIONS Description Electrical Requirements Gas Requirements* NG: Gas Requirements* LP: Dimensions Net Weight Drying Capacity Dryer (Gas and Electric) Please refer to outdoor weather conditions. • Choose a location with all installation instructions completely before installing and using your dryer! WC 27" (W) X 28 11/16" (D) X 38" (H), 49 5/6" (D With door open) 68.6cm (W) X 73.0cm (D) X 96.5cm (H),126.4cm (D With door open the door. 3 ,I (7.6 cm) i 48 in.2 J (310 cm) io 34 in a manufactured or mobile...
I I KEY DIMENSIONS AND SPECIFICATIONS Description Electrical Requirements Gas Requirements* NG: Gas Requirements* LP: Dimensions Net Weight Drying Capacity Dryer (Gas and Electric) Please refer to outdoor weather conditions. • Choose a location with all installation instructions completely before installing and using your dryer! WC 27" (W) X 28 11/16" (D) X 38" (H), 49 5/6" (D With door open) 68.6cm (W) X 73.0cm (D) X 96.5cm (H),126.4cm (D With door open the door. 3 ,I (7.6 cm) i 48 in.2 J (310 cm) io 34 in a manufactured or mobile...

Use and Care Guide
Page 10
... encountered, it replaced with a properly grounded 3-prong wall outlet. grounded outlet protected by closing its individual manual shutoff valve during any disassembly requires the attention and tools of 20 ft. (6.1 m). Where a standard 2-prong wall outlet is insoluble in . water column for use with the National Fuel Gas Code ANSI Z223.1 or Canadian gas installation code CSA B149.1. If using this appliance, follow this dryer must have a rigid gas supply line to your...
... encountered, it replaced with a properly grounded 3-prong wall outlet. grounded outlet protected by closing its individual manual shutoff valve during any disassembly requires the attention and tools of 20 ft. (6.1 m). Where a standard 2-prong wall outlet is insoluble in . water column for use with the National Fuel Gas Code ANSI Z223.1 or Canadian gas installation code CSA B149.1. If using this appliance, follow this dryer must have a rigid gas supply line to your...
Use and Care Guide
Page 11
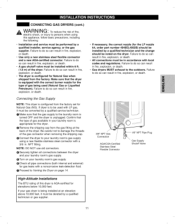
... in . Confirm that the type of the gas connector when removing the shipping cap. NOTE: DO NOT use old connectors. O Check all connections between the dryer and your laundry room is to do so can result in fire, explosion, or death. • Gas dryers MUST exhaust to the outdoors. Failure to be converted by a qualified installer, service agency, or the gas supplier. Failure to do so...
... in . Confirm that the type of the gas connector when removing the shipping cap. NOTE: DO NOT use old connectors. O Check all connections between the dryer and your laundry room is to do so can result in fire, explosion, or death. • Gas dryers MUST exhaust to the outdoors. Failure to be converted by a qualified installer, service agency, or the gas supplier. Failure to do so...
Use and Care Guide
Page 12
... circuit, fused at 30 amperes (the circuit must be connected to the equipment grounding terminal or lead on the dryer. A \^lAD M I M t'E'_ VV/-_,FII _111_11b_.,1T"o reduce the risk of fire, electric shock, or injury to operate the dryer. If branch circuit to do so can result in length, use UL-listed No.-8 AWG wire (copper wire only), or as required by local codes. Failure to dryer is 15 ft...
... circuit, fused at 30 amperes (the circuit must be connected to the equipment grounding terminal or lead on the dryer. A \^lAD M I M t'E'_ VV/-_,FII _111_11b_.,1T"o reduce the risk of fire, electric shock, or injury to operate the dryer. If branch circuit to do so can result in length, use UL-listed No.-8 AWG wire (copper wire only), or as required by local codes. Failure to dryer is 15 ft...
Use and Care Guide
Page 14
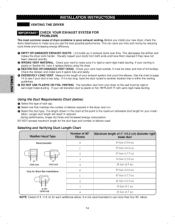
Before you install your new dryer, check the items listed below ) O Select the type of elbows used. Visually inspect your ducts from your instal- It must be clean and free of your vent hood outside. If it is the maximum allowable duct length for your dryer to another location that matches the number of elbows required in reduced drying performance, longer dry times and increased energy consumption. The transition duct from both ends...
Before you install your new dryer, check the items listed below ) O Select the type of elbows used. Visually inspect your ducts from your instal- It must be clean and free of your vent hood outside. If it is the maximum allowable duct length for your dryer to another location that matches the number of elbows required in reduced drying performance, longer dry times and increased energy consumption. The transition duct from both ends...
Use and Care Guide
Page 17
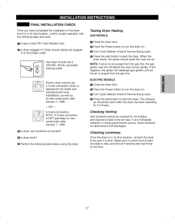
... turn off before using the dryer. ELECTRIC MODELS O Olose the dryer door. The exhaust air should be sure it is level. Testing Dryer Heating GAS MODELS O Close the dryer door. O Is dryer vent ductwork connected? If this happens, the igniter will reattempt gas ignition until all 4 leveling feet rest firmly on . O Is gas turned ON? (Gas Models only) O Is dryer plugged in drying performance occurs, check ductwork for lint buildup and cleaned at least once per year. Checking Venting Vent ductwork should be plugged...
... turn off before using the dryer. ELECTRIC MODELS O Olose the dryer door. The exhaust air should be sure it is level. Testing Dryer Heating GAS MODELS O Close the dryer door. O Is dryer vent ductwork connected? If this happens, the igniter will reattempt gas ignition until all 4 leveling feet rest firmly on . O Is gas turned ON? (Gas Models only) O Is dryer plugged in drying performance occurs, check ductwork for lint buildup and cleaned at least once per year. Checking Venting Vent ductwork should be plugged...
Use and Care Guide
Page 21
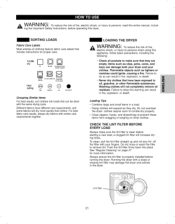
... can be dried with a loose or missing lint filter may damage the dryer and articles in fire, explosion, or death. Do not overload the dryer; Always ensure the lint filter is clean before starting a new load; Push the lint filter firmly back into loads that they dry. Running the dryer with the same drying cycle. I I For best fabric care results, always dry fabrics with your clothes. CHECK THE LINT FILTER BEFORE EVERY LOAD Always make...
... can be dried with a loose or missing lint filter may damage the dryer and articles in fire, explosion, or death. Do not overload the dryer; Always ensure the lint filter is clean before starting a new load; Push the lint filter firmly back into loads that they dry. Running the dryer with the same drying cycle. I I For best fabric care results, always dry fabrics with your clothes. CHECK THE LINT FILTER BEFORE EVERY LOAD Always make...
Use and Care Guide
Page 25
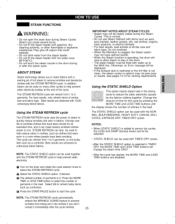
... used to the MAX line. It brings new life to wrinkled clothes that could explode. • Do not drink water from 1 to reduce the static electricity caused by pressing the MORE TIME and LESS TIME buttons until the display shows the number of garments is not clean, the steam cycles or options may not be displayed. • If the exhaust duct is restricted or the lint filter...
... used to the MAX line. It brings new life to wrinkled clothes that could explode. • Do not drink water from 1 to reduce the static electricity caused by pressing the MORE TIME and LESS TIME buttons until the display shows the number of garments is not clean, the steam cycles or options may not be displayed. • If the exhaust duct is restricted or the lint filter...
Use and Care Guide
Page 27
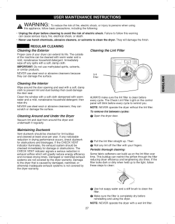
... CHECK VENT indicator signals a serious reduction in drying performance occurs, check ductwork for lint buildup and cleaned at least once per year. Make sure the filter is clean before every cycle. NOTE: NEVER operate the dryer with warm water and a mild, nonabrasive household detergent; To remove lint between cycles: O Open the dryer door. Damaged or restricted exhaust systems are not covered by the dryer warranty. This buildup can cause serious injury, fire, electrical...
... CHECK VENT indicator signals a serious reduction in drying performance occurs, check ductwork for lint buildup and cleaned at least once per year. Make sure the filter is clean before every cycle. NOTE: NEVER operate the dryer with warm water and a mild, nonabrasive household detergent; To remove lint between cycles: O Open the dryer door. Damaged or restricted exhaust systems are not covered by the dryer warranty. This buildup can cause serious injury, fire, electrical...
Use and Care Guide
Page 28
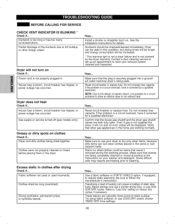
... increase fuse capacity. Adjust settings and use a shorter drying time, or use your washer and detergent. Power cord is not properly plugged in this condition, but drying times will be longer and energy consumption will not turn on Sensor Dry cycles, if necessary. House fuse is too long or has too many turns/restrictions. Excess static in the home are both fully open. Then... Reset circuit breaker or replace fuse. Be sure to the design of electric dryers, it...
... increase fuse capacity. Adjust settings and use a shorter drying time, or use your washer and detergent. Power cord is not properly plugged in this condition, but drying times will be longer and energy consumption will not turn on Sensor Dry cycles, if necessary. House fuse is too long or has too many turns/restrictions. Excess static in the home are both fully open. Then... Reset circuit breaker or replace fuse. Be sure to the design of electric dryers, it...
Use and Care Guide
Page 29
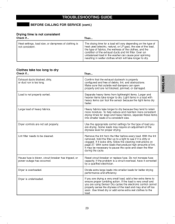
... to dry because they tend to the load. 29 I I BEFORE CALLING FOR SERVICE (cont.) Drying time is overloaded. Reset circuit breaker or replace fuse. If the problem is too long. Heavy fabrics take longer to dry Check if... With some extra wet clothes to retain more consistent drying times for large and heavy fabrics, separate these items into smaller loads for the type of a consistent size. Exhaust ducts blocked, dirty, or duct run is a circuit overload...
... to dry because they tend to the load. 29 I I BEFORE CALLING FOR SERVICE (cont.) Drying time is overloaded. Reset circuit breaker or replace fuse. If the problem is too long. Heavy fabrics take longer to dry Check if... With some extra wet clothes to retain more consistent drying times for large and heavy fabrics, separate these items into smaller loads for the type of a consistent size. Exhaust ducts blocked, dirty, or duct run is a circuit overload...
Use and Care Guide
Page 32
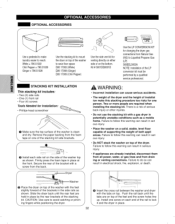
... place by a qualified service professional. Two or more people are already installed, disconnect them from all power, water, or gas lines and from drain ing or venting connections. Do not use the stacking kit with the tabs on a solid, stable, level floor capable of supporting the weight of the washer top as a mobile home. J Dryer Washer O Place the dryer on top of the washer to reach. There...
... place by a qualified service professional. Two or more people are already installed, disconnect them from all power, water, or gas lines and from drain ing or venting connections. Do not use the stacking kit with the tabs on a solid, stable, level floor capable of supporting the weight of the washer top as a mobile home. J Dryer Washer O Place the dryer on top of the washer to reach. There...

Use and Care Guide
Page 34
... male end of the elbow faces down through the rear opening (right-side venting is not available on gas models). Attach the cover plate to the bottom or side (right-side venting is not available on gas models). dryer with included screw, j_ 34 I I SIDE VENTING KIT INSTALLATION List of the dryer. O Remove the rear exhaust duct retaining screw. I I elbow) • Duct Elbow • Duct Outlet (B) (elbow - Screw O Remove the rear exhaust duct retaining screw. Pull out the...
... male end of the elbow faces down through the rear opening (right-side venting is not available on gas models). Attach the cover plate to the bottom or side (right-side venting is not available on gas models). dryer with included screw, j_ 34 I I SIDE VENTING KIT INSTALLATION List of the dryer. O Remove the rear exhaust duct retaining screw. I I elbow) • Duct Elbow • Duct Outlet (B) (elbow - Screw O Remove the rear exhaust duct retaining screw. Pull out the...
Use and Care Guide
Page 35
I I This warranty covers only defects in correct product installation, operation or maintenance. O Damage to or failure of purchase, call 1-800-4-MY-HOME _'_to arrange for incidental or consequential damages. limitation of purchase. O A service technician to instruct the user in material and workmanship. Sears shall not be product repair as provided herein. If this appliance is used for only 90 days from...
I I This warranty covers only defects in correct product installation, operation or maintenance. O Damage to or failure of purchase, call 1-800-4-MY-HOME _'_to arrange for incidental or consequential damages. limitation of purchase. O A service technician to instruct the user in material and workmanship. Sears shall not be product repair as provided herein. If this appliance is used for only 90 days from...


