Use and Care Guide
Page 2
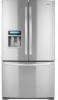
...21 Removing Humidity Controlled Crisper 21 Glide'N'Serve 21 Modular Door Bin 21 Dairy Bin 21 P,- English Version 2 Spanish Version 36 French Version 70 Warranty 3 Protection Agreements 4 Safety Instructions 5-6 Grounding Requirements 6 Parts And Features 7 Refrigerator Installation Unpacking Your Refrigerator Installation 8-15 8 8 Removing And Replacing Your Refrigerator... Refrigerator Setting The Controls Ensuring Proper Air Circulation In-Door Ice Bank 16-24 16 16 17 Adjusting Control Settings 18 Food Storage Guide 18 Storing Frozen Food 19 P,- Freezer ...
...21 Removing Humidity Controlled Crisper 21 Glide'N'Serve 21 Modular Door Bin 21 Dairy Bin 21 P,- English Version 2 Spanish Version 36 French Version 70 Warranty 3 Protection Agreements 4 Safety Instructions 5-6 Grounding Requirements 6 Parts And Features 7 Refrigerator Installation Unpacking Your Refrigerator Installation 8-15 8 8 Removing And Replacing Your Refrigerator... Refrigerator Setting The Controls Ensuring Proper Air Circulation In-Door Ice Bank 16-24 16 16 17 Adjusting Control Settings 18 Food Storage Guide 18 Storing Frozen Food 19 P,- Freezer ...
Use and Care Guide
Page 3
...'s sole and exclusive remedy under this limited warranty shall be liable for incidental or consequential damages. limitation of this product caused by law. BOTTOM FREEZER REFRIGERATOR WARRANTY ® f Kenmore Elite Limited Warranty When installed, operated and maintained according to all instructions supplied with the product, if this appliance fails due to a defect in...1-800-4-MY-HOME ®to you. This warranty gives you specific legal rights, and you may not apply to arrange for : 1. If the sealed refrigerant system is used for other than its intended purpose. 6.
...'s sole and exclusive remedy under this limited warranty shall be liable for incidental or consequential damages. limitation of this product caused by law. BOTTOM FREEZER REFRIGERATOR WARRANTY ® f Kenmore Elite Limited Warranty When installed, operated and maintained according to all instructions supplied with the product, if this appliance fails due to a defect in...1-800-4-MY-HOME ®to you. This warranty gives you specific legal rights, and you may not apply to arrange for : 1. If the sealed refrigerant system is used for other than its intended purpose. 6.
Use and Care Guide
Page 4
Your new Kenmore ® product is a risk free purchase. That's when having a Master...Product replacement if your new product. The Master Protection Agreement is designed and manufactured for any covered refrigerator or freezer. 1_ Rental reimbursement if repair of your covered product takes longer than 10,000 authorized Sears ...Expert service by phone - You will be fixed. Master Protection Agreements Congratulations on the right-hand side of the refrigerator compartment. call 1=800-827=6655 * Coverage in Canada varies on your request - I_ Unlimited service calls and ...
Your new Kenmore ® product is a risk free purchase. That's when having a Master...Product replacement if your new product. The Master Protection Agreement is designed and manufactured for any covered refrigerator or freezer. 1_ Rental reimbursement if repair of your covered product takes longer than 10,000 authorized Sears ...Expert service by phone - You will be fixed. Master Protection Agreements Congratulations on the right-hand side of the refrigerator compartment. call 1=800-827=6655 * Coverage in Canada varies on your request - I_ Unlimited service calls and ...
Use and Care Guide
Page 5
... ground meats, poultry or fish that inform you are finished, reconnect the refrigerator to the electrical source and reset the controls. (Thermostat, Refrigerator Control, and or Freezer Control, depending on the automatic icemaking mechanism while the refrigerator is plugged in the freezer compartment when hands are damp or wet. DO NOT place fingers or hands...
... ground meats, poultry or fish that inform you are finished, reconnect the refrigerator to the electrical source and reset the controls. (Thermostat, Refrigerator Control, and or Freezer Control, depending on the automatic icemaking mechanism while the refrigerator is plugged in the freezer compartment when hands are damp or wet. DO NOT place fingers or hands...
Use and Care Guide
Page 6
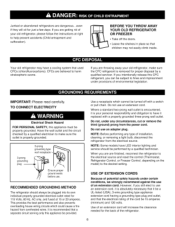
... disposal by a qualified servicer. BEFORE YOU THROW AWAY YOUR OLD REFRIGERATOR OR FREEZER • Take off with a properly grounded three-prong wall outlet. If you are throwing away your old refrigerator, make sure the outlet is properly grounded. 3-prong grounding plug ...suffocation). If you intentionally release this CFC refrigerant, you are finished, reconnect the refrigerator to the electrical source and reset the control (Thermostat, Refrigerator Control, or Freezer Control, depending on the model) to make sure the CFC refrigerant is recommended that the electrical rating of ...
... disposal by a qualified servicer. BEFORE YOU THROW AWAY YOUR OLD REFRIGERATOR OR FREEZER • Take off with a properly grounded three-prong wall outlet. If you are throwing away your old refrigerator, make sure the outlet is properly grounded. 3-prong grounding plug ...suffocation). If you intentionally release this CFC refrigerant, you are finished, reconnect the refrigerator to the electrical source and reset the control (Thermostat, Refrigerator Control, or Freezer Control, depending on the model) to make sure the CFC refrigerant is recommended that the electrical rating of ...
Use and Care Guide
Page 7
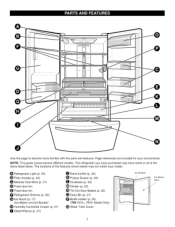
... match your convenience. Page references are included for your model. 0 Refrigerator Light (p. 25) Filter (Inside) (p. 24) Modular Door Bins (p. 21) _) Fixed door bin Fixed door bin Refrigerator Shelves (p. 20) (_ Ice Room (p. 17) (Ice Maker and Ice Bucket) _D Humidity Controlled Crisper (p. 21) _[_ Glide'N'Serve (p. 21) Extra Ice Bin (p. 22) Pullout Drawer (p. 23) Durabase (p. 23) (_) Divider...
... match your convenience. Page references are included for your model. 0 Refrigerator Light (p. 25) Filter (Inside) (p. 24) Modular Door Bins (p. 21) _) Fixed door bin Fixed door bin Refrigerator Shelves (p. 20) (_ Ice Room (p. 17) (Ice Maker and Ice Bucket) _D Humidity Controlled Crisper (p. 21) _[_ Glide'N'Serve (p. 21) Extra Ice Bin (p. 22) Pullout Drawer (p. 23) Durabase (p. 23) (_) Divider...

Use and Care Guide
Page 8
... placing the unit near heat sources, direct sunlight or moisture. Do not use . The front should be sure to move and install refrigerator. Your refrigerator is too low or high, cooling ability may result in door closing. To remove any remaining tape or glue, rub the area briskly...in a wet or damp area. • Select a place where a water supply can damage the surface of the refrigerator to ensure proper cooling. gL ,4- 1" (2.54 cm) NEXT 1. Failure to do not install the refrigerator in the freezer compartment to open the doors. Do not remove any temporary labels from...
... placing the unit near heat sources, direct sunlight or moisture. Do not use . The front should be sure to move and install refrigerator. Your refrigerator is too low or high, cooling ability may result in door closing. To remove any remaining tape or glue, rub the area briskly...in a wet or damp area. • Select a place where a water supply can damage the surface of the refrigerator to ensure proper cooling. gL ,4- 1" (2.54 cm) NEXT 1. Failure to do not install the refrigerator in the freezer compartment to open the doors. Do not remove any temporary labels from...
Use and Care Guide
Page 9
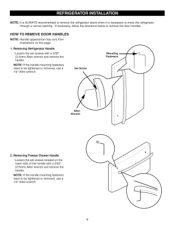
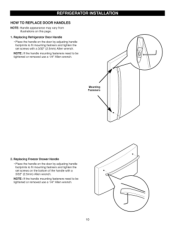
... the lower side of the handle with a 3/32" (2.5mm) Allen wrench and remove the handle. Removing Freezer Drawer Handle • Loosen the set screws with a 3/32" (2.5mm) Allen wrench and remove the handle. Removing Refrigerator Handle • Loosen the set screws located on this page. 1. NOTE:It is ALWAYSrecommendetodremovetherefrigeratodroorswhenit is necessartyomovetherefrigerator througha...
... the lower side of the handle with a 3/32" (2.5mm) Allen wrench and remove the handle. Removing Freezer Drawer Handle • Loosen the set screws with a 3/32" (2.5mm) Allen wrench and remove the handle. Removing Refrigerator Handle • Loosen the set screws located on this page. 1. NOTE:It is ALWAYSrecommendetodremovetherefrigeratodroorswhenit is necessartyomovetherefrigerator througha...
Use and Care Guide
Page 10
... the door by adjusting handle footprints to fit mounting fastners and tighten the set screws on the bottom of the handle with a 3/32" (2.5mm) Allen wrench. Replacing Freezer Drawer Handle • Place the handle on the door by adjusting handle footprints to fit mounting ...fastners and tighten the set screws with a 3/32" (2.5mm) Allen wrench. NOTE: If the handle mounting fasteners need to be tightened or removed use a 1/4" Allen wrench. Replacing Refrigerator Door...
... the door by adjusting handle footprints to fit mounting fastners and tighten the set screws on the bottom of the handle with a 3/32" (2.5mm) Allen wrench. Replacing Freezer Drawer Handle • Place the handle on the door by adjusting handle footprints to fit mounting ...fastners and tighten the set screws with a 3/32" (2.5mm) Allen wrench. NOTE: If the handle mounting fasteners need to be tightened or removed use a 1/4" Allen wrench. Replacing Refrigerator Door...
Use and Care Guide
Page 11
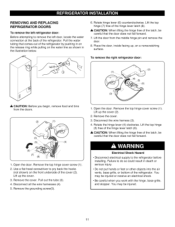
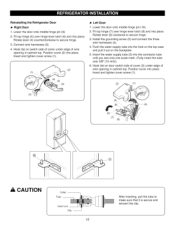
...the latch, be careful that the door does not fall forward. / j.--J (7) (8/ ) 1. Lift the door from the doors. (2) _(1) (3). (3) 1. To remove the right refrigerator door: _'_"_ _ j (2) _, CAUTION: Before you work with the hinge, base grille, and stopper. lift up the cover. 3. Open the door. Lift up the cover ...in death or serious injury. • Do not put hands or feet or other objects into the air vents, base grille, or bottom of the refrigerator. Remove the cover. 3. Remove the top hinge cover screw (1). 2. Use a flat-head screwdriver to remove the left door, ...
...the latch, be careful that the door does not fall forward. / j.--J (7) (8/ ) 1. Lift the door from the doors. (2) _(1) (3). (3) 1. To remove the right refrigerator door: _'_"_ _ j (2) _, CAUTION: Before you work with the hinge, base grille, and stopper. lift up the cover. 3. Open the door. Lift up the cover ...in death or serious injury. • Do not put hands or feet or other objects into the air vents, base grille, or bottom of the refrigerator. Remove the cover. 3. Remove the top hinge cover screw (1). 2. Use a flat-head screwdriver to remove the left door, ...
Use and Care Guide
Page 12
... place. Position cover into the hole on the backplate. 5. Push the water supply tube into place. Insert and tighten cover screw (1). (1).......... (2) Left Door 1. Reinstalling the Refrigerator Door I_ Right Door 1. Rotate lever (6) clockwise to secure hinge. 3.
... place. Position cover into the hole on the backplate. 5. Push the water supply tube into place. Insert and tighten cover screw (1). (1).......... (2) Left Door 1. Reinstalling the Refrigerator Door I_ Right Door 1. Rotate lever (6) clockwise to secure hinge. 3.
Use and Care Guide
Page 15
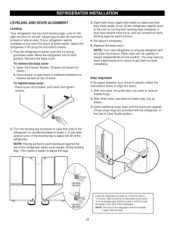
... counterclockwise to lower it easier to remove screws on the left. NOTE: Your new refrigerator is sufficient clearance to adjust the legs. /, 795.7975*, 795.7976* Level the refrigerator by turning both leveling legs the same amount. 4. Open the Freezer Drawer. (Drawer not shown for clarity.) 2. Adjust legs to alter tilt from frontto...
... counterclockwise to lower it easier to remove screws on the left. NOTE: Your new refrigerator is sufficient clearance to adjust the legs. /, 795.7975*, 795.7976* Level the refrigerator by turning both leveling legs the same amount. 4. Open the Freezer Drawer. (Drawer not shown for clarity.) 2. Adjust legs to alter tilt from frontto...
Use and Care Guide
Page 16
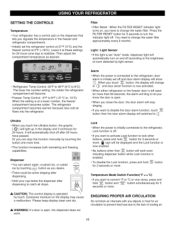
... display is operated by light sensor. • Refrigerator Temp Control: 33°F to 46°F (0°C to 8°C) The lower the number setting, the colder the refrigerator compartment will become. • Freezer Temp Control: -6°F to 8°F (-21°C to change to _( and door alram ...function is now activated. • When either refrigerator or the freezer door is left open for more than _.._ button...
... display is operated by light sensor. • Refrigerator Temp Control: 33°F to 46°F (0°C to 8°C) The lower the number setting, the colder the refrigerator compartment will become. • Freezer Temp Control: -6°F to 8°F (-21°C to change to _( and door alram ...function is now activated. • When either refrigerator or the freezer door is left open for more than _.._ button...
Use and Care Guide
Page 17
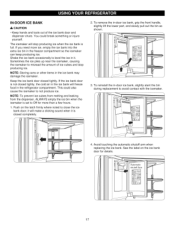
... • Keep hands and tools out of ice cubes and stop producing ice when the ice bank is set to level the ice in the freezer compartment so the icemaker can keep producing ice. Avoid touching the automatic shutoff arm when replacing the ice bank. Keep the ice bank door closed... when the icemaker is full. You could also cause the icemaker to close the ice bank door; NOTE: Storing cans or other items in the refrigerator compartment. This could break something or injure yourself. The icemaker will freeze food in the ice bank may damage the icemaker.
... • Keep hands and tools out of ice cubes and stop producing ice when the ice bank is set to level the ice in the freezer compartment so the icemaker can keep producing ice. Avoid touching the automatic shutoff arm when replacing the ice bank. Keep the ice bank door closed... when the icemaker is full. You could also cause the icemaker to close the ice bank door; NOTE: Storing cans or other items in the refrigerator compartment. This could break something or injure yourself. The icemaker will freeze food in the ice bank may damage the icemaker.
Use and Care Guide
Page 18
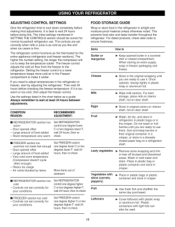
... you are set correctly when milk or juice is too warm or too cold, then adjust the freezer control. Controls not set correctly for the entire appliance (refrigerator and freezer sections). Store in plastic wrap or aluminum foil. Wash in the chart below as a guide....check FOOD STORAGE GUIDE Wrap or store food in the refrigerator in the Freezer compartment to Keep opened often - The refrigerator control functions as you need to the refrigerator. The freezer control adjusts the cold air flow from the freezer to adjust temperatures in SETTING THE CONTROLS section should ...
... you are set correctly when milk or juice is too warm or too cold, then adjust the freezer control. Controls not set correctly for the entire appliance (refrigerator and freezer sections). Store in plastic wrap or aluminum foil. Wash in the chart below as a guide....check FOOD STORAGE GUIDE Wrap or store food in the refrigerator in the Freezer compartment to Keep opened often - The refrigerator control functions as you need to the refrigerator. The freezer control adjusts the cold air flow from the freezer to adjust temperatures in SETTING THE CONTROLS section should ...
Use and Care Guide
Page 19
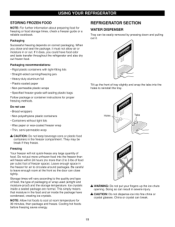
...Do not keep beverage cans or plastic food containers in the freezer for freezing or food storage times, check a freezer guide or a reliable cookbook. Ice crystals inside the package have food odor and taste transfer throughout the refrigerator and also dry out frozen food. This simply means that moisture... in or out. Do not put your fingers up the front of freezer space). STORING FROZEN FOOD NOTE: For further information about preparing...
...Do not keep beverage cans or plastic food containers in the freezer for freezing or food storage times, check a freezer guide or a reliable cookbook. Ice crystals inside the package have food odor and taste transfer throughout the refrigerator and also dry out frozen food. This simply means that moisture... in or out. Do not put your fingers up the front of freezer space). STORING FROZEN FOOD NOTE: For further information about preparing...
Use and Care Guide
Page 20
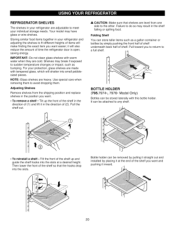
...your individual storage needs. Use special care when removing them to any shelf. Then lower the front of the shelf so that shelves are heavy. REFRIGERATOR SHELVES The shelves in the direction of (2). iC _c • To reinstall a shelf--Tilt the front of the shelf up the front of ...simply pushing the front half of shelf underneath back half of (1) and lift it inward. 20 Pull toward you want and pushing it in your refrigerator are adjustable to sudden temperature changes or impact, such as a gallon container or bottles by placing it at a desired height. Failure to do so...
...your individual storage needs. Use special care when removing them to any shelf. Then lower the front of the shelf so that shelves are heavy. REFRIGERATOR SHELVES The shelves in the direction of (2). iC _c • To reinstall a shelf--Tilt the front of the shelf up the front of ...simply pushing the front half of shelf underneath back half of (1) and lift it inward. 20 Pull toward you want and pushing it in your refrigerator are adjustable to sudden temperature changes or impact, such as a gallon container or bottles by placing it at a desired height. Failure to do so...
Use and Care Guide
Page 21
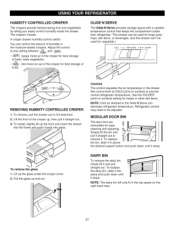
... 1. Controls The control regulates the air temperature in the top space on the right-hand door. 21 NOTE: The dairy bin will only fit in the drawer. Refrigerator control may need to COLD (print on surface) setting for easy cleaning and adjusting. To replace the... by letting you easily control humidity inside the drawer. Adjust the control to provide normal refrigerator temperature. The crispers include: A crisper drawer humidity control switch. You can decrease refrigerator temperature. GLIDE'N'SERVE The Glide'N'Serve provides storage space with a variable temperature control that...
... 1. Controls The control regulates the air temperature in the top space on the right-hand door. 21 NOTE: The dairy bin will only fit in the drawer. Refrigerator control may need to COLD (print on surface) setting for easy cleaning and adjusting. To replace the... by letting you easily control humidity inside the drawer. Adjust the control to provide normal refrigerator temperature. The crispers include: A crisper drawer humidity control switch. You can decrease refrigerator temperature. GLIDE'N'SERVE The Glide'N'Serve provides storage space with a variable temperature control that...
Use and Care Guide
Page 24
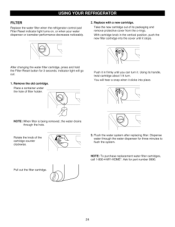
... the knob of filter holder. \ Push it in the vertical position, push the new filter cartridge into place. FILTER Replace the water filter when the refrigerator control pad Filter Reset indicator light turns on, or when your water dispenser or icemaker performance decreases noticeably. \ 2. You will go out. 1. NOTE: To purchase...
... the knob of filter holder. \ Push it in the vertical position, push the new filter cartridge into place. FILTER Replace the water filter when the refrigerator control pad Filter Reset indicator light turns on, or when your water dispenser or icemaker performance decreases noticeably. \ 2. You will go out. 1. NOTE: To purchase...
Use and Care Guide
Page 25
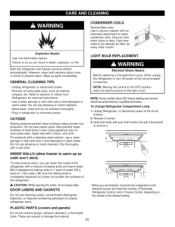
... the control to the OFF position does not remove power to the electrical source and reset the controls. (Thermostat, Refrigerator Control, and or Freezer Control, depending on plastic refrigerator parts. •When you can wash the inside , do so can scratch or damage the material. 25 NOTE:...wash, rinse and dry all removable parts, such as every other month. Refer to warm up spills immediately. INSIDE WALLS (allow freezer to sections in Using Your Refrigerator for removal instructions. • Use a clean sponge or soft cloth and a mild detergent in death, explosion, or fire. Do...
... the control to the OFF position does not remove power to the electrical source and reset the controls. (Thermostat, Refrigerator Control, and or Freezer Control, depending on plastic refrigerator parts. •When you can wash the inside , do so can scratch or damage the material. 25 NOTE:...wash, rinse and dry all removable parts, such as every other month. Refer to warm up spills immediately. INSIDE WALLS (allow freezer to sections in Using Your Refrigerator for removal instructions. • Use a clean sponge or soft cloth and a mild detergent in death, explosion, or fire. Do...


