Use and Care Guide
Page 2
...Refrigerator Shelves 21 Bottle Holder 21 Humidity Controlled Crisper 22 Removing Humidity Controlled Crisper 22 Glide'N'Serve 22 Modular Door Bin 22 Dairy Bin 22 Egg Box 22 P,- Freezer Section Tilting Door 23 Tilt-Out Door Basket 23 Extra Ice Bin 23 Durabase 24 Durabase Divider 24 PullOut Drawer 24... Parts And Features 7 Refrigerator Installation Unpacking Your Refrigerator Installation 8-15 8 8 Removing And Replacing Your Refrigerator Handles And Doors Leveling And Door Alignment Base Cover 9-14 15 15 Using Your Refrigerator Setting The Controls Ensuring ...
...Refrigerator Shelves 21 Bottle Holder 21 Humidity Controlled Crisper 22 Removing Humidity Controlled Crisper 22 Glide'N'Serve 22 Modular Door Bin 22 Dairy Bin 22 Egg Box 22 P,- Freezer Section Tilting Door 23 Tilt-Out Door Basket 23 Extra Ice Bin 23 Durabase 24 Durabase Divider 24 PullOut Drawer 24... Parts And Features 7 Refrigerator Installation Unpacking Your Refrigerator Installation 8-15 8 8 Removing And Replacing Your Refrigerator Handles And Doors Leveling And Door Alignment Base Cover 9-14 15 15 Using Your Refrigerator Setting The Controls Ensuring ...
Use and Care Guide
Page 3
BOTTOM FREEZER REFRIGERATOR WARRANTY ® f Kenmore Elite Limited Warranty When installed, operated and maintained according to all instructions supplied with the product, if this appliance fails due to a defect in material and ... implied warranties; Damage to or failure of detergents, cleaners, chemicals or utensils other than those recommended in the United States or Canada. If the sealed refrigerant system is not installed, operated or maintained according to the all instructions supplied with the product. 5. Disclaimer of this limited warranty shall be liable for...
BOTTOM FREEZER REFRIGERATOR WARRANTY ® f Kenmore Elite Limited Warranty When installed, operated and maintained according to all instructions supplied with the product, if this appliance fails due to a defect in material and ... implied warranties; Damage to or failure of detergents, cleaners, chemicals or utensils other than those recommended in the United States or Canada. If the sealed refrigerant system is not installed, operated or maintained according to the all instructions supplied with the product. 5. Disclaimer of this limited warranty shall be liable for...
Use and Care Guide
Page 4
..., model and serial number of home appliances, garage door openers, water heaters, and other major home items, in the U.S.A. Your new Kenmore ® product is designed and manufactured for any food spoilage that it takes for future reference. But like all products, it Rapid Resolution...'s manual." [_ Power surge protection against electrical damage due to time. Annual Preventive Maintenance Check at 1=800=361=6665. Think of any covered refrigerator or freezer. I_ 10% discount off the regular price of us as you want us. Once you want us, whenever you purchase the Agreement, a ...
..., model and serial number of home appliances, garage door openers, water heaters, and other major home items, in the U.S.A. Your new Kenmore ® product is designed and manufactured for any food spoilage that it takes for future reference. But like all products, it Rapid Resolution...'s manual." [_ Power surge protection against electrical damage due to time. Annual Preventive Maintenance Check at 1=800=361=6665. Think of any covered refrigerator or freezer. I_ 10% discount off the regular price of us as you want us. Once you want us, whenever you purchase the Agreement, a ...
Use and Care Guide
Page 5
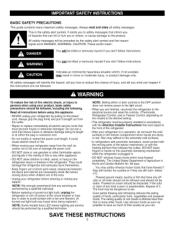
...can kill or hurt you are finished, reconnect the refrigerator to the electrical source and reset the controls. (Thermostat, Refrigerator Control, and or Freezer Control, depending on the model) to the desired setting. •This refrigerator must be followed, including the following. All safety ...climb, stand, or hang on the refrigerator doors or shelves in the area. • Unplug your refrigerator before using your product, basic safety precautions should be properly installed in the freezer compartment when hands are in the refrigerator. These words mean: You will identify ...
...can kill or hurt you are finished, reconnect the refrigerator to the electrical source and reset the controls. (Thermostat, Refrigerator Control, and or Freezer Control, depending on the model) to the desired setting. •This refrigerator must be followed, including the following. All safety ...climb, stand, or hang on the refrigerator doors or shelves in the area. • Unplug your refrigerator before using your product, basic safety precautions should be properly installed in the freezer compartment when hands are in the refrigerator. These words mean: You will identify ...
Use and Care Guide
Page 6
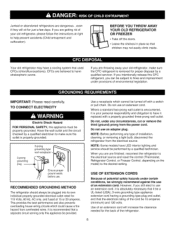
BEFORE YOU THROW AWAY YOUR OLD REFRIGERATOR OR FREEZER • Take off with a properly grounded three-prong wall outlet. Your old refrigerator may have a cooling system that children may not easily climb inside. TO CONNECT ELECTRICITY Electric Shock Hazard FOR PERSONAL SAFETY,... use an adapter plug. When you are finished, reconnect the refrigerator to the electrical source and reset the control (Thermostat, Refrigerator Control, or Freezer Control, depending on the model) to make sure the outlet is your old refrigerator, please follow the instructions at 15 or 20 amperes. CFCs are...
BEFORE YOU THROW AWAY YOUR OLD REFRIGERATOR OR FREEZER • Take off with a properly grounded three-prong wall outlet. Your old refrigerator may have a cooling system that children may not easily climb inside. TO CONNECT ELECTRICITY Electric Shock Hazard FOR PERSONAL SAFETY,... use an adapter plug. When you are finished, reconnect the refrigerator to the electrical source and reset the control (Thermostat, Refrigerator Control, or Freezer Control, depending on the model) to make sure the outlet is your old refrigerator, please follow the instructions at 15 or 20 amperes. CFCs are...

Use and Care Guide
Page 7
... (Inside) (p. 25) (_ Modular Door Bins (p. 22) _) Fixed Door Bin Fixed Door Bin Refrigerator Shelves (p. 21) (_ Ice Room (p. 17) (Ice Maker and Ice Bucket) _D Humidity Controlled Crisper (p. 22) _[_ Glide'N'Serve (p. 22) Extra Ice Bin (p. 23) Pullout Drawer (p. 24) Durabase (p. 24) (_) Divider (p. 24) _) Tilt-Out Door Basket (p. 23) (_ Dairy Bin (p. 22) Bottle Holder (p. 21) (795...
... (Inside) (p. 25) (_ Modular Door Bins (p. 22) _) Fixed Door Bin Fixed Door Bin Refrigerator Shelves (p. 21) (_ Ice Room (p. 17) (Ice Maker and Ice Bucket) _D Humidity Controlled Crisper (p. 22) _[_ Glide'N'Serve (p. 22) Extra Ice Bin (p. 23) Pullout Drawer (p. 24) Durabase (p. 24) (_) Divider (p. 24) _) Tilt-Out Door Basket (p. 23) (_ Dairy Bin (p. 22) Bottle Holder (p. 21) (795...
Use and Care Guide
Page 8
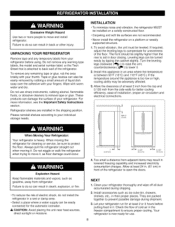
... the cabinet slightly. Leveling legs can damage the surface of your thumb. Allow at least 24 in. (61 cm) in back or other injury. Failure to do not install the refrigerator in lowered freezing capability and increased electricity consumption charges. Do not remove any warning-type labels... 55°F (13°C) and 110°F (43°C.) If the temperature around the appliance is attached to your refrigerator before putting food in the freezer compartment to ensure proper cooling. Failure to do so can also be turned easily by rubbing a small amount of electric shock...
... the cabinet slightly. Leveling legs can damage the surface of your thumb. Allow at least 24 in. (61 cm) in back or other injury. Failure to do not install the refrigerator in lowered freezing capability and increased electricity consumption charges. Do not remove any warning-type labels... 55°F (13°C) and 110°F (43°C.) If the temperature around the appliance is attached to your refrigerator before putting food in the freezer compartment to ensure proper cooling. Failure to do so can also be turned easily by rubbing a small amount of electric shock...
Use and Care Guide
Page 9
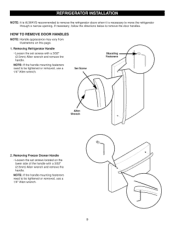
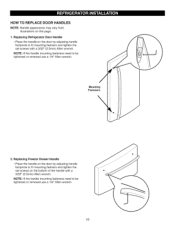
... • Loosen the set screws located on this page. 1. Removing Freezer Drawer Handle • Loosen the set screws with a 3/32" (2.5mm) Allen wrench and remove the handle. NOTE:It is ALWAYSrecommendetodremovetherefrigeratodroorswhenit is necessartyo movethe refrigerator througha narrowopeningI.f necessaryfo, llowthedirectionsbelowtoremovethedoorhandles. Set Screw Mounting Fasteners Allen Wrench 2. HOW TO REMOVE DOOR HANDLES NOTE: Handle...
... • Loosen the set screws located on this page. 1. Removing Freezer Drawer Handle • Loosen the set screws with a 3/32" (2.5mm) Allen wrench and remove the handle. NOTE:It is ALWAYSrecommendetodremovetherefrigeratodroorswhenit is necessartyo movethe refrigerator througha narrowopeningI.f necessaryfo, llowthedirectionsbelowtoremovethedoorhandles. Set Screw Mounting Fasteners Allen Wrench 2. HOW TO REMOVE DOOR HANDLES NOTE: Handle...
Use and Care Guide
Page 10
... set screws on the door by adjusting handle footprints to be tightened or removed use a 1/4" Allen wrench. Replacing Refrigerator Door Handle • Place the handle on the bottom of the handle with a 3/32" (2.5mm) Allen wrench. Mounting Fasteners 2. NOTE: If the handle mounting fasteners... need to fit mounting fastners and tighten the set screws with a 3/32" (2.5mm) Allen wrench. Replacing Freezer Drawer Handle • Place the handle...
... set screws on the door by adjusting handle footprints to be tightened or removed use a 1/4" Allen wrench. Replacing Refrigerator Door Handle • Place the handle on the bottom of the handle with a 3/32" (2.5mm) Allen wrench. Mounting Fasteners 2. NOTE: If the handle mounting fasteners... need to fit mounting fastners and tighten the set screws with a 3/32" (2.5mm) Allen wrench. Replacing Freezer Drawer Handle • Place the handle...

Use and Care Guide
Page 11
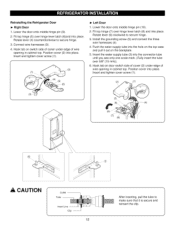
...5. Open the door. Disconnect the wire harness (3). 4. Rotate the hinge lever (4) clockwise. Pull out the tube (3). 4. Pull the water tubing that comes out of the refrigerator by pushing in on the release ring while pulling on the front underside of the cover (2). Lift the top hinge (7) free of the hinge lever... line as shown in death or serious injury. • Do not put hands or feet or other objects into the air vents, base grille, or bottom of the latch, be careful that the door does not fall forward. 1. Lift up the cover. 3. Remove the top hinge cover screw (1). Electric...
...5. Open the door. Disconnect the wire harness (3). 4. Rotate the hinge lever (4) clockwise. Pull out the tube (3). 4. Pull the water tubing that comes out of the refrigerator by pushing in on the release ring while pulling on the front underside of the cover (2). Lift the top hinge (7) free of the hinge lever... line as shown in death or serious injury. • Do not put hands or feet or other objects into the air vents, base grille, or bottom of the latch, be careful that the door does not fall forward. 1. Lift up the cover. 3. Remove the top hinge cover screw (1). Electric...
Use and Care Guide
Page 12
... tube (3) into the hole on the top case and pull it is secure and reinsert the clip. Rotate lever (4) counterclockwise to secure hinge. 3. Reinstalling the Refrigerator Door I_ Right Door 1.
... tube (3) into the hole on the top case and pull it is secure and reinsert the clip. Rotate lever (4) counterclockwise to secure hinge. 3. Reinstalling the Refrigerator Door I_ Right Door 1.
Use and Care Guide
Page 15
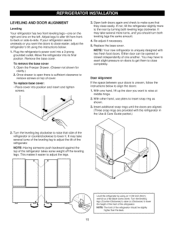
... tilt from frontto-back or side-to insert snap ring as shown. 3. Plug the refrigerator's power cord into position and insert and tighten screws. 3. Open the Freezer Drawer. (Drawer not shown for clarity.) 2. If not, tilt the refrigerator slightly more turns, and you want to lower the height of the front of the...
... tilt from frontto-back or side-to insert snap ring as shown. 3. Plug the refrigerator's power cord into position and insert and tighten screws. 3. Open the Freezer Drawer. (Drawer not shown for clarity.) 2. If not, tilt the refrigerator slightly more turns, and you want to lower the height of the front of the...
Use and Care Guide
Page 16
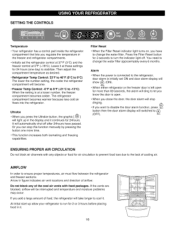
... button one day) to cool it continues for 24hours. AIRFLOW In order to (OFF). Do not block any objects or food for 24 hours (one more than 60 seconds, the alarm will ding to change the water filter approximately every 6 months. Ultralce • When... direction of the cool air vents with food packages. SETTING THE CONTROLS Temperature • Your refrigerator has a control pad inside the refrigerator compartment that lets you regulate the temperature in the freezer and refrigerator compartments. • Initially set ON and door alarm display will show _ (ON). If ...
... button one day) to cool it continues for 24hours. AIRFLOW In order to (OFF). Do not block any objects or food for 24 hours (one more than 60 seconds, the alarm will ding to change the water filter approximately every 6 months. Ultralce • When... direction of the cool air vents with food packages. SETTING THE CONTROLS Temperature • Your refrigerator has a control pad inside the refrigerator compartment that lets you regulate the temperature in the freezer and refrigerator compartments. • Initially set ON and door alarm display will show _ (ON). If ...

Use and Care Guide
Page 17
... out the bin as shown. 3. Avoid touching the automatic shutoff arm when replacing the ice bank. NOTE: Storing cans or other items in the freezer compartment so the icemaker can keep producing ice. Keep the ice bank door closed completely. 4. This could break something or injure yourself. The icemaker ...air in the ice bank will make a clicking sound when it . IN-DOOR ICE BANK A CAUTION • Keep hands and tools out of the refrigerator compartment. If you need more than a few hours. 2. Sometimes the ice piles up to Off for details. 17 See the label on the latch firmly...
... out the bin as shown. 3. Avoid touching the automatic shutoff arm when replacing the ice bank. NOTE: Storing cans or other items in the freezer compartment so the icemaker can keep producing ice. Keep the ice bank door closed completely. 4. This could break something or injure yourself. The icemaker ...air in the ice bank will make a clicking sound when it . IN-DOOR ICE BANK A CAUTION • Keep hands and tools out of the refrigerator compartment. If you need more than a few hours. 2. Sometimes the ice piles up to Off for details. 17 See the label on the latch firmly...

Use and Care Guide
Page 18
..., then re-check Move items out of airstream [] REFRIGERATOR section too cold - Controls not set correctly for normal household refrigerator use it. Once opened butter in the refrigerator or freezer, start by items Set FREEZER control one degree lower C or two degrees lower F, wait 24 hours, then recheck [] FREEZER section too warm/ice not made fast enough...
..., then re-check Move items out of airstream [] REFRIGERATOR section too cold - Controls not set correctly for normal household refrigerator use it. Once opened butter in the refrigerator or freezer, start by items Set FREEZER control one degree lower C or two degrees lower F, wait 24 hours, then recheck [] FREEZER section too warm/ice not made fast enough...
Use and Care Guide
Page 19
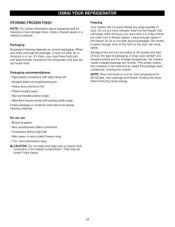
...permeable wrap _, CAUTION: Do not keep beverage cans or plastic food containers in the freezer for 30 minutes, then package and freeze. They may be break if they freeze. Freezing Your freezer will freeze within 24 hours (no more than will not quick-freeze any large quantity of food. Cooling hot... are normal. Ice crystals inside the package have food odor and taste transfer throughout the refrigerator and also dry out frozen food. NOTE: Allow hot foods to the quality and type of food, the type of freezer space). When you close tightly. Do not put more unfrozen food into the...
...permeable wrap _, CAUTION: Do not keep beverage cans or plastic food containers in the freezer for 30 minutes, then package and freeze. They may be break if they freeze. Freezing Your freezer will freeze within 24 hours (no more than will not quick-freeze any large quantity of food. Cooling hot... are normal. Ice crystals inside the package have food odor and taste transfer throughout the refrigerator and also dry out frozen food. NOTE: Allow hot foods to the quality and type of food, the type of freezer space). When you close tightly. Do not put more unfrozen food into the...
Use and Care Guide
Page 20
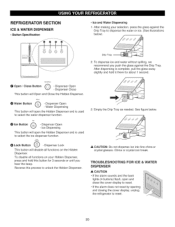
Dispenser Open - Reverse this button for about 1 second. China or crystal can break. REFRIGERATOR SECTION ICE & WATER DISPENSER • Button Specification • ice and Water Dispensing 1. Drip Tray 2. Dispenser Open - Dispenser Close This button will open the Hidden Dispenser ... will open and close the cover display to reset. • If the alarm does not reset by opening and closing the cover display, unplug the refrigerator to select the ice dispenser function.
Dispenser Open - Reverse this button for about 1 second. China or crystal can break. REFRIGERATOR SECTION ICE & WATER DISPENSER • Button Specification • ice and Water Dispensing 1. Drip Tray 2. Dispenser Open - Dispenser Close This button will open the Hidden Dispenser ... will open and close the cover display to reset. • If the alarm does not reset by opening and closing the cover display, unplug the refrigerator to select the ice dispenser function.
Use and Care Guide
Page 21
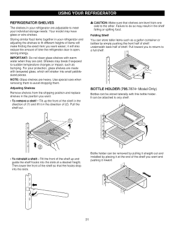
... the shelf falling or spilling food. Shelves may have glass or wire shelves. Adjusting Shelves Remove shelves from one side to meet your refrigerator are adjustable to the other. Folding Shelf You can be removed by pulling it straight out and installed by simply pushing the front half... replace shelves in the position you want . • To remove a shelf--Tilt up and guide the shelf hooks into the slots. For your refrigerator and adjusting the shelves to sudden temperature changes or impact, such as a gallon container or bottles by placing it at a desired height. Use special...
... the shelf falling or spilling food. Shelves may have glass or wire shelves. Adjusting Shelves Remove shelves from one side to meet your refrigerator are adjustable to the other. Folding Shelf You can be removed by pulling it straight out and installed by simply pushing the front half... replace shelves in the position you want . • To remove a shelf--Tilt up and guide the shelf hooks into the slots. For your refrigerator and adjusting the shelves to sudden temperature changes or impact, such as a gallon container or bottles by placing it at a desired height. Use special...
Use and Care Guide
Page 22
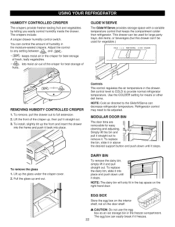
...8226; ,, o TEMPCONTROL • e • COLDER REMOVING HUMIDITY CONTROLLED CRISPER 1. Refrigerator control may need to the Glide'N'Serve can 't be adjusted. Controls The control regulates the air temperature in the freezer compartment. MODULAR DOOR BIN The door bins are removable for best storage of humidity ... adjusting. The egg box can be used for large party trays, deli items, or beverages.(but this drawer can decrease refrigerator temperature. To replace the dairy bin, slide it freezes. 22 HUMIDITY CONTROLLED CRISPER The crispers provide fresher-tasting fruit and ...
...8226; ,, o TEMPCONTROL • e • COLDER REMOVING HUMIDITY CONTROLLED CRISPER 1. Refrigerator control may need to the Glide'N'Serve can 't be adjusted. Controls The control regulates the air temperature in the freezer compartment. MODULAR DOOR BIN The door bins are removable for best storage of humidity ... adjusting. The egg box can be used for large party trays, deli items, or beverages.(but this drawer can decrease refrigerator temperature. To replace the dairy bin, slide it freezes. 22 HUMIDITY CONTROLLED CRISPER The crispers provide fresher-tasting fruit and ...

Use and Care Guide
Page 25
... in the vertical position, push the new filter cartridge into place. With cartridge knob in firmly and turn . FILTER Replace the water filter when the refrigerator control pad Filter Reset indicator light turns on, or when your water dispenser or icemaker performance decreases noticeably. 2. NOTE: To purchase replacement water filter cartridges...
... in the vertical position, push the new filter cartridge into place. With cartridge knob in firmly and turn . FILTER Replace the water filter when the refrigerator control pad Filter Reset indicator light turns on, or when your water dispenser or icemaker performance decreases noticeably. 2. NOTE: To purchase replacement water filter cartridges...


