Use and Care Guide
Page 2
... Durabase 24 Durabase Divider 24 PullOut Drawer 24 Filter 25 Care And Cleaning General Cleaning Tips Outside Inside Walls Door Liner And Gaskets Plastic Parts Condenser Coils 26-27 26 26 26 26 26 26 Light Bulb Replacement Power Interruptions When You Go On Vacation When You Move About The Automatic Icemaker 26-27 27 27 27 28-29 Connecting The Water Line Troubleshooting Guide 30-32 33-36 Refrigerator Section Ice & Water Dispenser 20 Troubleshooting For Ice & Water Dispenser 20 Refrigerator Shelves...
... Durabase 24 Durabase Divider 24 PullOut Drawer 24 Filter 25 Care And Cleaning General Cleaning Tips Outside Inside Walls Door Liner And Gaskets Plastic Parts Condenser Coils 26-27 26 26 26 26 26 26 Light Bulb Replacement Power Interruptions When You Go On Vacation When You Move About The Automatic Icemaker 26-27 27 27 27 28-29 Connecting The Water Line Troubleshooting Guide 30-32 33-36 Refrigerator Section Ice & Water Dispenser 20 Troubleshooting For Ice & Water Dispenser 20 Refrigerator Shelves...
Use and Care Guide
Page 3
... the date of implied warranties; BOTTOM FREEZER REFRIGERATOR WARRANTY ® f Kenmore Elite Limited Warranty When installed, operated and maintained according to all instructions supplied with the product, if this appliance fails due to a defect in material and workmanship within five years from the purchase date, call 1-800-4-MY-HOME ®to arrange for free repair. If the sealed refrigerant system is used for other than its...
... the date of implied warranties; BOTTOM FREEZER REFRIGERATOR WARRANTY ® f Kenmore Elite Limited Warranty When installed, operated and maintained according to all instructions supplied with the product, if this appliance fails due to a defect in material and workmanship within five years from the purchase date, call 1-800-4-MY-HOME ®to arrange for free repair. If the sealed refrigerant system is used for other than its...
Use and Care Guide
Page 4
...=6665. Think of the refrigerator compartment. I_ 10% discount off the regular price of home appliances, garage door openers, water heaters, and other major home items, in the U.S.A. You can 't be working on all that is all products. If you to power fluctuations. $250 Food Loss Protection annually for any non-covered repair service and related installed parts. Purchase your request...
...=6665. Think of the refrigerator compartment. I_ 10% discount off the regular price of home appliances, garage door openers, water heaters, and other major home items, in the U.S.A. You can 't be working on all that is all products. If you to power fluctuations. $250 Food Loss Protection annually for any non-covered repair service and related installed parts. Purchase your request...
Use and Care Guide
Page 5
.... • Before replacing a burned-out light bulb, unplug the refrigerator or turn off -color should not be refrozen and should be killed or seriously injured if you don't follow instructions. Be careful closing doors when children are finished, reconnect the refrigerator to the electrical source and reset the controls. (Thermostat, Refrigerator Control, and or Freezer Control, depending on the automatic icemaking mechanism while the refrigerator is plugged in. • DO...
.... • Before replacing a burned-out light bulb, unplug the refrigerator or turn off -color should not be refrozen and should be killed or seriously injured if you don't follow instructions. Be careful closing doors when children are finished, reconnect the refrigerator to the electrical source and reset the controls. (Thermostat, Refrigerator Control, and or Freezer Control, depending on the automatic icemaking mechanism while the refrigerator is plugged in. • DO...
Use and Care Guide
Page 6
... have LED interior lighting and service should always be turned off the doors. • Leave the shelves in place so that a separate circuit serving only this appliance must be provided. NOTE: Some models have a cooling system that the electrical rating of the cord be subject to make sure the CFC refrigerant is absolutely necessary that it replaced with a switch or pull chain. USE OF EXTENSION...
... have LED interior lighting and service should always be turned off the doors. • Leave the shelves in place so that a separate circuit serving only this appliance must be provided. NOTE: Some models have a cooling system that the electrical rating of the cord be subject to make sure the CFC refrigerant is absolutely necessary that it replaced with a switch or pull chain. USE OF EXTENSION...
Use and Care Guide
Page 8
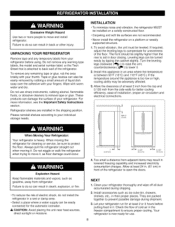
... to ensure proper cooling. To remove any remaining tape or glue, rub the area briskly with warm water and dry. If required, adjust the leveling legs to open the doors. Install this appliance in it , as floor damage could occur. When moving it . 2. UNPACKING YOUR REFRIGERATOR Remove tape and any warning-type labels, the model and serial number label, or the Tech Sheet that is now...
... to ensure proper cooling. To remove any remaining tape or glue, rub the area briskly with warm water and dry. If required, adjust the leveling legs to open the doors. Install this appliance in it , as floor damage could occur. When moving it . 2. UNPACKING YOUR REFRIGERATOR Remove tape and any warning-type labels, the model and serial number label, or the Tech Sheet that is now...

Use and Care Guide
Page 11
REMOVING AND REPLACING REFRIGERATOR DOORS To remove the left refrigerator door: Before attempting to remove the left door, locate the water connection at the back of the latch, be careful that the door does not fall forward. 1. Lift the door from the doors. (2) _1) (3). 1. Place the door, inside facing up the cover. 3. Open the door. Pull out the tube (3). 4. Disconnect the wire harness (3). 4. Rotate the hinge lever (4) clockwise. Remove the grounding screw(5). You may be injured or receive...
REMOVING AND REPLACING REFRIGERATOR DOORS To remove the left refrigerator door: Before attempting to remove the left door, locate the water connection at the back of the latch, be careful that the door does not fall forward. 1. Lift the door from the doors. (2) _1) (3). 1. Place the door, inside facing up the cover. 3. Open the door. Pull out the tube (3). 4. Disconnect the wire harness (3). 4. Rotate the hinge lever (4) clockwise. Remove the grounding screw(5). You may be injured or receive...
Use and Care Guide
Page 16
... icemaking and freezing capabilities. Do not block any of the cool air vents with any objects or food for 2 or 3 hours before placing food in the freezer and refrigerator compartments. • Initially set ON and door alarm display will stop this function manually by pressing the button one day) to change the water filter. If you add a large amount of food, the refrigerator will light up allow your refrigerator...
... icemaking and freezing capabilities. Do not block any of the cool air vents with any objects or food for 2 or 3 hours before placing food in the freezer and refrigerator compartments. • Initially set ON and door alarm display will stop this function manually by pressing the button one day) to change the water filter. If you add a large amount of food, the refrigerator will light up allow your refrigerator...

Use and Care Guide
Page 18
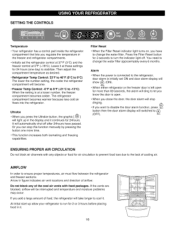
... higher the number setting, the longer the compressor will run to use them. For best storage, place milk on interior shelf, not on door shelf. _ Store in original carton or Egg Box on interior shelf, not on a refrigerator shelf. ADJUSTING CONTROL SETTINGS Give the refrigerator time to a lower temperature keeps more cold air in freezer packaging and freeze. The controls are ready to make it is as cold as the thermostat for your conditions Set REFRIGERATOR control one degree...
... higher the number setting, the longer the compressor will run to use them. For best storage, place milk on interior shelf, not on door shelf. _ Store in original carton or Egg Box on interior shelf, not on a refrigerator shelf. ADJUSTING CONTROL SETTINGS Give the refrigerator time to a lower temperature keeps more cold air in freezer packaging and freeze. The controls are ready to make it is as cold as the thermostat for your conditions Set REFRIGERATOR control one degree...
Use and Care Guide
Page 20
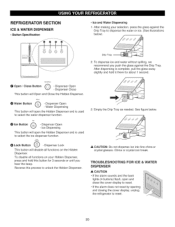
... (4 buttons) flash, open the Hidden Dispenser and is complete, pull the glass away slightly and hold this process to reset. 2O Dispenser Open - Dispenser Open - After making your Hidden Dispenser, press and hold it there for 3 seconds or until you push the glass against the Drip Tray to select the water dispenser function. REFRIGERATOR SECTION ICE & WATER DISPENSER • Button Specification • ice and Water Dispensing 1. O Open / Close Button ('_ - Water Dispensing This button will open and close the cover display to reset. • If the alarm...
... (4 buttons) flash, open the Hidden Dispenser and is complete, pull the glass away slightly and hold this process to reset. 2O Dispenser Open - Dispenser Open - After making your Hidden Dispenser, press and hold it there for 3 seconds or until you push the glass against the Drip Tray to select the water dispenser function. REFRIGERATOR SECTION ICE & WATER DISPENSER • Button Specification • ice and Water Dispensing 1. O Open / Close Button ('_ - Water Dispensing This button will open and close the cover display to reset. • If the alarm...
Use and Care Guide
Page 22
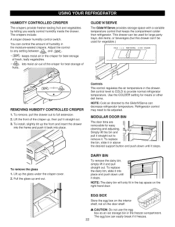
... in the freezer compartment. To install, slightly tilt up , then pull it freezes. 22 HUMIDITY CONTROLLED CRISPER The crispers provide fresher-tasting fruit and vegetables by letting you easily control humidity inside the drawer. Lift the front of fruits. Use the COLDER setting for meats or other dell items. NOTE: Cold air directed to remove it and pull straight out. Refrigerator control may need to any setting between...
... in the freezer compartment. To install, slightly tilt up , then pull it freezes. 22 HUMIDITY CONTROLLED CRISPER The crispers provide fresher-tasting fruit and vegetables by letting you easily control humidity inside the drawer. Lift the front of fruits. Use the COLDER setting for meats or other dell items. NOTE: Cold air directed to remove it and pull straight out. Refrigerator control may need to any setting between...

Use and Care Guide
Page 25
... new filter cartridge into the cover until it snap when the filter clicks into place. Remove the old cartridge. Dispense water through the hole. Flush the water system after replacing filter. Take the new cartridge out of its packaging and remove protective cover from the o-rings. indicator light will hear it stops. \ After changing the water filter cartridge, press and hold the Filter Reset button for 3 seconds; FILTER Replace the water filter when the refrigerator control pad Filter Reset indicator light turns on, or when your water dispenser or icemaker...
... new filter cartridge into the cover until it snap when the filter clicks into place. Remove the old cartridge. Dispense water through the hole. Flush the water system after replacing filter. Take the new cartridge out of its packaging and remove protective cover from the o-rings. indicator light will hear it stops. \ After changing the water filter cartridge, press and hold the Filter Reset button for 3 seconds; FILTER Replace the water filter when the refrigerator control pad Filter Reset indicator light turns on, or when your water dispenser or icemaker...
Use and Care Guide
Page 26
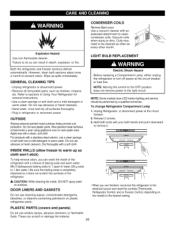
... the refrigerator to the electrical source and reset the controls (Thermostat, Refrigerator Control, and or Freezer Control, depending on plastic refrigerator parts. • When you can scratch or damage the material. 26 NOTE: Some models have LED interior lighting and service should be cleaned as often as shelves, crispers, etc. Mix 2 tablespoons baking soda to 1 quart of water (26 g soda to warm up spills immediately. CONDENSER COILS Remove Back cover. INSIDE WALLS (allow freezer...
... the refrigerator to the electrical source and reset the controls (Thermostat, Refrigerator Control, and or Freezer Control, depending on plastic refrigerator parts. • When you can scratch or damage the material. 26 NOTE: Some models have LED interior lighting and service should be cleaned as often as shelves, crispers, etc. Mix 2 tablespoons baking soda to 1 quart of water (26 g soda to warm up spills immediately. CONDENSER COILS Remove Back cover. INSIDE WALLS (allow freezer...
Use and Care Guide
Page 27
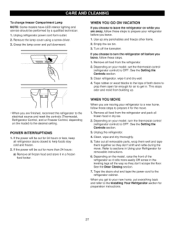
... you get in Using your model, turn the refrigerator off the Icemaker. See the Setting the Controls section. . Refer to get to your refrigerator to a new home, follow these steps to prepare it and dry well. 4. POWER INTERRUPTIONS 1. See the Setting the Controls section. 3. See the Door Closing section. 7. To change freezer Compartment Lamp NOTE: Some models have LED interior lighting and service should be out for more than 24 hours: a) Remove all...
... you get in Using your model, turn the refrigerator off the Icemaker. See the Setting the Controls section. . Refer to get to your refrigerator to a new home, follow these steps to prepare it and dry well. 4. POWER INTERRUPTIONS 1. See the Setting the Controls section. 3. See the Door Closing section. 7. To change freezer Compartment Lamp NOTE: Some models have LED interior lighting and service should be out for more than 24 hours: a) Remove all...
Use and Care Guide
Page 29
... bin and water running in the ice. • Dispense ice into a glass that already contains liquid. • Never use the ice or water until the problem is corrected. • Keep children away from the water supply line or the water tank. • Throw away the first few batches of rapid cooling. WHEN YOU SHOULD SET THE ICEMAKER POWER SWITCH TO O (OFF) • When the water supply will drop below freezing, have a qualified servicer drain the water supply...
... bin and water running in the ice. • Dispense ice into a glass that already contains liquid. • Never use the ice or water until the problem is corrected. • Keep children away from the water supply line or the water tank. • Throw away the first few batches of rapid cooling. WHEN YOU SHOULD SET THE ICEMAKER POWER SWITCH TO O (OFF) • When the water supply will drop below freezing, have a qualified servicer drain the water supply...

Use and Care Guide
Page 30
... the refrigerator to connect into 3 turns of expensive water damage. Then add 8 feet (2.4 m). It is sufficient extra tubing (about 10" [25 cm] diameter) to allow water to drain into a horizontal water pipe, make sure a saddle-type valve complies with local plumbing code requirements. To prevent burns and product damage, do not hook up the water line to water leakage or flooding. If you use your existing copper water line has...
... the refrigerator to connect into 3 turns of expensive water damage. Then add 8 feet (2.4 m). It is sufficient extra tubing (about 10" [25 cm] diameter) to allow water to drain into a horizontal water pipe, make sure a saddle-type valve complies with local plumbing code requirements. To prevent burns and product damage, do not hook up the water line to water leakage or flooding. If you use your existing copper water line has...
Use and Care Guide
Page 33
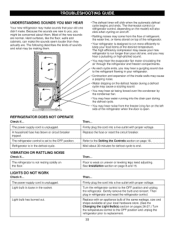
... hear the evaporator fan motor circulating the air through the refrigerator and freezer compartments. REFRIGERATOR Check if... DOES NOT OPERATE The power supply cord is unplugged. LIGHTS DO NOT WORK Check if... Floor is loose in the defrost cycle. Because the sounds are new to replacement. 33 The refrigerator control is open. Replace the fuse or reset the circuit breaker. See Installation section on top of the refrigerator. • Your refrigerator is in...
... hear the evaporator fan motor circulating the air through the refrigerator and freezer compartments. REFRIGERATOR Check if... DOES NOT OPERATE The power supply cord is unplugged. LIGHTS DO NOT WORK Check if... Floor is loose in the defrost cycle. Because the sounds are new to replacement. 33 The refrigerator control is open. Replace the fuse or reset the circuit breaker. See Installation section on top of the refrigerator. • Your refrigerator is in...
Use and Care Guide
Page 34
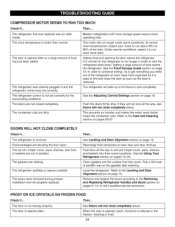
... Adjusting Control Settings section on page 18. If they touch. The ice bin, crisper cover, pans, shelves, door bins or baskets are out of paraffin wax on page 15. The doors were removed during product installation and not properly replaced, Then... Clean gaskets and the surface that was replaced was set correctly for the refrigerator to run about 40% to 80% of the refrigerator at once, keep food organized so it to cool...
... Adjusting Control Settings section on page 18. If they touch. The ice bin, crisper cover, pans, shelves, door bins or baskets are out of paraffin wax on page 15. The doors were removed during product installation and not properly replaced, Then... Clean gaskets and the surface that was replaced was set correctly for the refrigerator to run about 40% to 80% of the refrigerator at once, keep food organized so it to cool...

Use and Care Guide
Page 35
... produce ice. The freezer temperature is holding the door open . The interior of ice to eliminate taste and odor problems. See Care and Cleaning section on pages 26-27. Then... THE REFRIGERATOR SEEMS TO MAKE TOO MUCH NOISE Check if... The sounds may need to be installed to avoid discolored or offflavored ice. Check to water line may migrate to drip into the defrost pan. Water shutoff valve connecting refrigerator to see if something is cold...
... produce ice. The freezer temperature is holding the door open . The interior of ice to eliminate taste and odor problems. See Care and Cleaning section on pages 26-27. Then... THE REFRIGERATOR SEEMS TO MAKE TOO MUCH NOISE Check if... The sounds may need to be installed to avoid discolored or offflavored ice. Check to water line may migrate to drip into the defrost pan. Water shutoff valve connecting refrigerator to see if something is cold...

Use and Care Guide
Page 116
... 6665 (Canada) Para pedir servicio de reparaci6n a domicilio, y para ordenar piezas: 1-888-SU-HOGAR ® (1=888-784-6427) _ Au Canada pour service en frangais: 1-800-LE-FOYER Me (1-800=533=6937) www.sears.ca ...... ® Registered Trademark / TM Trademark / SM Service Mark of all major brand appliances, lawnandgardenequipment, orheatingandcoolingsystems, Forthe replacement parts, accessories and owner'smanualsthatyouneedtodoqt-yourself.
... 6665 (Canada) Para pedir servicio de reparaci6n a domicilio, y para ordenar piezas: 1-888-SU-HOGAR ® (1=888-784-6427) _ Au Canada pour service en frangais: 1-800-LE-FOYER Me (1-800=533=6937) www.sears.ca ...... ® Registered Trademark / TM Trademark / SM Service Mark of all major brand appliances, lawnandgardenequipment, orheatingandcoolingsystems, Forthe replacement parts, accessories and owner'smanualsthatyouneedtodoqt-yourself.


