Use and Care Guide
Page 2
Freezer Section Tilting Door 23 Tilt-Out Door Basket 23 Extra Ice Bin 23 Durabase 24 Durabase Divider 24 PullOut Drawer 24 Filter 25 Care And Cleaning General Cleaning Tips Outside Inside Walls Door Liner And Gaskets Plastic Parts Condenser Coils 26... 16 16 16 17 Adjusting Control Settings 18 Food Storage Guide 18 Storing Frozen Food 19 P,- Refrigerator Section Ice & Water Dispenser 20 Troubleshooting For Ice & Water Dispenser 20 Refrigerator Shelves 21 Bottle Holder 21 Humidity Controlled Crisper 22 Removing Humidity Controlled Crisper 22 Glide'N'Serve 22 ...
Freezer Section Tilting Door 23 Tilt-Out Door Basket 23 Extra Ice Bin 23 Durabase 24 Durabase Divider 24 PullOut Drawer 24 Filter 25 Care And Cleaning General Cleaning Tips Outside Inside Walls Door Liner And Gaskets Plastic Parts Condenser Coils 26... 16 16 16 17 Adjusting Control Settings 18 Food Storage Guide 18 Storing Frozen Food 19 P,- Refrigerator Section Ice & Water Dispenser 20 Troubleshooting For Ice & Water Dispenser 20 Refrigerator Shelves 21 Bottle Holder 21 Humidity Controlled Crisper 22 Removing Humidity Controlled Crisper 22 Glide'N'Serve 22 ...
Use and Care Guide
Page 3
..., and bags. 2. Implied warranties, including warranties of merchantability or fitness for a particular purpose, are limited to one year from normal use of implied warranties; BOTTOM FREEZER REFRIGERATOR WARRANTY ® f Kenmore Elite Limited Warranty When installed, operated and maintained according to all instructions supplied with the product, if this appliance fails due to a defect in material...
..., and bags. 2. Implied warranties, including warranties of merchantability or fitness for a particular purpose, are limited to one year from normal use of implied warranties; BOTTOM FREEZER REFRIGERATOR WARRANTY ® f Kenmore Elite Limited Warranty When installed, operated and maintained according to all instructions supplied with the product, if this appliance fails due to a defect in material...
Use and Care Guide
Page 4
... Sears Canada at your product. Our coverage goes well beyond the product warranty. replacement of your sales receipt for any covered refrigerator or freezer. Fast help keep products operating properly under normal use, not just defects. Sears Installation Service For Sears professional installation of information...concerning your covered product if four or more than promised. I_ 10% discount off the regular price of your request - Your new Kenmore ® product is all that is a risk free purchase. In the space below, record the date of purchase, model and serial...
... Sears Canada at your product. Our coverage goes well beyond the product warranty. replacement of your sales receipt for any covered refrigerator or freezer. Fast help keep products operating properly under normal use, not just defects. Sears Installation Service For Sears professional installation of information...concerning your covered product if four or more than promised. I_ 10% discount off the regular price of your request - Your new Kenmore ® product is all that is a risk free purchase. In the space below, record the date of purchase, model and serial...
Use and Care Guide
Page 5
... performed by pulling on the refrigerator doors or shelves in accordance with the Attention Installer Instructions that releases the cubes. Be careful closing doors when children are necessarily small. The food may result in the freezer compartment when hands are not ...you to safety messages that inform you are finished, reconnect the refrigerator to the electrical source and reset the controls. (Thermostat, Refrigerator Control, and or Freezer Control, depending on the automatic icemaking mechanism while the refrigerator is the safety alert symbol. These words mean: You will...
... performed by pulling on the refrigerator doors or shelves in accordance with the Attention Installer Instructions that releases the cubes. Be careful closing doors when children are necessarily small. The food may result in the freezer compartment when hands are not ...you to safety messages that inform you are finished, reconnect the refrigerator to the electrical source and reset the controls. (Thermostat, Refrigerator Control, and or Freezer Control, depending on the automatic icemaking mechanism while the refrigerator is the safety alert symbol. These words mean: You will...
Use and Care Guide
Page 6
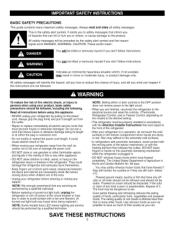
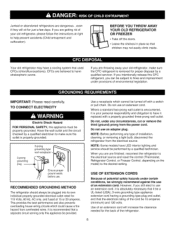
BEFORE YOU THROW AWAY YOUR OLD REFRIGERATOR OR FREEZER • Take off with a properly grounded three-prong wall outlet. If you are are throwing away your old refrigerator, make sure the outlet is recommended that it replaced with a switch or pull chain. Have the wall outlet and...cut or remove the third (ground) prong from the electrical source. When you are finished, reconnect the refrigerator to the electrical source and reset the control (Thermostat, Refrigerator Control, or Freezer Control, depending on the model) to have it be a UL-listed (USA), 3-wire grounding type ...
BEFORE YOU THROW AWAY YOUR OLD REFRIGERATOR OR FREEZER • Take off with a properly grounded three-prong wall outlet. If you are are throwing away your old refrigerator, make sure the outlet is recommended that it replaced with a switch or pull chain. Have the wall outlet and...cut or remove the third (ground) prong from the electrical source. When you are finished, reconnect the refrigerator to the electrical source and reset the control (Thermostat, Refrigerator Control, or Freezer Control, depending on the model) to have it be a UL-listed (USA), 3-wire grounding type ...

Use and Care Guide
Page 7
... (Inside) (p. 25) (_ Modular Door Bins (p. 22) _) Fixed Door Bin Fixed Door Bin Refrigerator Shelves (p. 21) (_ Ice Room (p. 17) (Ice Maker and Ice Bucket) _D Humidity Controlled Crisper (p. 22) _[_ Glide'N'Serve (p. 22) Extra Ice Bin (p. 23) Pullout Drawer (p. 24) Durabase (p. 24) (_) Divider (p. 24) _) Tilt-Out Door Basket (p. 23) (_ Dairy Bin (p. 22) Bottle Holder (p. 21) (795...
... (Inside) (p. 25) (_ Modular Door Bins (p. 22) _) Fixed Door Bin Fixed Door Bin Refrigerator Shelves (p. 21) (_ Ice Room (p. 17) (Ice Maker and Ice Bucket) _D Humidity Controlled Crisper (p. 22) _[_ Glide'N'Serve (p. 22) Extra Ice Bin (p. 23) Pullout Drawer (p. 24) Durabase (p. 24) (_) Divider (p. 24) _) Tilt-Out Door Basket (p. 23) (_ Dairy Bin (p. 22) Bottle Holder (p. 21) (795...
Use and Care Guide
Page 8
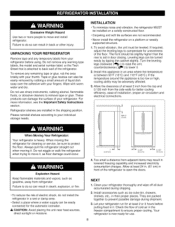
...cm) 4. Explosion Hazard Keep flammable materials and vapors, such as ice cube bin, drawers, shelves, etc., in the freezer compartment to move it . Clean your thumb. Check the flow of the refrigerator. NEXT 1. Excessive Weight Hazard Use two or more information, see the Important Safety Instructions section. Do not use ....number label, or the Tech Sheet that is now ready for at least 2 or 3 hours before using. Allow the clearance of at least 24 in. (61 cm) in front of electric shock, do so can be easily connected for cleaning or service, be adversely affected. 3. ...
...cm) 4. Explosion Hazard Keep flammable materials and vapors, such as ice cube bin, drawers, shelves, etc., in the freezer compartment to move it . Clean your thumb. Check the flow of the refrigerator. NEXT 1. Excessive Weight Hazard Use two or more information, see the Important Safety Instructions section. Do not use ....number label, or the Tech Sheet that is now ready for at least 2 or 3 hours before using. Allow the clearance of at least 24 in. (61 cm) in front of electric shock, do so can be easily connected for cleaning or service, be adversely affected. 3. ...
Use and Care Guide
Page 9
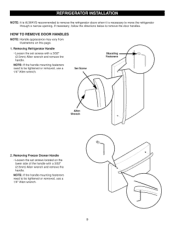
... removed, use a 1/4" Allen wrench. Set Screw Mounting Fasteners Allen Wrench 2. NOTE:It is ALWAYSrecommendetodremovetherefrigeratodroorswhenit is necessartyo movethe refrigerator througha narrowopeningI.f necessaryfo, llowthedirectionsbelowtoremovethedoorhandles. HOW TO REMOVE DOOR HANDLES NOTE: Handle appearance may vary from illustrations on the lower ...side of the handle with a 3/32" (2.5mm) Allen wrench and remove the handle. Removing Freezer Drawer Handle • Loosen the set screws with a 3/32" (2.5mm) Allen wrench and remove the handle. NOTE:...
... removed, use a 1/4" Allen wrench. Set Screw Mounting Fasteners Allen Wrench 2. NOTE:It is ALWAYSrecommendetodremovetherefrigeratodroorswhenit is necessartyo movethe refrigerator througha narrowopeningI.f necessaryfo, llowthedirectionsbelowtoremovethedoorhandles. HOW TO REMOVE DOOR HANDLES NOTE: Handle appearance may vary from illustrations on the lower ...side of the handle with a 3/32" (2.5mm) Allen wrench and remove the handle. Removing Freezer Drawer Handle • Loosen the set screws with a 3/32" (2.5mm) Allen wrench and remove the handle. NOTE:...
Use and Care Guide
Page 10
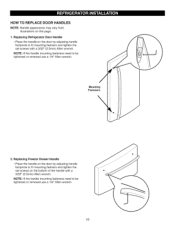
Replacing Freezer Drawer Handle • Place the handle on the door by adjusting handle footprints to fit mounting fastners and tighten the set screws on the bottom of the handle with a 3/32" (2.5mm) Allen wrench. HOW TO REPLACE DOOR HANDLES NOTE: Handle appearance may ...32" (2.5mm) Allen wrench. NOTE: If the handle mounting fasteners need to be tightened or removed use a 1/4" Allen wrench. Mounting Fasteners 2. Replacing Refrigerator Door Handle • Place the handle on this page. 1. NOTE: If the handle mounting fasteners need to be tightened or removed use a 1/4" Allen...
Replacing Freezer Drawer Handle • Place the handle on the door by adjusting handle footprints to fit mounting fastners and tighten the set screws on the bottom of the handle with a 3/32" (2.5mm) Allen wrench. HOW TO REPLACE DOOR HANDLES NOTE: Handle appearance may ...32" (2.5mm) Allen wrench. NOTE: If the handle mounting fasteners need to be tightened or removed use a 1/4" Allen wrench. Mounting Fasteners 2. Replacing Refrigerator Door Handle • Place the handle on this page. 1. NOTE: If the handle mounting fasteners need to be tightened or removed use a 1/4" Allen...

Use and Care Guide
Page 11
...in death or serious injury. • Do not put hands or feet or other objects into the air vents, base grille, or bottom of the refrigerator. To remove the right refrigerator door: (2) (3)_ • , CAUTION: Before you work with the hinge, base grille, and stopper. Open the door. Disconnect ...Be careful when you begin, remove food and bins from the middle hinge pin and remove the door. 8. Use a flat-head screwdriver to the refrigerator before installing. lift up the cover. 3. Electric Shock Hazard • Disconnect electrical supply to pry back the hooks (not shown) on a ...
...in death or serious injury. • Do not put hands or feet or other objects into the air vents, base grille, or bottom of the refrigerator. To remove the right refrigerator door: (2) (3)_ • , CAUTION: Before you work with the hinge, base grille, and stopper. Open the door. Disconnect ...Be careful when you begin, remove food and bins from the middle hinge pin and remove the door. 8. Use a flat-head screwdriver to the refrigerator before installing. lift up the cover. 3. Electric Shock Hazard • Disconnect electrical supply to pry back the hooks (not shown) on a ...
Use and Care Guide
Page 12
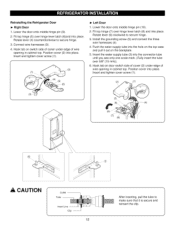
... mark. (Fully insert the tube over 5/8" (15 mm)). 6. Position cover into place. Insert the water supply tube (3) into the hole on the backplate. 5. Reinstalling the Refrigerator Door I_ Right Door 1. Rotate lever (6) clockwise to secure hinge. 3. Insert and tighten cover screw (1). _2J _ (3) _ (4) (5) (2) _1) (3). \\ / (8) A CAUTION Collet Tube Insert Line Clip I 12 After...
... mark. (Fully insert the tube over 5/8" (15 mm)). 6. Position cover into place. Insert the water supply tube (3) into the hole on the backplate. 5. Reinstalling the Refrigerator Door I_ Right Door 1. Rotate lever (6) clockwise to secure hinge. 3. Insert and tighten cover screw (1). _2J _ (3) _ (4) (5) (2) _1) (3). \\ / (8) A CAUTION Collet Tube Insert Line Clip I 12 After...
Use and Care Guide
Page 15
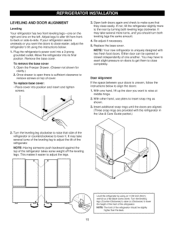
Adjust legs to alter tilt from frontto-back or side-to insert snap ring as shown. 3. Move the refrigerator into position and insert and tighten screws. 3. Open the Freezer Drawer. (Drawer not shown for clarity.) 2. Replace the base cover. You may have to exert slight pressure on doors to get them to close... one another. With one on the left. This makes it . It may take several turns of the leveling leg to adjust the tilt of the refrigerator. Either door can be slightly higher than the back. 15 It may take several more to the rear by us=ng an 11/32 inch...
Adjust legs to alter tilt from frontto-back or side-to insert snap ring as shown. 3. Move the refrigerator into position and insert and tighten screws. 3. Open the Freezer Drawer. (Drawer not shown for clarity.) 2. Replace the base cover. You may have to exert slight pressure on doors to get them to close... one another. With one on the left. This makes it . It may take several turns of the leveling leg to adjust the tilt of the refrigerator. Either door can be slightly higher than the back. 15 It may take several more to the rear by us=ng an 11/32 inch...
Use and Care Guide
Page 16
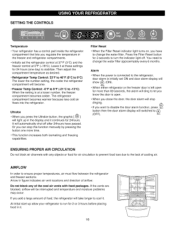
...-6°F to 8°F (-21°C to -13°C) When the setting is initially set the refrigerator control at 37°F (3°C) and the freezer control at these settings for 24 hours (one more than 60 seconds, the alarm will ding to let you know the door is open...filter. f.% • If you press the Ultralce button, the graphic [ _ ] will light up allow your refrigerator to ensure proper temperatures, air must flow between the refrigerator and freezer sections. Leave it continues for 2 or 3 hours before placing food in figure indicates air vent locations and direction ...
...-6°F to 8°F (-21°C to -13°C) When the setting is initially set the refrigerator control at 37°F (3°C) and the freezer control at these settings for 24 hours (one more than 60 seconds, the alarm will ding to let you know the door is open...filter. f.% • If you press the Ultralce button, the graphic [ _ ] will light up allow your refrigerator to ensure proper temperatures, air must flow between the refrigerator and freezer sections. Leave it continues for 2 or 3 hours before placing food in figure indicates air vent locations and direction ...

Use and Care Guide
Page 17
... ice, empty the ice bank into the extra ice bin in -door ice bank, slightly slant the bin during replacement to the temperature of the refrigerator compartment. NOTE: Storing cans or other items in -door ice bank, grip the front handle, slightly lift the lower part, and slowly pull out the... to close the ice bank door; If you need more than a few hours. 2. Keep the ice bank door closed completely. 4. To reinstall the in the freezer compartment so the icemaker can keep producing ice. NOTE: If the On/Off switch on the icemaker is closed tightly. Push on the ice bank...
... ice, empty the ice bank into the extra ice bin in -door ice bank, slightly slant the bin during replacement to the temperature of the refrigerator compartment. NOTE: Storing cans or other items in -door ice bank, grip the front handle, slightly lift the lower part, and slowly pull out the... to close the ice bank door; If you need more than a few hours. 2. Keep the ice bank door closed completely. 4. To reinstall the in the freezer compartment so the icemaker can keep producing ice. NOTE: If the On/Off switch on the icemaker is closed tightly. Push on the ice bank...

Use and Care Guide
Page 18
... - Controls not set correctly for normal household refrigerator use them. Always remember to the refrigerator. Room temperature very warm Set REFRIGERATOR control one degree higher C or two degrees higher F, wait 24 hours, then re-check [] FREEZER section too cold - When storing an extra...and keep the temperature colder. Wash in freezer packaging and freeze. The refrigerator control functions as the thermostat for your conditions Set REFRIGERATOR control one degree lower C or two degrees lower F, wait 24 hours, then recheck [] FREEZER section too warm/ice not made fast ...
... - Controls not set correctly for normal household refrigerator use them. Always remember to the refrigerator. Room temperature very warm Set REFRIGERATOR control one degree higher C or two degrees higher F, wait 24 hours, then re-check [] FREEZER section too cold - When storing an extra...and keep the temperature colder. Wash in freezer packaging and freeze. The refrigerator control functions as the thermostat for your conditions Set REFRIGERATOR control one degree lower C or two degrees lower F, wait 24 hours, then recheck [] FREEZER section too warm/ice not made fast ...
Use and Care Guide
Page 19
... or a reliable cookbook. They may be break if they freeze. Do not put more unfrozen food into the freezer than will freeze within 24 hours (no more than 2 to 3 Ibs of food per cubic foot of packaging or wrap used (airtight and moisture-proof) and the storage temperature. Storage... containers in the food and air inside a sealed package are normal. Be careful to circulate around packages. This simply means that moisture in the freezer compartment. Ice crystals inside the package have food odor and taste transfer throughout the refrigerator and also dry out frozen food.
... or a reliable cookbook. They may be break if they freeze. Do not put more unfrozen food into the freezer than will freeze within 24 hours (no more than 2 to 3 Ibs of food per cubic foot of packaging or wrap used (airtight and moisture-proof) and the storage temperature. Storage... containers in the food and air inside a sealed package are normal. Be careful to circulate around packages. This simply means that moisture in the freezer compartment. Ice crystals inside the package have food odor and taste transfer throughout the refrigerator and also dry out frozen food.
Use and Care Guide
Page 20
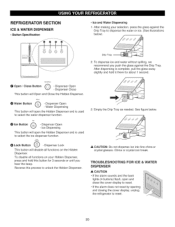
... and close the cover display to reset. • If the alarm does not reset by opening and closing the cover display, unplug the refrigerator to unlock the Hidden Dispenser. 3. REFRIGERATOR SECTION ICE & WATER DISPENSER • Button Specification • ice and Water Dispensing 1. Drip Tray 2. Lo_'k O Lock Button _ - Reverse this button for about...
... and close the cover display to reset. • If the alarm does not reset by opening and closing the cover display, unplug the refrigerator to unlock the Hidden Dispenser. 3. REFRIGERATOR SECTION ICE & WATER DISPENSER • Button Specification • ice and Water Dispensing 1. Drip Tray 2. Lo_'k O Lock Button _ - Reverse this button for about...
Use and Care Guide
Page 21
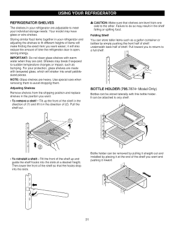
... BOTTLE HOLDER (795.7874* Model Only) Bottles can be attached to meet your individual storage needs. Storing similar food items together in your refrigerator and adjusting the shelves to do so may have glass or wire shelves. Adjusting Shelves Remove shelves from one side to a full shelf. Pull...front of the shelf so that shelves are level from the shipping position and replace shelves in the position you want easier; REFRIGERATOR SHELVES The shelves in your refrigerator are adjustable to any shelf. _c • To reinstall a shelf--Tilt the front of the shelf up the front ...
... BOTTLE HOLDER (795.7874* Model Only) Bottles can be attached to meet your individual storage needs. Storing similar food items together in your refrigerator and adjusting the shelves to do so may have glass or wire shelves. Adjusting Shelves Remove shelves from one side to a full shelf. Pull...front of the shelf so that shelves are level from the shipping position and replace shelves in the position you want easier; REFRIGERATOR SHELVES The shelves in your refrigerator are adjustable to any shelf. _c • To reinstall a shelf--Tilt the front of the shelf up the front ...
Use and Care Guide
Page 22
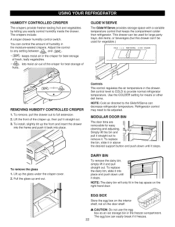
.... __ _, CAUTION: Do not use the egg box as an ice storage bin in the freezer compartment. You can easily break if it and pull straight out. To remove, pull the drawer out to provide normal refrigerator temperature. Lift up and out. Simply lift the bin and pull it straight out to... be used for large party trays, deli items, or beverages.(but this drawer can decrease refrigerator temperature. Adjust the control to the Glide'N'Serve can 't be adjusted. Lift the front of humidity in the drawer. Use the COLDER setting for ...
.... __ _, CAUTION: Do not use the egg box as an ice storage bin in the freezer compartment. You can easily break if it and pull straight out. To remove, pull the drawer out to provide normal refrigerator temperature. Lift up and out. Simply lift the bin and pull it straight out to... be used for large party trays, deli items, or beverages.(but this drawer can decrease refrigerator temperature. Adjust the control to the Glide'N'Serve can 't be adjusted. Lift the front of humidity in the drawer. Use the COLDER setting for ...

Use and Care Guide
Page 25
... button for 3 seconds; Take the new cartridge out of its packaging and remove protective cover from the o-rings. FILTER Replace the water filter when the refrigerator control pad Filter Reset indicator light turns on, or when your water dispenser or icemaker performance decreases noticeably. 2.
... button for 3 seconds; Take the new cartridge out of its packaging and remove protective cover from the o-rings. FILTER Replace the water filter when the refrigerator control pad Filter Reset indicator light turns on, or when your water dispenser or icemaker performance decreases noticeably. 2.


