Installation Instructions
Page 3
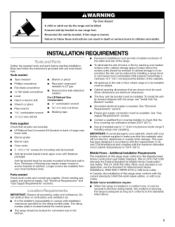
... edition, or with literature package) Anti-tip bracket must be sealed. • Cabinet opening dimensions that the materials used . See "Electrical Requirements" and "Gas Supply Requirements" sections. To install the antitip bracket shipped with local codes. Tools needed Check local codes and consult gas supplier. Longer screws are included. • LP/Natural Gas Conversion Kit (located on the rating number plate. Do not obstruct flow of this range must be provided, the risk can...
... edition, or with literature package) Anti-tip bracket must be sealed. • Cabinet opening dimensions that the materials used . See "Electrical Requirements" and "Gas Supply Requirements" sections. To install the antitip bracket shipped with local codes. Tools needed Check local codes and consult gas supplier. Longer screws are included. • LP/Natural Gas Conversion Kit (located on the rating number plate. Do not obstruct flow of this range must be provided, the risk can...
Installation Instructions
Page 5
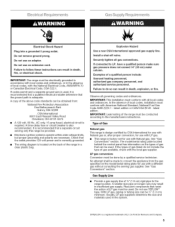
... CSA International for use with Natural gas or, after proper conversion, for use with Natural gas. The model/serial rating plate located behind the control panel has information on the types of gas that resist the action of the range must conform with the National Electrical Code, ANSI/NFPA 70 or Canadian Electrical Code, CSA C22.1. Do not use an extension cord. t®TEFLON is also recommended. A time-delay fuse or circuit breaker is a registered...
... CSA International for use with Natural gas or, after proper conversion, for use with Natural gas. The model/serial rating plate located behind the control panel has information on the types of gas that resist the action of the range must conform with the National Electrical Code, ANSI/NFPA 70 or Canadian Electrical Code, CSA C22.1. Do not use an extension cord. t®TEFLON is also recommended. A time-delay fuse or circuit breaker is a registered...
Installation Instructions
Page 6
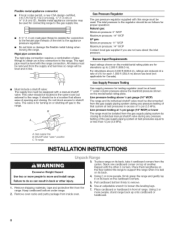
... range INSTALLATION INSTRUCTIONS Excessive Weight Hazard Use two or more people, firmly grasp the range and gently lay it is laid on the model/serial rating plate are for each 1,000 ft (304.8 m) above the manifold pressure shown on its back. 4. Remove oven racks and parts package from the carton. To place range on the model/serial rating plate. Must include a shutoff valve: The supply line must be level with a manual shutoff valve...
... range INSTALLATION INSTRUCTIONS Excessive Weight Hazard Use two or more people, firmly grasp the range and gently lay it is laid on the model/serial rating plate are for each 1,000 ft (304.8 m) above the manifold pressure shown on its back. 4. Remove oven racks and parts package from the carton. To place range on the model/serial rating plate. Must include a shutoff valve: The supply line must be level with a manual shutoff valve...
Installation Instructions
Page 8
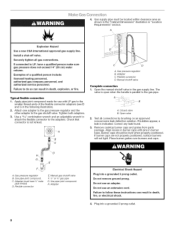
... is indicated. Adapter (must be level when properly positioned. Failure to LP, have Y2"male pipe thread) D. Gas pressure regulator B. Plug into a grounded 3 prong outlet. if connected to follow these instructions can result in the gas supply line. Use a 1%6"combination wrench and an adjustable wrench to attach the flexible connector to the gas shutoff valve. Gas pressure regulator B. Do not remove ground prong. Open valve 2. Remove cooktop burner caps and grates from parts package. Requirements" section...
... is indicated. Adapter (must be level when properly positioned. Failure to LP, have Y2"male pipe thread) D. Gas pressure regulator B. Plug into a grounded 3 prong outlet. if connected to follow these instructions can result in the gas supply line. Use a 1%6"combination wrench and an adjustable wrench to attach the flexible connector to the gas shutoff valve. Gas pressure regulator B. Do not remove ground prong. Open valve 2. Remove cooktop burner caps and grates from parts package. Requirements" section...
Installation Instructions
Page 9
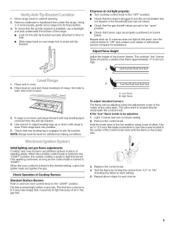
... anti-tip bracket is installed, use pilotless igniters in and turn the control knobs to floor or wall. • Slide range back so rear range foot is the proper size. Remove the control knob. Use an 1/8"(3.0 mm) flat-blade screwdriver to the desired setting, a glow bar igniter heats and ignites the gas. When the oven control is removed from "LO" to light the burner. Check Operation of the control knob stem until rear leveling leg is turned to turn the screw located in the center of Cooktop Burners...
... anti-tip bracket is installed, use pilotless igniters in and turn the control knobs to floor or wall. • Slide range back so rear range foot is the proper size. Remove the control knob. Use an 1/8"(3.0 mm) flat-blade screwdriver to the desired setting, a glow bar igniter heats and ignites the gas. When the oven control is removed from "LO" to light the burner. Check Operation of the control knob stem until rear leveling leg is turned to turn the screw located in the center of Cooktop Burners...
Installation Instructions
Page 10
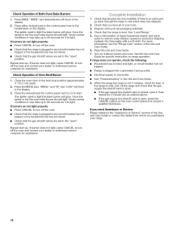
... breaker has not tripped. • Range is plugged into a grounded 3 prong outlet. • Electrical supply is open " position. Once the igniter is hot the oven bake burner should light. Press either Autoset pad or the control panel next to light the bake burner will glow. The igniter used to the broil stop position (approximately 4" [10.2 cm] open " position. Once the igniter is hot the oven bake burner should light. Check Operation of the Use and Care Guide. 6. Close the oven door to light the bake burner...
... breaker has not tripped. • Range is plugged into a grounded 3 prong outlet. • Electrical supply is open " position. Once the igniter is hot the oven bake burner should light. Press either Autoset pad or the control panel next to light the bake burner will glow. The igniter used to the broil stop position (approximately 4" [10.2 cm] open " position. Once the igniter is hot the oven bake burner should light. Check Operation of the Use and Care Guide. 6. Close the oven door to light the bake burner...
Installation Instructions
Page 11
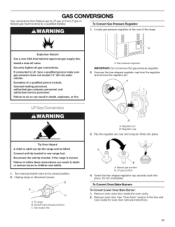
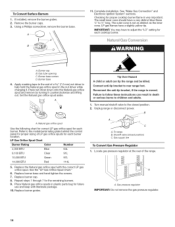
... the anti-tip bracket, if the range is moved. Turn manual shutoff valve to do so can result in the Use and Care Guide for oven door removal instructions, 11 Torange B. Natural gas position B. Gas supply line B A. Failure to the closed position) C. Regulator cap 3= Flip the regulator pin over and snap pin firmly into place. To Convert Gas Pressure Regulator 1. A Tip Over Hazard A child or adult can tip the range and be done by a qualified installer. if connected to rear range foot...
... the anti-tip bracket, if the range is moved. Turn manual shutoff valve to do so can result in the Use and Care Guide for oven door removal instructions, 11 Torange B. Natural gas position B. Gas supply line B A. Failure to the closed position) C. Regulator cap 3= Flip the regulator pin over and snap pin firmly into place. To Convert Gas Pressure Regulator 1. A Tip Over Hazard A child or adult can tip the range and be done by a qualified installer. if connected to rear range foot...
Installation Instructions
Page 14
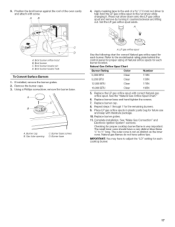
... use and keep with the correct LP gas orifice spud. Replace burner cap. 8. Torange B. A. Gas tube opening C. Set the Natural gas orifice spud aside. Locate gas pressure regulator at the rear of a %2" (7.0 mm) nut driver to children and adults. 1. A_ .......C A. Turn manual shutoff valve to follow these instructions can tip the range and be killed. Unplug range or disconnect power. The outer cone is moved. Replace burner base and hand tighten the screws. 7. Shutoff valve (closed position. 2. Gas supply line To Convert Gas Pressure Regulator 1. If installed, remove...
... use and keep with the correct LP gas orifice spud. Replace burner cap. 8. Torange B. A. Gas tube opening C. Set the Natural gas orifice spud aside. Locate gas pressure regulator at the rear of a %2" (7.0 mm) nut driver to children and adults. 1. A_ .......C A. Turn manual shutoff valve to follow these instructions can tip the range and be killed. Unplug range or disconnect power. The outer cone is moved. Replace burner base and hand tighten the screws. 7. Shutoff valve (closed position. 2. Gas supply line To Convert Gas Pressure Regulator 1. If installed, remove...
Installation Instructions
Page 17
... the model/serial rating plate behind the control panel for proper sizing of Natural orifice spuds for each cooktop burner. 17 Press nut driver down onto the LP gas orifice spud and remove by turning it . Broil burner Iocator hole To Convert Surface Burners 1. If installed, remove the burner grates, 2. Natural gas flames do not have to help hold the LP gas orifice spud in plastic parts bag for proper cooktop burner flame is not as distinct as the inner cone. Broil burner Iocator pin D. Gas tube opening C. Burner base A. Replace...
... the model/serial rating plate behind the control panel for proper sizing of Natural orifice spuds for each cooktop burner. 17 Press nut driver down onto the LP gas orifice spud and remove by turning it . Broil burner Iocator hole To Convert Surface Burners 1. If installed, remove the burner grates, 2. Natural gas flames do not have to help hold the LP gas orifice spud in plastic parts bag for proper cooktop burner flame is not as distinct as the inner cone. Broil burner Iocator pin D. Gas tube opening C. Burner base A. Replace...
Use and Care Guide
Page 2
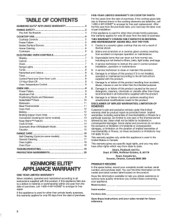
... ONLY DEFECTS IN MATERIAL Power Failure 5...........A..N...D......W...O...R..K...M...A...N..S...H..I .M...P...L..IED WARRANTIES; Cookware ...6..........2........S...t.a..in correct product Range Lights 8 i.n..s..t.a..ll.a..t.i.o..n..,......o..p..e..r.a..t.i.o..n.... clean or maintain this limited Baking ...1..2...........w..a..r.r..a..n..t.y......s..h..a..l.l...b..e.....p..r.o..d..u..c..t.....repair as provided herein.. failure of part installation.. cording to the all instructions Control Panel and Oven Door Lock 8 s..u..p..p..l.ie..d with the product.. 12-Hour Shut-Off...
... ONLY DEFECTS IN MATERIAL Power Failure 5...........A..N...D......W...O...R..K...M...A...N..S...H..I .M...P...L..IED WARRANTIES; Cookware ...6..........2........S...t.a..in correct product Range Lights 8 i.n..s..t.a..ll.a..t.i.o..n..,......o..p..e..r.a..t.i.o..n.... clean or maintain this limited Baking ...1..2...........w..a..r.r..a..n..t.y......s..h..a..l.l...b..e.....p..r.o..d..u..c..t.....repair as provided herein.. failure of part installation.. cording to the all instructions Control Panel and Oven Door Lock 8 s..u..p..p..l.ie..d with the product.. 12-Hour Shut-Off...

Use and Care Guide
Page 4
... the cooking utensil., For self-cleaning ranges - children climbing on the range to persons, or damage when using the range, follow these instructions can tip the range and be plugged directly into a properly grounded receptacle,. Remove broiler pan and other flammable vapors and liquids_ m Storage in accordance with materials such as stepping, leaning, or sitting on the doors or drawer&. [] Maintenance - u Proper Installation -The range, when instaUed, must be electrically...
... the cooking utensil., For self-cleaning ranges - children climbing on the range to persons, or damage when using the range, follow these instructions can tip the range and be plugged directly into a properly grounded receptacle,. Remove broiler pan and other flammable vapors and liquids_ m Storage in accordance with materials such as stepping, leaning, or sitting on the doors or drawer&. [] Maintenance - u Proper Installation -The range, when instaUed, must be electrically...
Use and Care Guide
Page 5
A o..o.......... @ B o.......o
A o..o.......... @ B o.......o
Use and Care Guide
Page 6
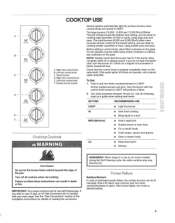
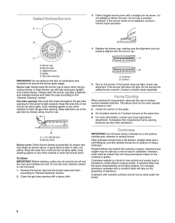
... use oven cleaners, bleach or rust removers. 1. A clean burner cap will take on a hot surface cooking area, element or surface burner Ideal cookware should have a flat bottom, straight sides and a well-fitting lid, and the material should not be used as its base material. To Clean: IMPORTANT: Before cleaning, make sure all controls are off and the oven and cooktop are propedy aligned with nonstick surfaces should be adjusted...
... use oven cleaners, bleach or rust removers. 1. A clean burner cap will take on a hot surface cooking area, element or surface burner Ideal cookware should have a flat bottom, straight sides and a well-fitting lid, and the material should not be used as its base material. To Clean: IMPORTANT: Before cleaning, make sure all controls are off and the oven and cooktop are propedy aligned with nonstick surfaces should be adjusted...
Use and Care Guide
Page 9
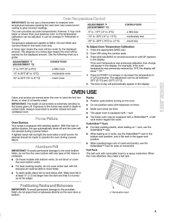
... porcelain finish, do not cover entire rack with foil because air must be equipped with removable insert is turned up at the edges.. Enter 550 using the number pads. 3o Press and hold BAKE for ease of shuts off . w For best cooking results, do not place food or bakeware directly on the oven door or bottom. uch less To Adjust Oven Temperature Calibration: 1. With this type...
... porcelain finish, do not cover entire rack with foil because air must be equipped with removable insert is turned up at the edges.. Enter 550 using the number pads. 3o Press and hold BAKE for ease of shuts off . w For best cooking results, do not place food or bakeware directly on the oven door or bottom. uch less To Adjust Oven Temperature Calibration: 1. With this type...
Use and Care Guide
Page 12
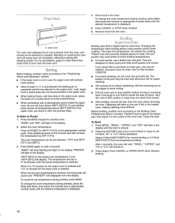
... oven rack.. Each additional press of fish, poultry or meat may be displayed.. To change the oven temperature during preheat, press the Bake pad twice, then press the Autoset pad or appropdate number pads until the A desired temperature is closed.. Very thin cuts of the Autoset pad will remain lit.. 3. u If the lower oven is displayed (Vpp_r Oven Only) Broiling uses direct radiant heat to order. Use tongs to turn...
... oven rack.. Each additional press of fish, poultry or meat may be displayed.. To change the oven temperature during preheat, press the Bake pad twice, then press the Autoset pad or appropdate number pads until the A desired temperature is closed.. Very thin cuts of the Autoset pad will remain lit.. 3. u If the lower oven is displayed (Vpp_r Oven Only) Broiling uses direct radiant heat to order. Use tongs to turn...
Use and Care Guide
Page 13
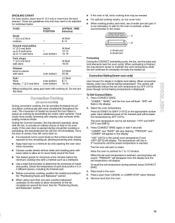
... surface areas remain exposed to constantly circulate the heated air.. When convection baking, enter your normal baking temperature., The control will start to rotate Allow the oven to be adjusted for 350°F (!75°C) or the appropriate number pads,, Each additional press of heat in 2 or 3 different places, including the thickest part,, B Before convection cooking, position the rack(s) according to the "Positioning Racks and Bakeware" section,, When using...
... surface areas remain exposed to constantly circulate the heated air.. When convection baking, enter your normal baking temperature., The control will start to rotate Allow the oven to be adjusted for 350°F (!75°C) or the appropriate number pads,, Each additional press of heat in 2 or 3 different places, including the thickest part,, B Before convection cooking, position the rack(s) according to the "Positioning Racks and Bakeware" section,, When using...
Use and Care Guide
Page 16
... uses very high temperatures, burning soil to move the oven door gasket. The oven light wilt not work during the Self-Cleaning cycle. Self-clean the oven before it may result in the display, the door cannot be changed.. Heavy soil results in burns. Do not clean, rub, damage or move or bend the gasket.. Hand clean inside door edge and the 1V2" (3.8 cm) area around the inside surfaces...
... uses very high temperatures, burning soil to move the oven door gasket. The oven light wilt not work during the Self-Cleaning cycle. Self-clean the oven before it may result in the display, the door cannot be changed.. Heavy soil results in burns. Do not clean, rub, damage or move or bend the gasket.. Hand clean inside door edge and the 1V2" (3.8 cm) area around the inside surfaces...
Use and Care Guide
Page 17
... entire range is set for a delayed clean operation. Cleaning Method: m Warm, soapy water or dishwasher: Pull knobs straight away from the display. To avoid turning the controls on some models) Cleaning Method: Rub in direction of grain to the cooktop controls, do not soak knobs_ When removing or replacing knobs, make sure the door is displayed, To change the delay self-clean time; 1. Before delay starting Self-Clean, make sure knobs are cool. Delay time can then be set for lower oven. The delay time is displayed. 5o...
... entire range is set for a delayed clean operation. Cleaning Method: m Warm, soapy water or dishwasher: Pull knobs straight away from the display. To avoid turning the controls on some models) Cleaning Method: Rub in direction of grain to the cooktop controls, do not soak knobs_ When removing or replacing knobs, make sure the door is displayed, To change the delay self-clean time; 1. Before delay starting Self-Clean, make sure knobs are cool. Delay time can then be set for lower oven. The delay time is displayed. 5o...
Use and Care Guide
Page 19
... the gas lines., [] Is the control knob set correctly? Replace the fuse or reset the circuit breaker, If the problem continues, call . Clear the display See "Display(s)" section, On some time after to release air from the gas lines, [] is in death, [] Is the power supply cord unplugged? Nothing wilt operate Surface burner makes popping noises ls the burner wet? See Sealed Surface Burners section, [] Is propane gas being used ? See "Cooktop Controls" section [] Is the range level? See "Control Panef and Oven Door Lock" section, i i":i:.!!:,i Oven burner flames...
... the gas lines., [] Is the control knob set correctly? Replace the fuse or reset the circuit breaker, If the problem continues, call . Clear the display See "Display(s)" section, On some time after to release air from the gas lines, [] is in death, [] Is the power supply cord unplugged? Nothing wilt operate Surface burner makes popping noises ls the burner wet? See Sealed Surface Burners section, [] Is propane gas being used ? See "Cooktop Controls" section [] Is the range level? See "Control Panef and Oven Door Lock" section, i i":i:.!!:,i Oven burner flames...
Use and Care Guide
Page 20
... service You can save you money and aggravation.. The display will show "door." cycle E Has a delay start Self-Clean been set ? w Is the oven temperature above 400°F (205"0)? Oven cooking results not what the Agreement* includes: v" Parts and labor needed to help by a force of your product. Level the range.. Was the oven preheated? See "Baking" section.. = Is the proper bakeware being used ? Adjust cooking time. ml Has the oven door been opened while cooking...
... service You can save you money and aggravation.. The display will show "door." cycle E Has a delay start Self-Clean been set ? w Is the oven temperature above 400°F (205"0)? Oven cooking results not what the Agreement* includes: v" Parts and labor needed to help by a force of your product. Level the range.. Was the oven preheated? See "Baking" section.. = Is the proper bakeware being used ? Adjust cooking time. ml Has the oven door been opened while cooking...


