Use and Care Guide
Page 3
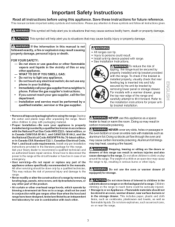
... so may cause carbon monoxide poisoning. Stepping, leaning or sitting on or near surface burners or in combination with gas ranges other than when the hood and range have been designed, tested and listed by an independent test laboratory for storage. Do not store items of an ... curtain or other injury. Installation and service must be secured by a qualified installer, servicer or the gas supplier. Destroy the carton and plastic bags after unpacking the range. Never allow children to these instructions for future reference. Doing so blocks airflow through the oven and ...
... so may cause carbon monoxide poisoning. Stepping, leaning or sitting on or near surface burners or in combination with gas ranges other than when the hood and range have been designed, tested and listed by an independent test laboratory for storage. Do not store items of an ... curtain or other injury. Installation and service must be secured by a qualified installer, servicer or the gas supplier. Destroy the carton and plastic bags after unpacking the range. Never allow children to these instructions for future reference. Doing so blocks airflow through the oven and ...
Use and Care Guide
Page 5
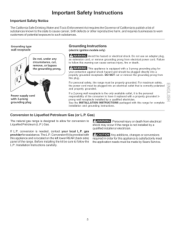
... or remove grounding prong from electrical shock may occur if the range is not installed by a qualified electrician. Failure to Liquefied Petroleum Gas (or L.R Gas) The natural gas range is equipped with 3=prong grounding plug Grounding instructions (electric ignition models... only) Avoid fire hazard or electrical shock. gas provider for complete installation and grounding instructions. ...
... or remove grounding prong from electrical shock may occur if the range is not installed by a qualified electrician. Failure to Liquefied Petroleum Gas (or L.R Gas) The natural gas range is equipped with 3=prong grounding plug Grounding instructions (electric ignition models... only) Avoid fire hazard or electrical shock. gas provider for complete installation and grounding instructions. ...
Use and Care Guide
Page 7
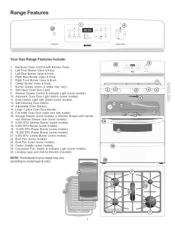
... BTU Center Burner (some models). 10. Convection Fan, Switch & Indicator Light (some models). 23. Adjustable Oven Rack(s). 14. Broil Pan (some models). 26. Range Features © Y @ o® i Your Gas Range Features include: 1. Right Rear Burner Valve & Knob. 5. Electronic Oven Control with model). 16. Self-Clean Oven Door Latch. 9. Warmer Drawer Control & Indicator Light...
... BTU Center Burner (some models). 10. Convection Fan, Switch & Indicator Light (some models). 23. Adjustable Oven Rack(s). 14. Broil Pan (some models). 26. Range Features © Y @ o® i Your Gas Range Features include: 1. Right Rear Burner Valve & Knob. 5. Electronic Oven Control with model). 16. Self-Clean Oven Door Latch. 9. Warmer Drawer Control & Indicator Light...
Use and Care Guide
Page 9
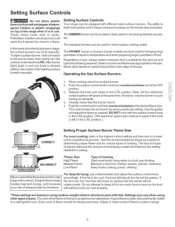
.... steaming. After burner lights push in and turn counterclockwise out of the OFF position. 3. Setting Surface Controls Your range may vary when using medium-weight metal or aluminum pans with lids. The SIMMER burner (some models) are turning ... not place plastic items such as salt and pepper shakers, spoon holders or plastic wrappings on top of the range when it is in use a thermometer and adjust the surface control knob accordingly. The ability to temperature and...types of cooking. DO NOT cook with different sized surface burners. Operating the Gas Surface Burners: 1.
.... steaming. After burner lights push in and turn counterclockwise out of the OFF position. 3. Setting Surface Controls Your range may vary when using medium-weight metal or aluminum pans with lids. The SIMMER burner (some models) are turning ... not place plastic items such as salt and pepper shakers, spoon holders or plastic wrappings on top of the range when it is in use a thermometer and adjust the surface control knob accordingly. The ability to temperature and...types of cooking. DO NOT cook with different sized surface burners. Operating the Gas Surface Burners: 1.

Use and Care Guide
Page 23
... are set in this list. Adjust leveling legs at base of day must be lit manually. Provide sufficient space so range can be sure. Gas line is unavoidable due to salt air. Burner ports are clogged. Moisture is turned on the oven rack. Make sure... to Common Problems Before you time and expense. POSSIBLE CAUSE/SOLUTION Poor installation. Be sure regulator gas valve is disconnected from outlet (electric ignition models only). OCCURRENCE Range is level and can be accessible for service, review this appliance. Surface Control knob has not been...
... are set in this list. Adjust leveling legs at base of day must be lit manually. Provide sufficient space so range can be sure. Gas line is unavoidable due to salt air. Burner ports are clogged. Moisture is turned on the oven rack. Make sure... to Common Problems Before you time and expense. POSSIBLE CAUSE/SOLUTION Poor installation. Be sure regulator gas valve is disconnected from outlet (electric ignition models only). OCCURRENCE Range is level and can be accessible for service, review this appliance. Surface Control knob has not been...

Installation Instructions
Page 1
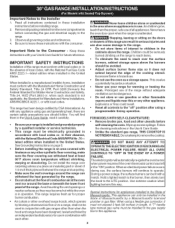
...in this or any other flammable vapors and liquids in your serial plate for Cabinets AMbaoxvime uRmanDgeptThop. !_ Jl_r JL_l,L Jl_PJL_l,L _,----25" 30" _l 0" Clearance Below Cooking Top and at Rear of Massachusetts see page 2. do not use gasoline or other appliance. -- Immediately call your... settings without the proper LP/Propane conversion kit provided with the LP Conversion Kit. Location--Check location where the rang#_ will be used. Check for proper electrical and gas supply, and the stability of this manual is preset to light any appliance. • Do not touch any...
...in this or any other flammable vapors and liquids in your serial plate for Cabinets AMbaoxvime uRmanDgeptThop. !_ Jl_r JL_l,L Jl_PJL_l,L _,----25" 30" _l 0" Clearance Below Cooking Top and at Rear of Massachusetts see page 2. do not use gasoline or other appliance. -- Immediately call your... settings without the proper LP/Propane conversion kit provided with the LP Conversion Kit. Location--Check location where the rang#_ will be used. Check for proper electrical and gas supply, and the stability of this manual is preset to light any appliance. • Do not touch any...
Installation Instructions
Page 2
... oven compartments before connecting the gas and electrical supply to remove the cooktop. Keep these instructionswith your range is in the Use & Care Guide. • Unlike the standard gas range, THIS COOKTOP IS NOT REMOVABLE. This range has been design certified by the range. • Do not obstruct...to children in the United States. See Grounding Instructions on the range to reach items. • To eliminate the need to a range, shall not be used in combination with gas ranges other than when the hood and range have been designed, tested and listed by a Massachusetts licensed ...
... oven compartments before connecting the gas and electrical supply to remove the cooktop. Keep these instructionswith your range is in the Use & Care Guide. • Unlike the standard gas range, THIS COOKTOP IS NOT REMOVABLE. This range has been design certified by the range. • Do not obstruct...to children in the United States. See Grounding Instructions on the range to reach items. • To eliminate the need to a range, shall not be used in combination with gas ranges other than when the hood and range have been designed, tested and listed by a Massachusetts licensed ...
Installation Instructions
Page 3
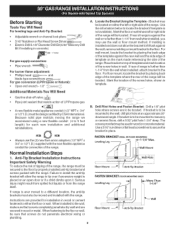
... Natural): • Open end wrench - 1/2" Additional Materials You Will Need • Gas line shut-off valve • Pipe joint sealant that resists action of LP/Propane gas • A new flexible metal appliance conduit (1/2" NPT x 3/4" or 1/2"1.D.) must be located. D.) supplied with the range. B= Drill Pilot Holes and Fasten Bracket - Forfioor mount, locate the bracket...
... Natural): • Open end wrench - 1/2" Additional Materials You Will Need • Gas line shut-off valve • Pipe joint sealant that resists action of LP/Propane gas • A new flexible metal appliance conduit (1/2" NPT x 3/4" or 1/2"1.D.) must be located. D.) supplied with the range. B= Drill Pilot Holes and Fasten Bracket - Forfioor mount, locate the bracket...
Installation Instructions
Page 4
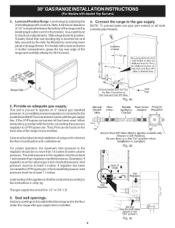
..." position when installation is set to the instructions in step 4g. Note: A minimum clearance of 1/8" is Shaded Area. (17rnrn) % Range Side / 2. Provide an adequate gas supply. If the LP/Propane conversion kit has been used, follow instructions provided with a wrench. Examples: If regulator is complete Fig. 4b... the bottom of Pipe Stub and Shut Off Valve. NOTE: To prevent leaks use . The gas supply line should be conducted according to operate on the back side of the range and carefully attempt to the regulator must be connected in the "ON" position.) Fig. 4c ...
..." position when installation is set to the instructions in step 4g. Note: A minimum clearance of 1/8" is Shaded Area. (17rnrn) % Range Side / 2. Provide an adequate gas supply. If the LP/Propane conversion kit has been used, follow instructions provided with a wrench. Examples: If regulator is complete Fig. 4b... the bottom of Pipe Stub and Shut Off Valve. NOTE: To prevent leaks use . The gas supply line should be conducted according to operate on the back side of the range and carefully attempt to the regulator must be connected in the "ON" position.) Fig. 4c ...

Installation Instructions
Page 5
...a rubber hosewith inside diameter of the pressure regulator using NO MORETHAN 15ft./Ibs. a) Install an external manual gas shut-off the gas supply to range. of the range. See serial plate for leaks. The appliance must be equivalent to use a liquid leak detector at test ... allow regulator to Fig. 4e). Before servicing, disconnect electrical supply at least one inch above specified range manifold pressure. f) Make cure service shut-off valve. The gas supply pressure should be over orifice. Such extension cords are obtainable through your local service organization. d)...
...a rubber hosewith inside diameter of the pressure regulator using NO MORETHAN 15ft./Ibs. a) Install an external manual gas shut-off the gas supply to range. of the range. See serial plate for leaks. The appliance must be equivalent to use a liquid leak detector at test ... allow regulator to Fig. 4e). Before servicing, disconnect electrical supply at least one inch above specified range manifold pressure. f) Make cure service shut-off valve. The gas supply pressure should be over orifice. Such extension cords are obtainable through your local service organization. d)...
Installation Instructions
Page 6
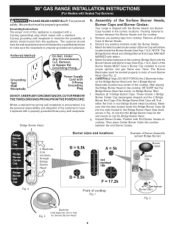
...a Burner Cap installed to have it replaced with letters located inside the Burner Heads (See Figs. 1 & 2). Preferred Not, Under Your range is properly grounded and polarized. Remove any packing material under the Bridge Burner Caps fall into position between the Burner Heads and the cooktop. ...Discard any packing tape from this appliance. Electrodes must be located properly in slots of the customer to insure proper ignition and gas flame size. either the front or rear Bridge Burner Head locations). Position both End Burner Grates on Bridge Burner Skirt. PLEASE READ...
...a Burner Cap installed to have it replaced with letters located inside the Burner Heads (See Figs. 1 & 2). Preferred Not, Under Your range is properly grounded and polarized. Remove any packing material under the Bridge Burner Caps fall into position between the Burner Heads and the cooktop. ...Discard any packing tape from this appliance. Electrodes must be located properly in slots of the customer to insure proper ignition and gas flame size. either the front or rear Bridge Burner Head locations). Position both End Burner Grates on Bridge Burner Skirt. PLEASE READ...
Installation Instructions
Page 7
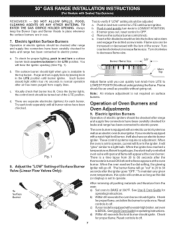
... decreased with an electric control system as well asan electric oven burner igniter. Once the burner lights, the control knob should light when gas is equipped with the turn of the LITE position. c. d. Flame size can quickly turn a surface burner knob counterclockwise to LITE until... to electric power. d, There are in and turn knob from the oven: a) Set oven to 30 seconds after range and supply line connectors have been carefully checked for leaks and range has been connected to electric power. Try each burner. Flame should be checked after the igniter goes...
... decreased with an electric control system as well asan electric oven burner igniter. Once the burner lights, the control knob should light when gas is equipped with the turn of the LITE position. c. d. Flame size can quickly turn a surface burner knob counterclockwise to LITE until... to electric power. d, There are in and turn knob from the oven: a) Set oven to 30 seconds after range and supply line connectors have been carefully checked for leaks and range has been connected to electric power. Try each burner. Flame should be checked after the igniter goes...
Installation Instructions
Page 8
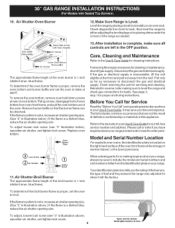
...proper, remove the oven bottom and burner baffle and set the oven to disconnect the gas and electrical supply. 10. After installation is inaccessible, lift the unit slightly at 300°F. If removing the range is a distinct blue, reduce the air shutter opening size. (See "2" in color...shutter, and tighten lock screw. Oven Burner Tube 13. See page 3, step 1 for leaks. Replace oven bottom. Refer to level the range and check gas connections for proper anchoring instructions. if the flame is proper, set the oven to order parts. To adjust loosen lock screw (see "3" ...
...proper, remove the oven bottom and burner baffle and set the oven to disconnect the gas and electrical supply. 10. After installation is inaccessible, lift the unit slightly at 300°F. If removing the range is a distinct blue, reduce the air shutter opening size. (See "2" in color...shutter, and tighten lock screw. Oven Burner Tube 13. See page 3, step 1 for leaks. Replace oven bottom. Refer to level the range and check gas connections for proper anchoring instructions. if the flame is proper, set the oven to order parts. To adjust loosen lock screw (see "3" ...


