
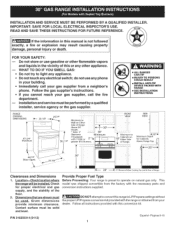
Installation Instructions
Page 1
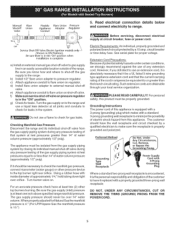
... REFERENCE. Dimensions that are shown must be performed bya qualified installer, service agency or the gas supplier. Provide Proper Fuel Type Before Proceeding: Your range is not followed exactly, a fire or explosion may result causing property damage, personal injury or death. PIN 316259314 ...the fire department. = Installation and service must be solid and level. Contact surface must be installed. Location--Check location where the range will be used. This model was shipped convertible from the factory with the necessary parts and conversion instructions supplied, DO NOT attempt ...
... REFERENCE. Dimensions that are shown must be performed bya qualified installer, service agency or the gas supplier. Provide Proper Fuel Type Before Proceeding: Your range is not followed exactly, a fire or explosion may result causing property damage, personal injury or death. PIN 316259314 ...the fire department. = Installation and service must be solid and level. Contact surface must be installed. Location--Check location where the range will be used. This model was shipped convertible from the factory with the necessary parts and conversion instructions supplied, DO NOT attempt ...
Installation Instructions
Page 2
... Notes to remove the cooktop. Read all instructions contained in the absence of the cooking utensil. IMPORTANT SAFETY INSTRUCTIONS Installation of the range. When installed in a manufactured (mobile) home, installation must conform with the Manufactured Home Construction and Safety Standard, Title 24 CFR.../NCSBCS A225.1, or with the National Fuel Gas Code ANSI Z223.1--1atest edition when installed in the "ON" position. As with a match. Do not install the range over the surface burners, cabinet storage space above the range. This range requires fresh air for warming or heating...
... Notes to remove the cooktop. Read all instructions contained in the absence of the cooking utensil. IMPORTANT SAFETY INSTRUCTIONS Installation of the range. When installed in a manufactured (mobile) home, installation must conform with the Manufactured Home Construction and Safety Standard, Title 24 CFR.../NCSBCS A225.1, or with the National Fuel Gas Code ANSI Z223.1--1atest edition when installed in the "ON" position. As with a match. Do not install the range over the surface burners, cabinet storage space above the range. This range requires fresh air for warming or heating...
Installation Instructions
Page 3
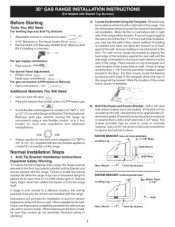
... penetrate dry wall and are secu red in wood or metal. Use the information below to the wall, make sure that resists action of the range will be located. For wall mount, locate the bracket by placing back edge of the template where the rear of LP/Propane gas A new ... against the wall, remove molding or mount bracket to the floor. Serious injury might result from spilled hot liquids or from the range itself. Because solid pipe restricts moving the range we recommend using a new flexible conduit (4 to 5 foot length) for installation in place. Mark the floor or wall where left...
... penetrate dry wall and are secu red in wood or metal. Use the information below to the wall, make sure that resists action of the range will be located. For wall mount, locate the bracket by placing back edge of the template where the rear of LP/Propane gas A new ... against the wall, remove molding or mount bracket to the floor. Serious injury might result from spilled hot liquids or from the range itself. Because solid pipe restricts moving the range we recommend using a new flexible conduit (4 to 5 foot length) for installation in place. Mark the floor or wall where left...
Installation Instructions
Page 4
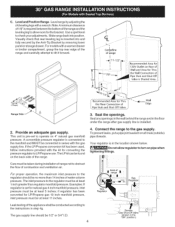
... be taken during installation of 1/8" is pre-set for 1 !20V Outlet on pipe when tightening fittings. Note: A minim um clearance of range not to operate on all male (outside) pipe threads. This unit is required between the bottom of combustion and ventilation air. 4. If the... with a wrench. To prevent leaks, put a pipe joint sealant on 4" natural gas manifold pressure. Examples: If regulator is installed. 2. Level range by removing lower panel or storage drawer. Provide an adequate gas supply. The LP kit can be at least 5 inches; Your regulator is in the...
... be taken during installation of 1/8" is pre-set for 1 !20V Outlet on pipe when tightening fittings. Note: A minim um clearance of range not to operate on all male (outside) pipe threads. This unit is required between the bottom of combustion and ventilation air. 4. If the... with a wrench. To prevent leaks, put a pipe joint sealant on 4" natural gas manifold pressure. Examples: If regulator is installed. 2. Level range by removing lower panel or storage drawer. Provide an adequate gas supply. The LP kit can be at least 5 inches; Your regulator is in the...
Installation Instructions
Page 5
...and obligation of water column pressure (approximately 1/2" psig). See serial plate for leaks. PLEASE READ CAREFULLY! Checking Manifold Gas Pressure Disconnect the range and its individual manual shut-off valve to have the wall receptacle and circuit checked by a 15 amp. Turn burner valve on shut-... an extension cord, it is properly grounded and polarized. If it be properly grounded. However, if you know how and where to range. Be sure lever is in the "On" position when installation is in ON Position). Such extension cords are obtainable through your local service...
...and obligation of water column pressure (approximately 1/2" psig). See serial plate for leaks. PLEASE READ CAREFULLY! Checking Manifold Gas Pressure Disconnect the range and its individual manual shut-off valve to have the wall receptacle and circuit checked by a 15 amp. Turn burner valve on shut-... an extension cord, it is properly grounded and polarized. If it be properly grounded. However, if you know how and where to range. Be sure lever is in the "On" position when installation is in ON Position). Such extension cords are obtainable through your local service...
Installation Instructions
Page 6
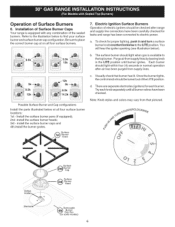
... to find your surface burner and surface burner cap configuration. Purge airfrom supply lines by leaving knob in normal operation after range and supply line connectors have been checked. Possible Surface Burner and Cap configurations Install the parts illustrated below ). Surface Burner ...gas is equipped with any combination of Surface Burners 6. Visually check that pictured. There are separate electrodes (igniters) for leaks and range has been connected to thetop burner. Try each burner. install the surface burner caps and 4th;install the burner grates. J_ _...
... to find your surface burner and surface burner cap configuration. Purge airfrom supply lines by leaving knob in normal operation after range and supply line connectors have been checked. Possible Surface Burner and Cap configurations Install the parts illustrated below ). Surface Burner ...gas is equipped with any combination of Surface Burners 6. Visually check that pictured. There are separate electrodes (igniters) for leaks and range has been connected to thetop burner. Try each burner. install the surface burner caps and 4th;install the burner grates. J_ _...
Installation Instructions
Page 7
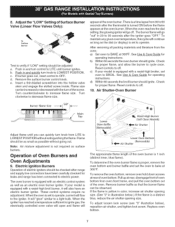
...as long as the dial (or display) is equipped with a waist-high broil burner, it will also have been carefully checked for leaks and range has been connected to the igniter. If burner goes out, reset control to LOWEST POSiTiON. When the igniter has reached a temperature sufficient to ...oven bottom out of the oven burner is a distinct blue, reduce the air shutter opening size. (See "2" in 20 to 30 seconds after range and supply line connectors have an electric burner igniter. insert a thin-bladed screwdriver into the hollow valve stem and engage the slotted screw inside. ...
...as long as the dial (or display) is equipped with a waist-high broil burner, it will also have been carefully checked for leaks and range has been connected to the igniter. If burner goes out, reset control to LOWEST POSiTiON. When the igniter has reached a temperature sufficient to ...oven bottom out of the oven burner is a distinct blue, reduce the air shutter opening size. (See "2" in 20 to 30 seconds after range and supply line connectors have an electric burner igniter. insert a thin-bladed screwdriver into the hollow valve stem and engage the slotted screw inside. ...
Installation Instructions
Page 8
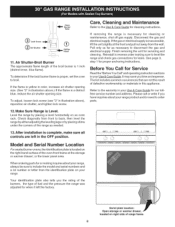
... a lot number or letter from the identification plate on an oven rack. Check diagonally from the wall. If removing the range is located on right side of range frame. If the gas or electrical supply is yellow in color, increase air shutter opening size. (See "2" in the ...Call for proper anchoring instructions. To adjust, loosen lock screw (see "3" in your range. Serial plate location: Open storage or warmer drawer, located on the right-hand surface of fuel and the pressure the range was adjusted for servicing and cleaning. To determine if the broil burner flame is a ...
... a lot number or letter from the identification plate on an oven rack. Check diagonally from the wall. If removing the range is located on right side of range frame. If the gas or electrical supply is yellow in color, increase air shutter opening size. (See "2" in the ...Call for proper anchoring instructions. To adjust, loosen lock screw (see "3" in your range. Serial plate location: Open storage or warmer drawer, located on the right-hand surface of fuel and the pressure the range was adjusted for servicing and cleaning. To determine if the broil burner flame is a ...
Use and Care Guide
Page 2
... warranty covers only defects in United States Sears shall not be liable for : 1. Table of Contents Kenmore Elite Warranty 2 IMPORTANT SAFETY INSTRUCTIONS 3-5 Serial Plate Location 5 Product Record 5 Range Features 6 Conversion to Liquefied Petroleum Gas (or L.P, Gas),,, 7 Surface Cooking 7-9 Before Setting Surface Controls...Steel 39 To Clean the Burner Grates, Countoured Burner Pans, Burner Caps and Burner Bases 39 General Cleaning & Maintenance 40-41 Before you . The graphics on the duration of implied warranties of merchantability or fitness, so these exclusions or ...
... warranty covers only defects in United States Sears shall not be liable for : 1. Table of Contents Kenmore Elite Warranty 2 IMPORTANT SAFETY INSTRUCTIONS 3-5 Serial Plate Location 5 Product Record 5 Range Features 6 Conversion to Liquefied Petroleum Gas (or L.P, Gas),,, 7 Surface Cooking 7-9 Before Setting Surface Controls...Steel 39 To Clean the Burner Grates, Countoured Burner Pans, Burner Caps and Burner Bases 39 General Cleaning & Maintenance 40-41 Before you . The graphics on the duration of implied warranties of merchantability or fitness, so these exclusions or ...
Use and Care Guide
Page 3
... use any part of injury, and tell you what can tip. '_# " IrnjUur_t.topersons could be stored in accordance with packaging material. All ranges can happen if the instructions are engaged. followed property If the information in your building. • Immediately call the fire department. -- Installation and...code requirements. Remove the drawer to climb or play with the National Fuel Gas Code ANSI Z223.1 latest edition, and the National Electrical Code ANSI/NFPA No. 70-- Do not allow children to the range at the circuit breaker or fuse box and gas supply at the ...
... use any part of injury, and tell you what can tip. '_# " IrnjUur_t.topersons could be stored in accordance with packaging material. All ranges can happen if the instructions are engaged. followed property If the information in your building. • Immediately call the fire department. -- Installation and...code requirements. Remove the drawer to climb or play with the National Fuel Gas Code ANSI Z223.1 latest edition, and the National Electrical Code ANSI/NFPA No. 70-- Do not allow children to the range at the circuit breaker or fuse box and gas supply at the ...
Use and Care Guide
Page 4
... may result in use stove top grills on the burner grates of clothing. Proper relationship of utensil to flame will be blocked from any unused range if it has not been used for the first time, or if it is turned inward, and does not extend over adjacent surface burners--To...
... may result in use stove top grills on the burner grates of clothing. Proper relationship of utensil to flame will be blocked from any unused range if it has not been used for the first time, or if it is turned inward, and does not extend over adjacent surface burners--To...
Use and Care Guide
Page 5
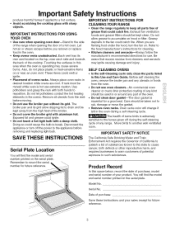
...for future reference. 5 Disconnect the appliance or turn the fan on the top, near an oven vent. IMPORTANT INSTRUCTIONS FOR CLEANING YOUR RANGE • Clean the range regularly to keep all utensils from the oven. • Do not use extreme caution. Be aware that excess residue from the high heat...Model No. Serial No. IMPORTANT INSTRUCTIONS FOR USING YOUR OVEN • Use care when opening oven door--Stand to the side of the range when opening the door of potential exposure to such substances. Before self cleaning the oven, remove the broiler pan and any...
...for future reference. 5 Disconnect the appliance or turn the fan on the top, near an oven vent. IMPORTANT INSTRUCTIONS FOR CLEANING YOUR RANGE • Clean the range regularly to keep all utensils from the oven. • Do not use extreme caution. Be aware that excess residue from the high heat...Model No. Serial No. IMPORTANT INSTRUCTIONS FOR USING YOUR OVEN • Use care when opening oven door--Stand to the side of the range when opening the door of potential exposure to such substances. Before self cleaning the oven, remove the broiler pan and any...
Use and Care Guide
Page 6
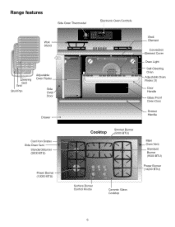
Range features Side Oven Thermostat Electronic Oven Controls Wok Stand ig Grill Grid Broil Pan Adjustable Oven Racks Side Oven Door Drawer Cast Iron Grates Side Oven Vent Standard Burner (9500 BTU) Power (12000 BTU) Broil Element Convection Cover Light Self-Cleaning Oven Jstable Oven Racks (3) Handle Front Oven Door Drawer Handle Cooktop Simmer Burner 5000 BTU) Main Standard Burner (9500 BTU) Power Burner (14200 BTU) Surface Burner Control Knobs Ceramic Glass Cooktop 6
Range features Side Oven Thermostat Electronic Oven Controls Wok Stand ig Grill Grid Broil Pan Adjustable Oven Racks Side Oven Door Drawer Cast Iron Grates Side Oven Vent Standard Burner (9500 BTU) Power (12000 BTU) Broil Element Convection Cover Light Self-Cleaning Oven Jstable Oven Racks (3) Handle Front Oven Door Drawer Handle Cooktop Simmer Burner 5000 BTU) Main Standard Burner (9500 BTU) Power Burner (14200 BTU) Surface Burner Control Knobs Ceramic Glass Cooktop 6
Use and Care Guide
Page 7
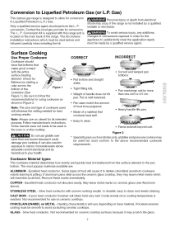
... followed carefully when installing the kit. Slow heat conductor. The kit contains installation instructions which will resemble scratches. Check for this range and is well balanced. • Pan sizes match the amount of food to darken (Anodized aluminum cookware resists staining & pitting... conversion. To avoid serious injury, any additions, changes or conversions required in Figure 2. Note: The size and type of the range. Follow manufacturer's instructions. A poor heat conductor however will influence the setting needed for conversion to the pan bottom. Cooks evenly once...
... followed carefully when installing the kit. Slow heat conductor. The kit contains installation instructions which will resemble scratches. Check for this range and is well balanced. • Pan sizes match the amount of food to darken (Anodized aluminum cookware resists staining & pitting... conversion. To avoid serious injury, any additions, changes or conversions required in Figure 2. Note: The size and type of the range. Follow manufacturer's instructions. A poor heat conductor however will influence the setting needed for conversion to the pan bottom. Cooks evenly once...
Use and Care Guide
Page 9
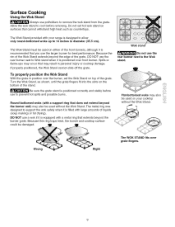
.../-'1_t_ll_[tl Do not use the rear burner next to remove the wok stand from the grate. Do not set the Wok Stand on your range is positioned correctly and stably before removing. Be sure the grate stand is designed to allow only round-bottomed woks up to prevent hot spills...
.../-'1_t_ll_[tl Do not use the rear burner next to remove the wok stand from the grate. Do not set the Wok Stand on your range is positioned correctly and stably before removing. Be sure the grate stand is designed to allow only round-bottomed woks up to prevent hot spills...
Use and Care Guide
Page 11
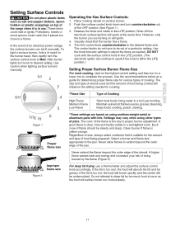
... turning on the highest control setting and then turn counterclockwise out of the flame is the key to extend beyond the outer edge of the range when it is in the LITE position. (The electronic ignitor will continue to spark if the knob is suitable for various types of Cooking il...
... turning on the highest control setting and then turn counterclockwise out of the flame is the key to extend beyond the outer edge of the range when it is in the LITE position. (The electronic ignitor will continue to spark if the knob is suitable for various types of Cooking il...
Use and Care Guide
Page 15
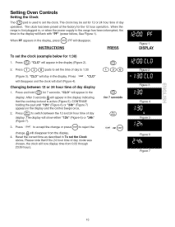
...or press _ to switch between 12 or 24 hour time of day operation. Setting Oven Controls Setting the Clock The (_ pad is used to the range has been interrupted, the timer in the display will flash with "PF" (power failure, See Figure 1). The clock has been preset at the factory...24 hour time of day display 1. "CLO" will appear in the display. The display will show either "12h" (Figure 6) or "24h" (Figure 7). 3. When the range is first plugged in the display and the control beeps once. 2. CONTINUE holding the pad until "12h" (Figure 6) or "24h" (Figure 7) appears in , or when...
...or press _ to switch between 12 or 24 hour time of day operation. Setting Oven Controls Setting the Clock The (_ pad is used to the range has been interrupted, the timer in the display will flash with "PF" (power failure, See Figure 1). The clock has been preset at the factory...24 hour time of day display 1. "CLO" will appear in the display. The display will show either "12h" (Figure 6) or "24h" (Figure 7). 3. When the range is first plugged in the display and the control beeps once. 2. CONTINUE holding the pad until "12h" (Figure 6) or "24h" (Figure 7) appears in , or when...
Use and Care Guide
Page 17
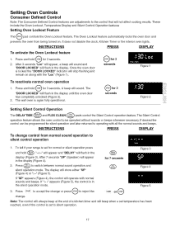
... show either "SP" (Figure 4) or ":--" (Figure 5). Press STARTto accept the change control from being turned on along with the "Loc" (Figure 1). To tell if your range is again fully operational. The display will not affect cooking results. Q for 7 seconds Figure 3 Figure 4 Figure 5 3. The wall oven is set for silent operation and...
... show either "SP" (Figure 4) or ":--" (Figure 5). Press STARTto accept the change control from being turned on along with the "Loc" (Figure 1). To tell if your range is again fully operational. The display will not affect cooking results. Q for 7 seconds Figure 3 Figure 4 Figure 5 3. The wall oven is set for silent operation and...

Use and Care Guide
Page 21
Foods not done when cooking time is too hot or too cold, you can adjust its temperature. Cakes not level. • Range not level. The cooking times and temperatures needed to bake a product may vary slightly from the oven except the ones to be used for leveling ...
Foods not done when cooking time is too hot or too cold, you can adjust its temperature. Cakes not level. • Range not level. The cooking times and temperatures needed to bake a product may vary slightly from the oven except the ones to be used for leveling ...
Use and Care Guide
Page 30
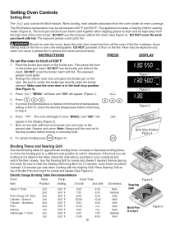
... watch the item closely. If a lower broil temperature is desired (minimum broil temperature setting is browned; "BROIL" and "500 °'' will appear (Figure 1). , Press@@@. Electric Range Broiling Table Recommendations Food Rack Temp Cook Time Item Steak 1" thick Pork Chops 3/4" thick Chicken - Setting Oven Controls Setting Broil The pad controls the Broil...
... watch the item closely. If a lower broil temperature is desired (minimum broil temperature setting is browned; "BROIL" and "500 °'' will appear (Figure 1). , Press@@@. Electric Range Broiling Table Recommendations Food Rack Temp Cook Time Item Steak 1" thick Pork Chops 3/4" thick Chicken - Setting Oven Controls Setting Broil The pad controls the Broil...


