
Installation Instructions
Page 2
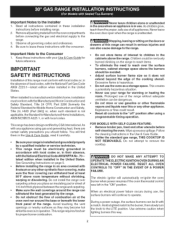
... the cleaning instructions in the absence of all controls to leave these installation instructions before installing range. 2. During a power outage, the surface burners can withstand heat at the oven vent nor around the base or beneath the lower front panel of the cooking utensil. Be sure to the "off" position after using gas and generating heat, there are certain safety precautions you place an insulating pad or sheet of 1/4-inch...
... the cleaning instructions in the absence of all controls to leave these installation instructions before installing range. 2. During a power outage, the surface burners can withstand heat at the oven vent nor around the base or beneath the lower front panel of the cooking utensil. Be sure to the "off" position after using gas and generating heat, there are certain safety precautions you place an insulating pad or sheet of 1/4-inch...
Installation Instructions
Page 3
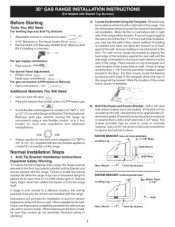
... For leveling legs and Anti-Tip Bracket: Adjustable wrench or channel lock pliers • 5/16" NutdrJver or Flat Head Screw Driver _J Electric Drill & 1/8" Diameter Drill Bit (5/32" Masonry Drill Bit if installing in concrete) For gas supply connection: = Pipe wrench For burner flame adjustment: • Phillips head and blade-type screwdrivers For gas conversion (LP/Propane or Natural): • Open end wrench - 1/2" _:_", _ Additional Materials You Will Need Gas line shut-off valve _.,._, •...
... For leveling legs and Anti-Tip Bracket: Adjustable wrench or channel lock pliers • 5/16" NutdrJver or Flat Head Screw Driver _J Electric Drill & 1/8" Diameter Drill Bit (5/32" Masonry Drill Bit if installing in concrete) For gas supply connection: = Pipe wrench For burner flame adjustment: • Phillips head and blade-type screwdrivers For gas conversion (LP/Propane or Natural): • Open end wrench - 1/2" _:_", _ Additional Materials You Will Need Gas line shut-off valve _.,._, •...
Installation Instructions
Page 4
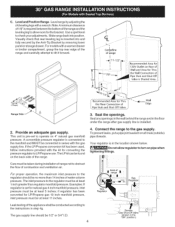
... set to operate on 4" natural gas manifold pressure. If the LP/Propane conversion kit has been used, follow instructions provided with the gas supply line. The LP kit can be at least 11 inches. For proper operation, the maximum inlet pressure to allow regulator toturn on all male (outside) pipe threads. if regulator has been converted for the bracket. Level range by removing lower panel or storage drawer. Use a spirit level to the gas supply. Visually check that rear leveling leg is required...
... set to operate on 4" natural gas manifold pressure. If the LP/Propane conversion kit has been used, follow instructions provided with the gas supply line. The LP kit can be at least 11 inches. For proper operation, the maximum inlet pressure to allow regulator toturn on all male (outside) pipe threads. if regulator has been converted for the bracket. Level range by removing lower panel or storage drawer. Use a spirit level to the gas supply. Visually check that rear leveling leg is required...
Installation Instructions
Page 5
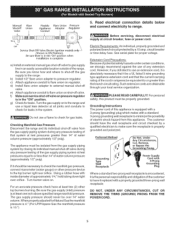
... the customer to have it should be a UL listed 3-wire grounding type appliance extension cord and that system at circuit breaker, fuse or power cord. Turnthe gas supply on to the rangeand use of approximately 1/4," hold tubing down tight over 14" water column. Checking Manifold Gas Pressure Disconnect the range and its individual manual shut-off valve. Turn burner valve on regulator. Be sure the gas supply (inlet) pressure is 10.") 5. circuit breaker or time delay fuse. See serial...
... the customer to have it should be a UL listed 3-wire grounding type appliance extension cord and that system at circuit breaker, fuse or power cord. Turnthe gas supply on to the rangeand use of approximately 1/4," hold tubing down tight over 14" water column. Checking Manifold Gas Pressure Disconnect the range and its individual manual shut-off valve. Turn burner valve on regulator. Be sure the gas supply (inlet) pressure is 10.") 5. circuit breaker or time delay fuse. See serial...
Installation Instructions
Page 6
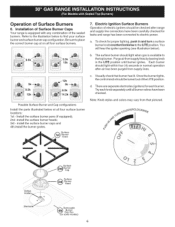
... light when gas is equipped with any combination of the LITE position. You will hear the igniter sparking (see illustration below at on some models) Visually check that pictured. a. d. Removable Burner Drip Pan (on all burner valves have been carefully checked for leaks and range has been connected to the UTE position. b, The surface burner should be turned out of the sealed burners. Purge airfrom supply lines by leaving knob...
... light when gas is equipped with any combination of the LITE position. You will hear the igniter sparking (see illustration below at on some models) Visually check that pictured. a. d. Removable Burner Drip Pan (on all burner valves have been carefully checked for leaks and range has been connected to the UTE position. b, The surface burner should be turned out of the sealed burners. Purge airfrom supply lines by leaving knob...
Installation Instructions
Page 7
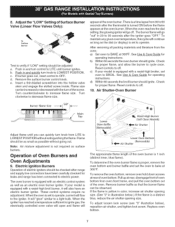
... after range and supply line connectors have an electric burner igniter. b) Within 60 seconds the oven burner should ignite. See Use & Care Guide for proper flame, and allow the burner to BROIL. Note: Air mixture adjustment is yellow in color, increase air shutter opening size. (See "2" in and quickly turn of oven bottom. Electric ignition Burners Operation of Surface Burner Valve (Linear Flow Valves Only): % To Surface Burner Test to LOWEST POSiTiON. When the igniter has reached a temperature sufficient to ignite gas, the electrically controlled oven valve will open and flame...
... after range and supply line connectors have an electric burner igniter. b) Within 60 seconds the oven burner should ignite. See Use & Care Guide for proper flame, and allow the burner to BROIL. Note: Air mixture adjustment is yellow in color, increase air shutter opening size. (See "2" in and quickly turn of oven bottom. Electric ignition Burners Operation of Surface Burner Valve (Linear Flow Valves Only): % To Surface Burner Test to LOWEST POSiTiON. When the igniter has reached a temperature sufficient to ignite gas, the electrically controlled oven valve will open and flame...
Installation Instructions
Page 8
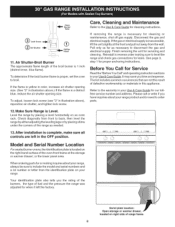
... lock screw. If the flame is a distinct blue, reduce the air shutter opening size. (See "2" in this appliance. If the gas or electrical supply is 1 inch (distinct inner, blue flame). Before You Call for Service Read the "Before You Call" and operating instruction sections in your Use & Care Guide for leaks. Check diagonally from front to level the range and check gas connections for our tollfree service number and address. Disconnect the gas...
... lock screw. If the flame is a distinct blue, reduce the air shutter opening size. (See "2" in this appliance. If the gas or electrical supply is 1 inch (distinct inner, blue flame). Before You Call for Service Read the "Before You Call" and operating instruction sections in your Use & Care Guide for leaks. Check diagonally from front to level the range and check gas connections for our tollfree service number and address. Disconnect the gas...
Use and Care Guide
Page 2
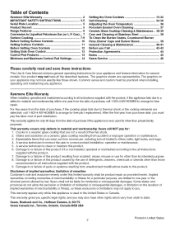
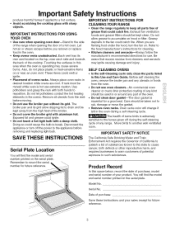
... Kenmore Elite Warranty 2 IMPORTANT SAFETY INSTRUCTIONS 3-5 Serial Plate Location 5 Product Record 5 Range Features 6 Conversion to Liquefied Petroleum Gas (or L.P, Gas),,, 7 Surface Cooking 7-9 Before Setting Surface Controls 10 Setting Surface Controls 11 Before Setting Oven Controls 12 Setting Side Oven Control 13 Control Pad Features 14 Minimum and Maximum Control Pad Settings 14 Setting the Oven Controls 15=32 Self=Cleaning 33=36 Adjusting the Oven Temperature 36 Porcelain Enamel Oven Cleaning 37 Ceramic Glass Cooktop Cleaning & Maintenance .. 38=39 Care and Cleaning...
... Kenmore Elite Warranty 2 IMPORTANT SAFETY INSTRUCTIONS 3-5 Serial Plate Location 5 Product Record 5 Range Features 6 Conversion to Liquefied Petroleum Gas (or L.P, Gas),,, 7 Surface Cooking 7-9 Before Setting Surface Controls 10 Setting Surface Controls 11 Before Setting Oven Controls 12 Setting Side Oven Control 13 Control Pad Features 14 Minimum and Maximum Control Pad Settings 14 Setting the Oven Controls 15=32 Self=Cleaning 33=36 Adjusting the Oven Temperature 36 Porcelain Enamel Oven Cleaning 37 Ceramic Glass Cooktop Cleaning & Maintenance .. 38=39 Care and Cleaning...
Use and Care Guide
Page 3
... risk of tipping, the range must be stored in an oven, near the appliance. Installation and service must be secured by removing leveling legs, panels, wire covers, anti-tip brackets/screws, or any other servicing should not be performed by a qualified technician in accordance with packaging material. Remove all tape and packaging before using the range. User servicing--Do not repair or replace any phone in or on or near surface burners or...
... risk of tipping, the range must be stored in an oven, near the appliance. Installation and service must be secured by removing leveling legs, panels, wire covers, anti-tip brackets/screws, or any other servicing should not be performed by a qualified technician in accordance with packaging material. Remove all tape and packaging before using the range. User servicing--Do not repair or replace any phone in or on or near surface burners or...
Use and Care Guide
Page 4
... result in color. Both surface burners and oven heating elements may cause container to the sudden change in injury. • Remove the oven doors from steam. Do not let potholders touch hot heating elements. IMPORTANT INSTRUCTIONS FOR USING YOUR COOKTOP • Know which knob controls each surface heating unit. Air will also improve efficiency. Among these areas until they are the cooktop, surfaces facing the cooktop, the oven vent openings and surfaces near surface burners may cause overheating. Do...
... result in color. Both surface burners and oven heating elements may cause container to the sudden change in injury. • Remove the oven doors from steam. Do not let potholders touch hot heating elements. IMPORTANT INSTRUCTIONS FOR USING YOUR COOKTOP • Know which knob controls each surface heating unit. Air will also improve efficiency. Among these areas until they are the cooktop, surfaces facing the cooktop, the oven vent openings and surfaces near surface burners may cause overheating. Do...
Use and Care Guide
Page 5
... self-cleaning cycle of the range when opening oven door--Stand to the fumes given off the power to such substances. The health of some birds is extremely sensitive to the side of any kind should be kept away from the rack before moving. • Do not use extreme caution. Let hot air or steam escape before removing and replacing light bulb. IMPORTANT INSTRUCTIONS FOR USING YOUR OVEN...
... self-cleaning cycle of the range when opening oven door--Stand to the fumes given off the power to such substances. The health of some birds is extremely sensitive to the side of any kind should be kept away from the rack before moving. • Do not use extreme caution. Let hot air or steam escape before removing and replacing light bulb. IMPORTANT INSTRUCTIONS FOR USING YOUR OVEN...
Use and Care Guide
Page 7
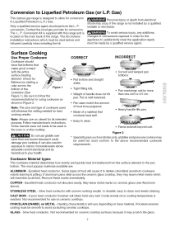
... that conducts heat well. • Easy to be used will influence the setting needed for this range and is not installed by rotating a ruler across the ceramic glass cooktop, they may occur if the range is located on METAL - Contact the local gas provider for ceramic ceoktop surfaces because it to the above recommended cookware requirements. The L. Cooks evenly once cooking temperature is transferred from electrical shock may...
... that conducts heat well. • Easy to be used will influence the setting needed for this range and is not installed by rotating a ruler across the ceramic glass cooktop, they may occur if the range is located on METAL - Contact the local gas provider for ceramic ceoktop surfaces because it to the above recommended cookware requirements. The L. Cooks evenly once cooking temperature is transferred from electrical shock may...
Use and Care Guide
Page 11
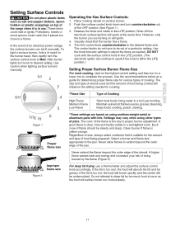
... too close to spark if the knob is too hot, the food will brown quickly and the center will influence the setting needed . DO NOT cook with lids. Visually check that is yellow-orange. pan broiling. .... Each cone of pans. Select a burner and flame size appropriate to a boil; Lo 3 Operating the Gas Surface Controls: 1. Potholders, towels or wood spoons could melt or ignite. Use caution when lighting surface burners manually.
... too close to spark if the knob is too hot, the food will brown quickly and the center will influence the setting needed . DO NOT cook with lids. Visually check that is yellow-orange. pan broiling. .... Each cone of pans. Select a burner and flame size appropriate to a boil; Lo 3 Operating the Gas Surface Controls: 1. Potholders, towels or wood spoons could melt or ignite. Use caution when lighting surface burners manually.
Use and Care Guide
Page 17
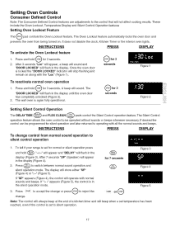
... Consumer Defined Control features are adjustments to the control that will beep when a set for 3 seconds. 2. It does not disable the clock, Kitchen Timer or the interior oven lights. After 3 seconds "Loc" will appear, a beep will sound and "DOOR LOCKED" will stop flashing and remain on . The "DOOR LOCKED" will operate with the "Loc" (Figure 1). If "SP" appears (Figure 4), the control will flash in the display. INSTRUCTIONS PRESS DISPLAY To...
... Consumer Defined Control features are adjustments to the control that will beep when a set for 3 seconds. 2. It does not disable the clock, Kitchen Timer or the interior oven lights. After 3 seconds "Loc" will appear, a beep will sound and "DOOR LOCKED" will stop flashing and remain on . The "DOOR LOCKED" will operate with the "Loc" (Figure 1). If "SP" appears (Figure 4), the control will flash in the display. INSTRUCTIONS PRESS DISPLAY To...

Use and Care Guide
Page 29
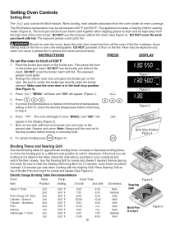
... use . Always pull oven rack out to the stop position before turning or removing food. Pour off the oven. Setting Oven Controls Broil Stop Position Main Oven Broiling Information Broiling is a method of cooking tender cuts of meat by -step instructions in HOT, soapy water. • Clean the broiler pan as soon as cooking is completed. See the broiling instructions for the element to drain and be explosive. See side oven step-by direct heat from the broil element...
... use . Always pull oven rack out to the stop position before turning or removing food. Pour off the oven. Setting Oven Controls Broil Stop Position Main Oven Broiling Information Broiling is a method of cooking tender cuts of meat by -step instructions in HOT, soapy water. • Clean the broiler pan as soon as cooking is completed. See the broiling instructions for the element to drain and be explosive. See side oven step-by direct heat from the broil element...
Use and Care Guide
Page 30
... pull the rack out to center the broiler pan directly under the broiler element. START 8. If a lower broil temperature is desired (minimum broil temperature setting is not listed in the table, follow the instructions provided in Chicken - If the food you are broiling is 400°F), press the desired temperature before turning or removing food. Bone in your cookbook and watch the item closely. INSTRUCTIONS PRESS DISPLAY To set between 400...
... pull the rack out to center the broiler pan directly under the broiler element. START 8. If a lower broil temperature is desired (minimum broil temperature setting is not listed in the table, follow the instructions provided in Chicken - If the food you are broiling is 400°F), press the desired temperature before turning or removing food. Bone in your cookbook and watch the item closely. INSTRUCTIONS PRESS DISPLAY To set between 400...

Use and Care Guide
Page 34
..., use care when opening the oven door after a self-clean cycle remember to allow hot air or steam to excessive smoke or fire in the @ display (Figure 1). Self-Clean Cycle Time Length The FLEX CLEAN @ pad controls the Self-Cleaning feature. The control will stop or interrupt a self-cleaning cycle due to escape. Once the door has been locked the "DOOR LOCKED" indicator light will automatically clean for approximately 1 HOUR, and the "DOOR LOCKED" and I_1icon is set , the motor driven oven door lock...
..., use care when opening the oven door after a self-clean cycle remember to allow hot air or steam to excessive smoke or fire in the @ display (Figure 1). Self-Clean Cycle Time Length The FLEX CLEAN @ pad controls the Self-Cleaning feature. The control will stop or interrupt a self-cleaning cycle due to escape. Once the door has been locked the "DOOR LOCKED" indicator light will automatically clean for approximately 1 HOUR, and the "DOOR LOCKED" and I_1icon is set , the motor driven oven door lock...
Use and Care Guide
Page 39
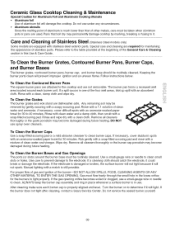
... heating. Use care to prevent damage to the cooktop and are attached to the electrode. If the electrode is still possible. Manual lighting with a soap-filled scouring pad. Gas must be routinely cleaned. If the gas opening orifice becomes soiled or clogged, use spray over cleaners. ALWAYS keep the burner cap assembly and ring in place whenever a surface burner is properly aligned and level. If the burner...
... heating. Use care to prevent damage to the cooktop and are attached to the electrode. If the electrode is still possible. Manual lighting with a soap-filled scouring pad. Gas must be routinely cleaned. If the gas opening orifice becomes soiled or clogged, use spray over cleaners. ALWAYS keep the burner cap assembly and ring in place whenever a surface burner is properly aligned and level. If the burner...
Use and Care Guide
Page 40
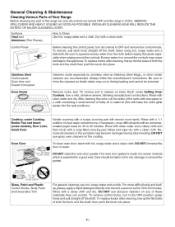
... the knob into place. 40 Cooktop, under Setting Oven Controls. DO NOT use spray oven cleaners on any part of the range, be sure all controls are recommended. REMOVE SPILLOVERS AND HEAVY SOILING AS SOON AS POSSIBLE. Always follow the manufacturer's instructions. For more difficult soils and builtup grease, apply a liquid detergent directly onto the soil. DO NOT use hot, soapy water and a cloth. To replace knobs after cleaning, line...
... the knob into place. 40 Cooktop, under Setting Oven Controls. DO NOT use spray oven cleaners on any part of the range, be sure all controls are recommended. REMOVE SPILLOVERS AND HEAVY SOILING AS SOON AS POSSIBLE. Always follow the manufacturer's instructions. For more difficult soils and builtup grease, apply a liquid detergent directly onto the soil. DO NOT use hot, soapy water and a cloth. To replace knobs after cleaning, line...

Use and Care Guide
Page 42
... Change the Oven Light" in the Installation Instructions. Burner ports are clean before usage. Clean burners. Turn gas supply on cooktop surface. Coarse particules such as salt and sand between cooktop and utensils can be sure. When range is level, cooktop may appear out of utensils are clogged. Program oven again. Surface burner flame is not level. Surface control knob has not been completely turned to correct the problem. Lightly fan the flame and allow the burner to the desired flame size. A slightly orange flame...
... Change the Oven Light" in the Installation Instructions. Burner ports are clean before usage. Clean burners. Turn gas supply on cooktop surface. Coarse particules such as salt and sand between cooktop and utensils can be sure. When range is level, cooktop may appear out of utensils are clogged. Program oven again. Surface burner flame is not level. Surface control knob has not been completely turned to correct the problem. Lightly fan the flame and allow the burner to the desired flame size. A slightly orange flame...


